Page 282 of 541
When the Tire
first read and note the introductory information and heed
the on page 276.
Model Engine Tire dimensions Tire pressure
R 16 91 H 34 238
(125 kW)
225145 R
17 91 H 34 238
Golf
l -
The Tire is confi gured at the factory with
the correct tir e inflation pressure applicabl e for the ve hicl e model, en-
g in e
and factory-install ed tire s. This t ire inflation pressure is also listed
on the sticke r insid e the driver page 283 . The tire inflation pres -
s
ure a re listed for all tires and the compact spare wheel. If diff ere n t
tires are
installed, the Tire Monitoring cannot properly
monitor tir e inflation pressures unl ess the is reset to the new tire
page
Informatio n n ot availa b le at t ime o f printing.
Vehicle core and maintenance 284 285
Page 315 of 541
Do it yourself
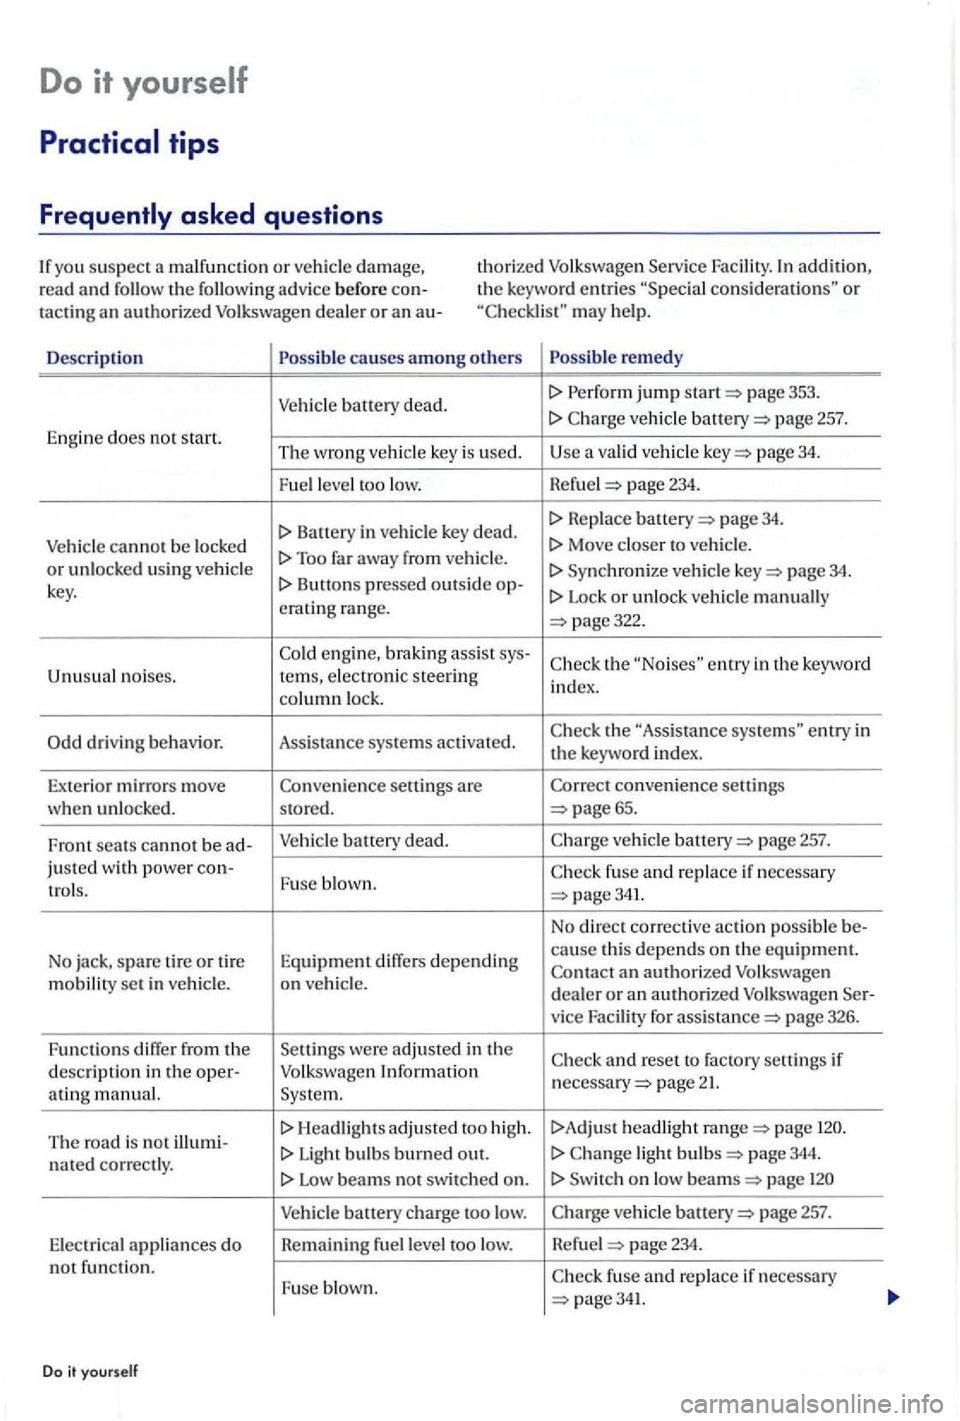
con sid era tions" or may help.
De
scription causes amon g oth ers remed y
Vehicl e ba tt ery dead. jump page 353.
page 257. Engine does no t start. The wrong ve hicle key is used. a valid ve hicl e page 34.
Fuel leve l too low. Hefue l 234.
Batt ery in ve hicl e key dead. page 34.
Vehicle cannot be locke d Too far away from vehicle . Sy nchroni ze veh icle page 34. key. Lock or unlo ck vehicl e manually
crat ing range. page322.
en gine, braking assis t sys-th e entry in the ke yword noises. te rns, e lectro nic steering index.
co lumn lock.
the "Assis tance e ntry in the keywo rd in dex .
Exterior mirro rs move convenience settings
w he n unl ocke d . stored. 65.
F ront seats can not be ad -Vehicle battery dead. veh icle page 257.
jus ted with power con-Fuse b lown.
a n authoriz e d Volkswage n
m obilit y se t in vehicle. on ve h icl e. dealer or an authori zed Volk swagen Ser-
v ice Facility for page 326.
Func tions diff
er from th e Settin gs were adju ste d in th e and reset to fac tory settings if
descript ion in the oper-Volkswagen Information page 2 ating manual. Syste m.
T he road
is not illumi-H ea dlights a djusted too hig h . !>A dju st headlig ht page
n a ted correctly. Light b ulb s burned out. ligh t page 344.
Low beams no t swi tched on . Switch on low page
Vehicle battery ch a rge too low. page 257.
E lect rica l a p plian ces do Remaining fuel le vel too low. Refu el page 234. not functi on.
page341.
Do it yourself
Page 417 of 541
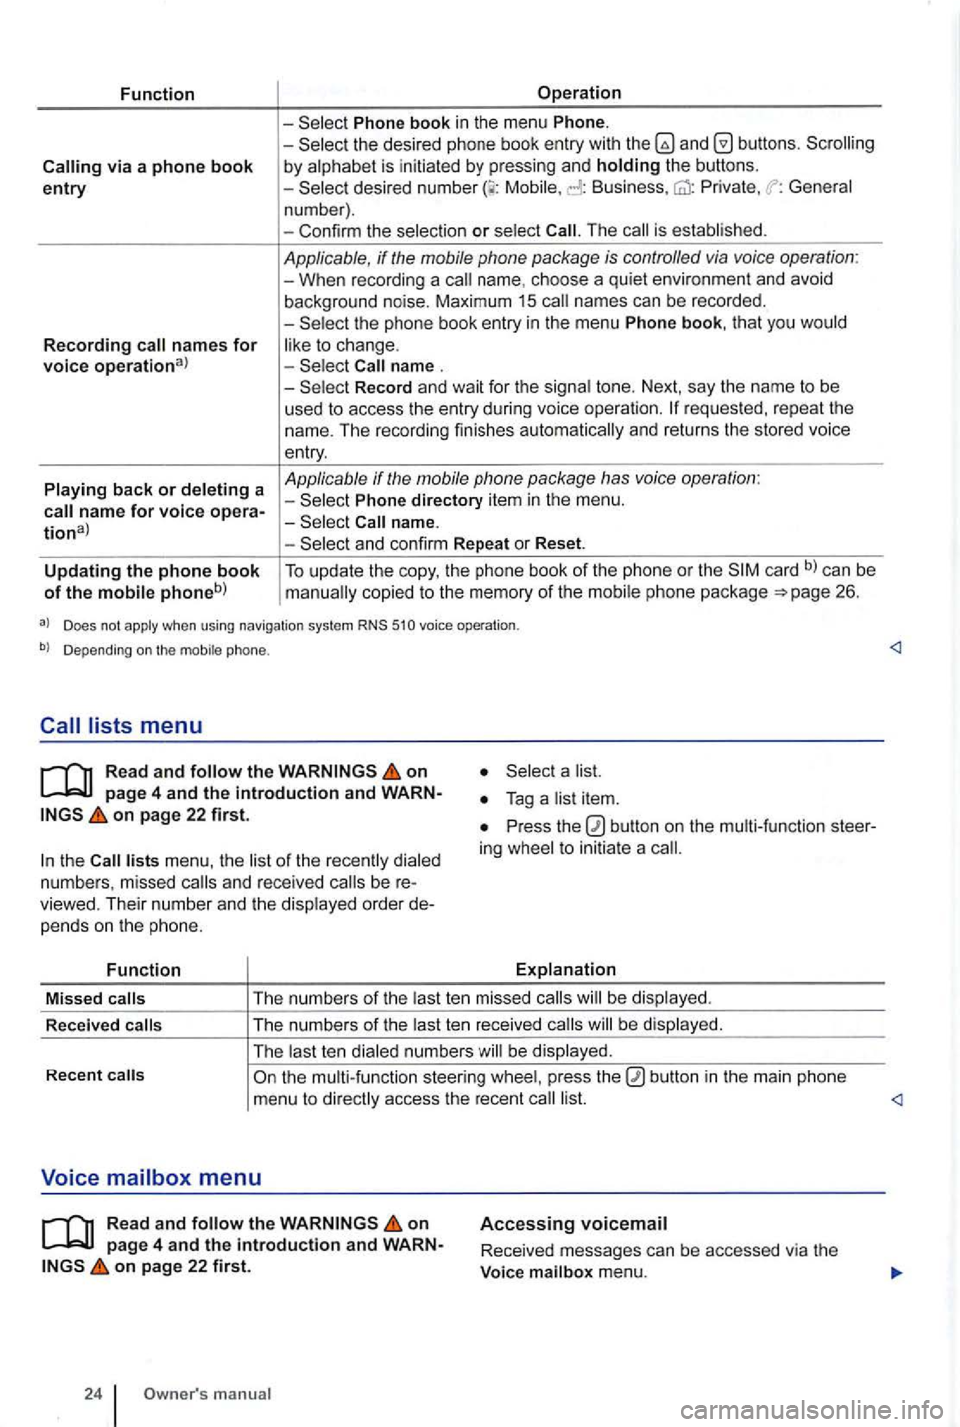
Function
via a phone book entry
Recording names for voice operational
Playing back or deleting a
Operation
Phone book in the menu Phone. -the desired phone book entry with and by alphabet is initiated by pressing and holding the buttons. -Mobile, Business, Private , General
n um ber) .
- Con firm the selec tio n
or select The is established .
Applicable, if the mobile phone package is controlled via voice operation : -When recording a name. choos e a qui et environ ment and avoid
background noise. Maximum 15 names can be recorded .
-
Record and wait for the signa l tone. Next, say the name to be
used t o access the entry during voice ope rati on .
Phone directory item in the menu .
and confirm Repeat or Reset.
Updating the phone book of the mobile phoneb) To update the copy, the phone book of the phone or the card b) can be copied to the memory of the mobil e ph one pac kage 26.
a) Does not apply when using navigation system RNS 510 voice operation .
b) Depending on the mobile phone.
Read and follow the on
on page 22 first.
the lists menu , the list of the rece ntl y dialed
numb ers , missed and rece ived be viewed. Their numb er and the disp layed order pe nd s o n the p hone.
Function
a list.
Press the ing whee l to initiat e a
Explanation
Missed
calls T
he numb ers of the last te n mis sed calls be dis pl ayed .
R ece
ived calls The
numbers of the last ten re ceived b e displayed .
The last t en dialed numbe rs w ill be display ed.
Recent
on page 4 and the introduction and on page 22 first.
24 manua l
Accessing voicemail
Received messages can be accessed via the
Voice mailbox menu.
Page 436 of 541
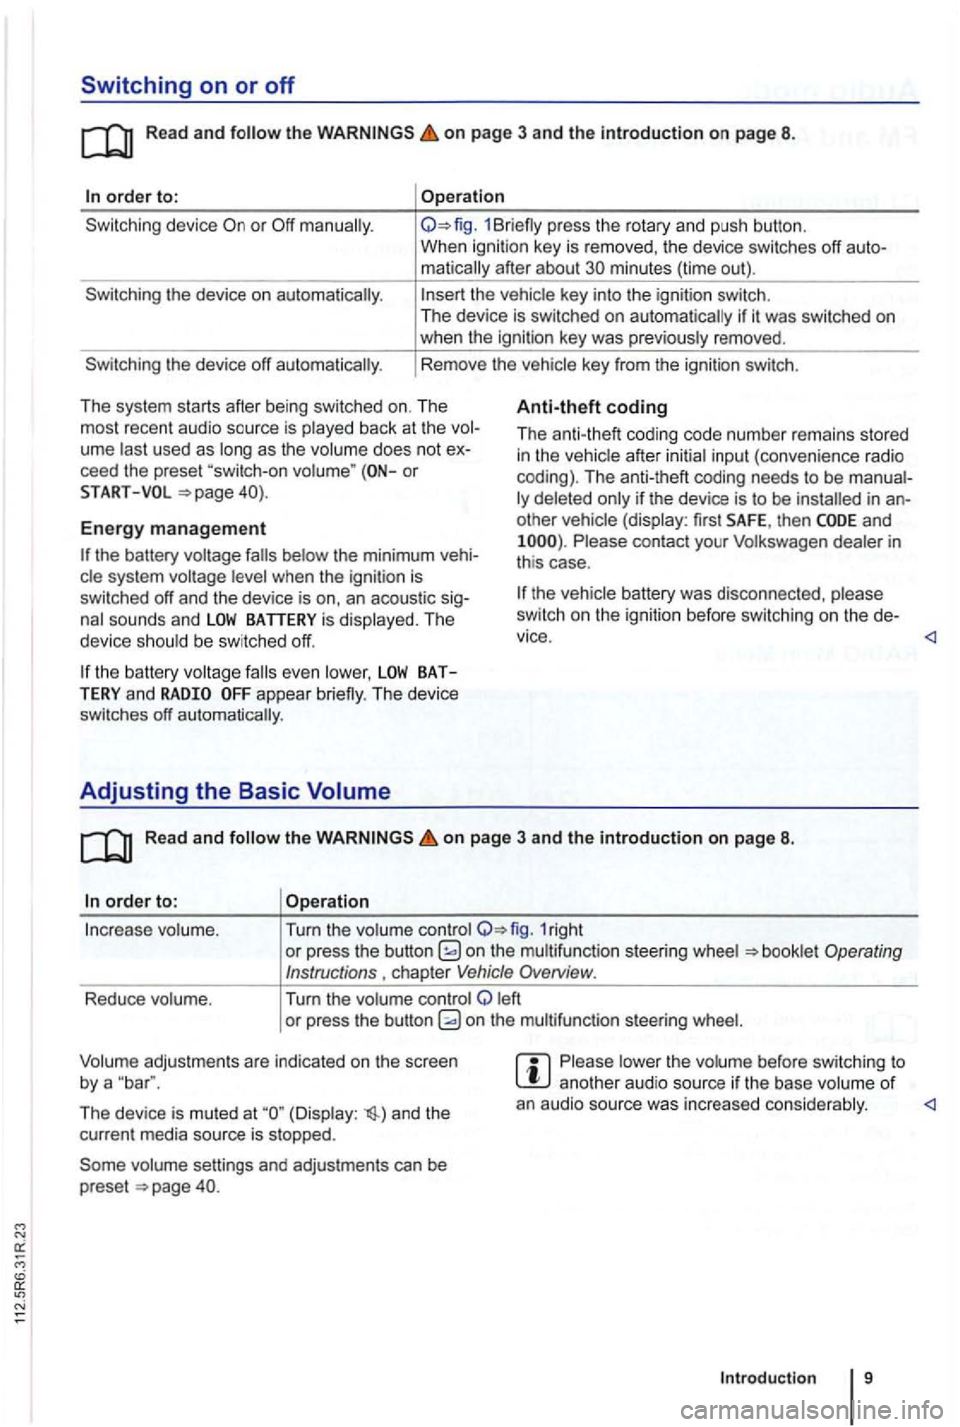
Switching on or off
Read and on page 3 and the in troduction on page 8.
order to:
the device on automatically.
the device off automatically .
Operation
1Br iefly press the rotary and push button.
When ignition key is removed , the device switches off
matically after about minutes (time out).
the vehicle key into the ignition switch.
The device is switched on auto matically if it was switched on when the ignition key was previously removed .
Rem ove the vehicle key from the ignition switch.
Th e system starts after being switched on. The
most recent audio source is play ed back at the
ume last used as long as the volume does not ceed the preset or
Anti-theft coding
Th e anti-theft coding code numb er remains stored in the vehicle after initial input (conven ience radio
coding). The anti-theft coding needs to be
other vehicle (display: first SAFE, then and Please contact your Volkswagen dealer in
th is case .
START
Energy management
the battery was disco nnec ted , please
sw itch on the ignition before switchin g o n the
the battery system voltage
the battery BATTERY and appear briefly. The device
switches off automatically.
Adjusting the Basic Volume
Read and the on page 3 and the introduction on page 8.
order to: Operation
In crease volume . Turn the volume control 1right or press the button on the multifunct ion steer ing wheel
left
o r pre ss the button
The device is muted at (Display : and the
cur rent media source is stopped.
vo lume settings and adjustments can be
preset .
Please lower the volume before switc hing to another aud io source if th e base volume of an audio source was increased conside rably.
Introduction 9
Page 437 of 541
Audio mode
FM and AM Radio Mode
Introduction
ing:
. . . . . 11 Changing . . . . . . . . . . . . . . . . . . . . . . 12
. . . . . . . . . . . . . . . . . . . . . . . . . . . . . . . . . 13
. . . . . . . 14
and Accessi ng . . . . . . . . . . . . 15
Different versions of the radio system are shipped,
depending on the country of deliv ery and the
1.
Accessing and operating Radio mode depends to
a certain extent
on the device variant.
Device overview 6
radio data services and TP (tr affic gram ) 16
Parking garages, tu nn els , h ig h buildin gs or mountains can in te rfere with the radio signal.
Decals or metal-coated stickers on the cle windows can affect ra dio recep tion in ve -
hicles with window antennas .
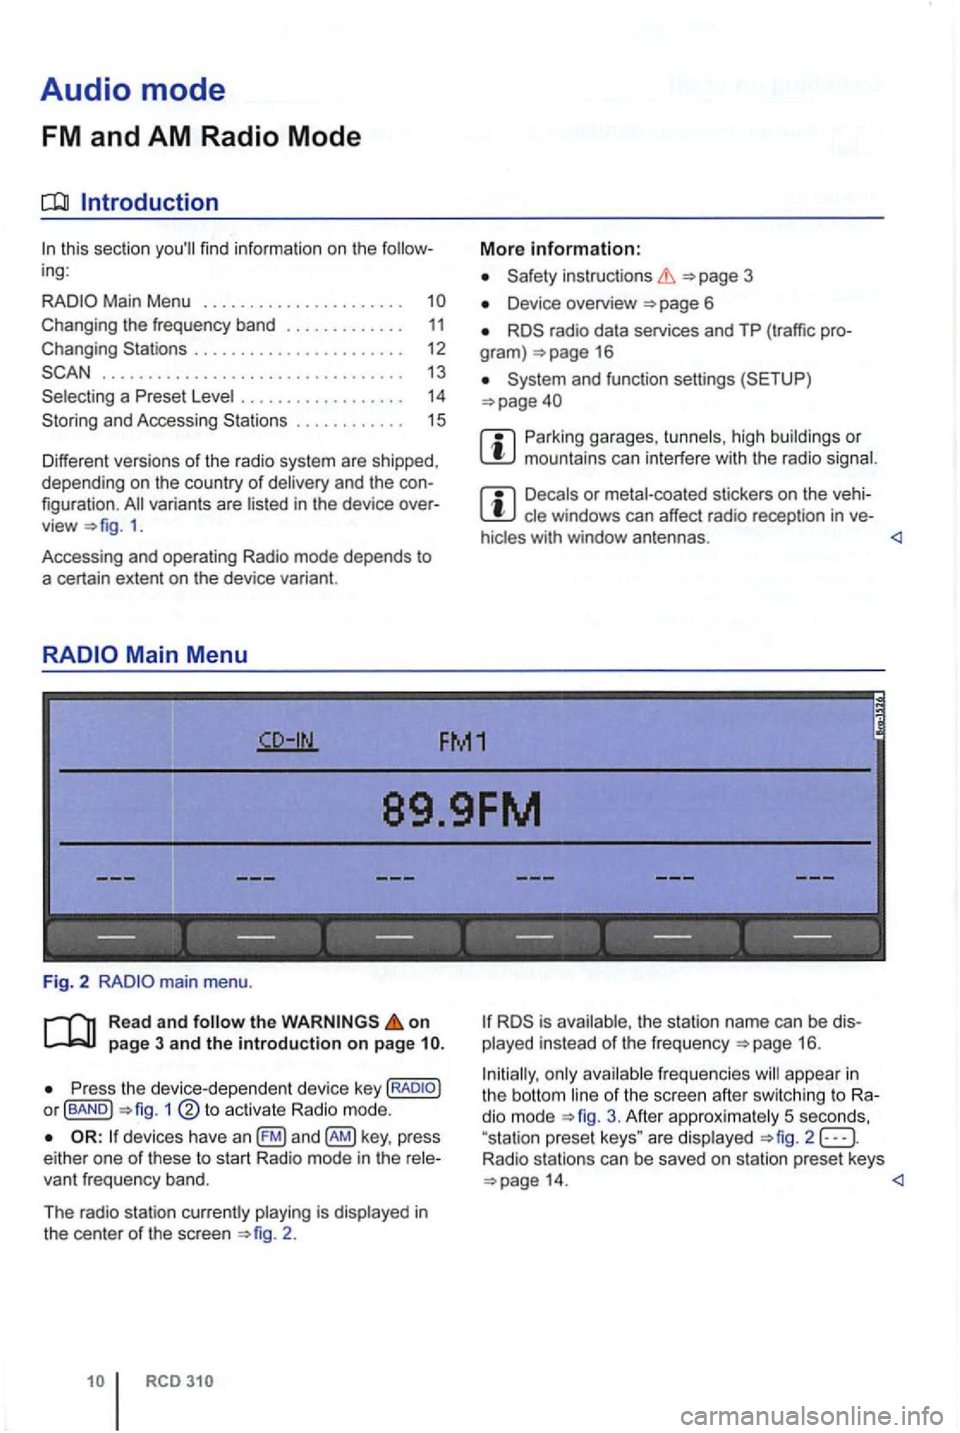
FM1
89.9FM
------------------
Fig. 2
Read and follow the on page 3 and the introduction on page
P ress the device -d ep en dent devic e key or fBAND ) 1
devices have an key , press
e ither one of these to s tart Radio mode in the
2 .
is ava ilable, th e s tation name can be played instead of the frequ e n cy 16 .
Initially, only ava
ilable freq ue ncies will appea r in the bott om line of the sc ree n afte r sw itc hing to dio mode 3. Afte r approx imately 5 seco nds,
"sta tion prese t keys " are disp layed 2 Radio stations can be saved on station preset keys
Page 438 of 541
Changing the frequency band
FM1
89.9FM
FM2 AM1 AM2
------------------
Fig. 3 main menu : frequenc ies and preset levels are displayed .
on page 3 and the introduction on page
The current frequency is disp layed above the tion .
Ava ilable frequencies and preset levels appear in
the bottom line
of the screen for approximately 5
seconds after sw itching to Radio mode 3.
set leve l a re disp layed 14.
Radio mode,
Press one of the function keys displayed 3 to switch to the corresp onding frequency .
Page 439 of 541
Changing Stations
TP FM1
89.9FM 92.1FM
.
.
------ --- ---------
Fig. 5 Changing stations using the () rocke r switch is for preset stations .
Read and the on page 3 and the introduction on page
Briefly press the 1 ... rocker switch 1 or right.
Radio mode with of in the te r of the screen 4.
Radio mode with
of the screen 5.
Radio mode with
of in the ter of the screen and of: TP 4.
AM mode: switching frequencies
P ress and 1 .. . ).
stat ion is 1 ...
According to the SEEK system settings,
Effect
Ch anges to the next
Cha nges to the nex t sto red station
16 .
a station frequency
the desired freq uency
Turn the adjus tment knob 1 89. 9 ) appears on the sc reen .
Page 440 of 541
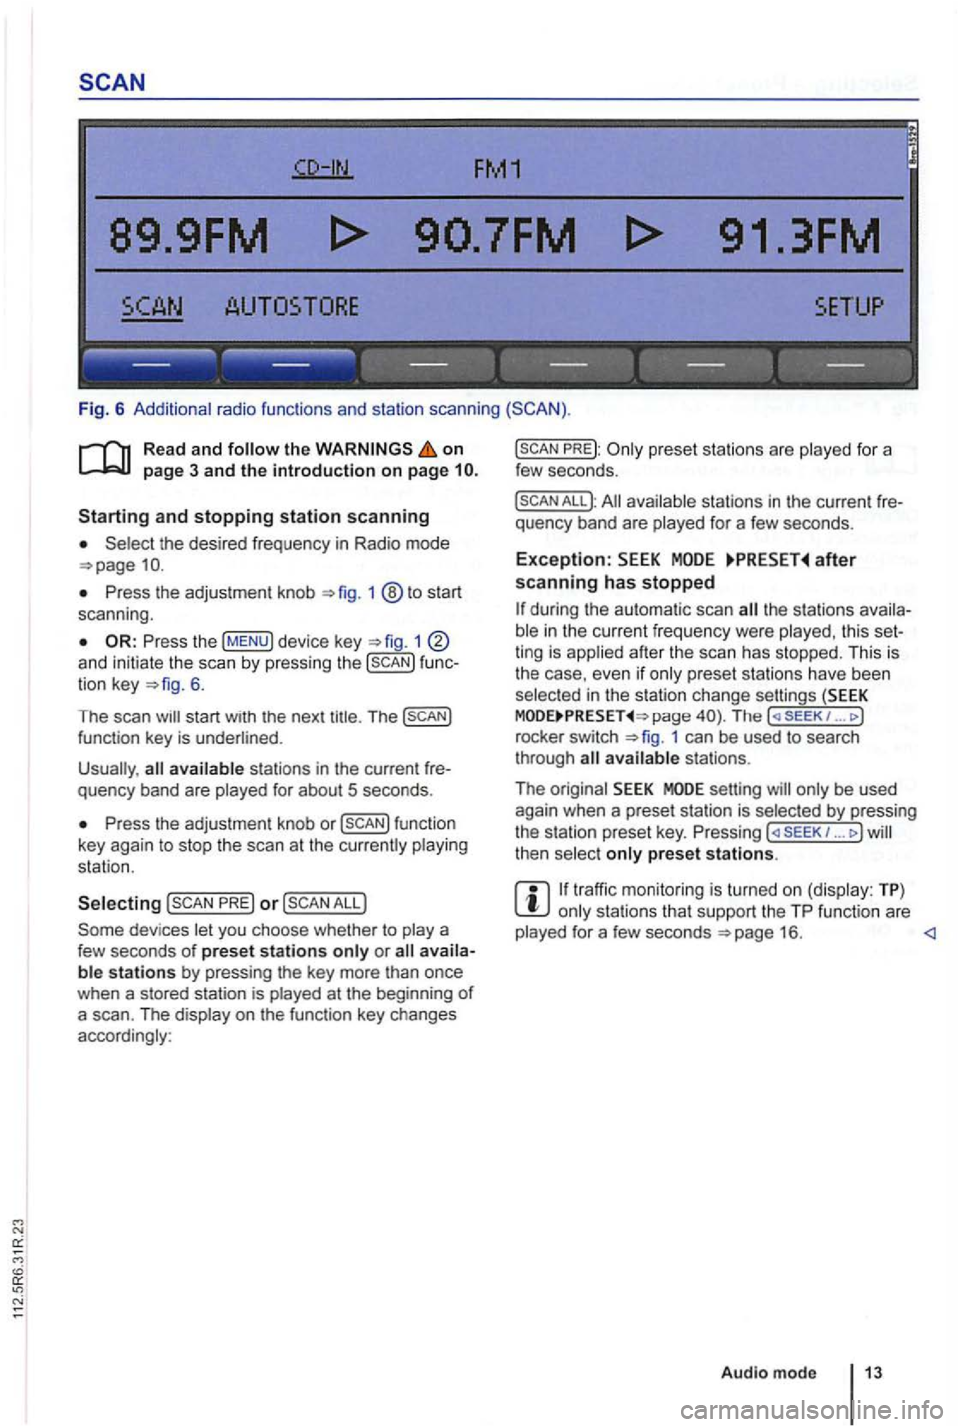
FM1
89.9FM
------------------
Fig. 6 Additional radio functions and station scanning
the on page 3 and the introduction on page
the desired frequency in Radio mode
Press the adjustment knob 1 ®to start
scan ning .
1 and initiate the scan by press ing the func
tion key 6.
The scan
Press the adjustment knob or
PRE) or
PREJ:
All available stations in the curre nt fre
quency band are played for a few seconds.
Exception: after scanning has stopped
the stations availa
ble in the curr ent fr equency were played , th is set
ting is applied after the scan has stopped. This is
the case, even
if only prese t sta tions have been
selec ted in the stati on change settings (SEEK page The ( SE EK 1 ... J
rocke r switch 1 can be used to search
through
setting will only be used
again when a preset station is selected by pressing
the station preset key. Pressing ... J then select only preset stations.
traffic monitoring is turned on (display: TP) only stations that support the TP function are
played for a few seconds