2007 VOLKSWAGEN GOLF PLUS dimensions
[x] Cancel search: dimensionsPage 32 of 541
Technical data
In thi s section yo u 'll find inf ormatio n on the fol
l owing:
.... _.. . . 31
Engi ne data and dimensions ......... _. . . . . . . . . 32
D im ensions . . . . . . . . . . . . . . . . . . . . . . . . . . . . . . . . . 33
Th e engine configu rat io n ca n be found on the ve
hi cle identification label in the Warranty an d
Maint enance bookle t or in th e officia l vehicle documents.
Specifications in ve hicl e documents al
way s take precede nce. Th e specificatio n s i n thi s
Manual r e fer to the basic m odel. The stated values m ay vary, dep ending upon diff erent equipment opti o ns o r models , a s well as with respect to special vehicles and vehicles exported to different countries.
45-7-5545
o
PRSSRT Lim. NRR
147kl.J
..
D9l 162 5RQ 5SL TQ3 352 BGV 12H
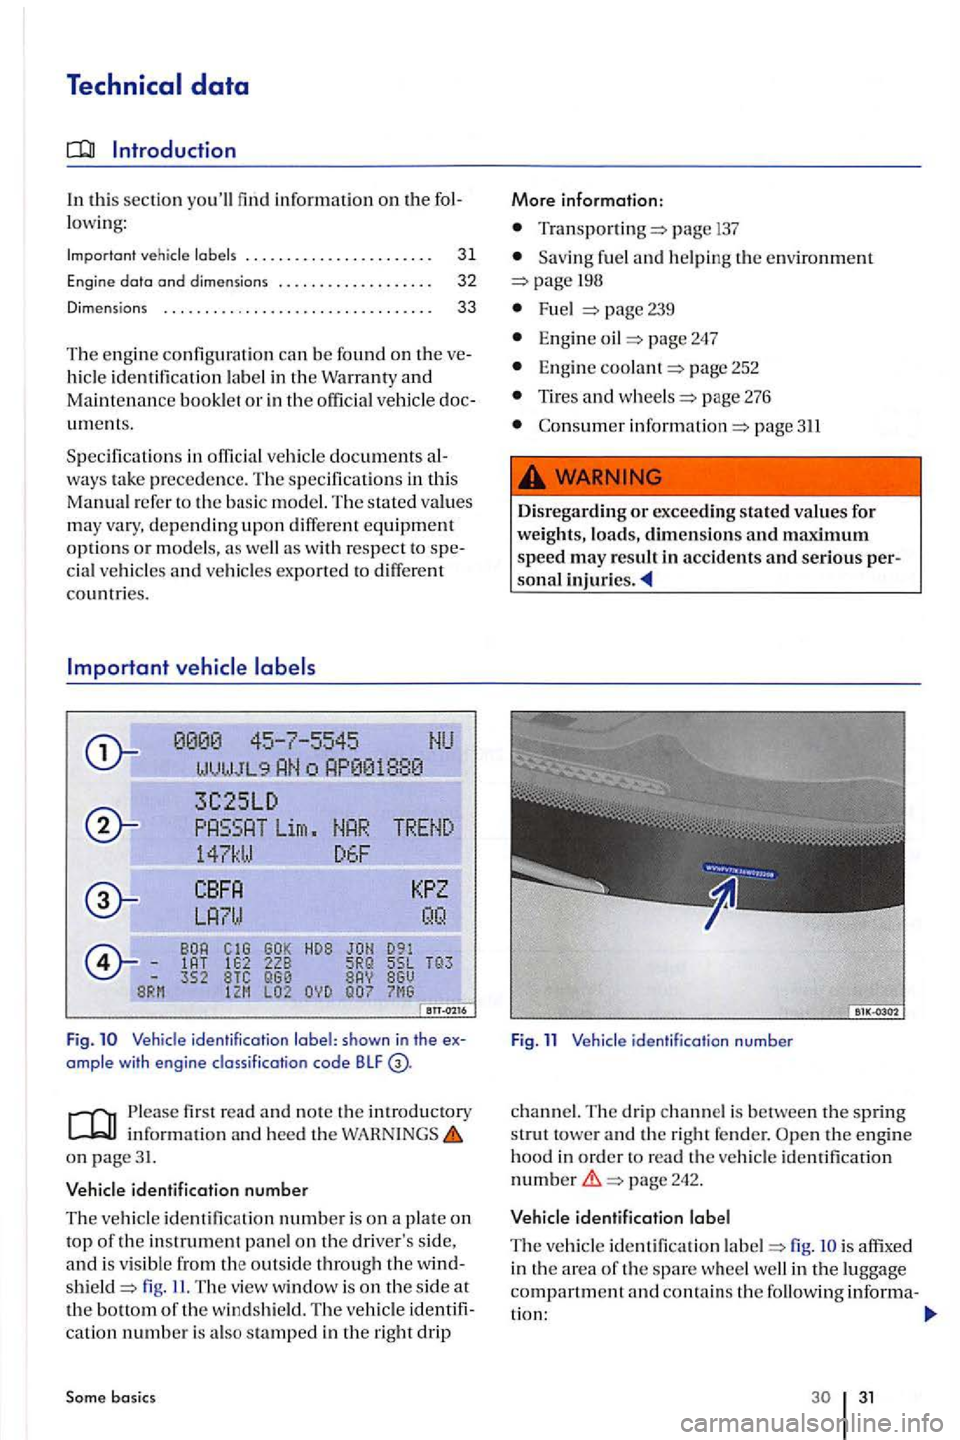
Fig. Vehicle identification Iobel: shown in the ex
ample with eng ine classi fication code BLF
read and no te th e introductory informatio n an d heed th e on page31.
V ehicl e id entification number
The ve hicl e identification number is on a plate on top of the in strument pan el o n the dri ver's s ide,
and is v isibl e from the outsid e th rough the windfig . The v iew window is on t h e side at the botto m of th e w ind shi eld. Th e vehicle identification number i s al so in the right drip
Some basic s
M ore informatio n:
page
Sav ing fuel and helping th e enviro nment
Fu el page 23 9
Engine page 247
En gin e page 252
Tires and 276
page 311
Disregarding or exceeding stated values for weights , loads, dimensions and maximum speed may result in accidents and serious per-son al
Fig. 11 Vehicle identification number
c h a
nnel. The drip ch annel is between the spring stru t towe r and the right fender.
p age 242.
Vehicle identification Iobel
T he ve hicle i
dentifi cation fig . is in th e area o f th e spare w heel well in the luggage
compartm en t a nd contains th e follo wing informa-
tion :
31
Page 33 of 541
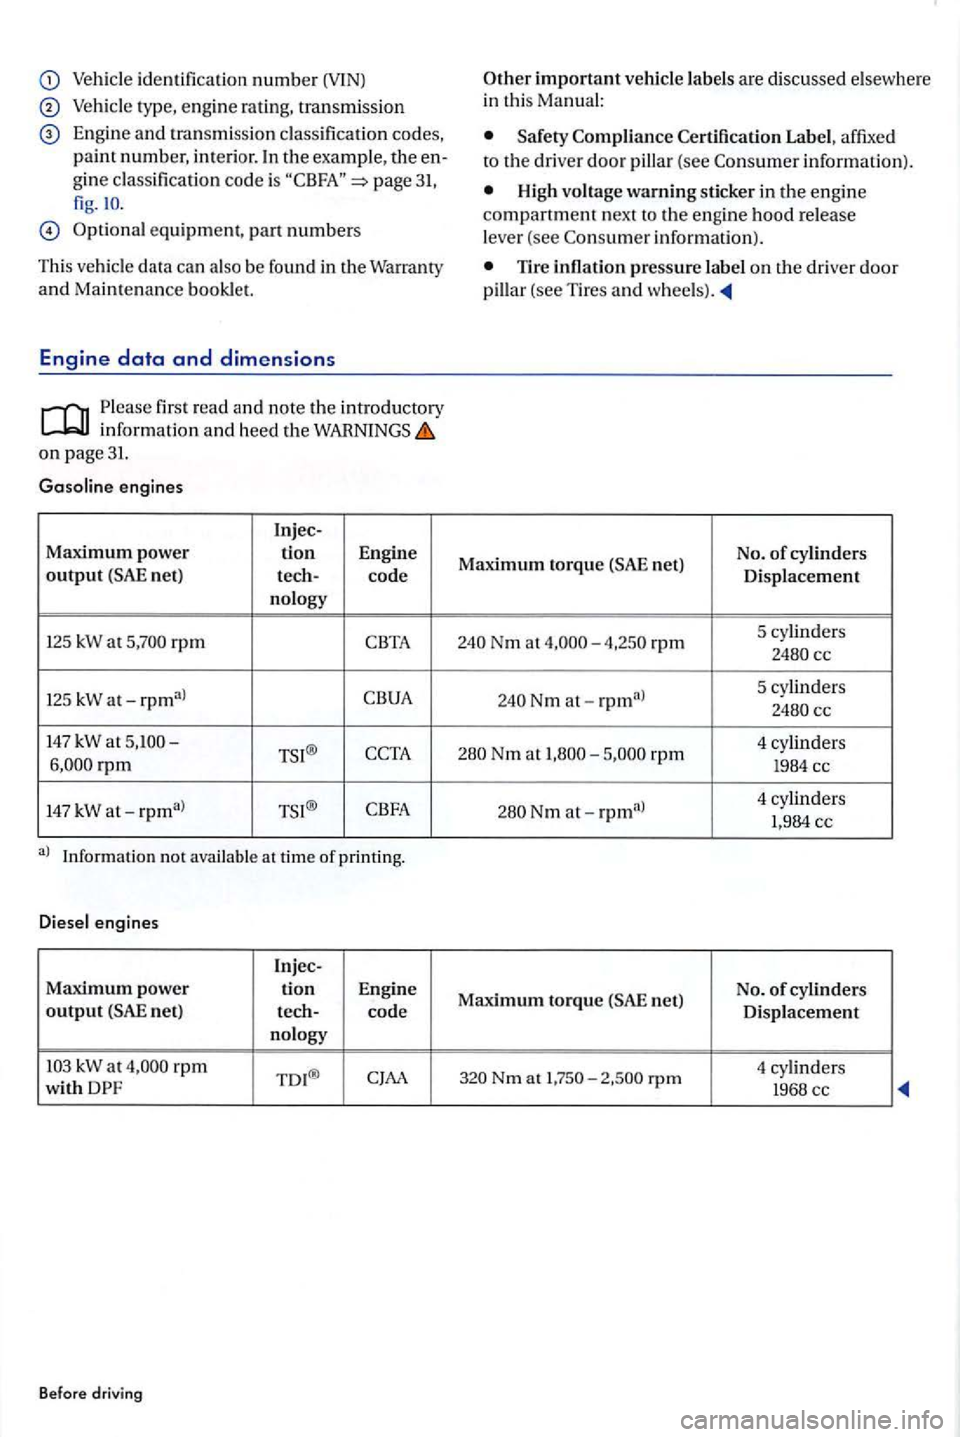
identificatio n number (VlN)
Veh icle type, eng in e rating , tran smission
E n gine and tra nsm iss io n classificatio n cod es, pain t num ber, interior. In the exa mple,
3 1, fig.IO.
equipment, part num bers
Thi s ve
hicle data can also b e fou nd i n t he War ra nty
and Maintenan ce booklet.
Engine data and dimensions
first read and note the in trod uctory inform ation and heed th e WARNINGS on page31.
G aso line engi nes
Injec -
Maxim um power
rp m
125 kW at-
147 kW at
kW at rpm T D I®
Before dri ving
Safety
i nfo rmatio n).
Hi gh vo ltage warning sticker in the en gin e compartment next to the eng ine hood r elease leve r (see in format ion) .
Tire infl ati o n pressure la b el o n th e driver door
pillar (see Tires and
Maximum torqu e net) N
o. of cy linders
Disp laceme n t
Nm at rpm 5 cy linders
5 cy linders
N m at-4 cylinders
1 ,984 cc
Max
imum torque n et) N
o. of cy lin ders
Di sp lacement
N m at rp m 4 cylinde
rs 196 8 cc
Page 34 of 541
Dimensions
Please first read a nd note th e imrodu ctory informa tion and hee d th e on pa ge 31.
Le ngt h 165.3-
16 9 .6 in ches (4,199-mm)
W id th
inch es (1786 mm)
H eig
ht ( unload ed ) 57.5-59.1 in ch es (1,461-mm)
W h
eelb ase inch es (2,575 mm)
M inimum turning circl e diamet er
(wall to abou t 35 feet 9 inch es m)
inch es 1,523 mm)
G ro
und clearance at maximum p ermi ssibl e we ig ht about3.5 inch es (8 9 mm)
a)
Note
Plea se be careful when parking your vehicle in
areas with parking barriers or curbs. These vary in
height and could dama ge you r bumper and
basic s
Note (continued)
Always be carefu l when you enter a driveway or dri ve up or down steep ramps or over curbs or other obstacles . Part s of the vehicle close to the ground may be damaged (such as bumper covers ,
spoil ers , and parts of the engine, su sp en sion, and exhaust
32 33
Page 158 of 541
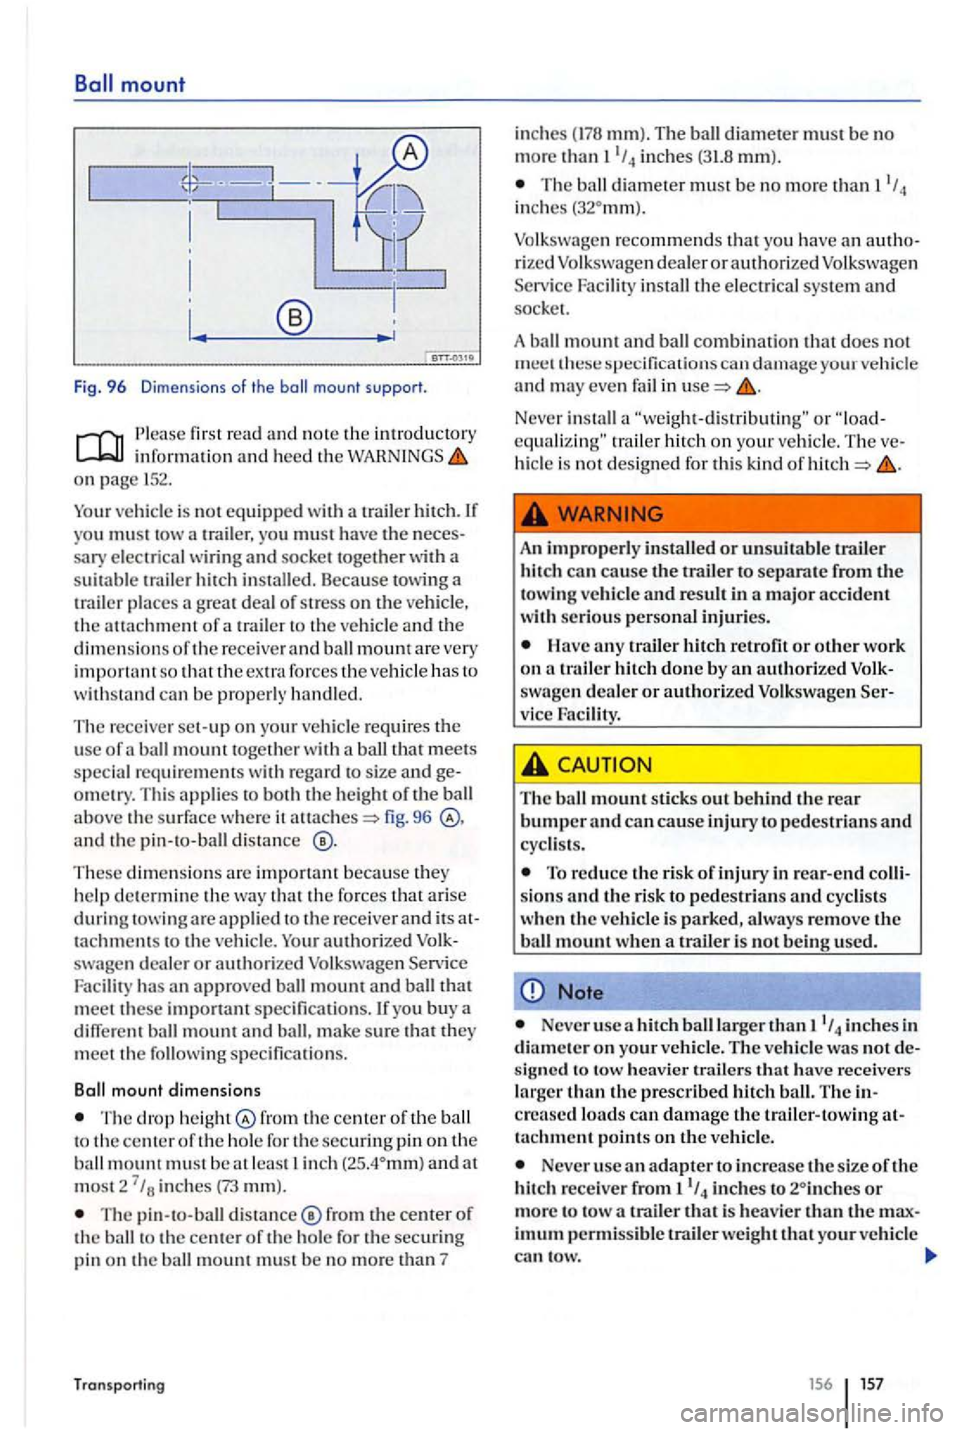
Fig. 96 Dimensions of the mount support.
first read an d note the int rod uctory inform ati o n an d heed th e on 152.
Your vehicle is not equipped with a trailer h itch. you must tow a trailer, yo u must h ave the
ca n be pro perly ha nd le d.
The rec eive r set-up on yo ur ve hicle requ ires the use of ball mount togeth e r a ball that meet s
s pecia l re quire ments with regard to size and om etry. Th is app lie s to bot h th e height of th e ball above the surface where it fig. 96 and th e pin -to-ball distance
These dimen sion s are im po rtant because they h elp dete rmi ne th e th a t the forces that a rise during a re applie d to t he receiver and its tachments to th e ve hicle. Your authori zed dealer or authori zed Volksw agen Service
Faci lit y has approved ball mount an d ball th a t
meet these importa nt specifica tion s. you buy a
diff ere nt ball mount and ball, make s ure that th ey
meet t he following specifica tion s.
Ball
mount dimensions
T he drop heig ht fro m th e ce nter of th e ball to th e cente r of th e ho le fo r th e sec uring pin on th e ball mount mus t b e a t least in ch
T he pin-to -ball dista n ce ® from th e center of th e ball to th e ce nter o f th e hole fo r t he sec uring
pin on th e ball mount must b e no mo re th an 7
Transporti ng
inches mm). The ball diamete r must be no
m ore thanl1
/ 4 in ches (31.8 mm).
T he ball d iamete r must b e no more th a n in ch es
rize d Volkswagen dealer o r a u th o rized Volkswag en
S ervice Facility in stall tl1e electri c a l sys te m and socket.
A ba
ll mount and ball combin ation that does not specifi cat io ns can d amag e your ve hicle and may ev en fail in
o r tr ailer hi tch on you r veh icle . The h icle is not desig ned for this kind of
A n impro pe rl y instal led or unsuit abl e trailer
hi tch can cause the tra iler t o separa te from towing ve hicle and result in a m ajo r ac cident
with seri o us personal inju ries.
H ave any trail er hitch retro fit or
dealer or authorize d Volkswagen vice Faci lity.
Th e ball m ount sti ck s out b ehind th e rear bumper an d can cause injury to pedestria ns a nd
cyclis ts.
T o reduce the risk of inju ry in rea r-end
Note
Neve r usc a hit ch b all larger th an inches in
d ia m ete r o n your vehi cle. The ve hicl e was no t sig ne d t o tow he avier trailers h ave receivers
l a rger than th e pres c rib ed hit ch ball. The cre ased loads ca n d amage the trailer- towin g tachment points on the ve hi cle.
Neve r use adapter to inc rease the size of th e
hit ch r eceive r fr om inches to is heav ie r
Page 159 of 541
Note
can use one of these adapte rs if required for the proper in stallation of bi cycle rack or
m ent s are m el. Wh en u sin g bicycle rack s or carri ers make sure that th e tailli ghts are n o t
bl ocke d.
Retrofitting a
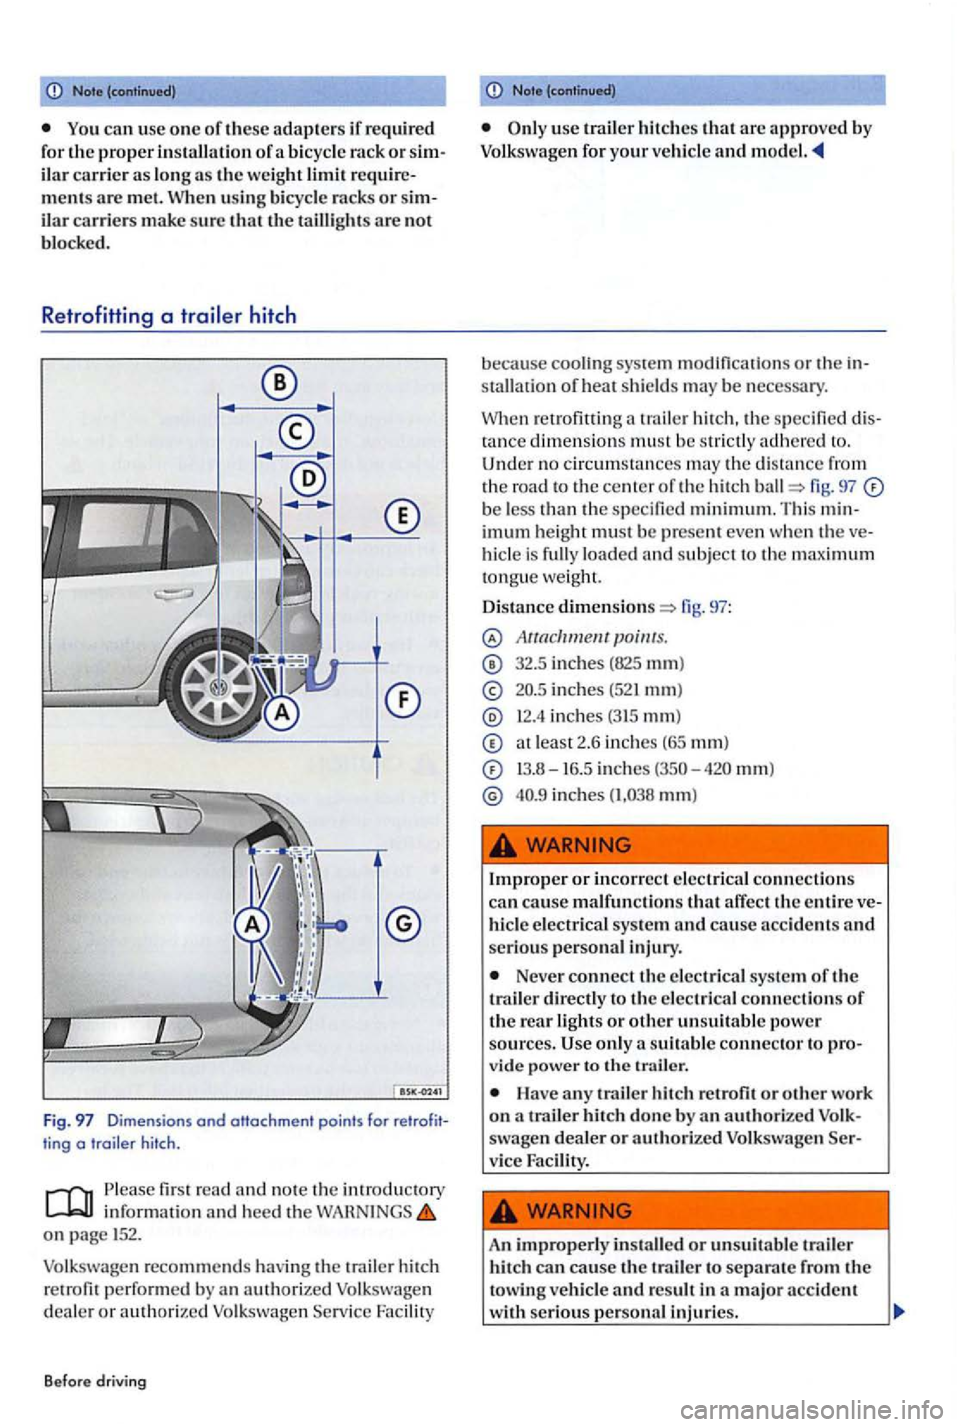
Fig. 97 Dimensions ond ottochment points for ting o hitch.
first re ad and not e th e intr oductory information and h eed th e on page 152 .
V o lk sw age n rec
ommends hav in g the trai le r hit ch
r e trofit perf o rm ed b y an Volk swag en deale r o r authorized Volk s wa gen Servic e Facility
B efore driving
Note (continued)
use hitches that a re approved by for your vehicl e and
because cooli ng sys te m m od ification s or th e sta llation of heat shield s may be necessary.
Wh en re trofi tting
traile r hi tch, th e specified ta nce dimensions must be stri ctly adhered to. Under no circums ta nces m ay the distance f ro m
th e road to the center o f the hitch fig. 97 be le ss than th e s pecifi ed min im um. Thi s imum height must be present ev e n whe n the hi cle is full y load ed and subje ct to the maximum tongue weigh
D istance fig. 97:
32.5 inch es (825 mm)
in ches ( 52 1 mm)
inc hes (315 mm )
atleast2 .6 in ches (6 5 mm)
13.8-16.5 inches mm)
in ches
Imprope r or incorrect elec tri cal connection s
ca n cause malfunction s that affect th e e ntire hicl e elec tri cal sys te m and cau se acc id e nt s and serio us perso na l injury.
Neve r connect th e e lectrical syste m of the
trailer directly to the e lec trical connectio ns of the rear light s or oth er unsuitabl e power sources . U se only v ide po w er t o th e trailer.
H ave a ny trailer hit ch r etrofit or other work on a trailer hit ch don e by an authorized swage n deal er or authorize d Volkswage n
An improperly in stalled or uns uitable trailer hitcl1 can cause th e trai le r to separate fro m the
towing vehicl e and result in major accident with serious perso nal injuries.
Page 278 of 541
Improper loosen ing and tightening of the bolts on wheel rim s with bolted rim rings can ca use accident s and serious personal injury.
Never loosen bolted connections on wheel
rim s with bo lt ed rim rings.
New and
Please first read and note the
introductory information
and h ee d the on
page 276.
New tires
Drive a ve hicle with new tires es
pecially carefully for
the first
miles km) because the tires
must first be broken in. Tires that
a re not broken in have reduce d
traction
and brakin g perfo r
In stall radial tires only of same
make , same dimensions (rollin g
circumference),
and s imil ar tread
profil e
onto all four wheels.
The tread depth of new tir es can
diff er
between tir e models and
manufacturers b eca use of dif
f e re
nt d esig n feature s and trea d
design.
Replacing tires
Tires should be replaced in pairs
a
nd not indi viduall y (both front
Have all work on wheel rim s with bolted rim rings performed by an authorized Volkswage n
dealer or autho ri ze d Volkswage n Facility.
tires or both rear tires at the same
Replace tires only with tires that
have the same s pecif ica tions , in
cluding width
and diameter, load
a
nd top sp ee d rating as the tires
a
pproved by Volkswagen for your
vehicle and model.
Never use tires that are larg er or
wider
than the dim ension s of the
t ir es appro ved b y Volkswagen for
your vehicl e and model. Larger
t ir es co
uld scrape and rub on the
vehicle body or other parts of the
veh icle.
N ew tires must be broken in be
cause new tires do not have full
traction and braking perfor
mance.
miles km) to
h elp
reduce the risk of losing
control, a collision, and serious
personal injuries.
280
Page 282 of 541
When the Tire
first read and note the introductory information and heed
the on page 276.
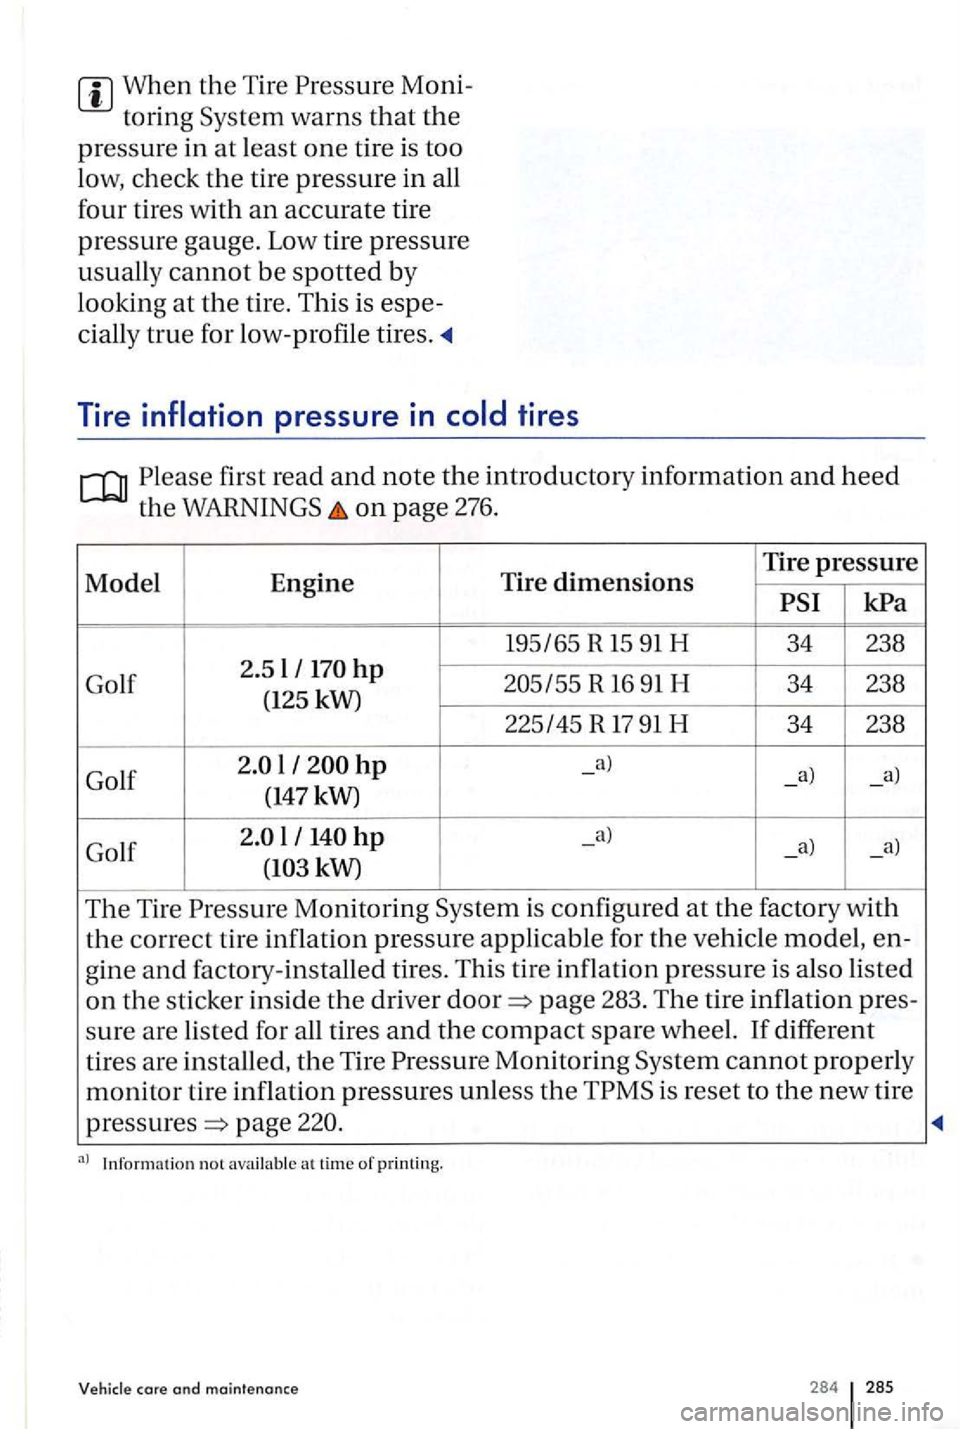
Model Engine Tire dimensions Tire pressure
R 16 91 H 34 238
(125 kW)
225145 R
17 91 H 34 238
Golf
l -
The Tire is confi gured at the factory with
the correct tir e inflation pressure applicabl e for the ve hicl e model, en-
g in e
and factory-install ed tire s. This t ire inflation pressure is also listed
on the sticke r insid e the driver page 283 . The tire inflation pres -
s
ure a re listed for all tires and the compact spare wheel. If diff ere n t
tires are
installed, the Tire Monitoring cannot properly
monitor tir e inflation pressures unl ess the is reset to the new tire
page
Informatio n n ot availa b le at t ime o f printing.
Vehicle core and maintenance 284 285
Page 292 of 541
Drivin g faster than the speed fo r
w hich the winter tires on your vehicl e were
serious person al injuries.
Winter tire s have speed be lower your vehicle's maximum speed.
Never drive faster than the s peed fo r w hich the winter or other tires in stalled on your ve hicle are because tires that arc drive n faster than their speed can fail denl y.
Snow chains
first r ead an d n ote the introductory information and heed th e on pagc276.
local re g ul ations as w ell the applicable sp ee d lim its w hen driv in g with snow ch a in s.
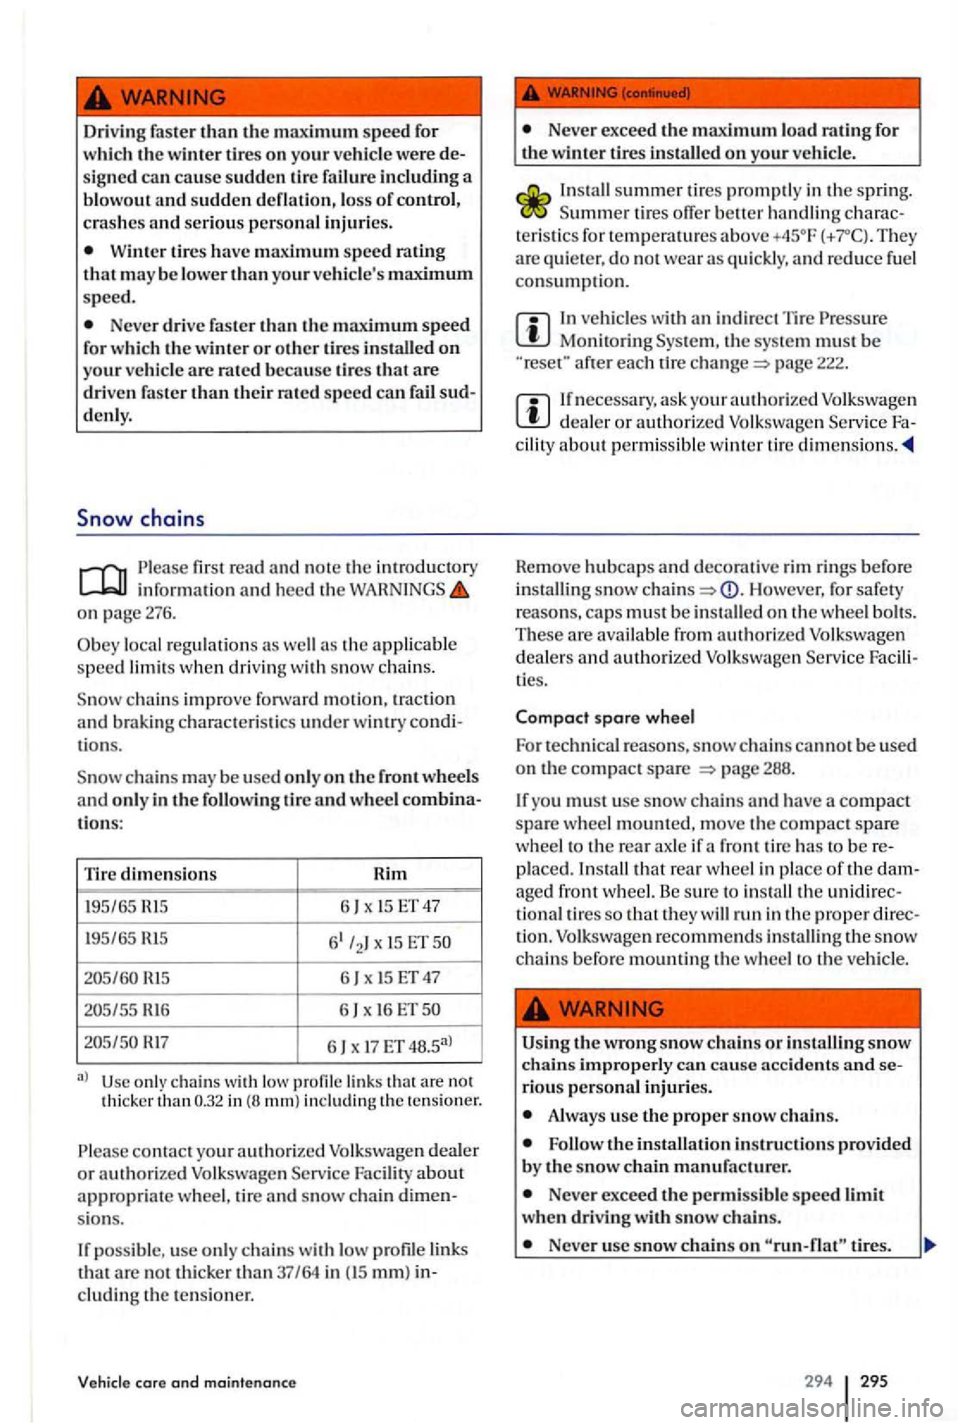
wheel tions:
Tire
dimensions Rim
1 9
5/6 5 x 15 ET47
1 9
5/6 5 6 t/2 l x 15 ET5 0
6 x 15 ET 4 7
205/55
x 16 ET50
6 x 17 ET 48.5a l
are not
thic ke r
contact yo ur authorized V olk swage n deal er or authorize d Vo lk swagen s now chain sio ns.
possib le, use o nl y c hain s w ith lo w profile link s that are not thi cke r than37 /64 in mm) cluding th e te n sio ner.
core and maintenance
Never exceed the maximum load for
t h e winter tires install ed on vehicle .
tires offe r be tt er ha ndling teris tics for tcmpe ralll res abo ve T hey are quieter, do not wear as quickly , reduce fuel
cons umption.
In ve hicles with indirect T ir e Monitoring th e sys te m must be each tire page 222.
I f necessa ry , a sk your authorized Volkswagen dealer or authorized Volk swagen
Remove hubcap s and deco rative rim rings before
in sta llin g sno w Ho wever, for safet y
r e a sons, must be in stall ed on th e wheel b o lts. These are ava ilabl e from authorize d Volk swage n
deal ers and authorized Volk swage n ties.
Compact spare w heel
F o r t
echnical r easons, snow ch ain s canno t b e use d
o n the compact spare page 288 .
I f y
ou mus t u se snow chains
front tir e has to be placed. In stall tha t rear w heel in pla ce of the ag ed fron t wheel. Be sure to install the un id ire c
tional tires s o that they will run in the proper tion. Volkswagen recommends in sta lli ng the snow chains be fo re mounting th e wheel to the ve hicl e.
the wrong snow chains or in sta lling snow chains improperly can cause accidents and rious personal injuries.
A lways usc th e proper snow chain s.
the insta llation in structi o ns pro vided by the s now chain manufacturer.
Neve r exceed th e permis si bl e speed lim it when driving with snow ch ains.
Neve r usc snow ch ai ns on tires.
294
295