2007 VOLKSWAGEN GOLF tow
[x] Cancel search: towPage 301 of 444
Booklet 3.2 Tips and Advice
Dampen the windows w ith commer
cially avai lable, alcohol-based g lass
clean er.
Dr y the windows with a clean chamois
or a lint-free cloth.
Removing snow
- Use a s mall brush to remov e snow from
the windows and mirror s.
Removing ice
-Use a de-i cer spra y.
U se a clean cloth to dry th e windows. The
c h amois leather, whic h was use d to wip e paint
surfaces, contains oily res idu e from protective
agents and would smear th e
poss ible use a de- ic in g spray to remove ice. you have to use an ice scraper, push it on ly in one dire ctio n- away from 0.
Use window cleane r or a silico ne remover to re
move rubber, oil, grease silicone depo sits.
Wiper blades should be cleaned regularly.
Clean wiper blades are important so that
y
ou can see.
- Use a so
ft cloth to re mov e dust and dirt
from the windshi eld wiper blades.
- U se window clean
er to clean the w ind
s hi eld wip er blad es. U se a s
ponge or a
cloth to re
move stubborn dirt.
Wax deposits have to be remove d with sp ecial
cleaner. Wax deposits on the windshield could cause the wiper blades to rub. A window clea ner sp ecifica lly for removing wax will stop the b lades
f rom rubbing if added to the windshie ld wash wa te r. Grease removing cleaners will not remove
wax deposits.
WARNING
Poor visi bili ty inc re ases the risk of collisions and oth er ac cid ent s.
Always make sure all win dows are clear of ice , snow , and cond ensation for goo d vis ibility -out the windshie ld, side and rear windows.
Never use warm or h ot water to re move snow and ice from wind ows and mirro rs. This could
ca use th e glass to crack!
The heati ng ele ment s for the rear defogger
a re on t h e in side of the rear window. To preve nt damage, do not put sticke rs over the heatin g e l
ements o n the in side of the rear w indow.
Never move the ice scraper back and forth to
p reve nt dirt from being ground against the gla ss
when you pull the sc raper back towa rds yo u.
Cleaning and protection 25
Page 324 of 444
Booklet 3.2 Tips and Advice
functional problem s or engine damage could be caused
Warning temperature
The warning symbol lights up if the coolant temperatur e is too high or if the
coolant level is too
Low.
Ther e is a fault if:
The wa rnin g symbol does not go out aga in afte r a few seconds.
The wa rnin g symbol light s up or flas hes whil e the vehicle is moving. Three warning s
This means th at eith er th e coolant leve l is too low or the coo lant temperature is too high.
Th ere may be a m essage in the i
nstrument
clu ste r inf orming you or advi sing you of th e
Coolant temperature too high
Fir st look at the coolan t tempe rature gau ge. The coolant temperature is too hi gh if th e need le is
o ver to th e fa r right on the dial. the vehicle,
switc h the engine wait for it to cool down. the coo lant level.
I f th e coo lant level is co rrect, th e over heating may be caused by a radia tor fan fault. the ra diator fan fuse and have it replaced if page
If th e wa rnin g light lights up again after driving
o n for short distan ce, stop the vehicle switch otT th e e ngine. an authorized Volkswagen dea le r or a qu alified worksh op.
when towing a trailer
If you have to c limb a lo ng g rad e w ith high temperatures in low gea r at high gin e ture booklet 3. 1 and If th e
w arning light in th e in st rument cluster flas hes, stop and a llo w the e ngine to coo l down
48 Checking and Filling
for minutes at idl e. For more inform ation 15.
alw ays read and heed all
Hot steam or coolant ca n cause seriou s burns.
Neve r open the engine hood if you see steam or coolant escaping from the engine compartment. Always wait until you no longe r see or hear steam or coolant escaping from the
e n gine.
Always let the engine to cool down pl ete ly before carefully opening the engin e hood. Hot components will burn tact.
When the engine has coo led down and you are ready to open the engine hood:
-
move the key f rom the ignitio n.
- Appl y
the parking brake firmly and put the selector in ( Park, automatic mission) or Neutral (manual
Never reach into the area around or tou ch
th e rad iator fan. with the blades ca n
re sult in serio us personal injury.
remembe r th at the radiator fan is temperature-controlled and can turn on
fo r a longer p eriod of tim e and the
key has been r emoved fro m the ig nition.
Never unscrew the coola nt expansion tank cap when the e ngin e is hot. A hot engine will
Page 356 of 444
Location
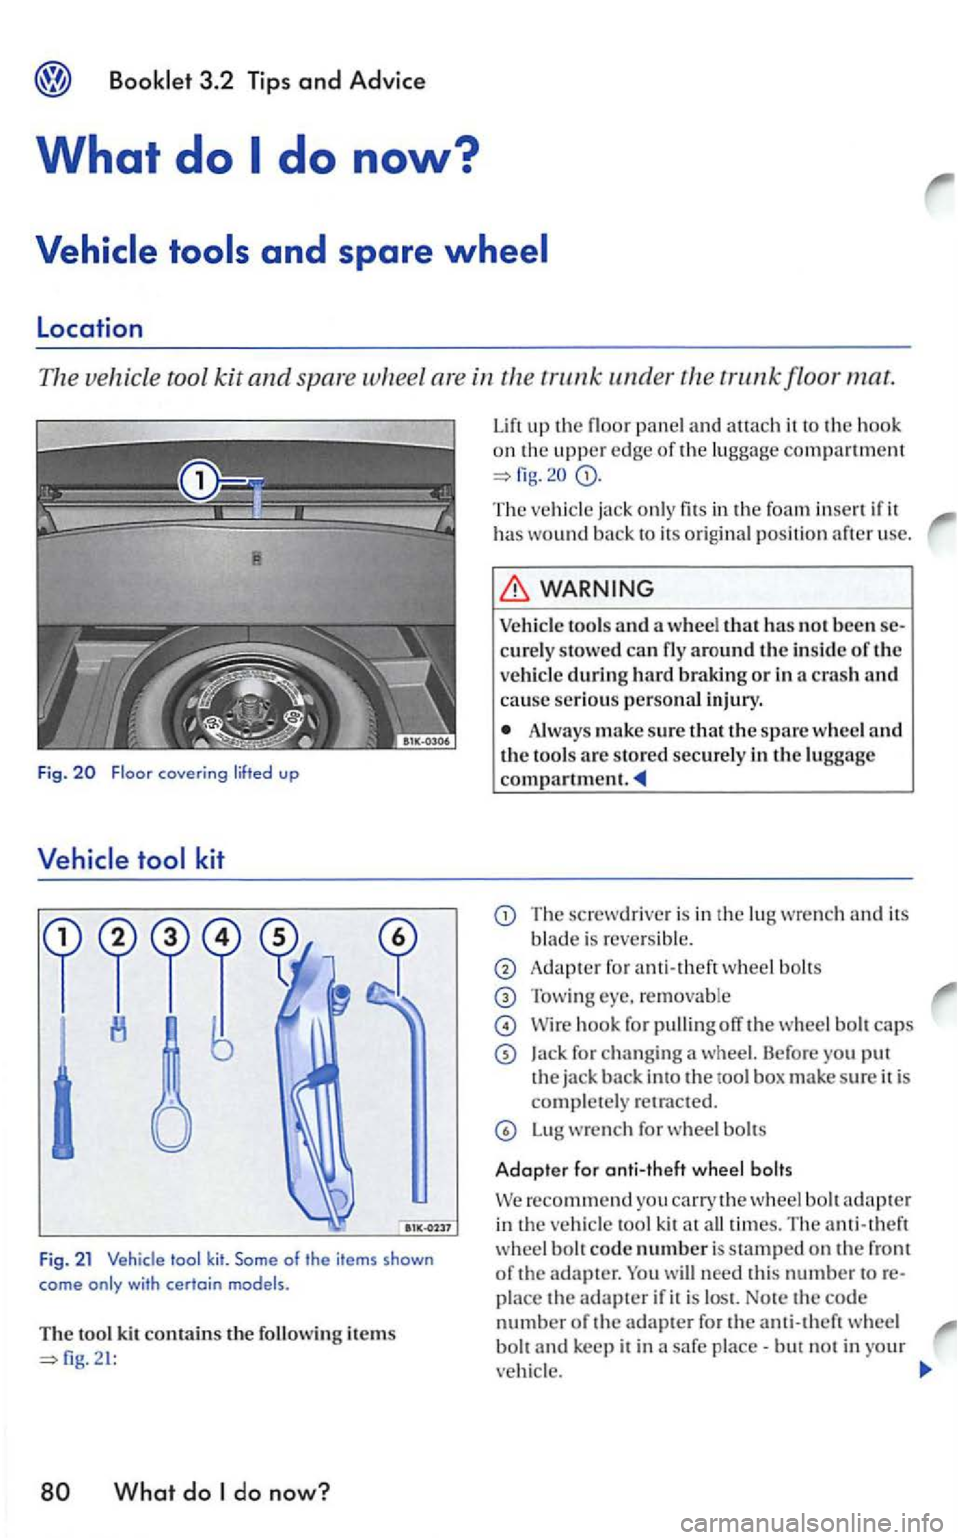
The vehicle tool kit and spar e wheel are in the
What do do now?
Lift up the floor panel and auach it to the hook on the uppe r e dge of the luggage compa rtment
The ja ck only fits in the foam inse rt if it has wound back to its orig inal position after u sc.
Vehicl e too ls and a whee l has not bee n se
cure ly stowed can fly around the ins id e of the during hard braking o r in a crash and cause serious personal in jury.
Always make sure that the spare wheel and the tools arc s tored securely in the luggage compartment.
The screwdriver is in the lu g wrenc h and its
b lade is revers ible.
Adapter for anti-theft wheel bolt s
Tow ing eye. remo vable
\Vire hook for pulling off the wheel bo lt caps
Jack for changing a wheel. Before you put the jack back into the tool box make sure it is comple tel y retract ed.
Lug wrench for wheel bolts
Adopter for anti-theft wheel bolts
recommend you carry the wheel bolt adapter in the tool kit at all tim es. The anti-theft wheel bolt code numbe r is stampe d on the front of th e adapter. will need this number toreplace the adapter if it is lost. Note the code number of the adapter for the anti-theft wheel bolt and keep it in a safe place-but no t in your
Page 358 of 444
3.2 Tips and Advice
WARNING
The spare whee l may be smaller than the origina l tir e. The s maller spare wheel is identified with a sticker and the words
The spare whee l m ust be returned to the
spare whee l well so on as the standard road
wheel can be re pla ced.
Getting started
The spare wheel must always be secured
with the w hee l bolts provided by the factory .
After
r
vehicle in a safe place before changing a wheel.
If yo u have a flat tire or puncture, park
the vehicle as far away fro m the of
traffic as possib le on a firm, even surface
Turn off the e ngin e. Turn on the emer
gency flasher.
App ly the parkin g brake firm ly and e n
gage a
gear or put the selector in
If yo u are towin g a trailer, unhitch it
from yo
ur vehicle.
WARNING
Changin g a wheel, especially on
Alw ays stop the ve hicl e
to change the
Turn on th e e merge ncy fla sh er and se t up an o th er warning device ab o ut 27 ya rds (25 meters) beh ind the vehicl e to warn ap
proa ching traffic.
Always sure th at th e ground is leve l and firm, if necessary usc sturdy under the ja ck .
When one wh eel is lift ed off the ground putting the se lec to r l ever in
Always apply tl1e par k in g brake firmly and firmly engage gea r or put th e selec tor lever in
Page 359 of 444
(continued)
you towi ng
use
cops
3.2 Tips and Advice
(cont inued )
Never use o th er jacks, even if they been approve d for use on oth er Volkswage n
mode ls.
To re duce the risk o fl osing contro l, cras hes and serious personal injuries, never loosen
the sc rews on rims wi th threaded rim rings
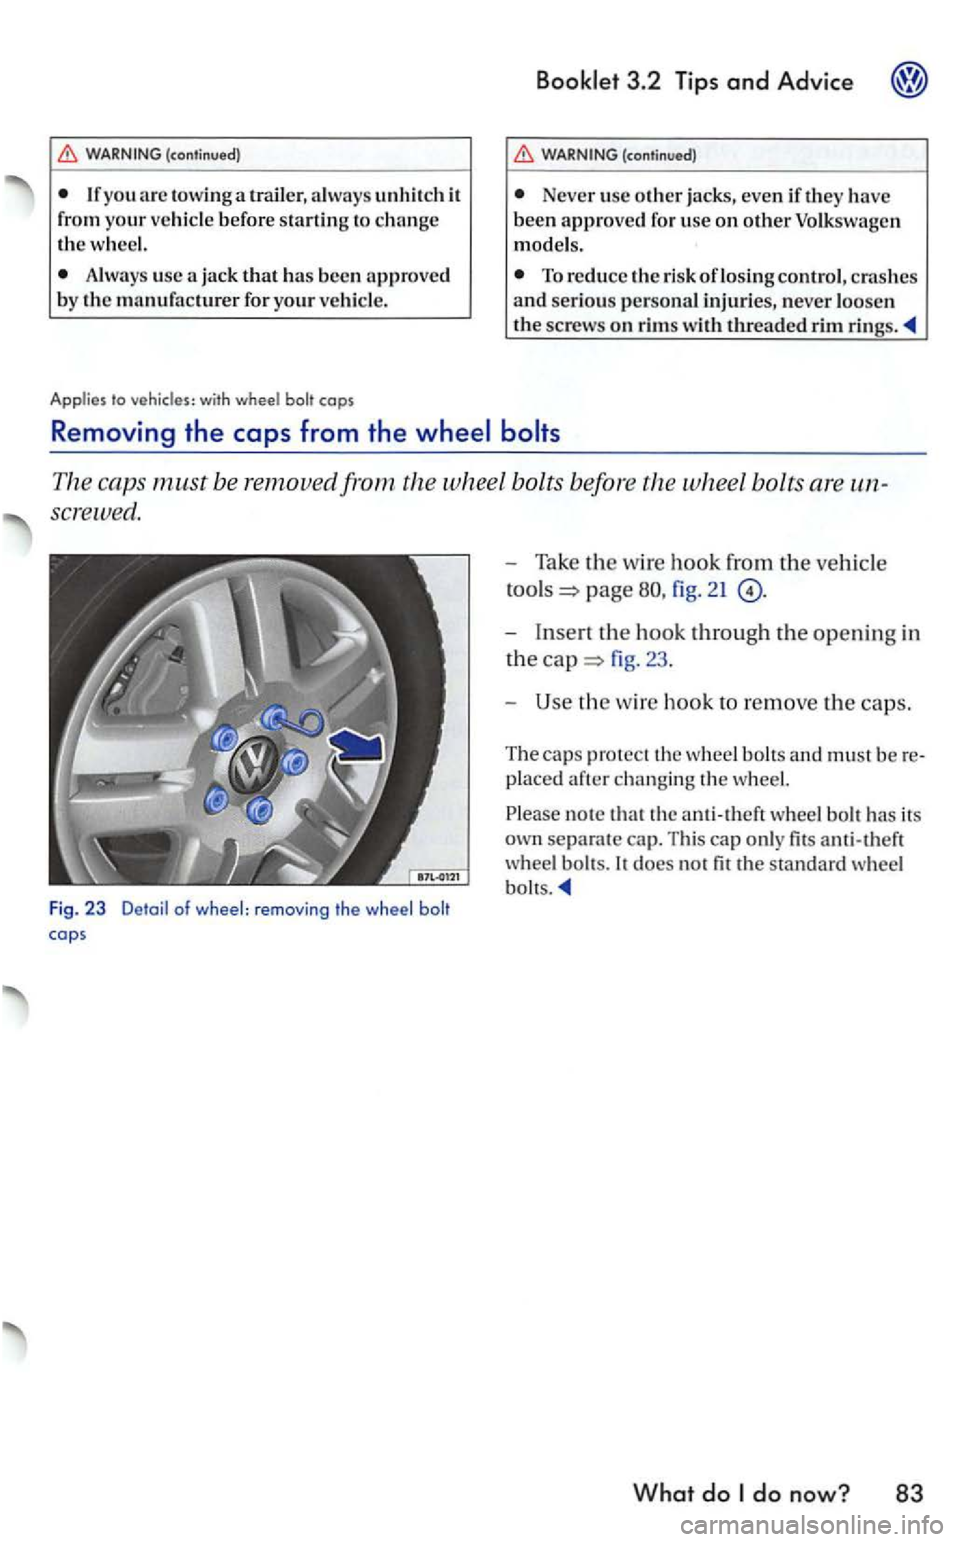
Removing the caps from the
Th e ca ps must be removed from the whee l bo lts before th e wheel bolts are
screwed .
Fig. 23 Detail of wheel: removing the
=> page fig . 2 1
the w ire hook to remove th e caps.
The caps protect th e and must be
n ote that the anti-theft fits
.
What do
Page 378 of 444
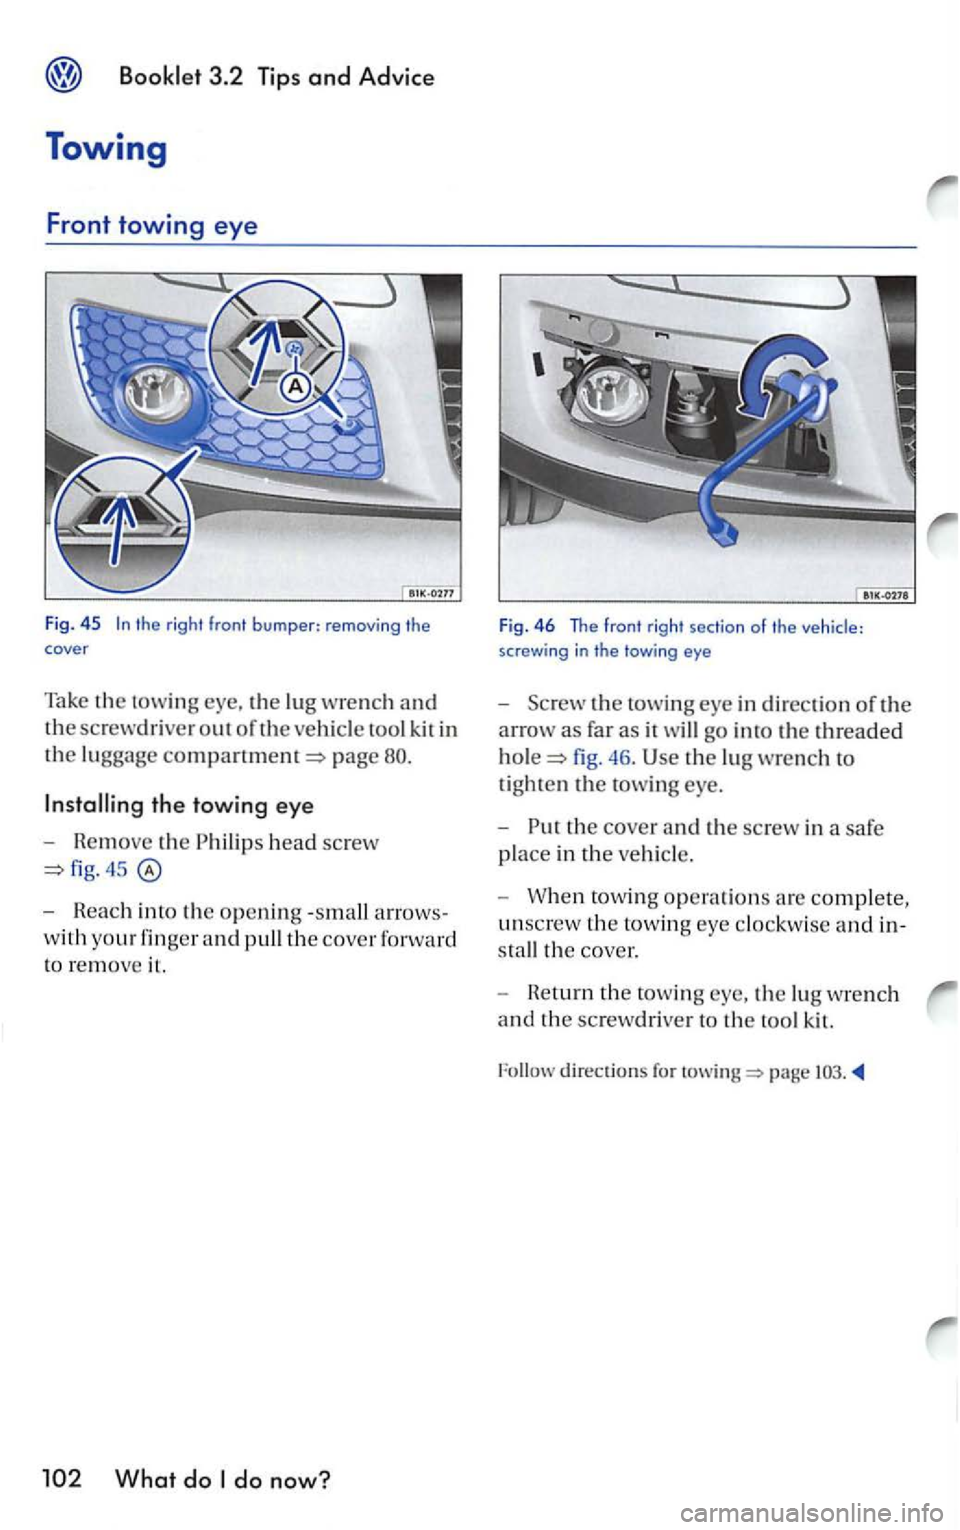
the right front bumper: removing the cover
Take the towing the lug wrench and
the screwdriver out of the vehicl e tool kit in
the luggage page
the towing eye
- Remove the Ph ilips head screw
- Reach into the opening -small arrows
with your finger and pull th e cover forward
to remove i l.
the towing eye in direction of the
arrow as far as it will go into the threaded
46. the lu g wrench to
tighte n the towing eye.
-
the cover and the sc rew in a safe
p l
ace in the ve hicl e.
-
When towin g operations a re complete,
unsc rew the towing eye clockw ise and in
s ta
ll the cover.
-
He turn the to wi ng the lu g w re n ch
a
nd the screwdrive r t o the to ol kit.
Follow directions for
Page 379 of 444
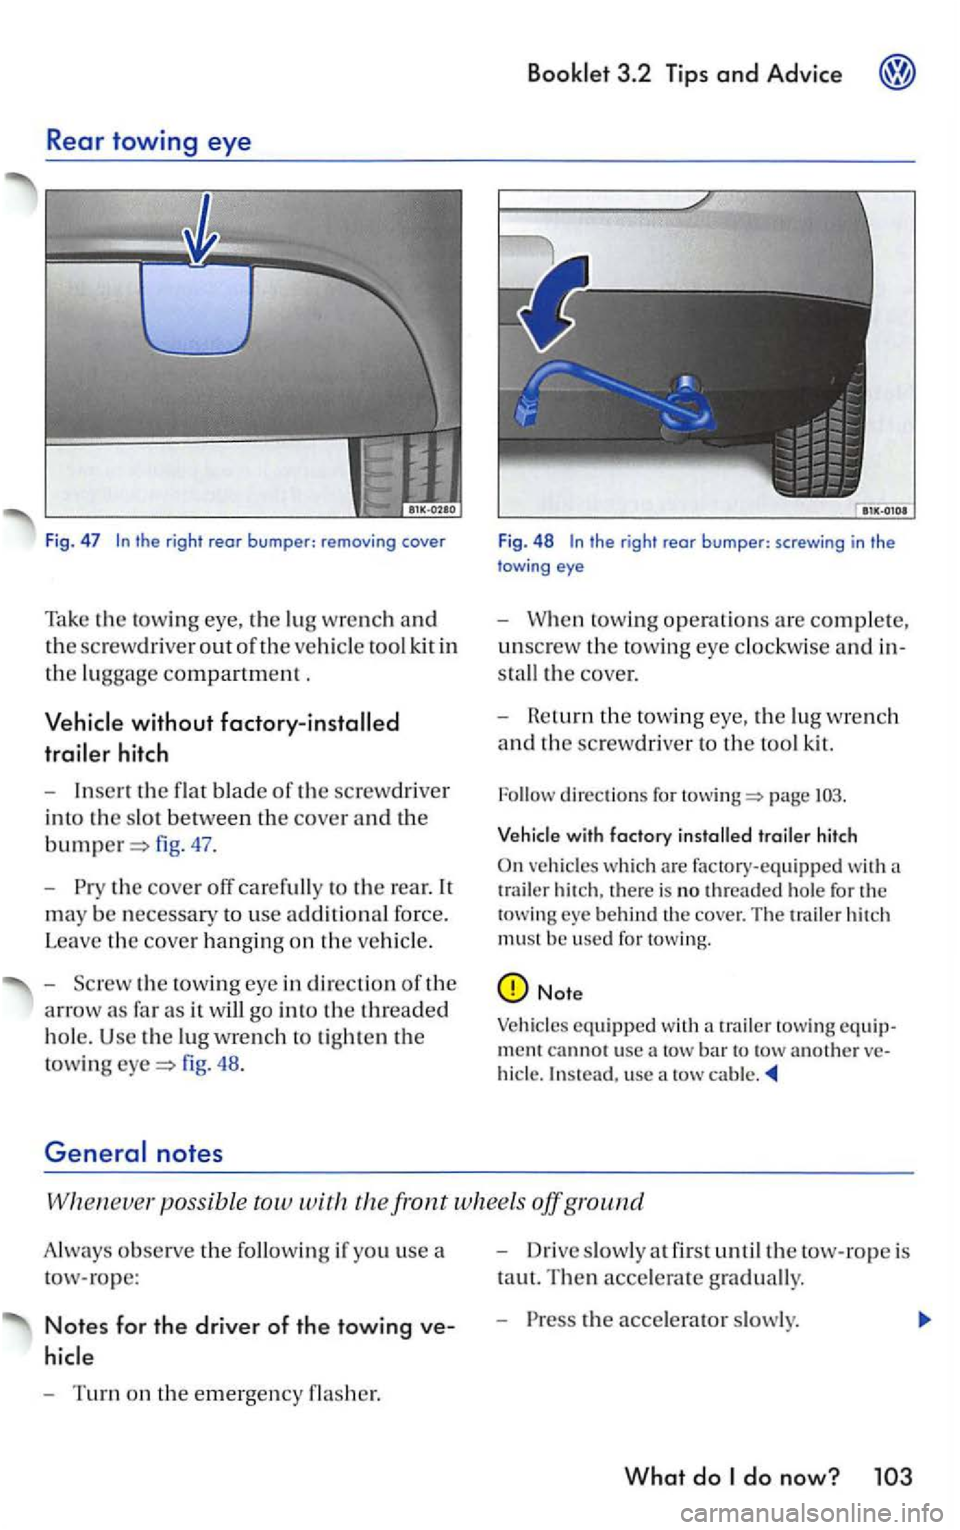
Rear towing eye
Fig. 47
without
hitch
-Inse rt the flat blade of the screw driver
i n to
the slo t between th e cover and the
fig . 47 .
-
th e cove r off carefully to the re ar. It
m
ay be necessar y to use addi t ional force.
Lea
ve the cove r hanging on the veh icle.
- Scr
ew the tow ing eye in di rectio n of th e
arrow as fa r as it will go into the threa ded
hole. Use the lu g wrench tigh te n the
to wing fig . 48 .
3.2 T ip s and Advice
Fig. 48 the right rear bumper: screwing in the eye
-towing operations are comple te,
unsc rew the towing eye clockwise and in
s ta
ll t h e cover.
-
He turn t h e tow ing eye , the lug wre nch
and th e screwdriver to the too l kit.
page
trailer hi tch
On veh icles whic h are fac tory-equipped wit h a
t rai ler hitch . there is no threaded hole for th e
to w in g behind th e cover. The trailer hitc h
must be use d for towing.
Note
Vehicle s equi pped with a trailer towing cannot use a tow bar to usc a
possib le tow the front w hee ls off g round
Always observe the followi ng if yo u use a
tow-rope :
Notes for the driver of the towing ve
-Turn on the emergency
- Drive slowly at fir s t until the tow-rope is
t a u
t. Th en accelerate gradually.
-the acce lerator s lowly.
What do
Page 380 of 444
hicle yo u are tow ing. Brake earlier and
more gently than you wou ld normally
- Do not drive faster than mph
miles
-Turn on the emergency flasher.
-Move the se lecto r lever or gearshift
l eve r to
the neutral position (N).
- Make s
ure that the tow-rope is taut at all
Tow-rope or lo w-bar
bar. use a tow -rope if you do not have a
tow -bar.
A tow-ro pe s ho uld
be slightl y elastic to reduce the loading on both ve hicl es. Use a tow -rope made of synthetic fiber or similar ela stic
load ing and damaging the anchorage points.
T he ignition
of the vehicle bein g to we d must be switched on to ensure
will
hav e to apply considera bly more press ure to the brak e pedal than you would normally.
Move the selec tor leve r toN.
Do not drive fas te r than mph
Do not tow farth er than mil es km).
a tow truck is used, the vehicl e must be tow ed with all wheels the ground.
Tow starti ng
For technica l rea sons,
it is not pos sibl e to tow start you r vehicle, if the vehicl e is without trical power. The engine management systems may not operate prop erly.
Use jumper cables page
WARNING
Towing a ve hicle changes th e way your ve hicle
h an dles and brakes. To help reduce the risk of
a n accident lea ding to serio us personal i njury, note the fo ll owi ng:
T he drive r of the vehi cle t hat is being towed:
Will have to press the brake pedal
Will have to use considerably more force
to turn t h e s teering wheel, because th e
power s teerin g is no t ac tive.
The driver of the vehicle that is towing:
Must accelerate gradually and gently avoid jerking movements.
Mus t brake earlie r and more ge ntl y than you would normally.
Tips
For technical r easo ns, it is not possible to sta rt a ve hicle with an aut omati c transmission.
th ere is no fluid in the vehicle transmission because o f a defect. th e vehicle must be tow ed
w ith the dri ve whee ls t h e ground.
a veh icle with an automati c tra nsmission has to be towed more th an miles