2007 VOLKSWAGEN GOLF height
[x] Cancel search: heightPage 14 of 444
seat 3. 1:
seal.
foldin g back 3.1:61, 62
fold ing forward 3.1: 61
v iew mirror 3.1:52
window heating 3.1: 75
Heating wires 3.2:25
window wiper 3. 1:51
H
earwipe r 3.1:49
3.2: 35
care 3.2:2 1
contro l key tons 3.1: 2 8
Heplaci ng th e bauery 3.1: Synchroni zing 3.1: 29
H emoving caps to acce ss positiv e and tive te rminal s 3.2:
2.1: 12,3.2: 106
R etra ct
or 2.1: 19
R everse
A utomatic transm ission 3.1:93
Hims
R
epl aci ng 3.2: 75 With screw-on decorative cove rs 3.2: 58
With threaded rim ring 3.2:57
Hoof l
oad 3.1: 74
we ight 3.3: 4
Rubb er ga sket s 3.2:
26
s
driv in g 2.1: 2
Sa fety
C hild
safet y lock 3.1: 33
Sa fe ty belt ex te
nder 2.1:23
b elt height adjustment 2.1:25
belt pos ition 2.1:21
Adju sting safe ty
belt height 2.1:25
Pr eg nant
women 2.1: 22
Sa fe ty belt pre tension ers 2.1:26
Sa fety belt s
2.1: 13, 19
C leaning 3.2:
Extende r 2. 1: 23
Ho w ca n I adjust the height of my safety
belt? 2.1: 25
How
do yo u pu t on your safety belt correc tly? 2.1 : 19
Improp erly worn 2.1:26
child restraint 2.1:63
N ot
worn 2.1: 16
belt positi on 2.1: 2 1
instru ction s 2.1: 17
S p ec ial c
onsiderations for pregnant women 2.1: 22
Swi tc h able lo cking feature 2.1: 6 5
Unfa ste
ning s afety be lt s 2.1:2 5
Warning lig ht 2.1: 14
What happens to occ upants not wearing
safe ty be lts? 2.1: 16
Why assume
the correct seatin g
po sition ? 2.1:28
Why saf e ty belt s protect ? 2. 1: 1 7
Why wear safety belt
s? 2.1: 15, 28
Safe ty belts pro tect 2.1: 17
b elt warning ligh t 2.1: 14
Safety compliance sticke r 3.3: 2
Key words 11
Page 15 of 444
Safety instructions
Belt pretensioners 2.1: 27
Child restraint on the front seat 2.1:
Child seats 2.1 : 56
Coolant tempera ture 3.2:48
Loading
the lu ggage compartment 2.1:
seating position for passengers in
r
ear seat s 2.1: 6 seating position for
driver 2.1: 4
seating position for the front
passenger 2.1: 5
Safety belt extender 2.1: 23
Sa fet y
belts 2.1: 17 S id e airbag s 2.1: 48
Side Curtain ProtectionTM airbags 2.1: 52
Screw-on decorati ve covers 3.2: 58
Seat adjustment 3.1: 55, 58
Seat heating
Front 3.1:
59
Seating ca pacity 2.1: 13
Sea ting
position
Di s
tance between driver and ste erin g
w
hee l 2.1:4 Dr iver 2.1: 4
Fron t passen ger 2.1: 5 Improper seatin g position s 2.1: 8
Speed rating le tter code 3.2: 74
Speed warning 3.1: 21
Starting th e engine W ith the ig nition key 3.1:85
S tartin g
with jumper cables 3.2: 99
Stee rin g 3.1: 25
S
teering lock 3.1: 84
S te ering
wheel
Di s
tance to the driver 2.1: 4
Steerin g wheel height adjustment 3.1: 25
S
teps for determining co rrect load limit 3.2: 71
Sticker on th e left door jamb 3.3 : 3
Stopping the en gine 3.1:8 6
Sto rage
area
Roof 3.1:65
S torage
compartment 3.1: 64
additional sto rage 3.1: 66
Front center armrest 3.1: 65
S torage for
the vehicle literature 3.1: 64
Sunroof 3.1: 41
Sunshade
power roof 3.1:41
Sun viso r 3.1:49
Sw itch
able loc king feature
Activatin g 2.1: 65
D
eacti va tin g 2.1: 67
Sw itches Em ergency flasher 3.1: 45
Light swit ches 3.1: 43 outside mirrors 3.1: 53 ro of 3.1:41 windows 3.1: 38
Sw itching off the engin e
W ith the ignit ion key 3.1: 86
Sw itch
lig htin g 3.1: 3
T
Tachometer 3.1: 9
Ta
ilga te 3.1:35
Page 95 of 444
pant restraint system and can help to reduce the risk of injuries in accident
tions.
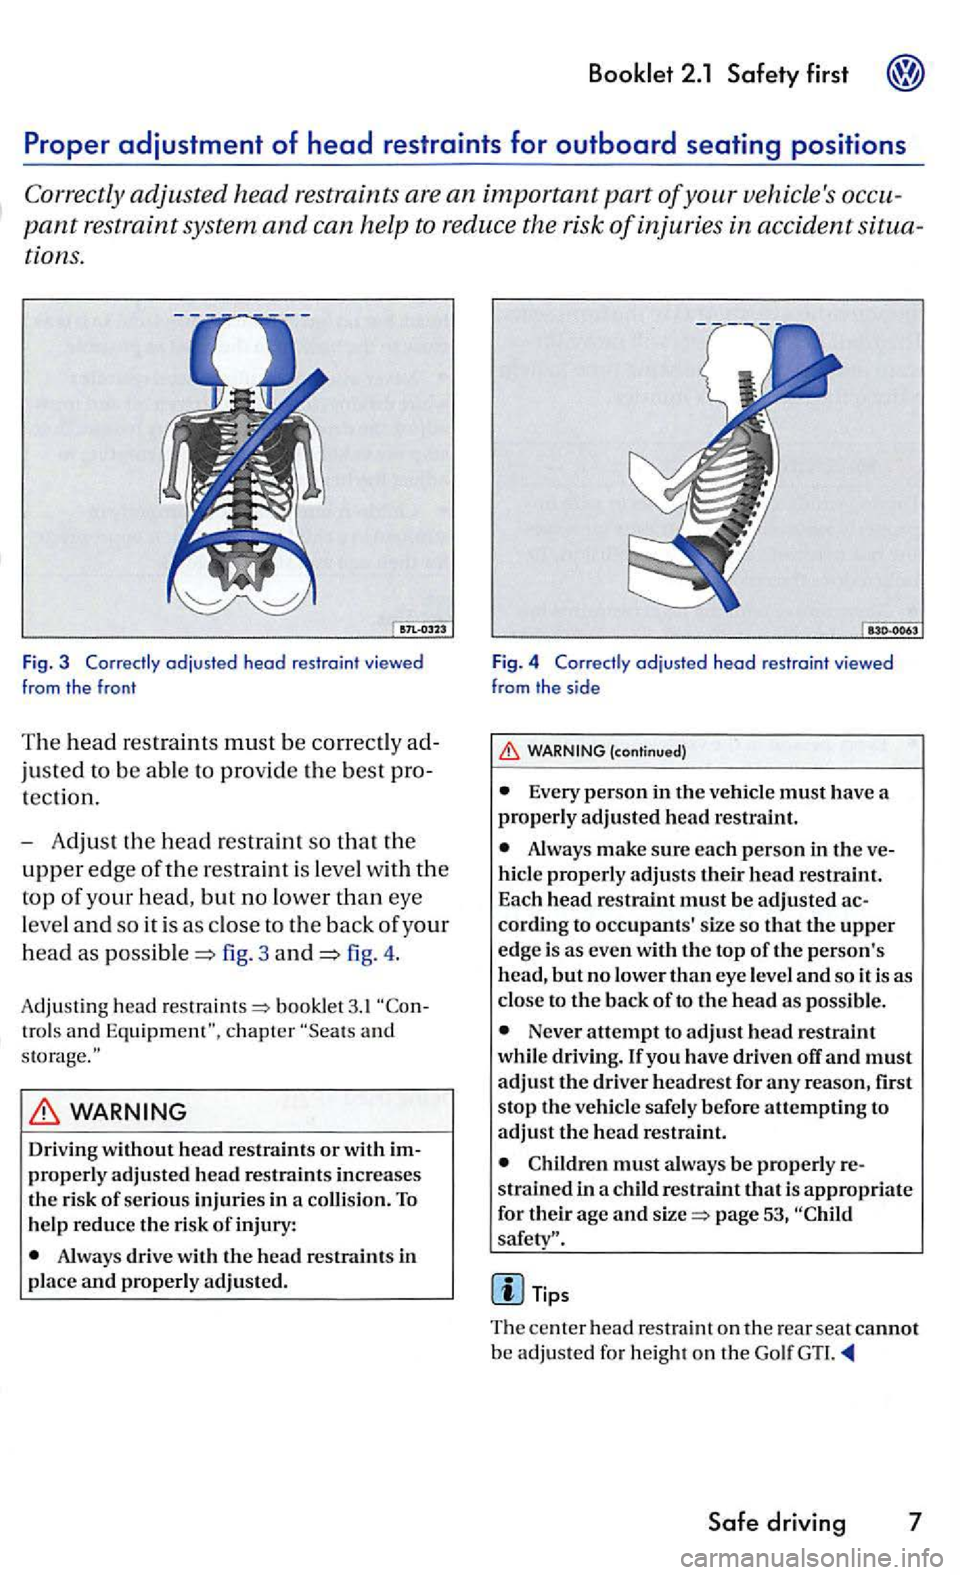
Fig. 3 Correctly adjusted head res traint viewed
from the fron t
The head restraints must be
justed to be
tection.
Adjust the head restrain t so that the
upper edge ofthe restraint is w ith the
top of your head, but no
and so it is as to t he back of your
hea d as fig. 3 and fig. 4 .
Adju stin g head booklet 3. t and
Driving without head restraints or with prot>erly adjusted head restraints increases the risk of se rious injuries in a collision. To help reduce the risk of injury:
Always drive with the head restraints in
place and properly adjust ed.
F ig . 4 Correctly adjusted head rest rain t viewed
from the side
WARNING (continued)
Every person in the ve hicl e must have a properly adjusted hea d restraint.
Always make sure each person in the
cordin g to occupants' size so that upper edge is as eve n with the top of the person's hea d, but no low er th an eye level and so it is as
close t o the bac k of to the hea d as poss ible.
Never attempt to adjust head r estraint while driving. lfyou have d rive n off and must ad ju st driver headrest for an y reason, stop the ve hicle safe ly before attemptin g to adjust the head rest ra int.
must always be properly
page
The center head res trai nt on th e rear seat cannot be adjusted fo r height on th e Golf GTI.
Page 96 of 444
WARNING
Driving head restraint s or with im
properly adjusted head restraints increases
t h e risk of seriou s injuries in a co llision.
To help reduce the risk of injury:
Always drive with the head restraints in
place and properly adjusted. Remember that the rear center head restraint is not height ad
justable and that it must be rai sed up all the way whenever the center rear seat is occupied.
Every person in the vehicl e must have a
properly adjusted head restraint.
Always make sure each person in th e ve
hicle properly adjusts their head restraint.
Neve r attempt to adjust head restraint while driving. If you have driven off and must
adju st the driver headres t for any reason, first
stop the vehicl e sa fely before attempting to adjust th e head restraint.
Childre n must always be properly re
stra ined in a child restraint that is appropriate
for their age and page 53.
Tips
The active front hea d restr aint s ca n al so activate
w he n a passenge r pushe s up again st the backrest with enou gh force (for exampl e if yo u let
yourse lf ju st fall into the seat abruptly) or if th e
h ead restraint is pu shed from behind . Th is is
no rmal and
will not damage the he ad rest ra int. It will go back to it s origina l posit ion right
The followin g lists only some of th e pos ition s
that will increase the risk of seriou s injury and
death.
n eve r stand up in the vehicl e
neve r stand on th e sea ts
n eve r knee l on the seat s
neve r lie do wn on th e rear seat
Page 109 of 444
Booklet 2.1 Safety first
Safety
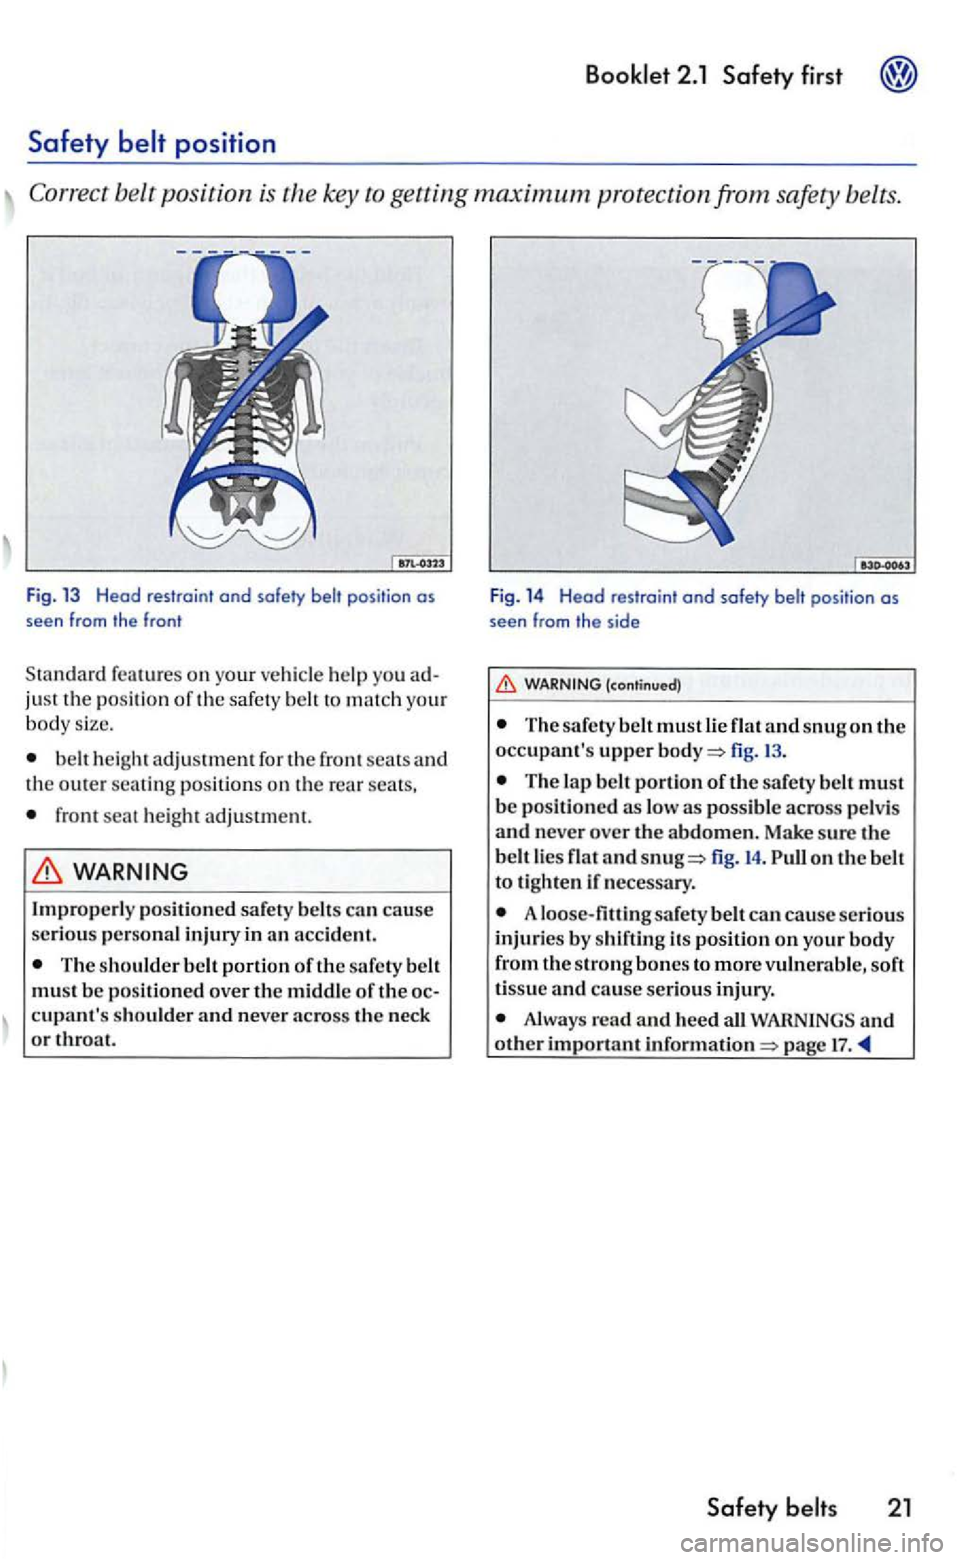
key to getting maximum protection from
help you ad
ju st the position of th e safe ty belt to mat ch your body size.
b elt he ig ht ad justment for th e front seats a nd
th e outer se atin g pos ition s on the rear se ats,
front seat height adju stment.
(con tinued)
The safety belt must lie flat and snug on the occupant's upper fig. 13 .
T he lap belt portion of the safety belt must be positioned as
fig. 14 . on the b elt
to tighte n if ne cess ary.
A loose-filli ng safety belt can cause serious
injuri es by shifting its position on your body
from the strong bone s to more v ulnerabl e, soft tissue and cause seriou s injury.
Always read and heed all a n d other important infor matio n 17.
Safety belts 21
Page 113 of 444
Unbuckle the safety belt with the red re lease button only after the vehicle has
stopp ed.
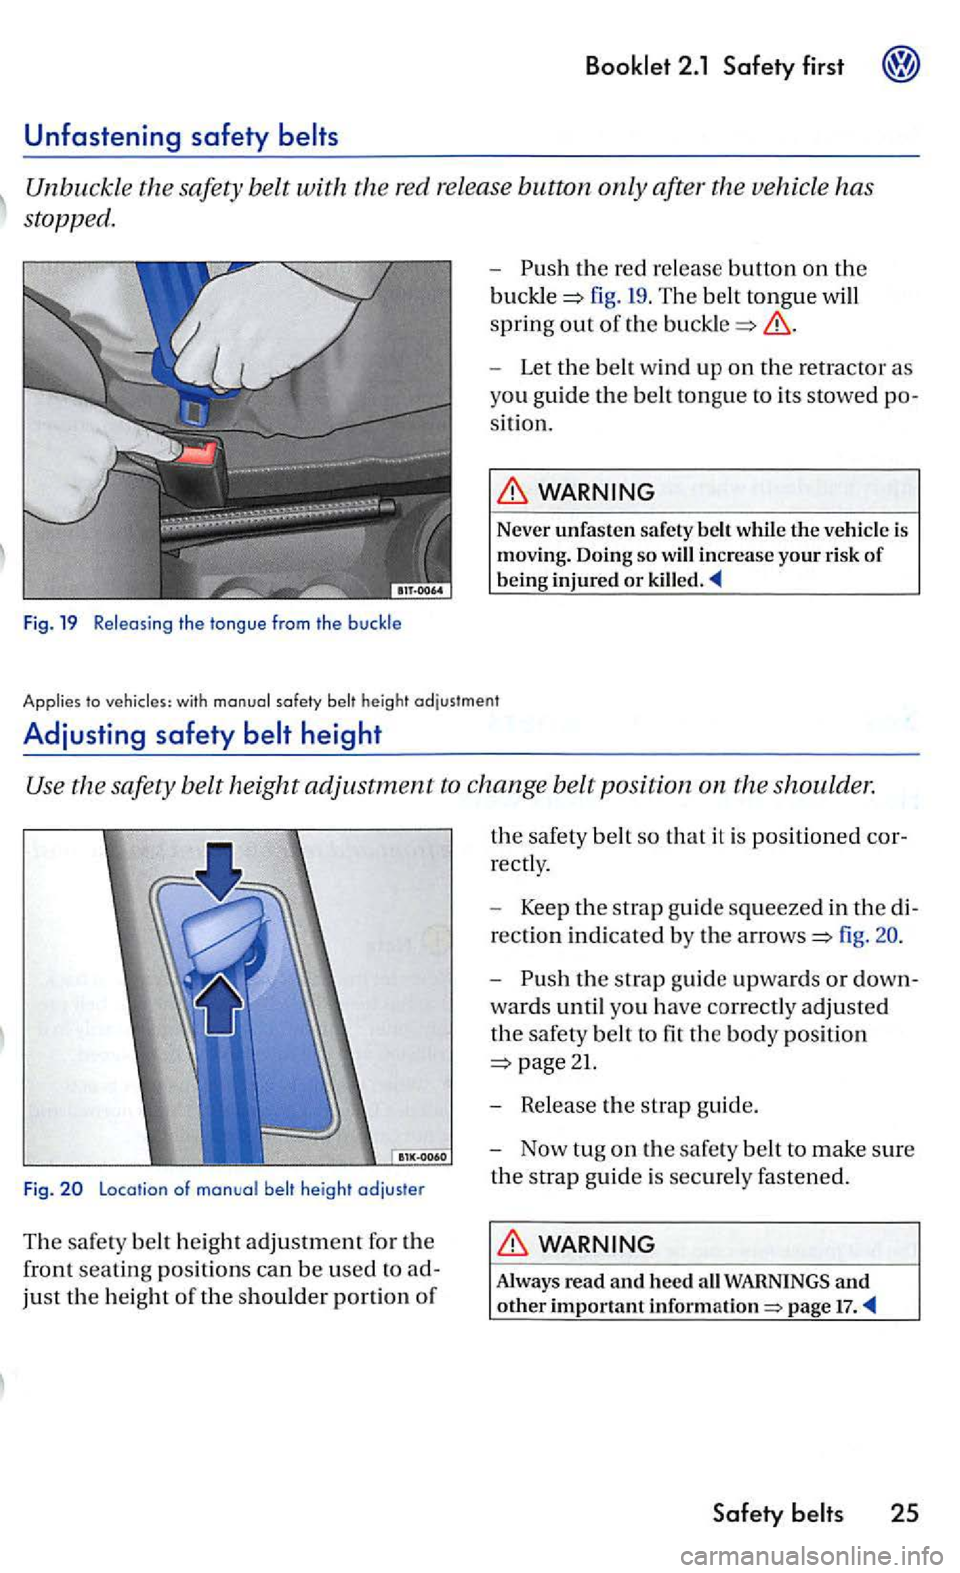
Fig. 19 Relea sing the tongue from the buckle
-the red re lease butto n on the
fig. 19 . The belt tongue will
s p ri
ng out of th e
WARNING
Never unfaste n safet y belt while the vehicle is
moving. Doing so will increase your risk of being injured or
to h eight adjustment
Adju sting safety
the safety belt height adjustm ent to ch ange belt position on th e shoulde r.
Fig. Location of manual belt height adjuster
The b e lt heig ht adjusunent for th e
fron t
seating pos it ion s ca n be used to ad
just the heig ht of th e should er porti on of
the safety belt so that i t is posit ioned cor
r
ectly .
-
Keep the s trap guid e squeeze d in the di
r
ection indicate d by th e fig.
-
WARNING
Always read and hee d WARNINGS and other important page 17.
Page 227 of 444
and Equipment
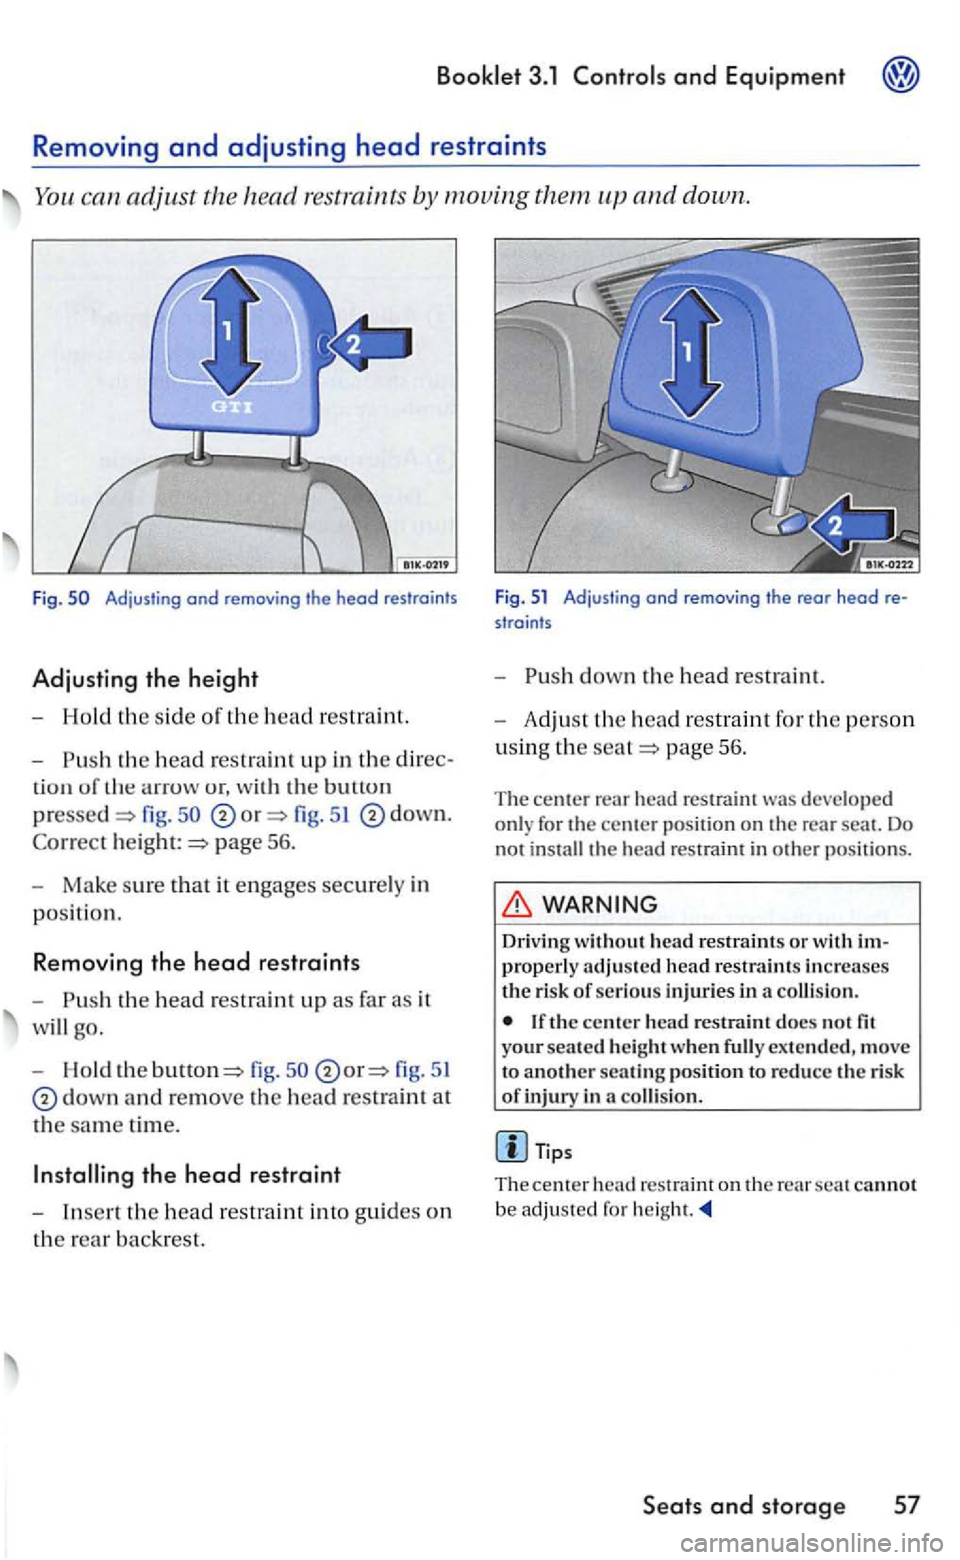
adjust the head by moving them
u r, w ith bullun
pressed fig. 51 down.
page 56.
- M ake sure tha t it engages securely in
position.
Removing the head restraint s
-
th e fig . fig. 51
down and remove th e head restraint at
the sam e time.
th e head restraint in to guides on
the rear backrest .
F ig. 51 Adjusting and removing the rear head re
straints
-
page 56.
T he ce nter r
ear h ead res train t deve lo p ed
o nly for the center p osition on th e rear seat. Do
not install the head restraint in oth er p ositio ns.
Driving without h ead restrain ts or
th e ce nter head restra int do cs not fit your seated h eig h t w he n full y exte nded, move
t o another s ea tin g posi tion to reduce the risk of inj ury in a collis ion.
Tips
The ce n te r h ead
res traint on the rear scat ca nn ot
b e a dju ste d fo r height.
Seats and storage 57
Page 228 of 444
adjustable front seats
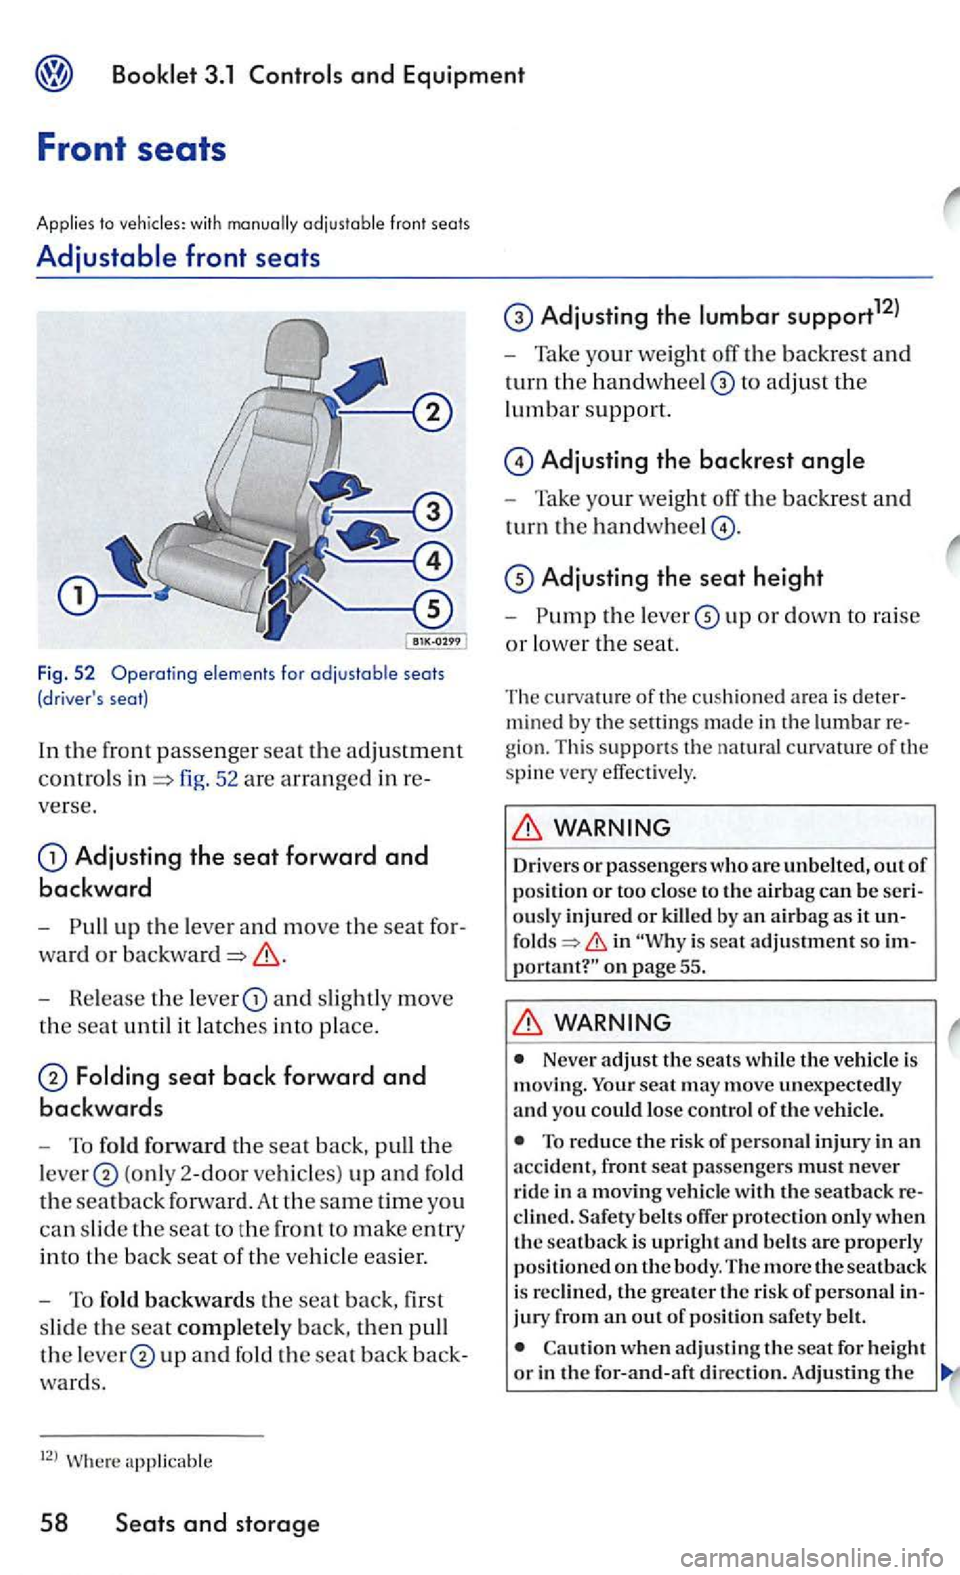
fig. 52 are arranged in
Adjusting the seat forward and
backward
-up the lever and move the seat
ward or
- Release the lever and slig htl y move
the seat until it la tches into place .
seat bock forward and
backwards
-To fold forward th e seat back, pull tl1e
(only 2-door vehicles) up and fold
th e
seatback At th e same time you
can slid e th e seat to th e front to make entry
into t he bac k seat of the vehicl e easier.
- To fold backwards the seat back, first
s lide the seat completely back, then pull
th e up and fold th e seat back
W here appl icabl e
58 and storage
Adjusting the support12l
-Take your weight off the backrest and
turn the to adjust the
lumbar support.
Adju sting the backrest
- Take your weight off the backrest and
turn the
up or down to raise
or lower the seat.
T he curvature of the cu shioned area is mined by the senings made in th e lumbar gio n. This s up pons the natural curvature of the spine ve ry effect ively.
WARNING
Drivers or passen gers who are unbelted, out of positio n or too close to the airbag can be
in is seat adjustment so on page 55 .
WARNING
Never adjust the seats whil e th e ve hicle is
moving. seat may mov e unexpected ly
a nd you could lose control of the vehicle.
To reduce the risk of personal injury in an accide nt, front seat passengers must n eve r
ride in a moving ve hicl e with the seatback
jury from an out of position safety belt.
when adjusting the seat for height or in the far-and-aft di rec tio n. Adjusting th e