2007 SUBARU TRIBECA tires
[x] Cancel search: tiresPage 288 of 377
In case of emergency 9-17
– CONTINUED –
4. Tighten the towing hook securely using
a wheel nut wrench.
After towing, remove the towing hook from
the vehicle and stow it in the tool bag.
Put the thread hole cover on the rear
bumper.
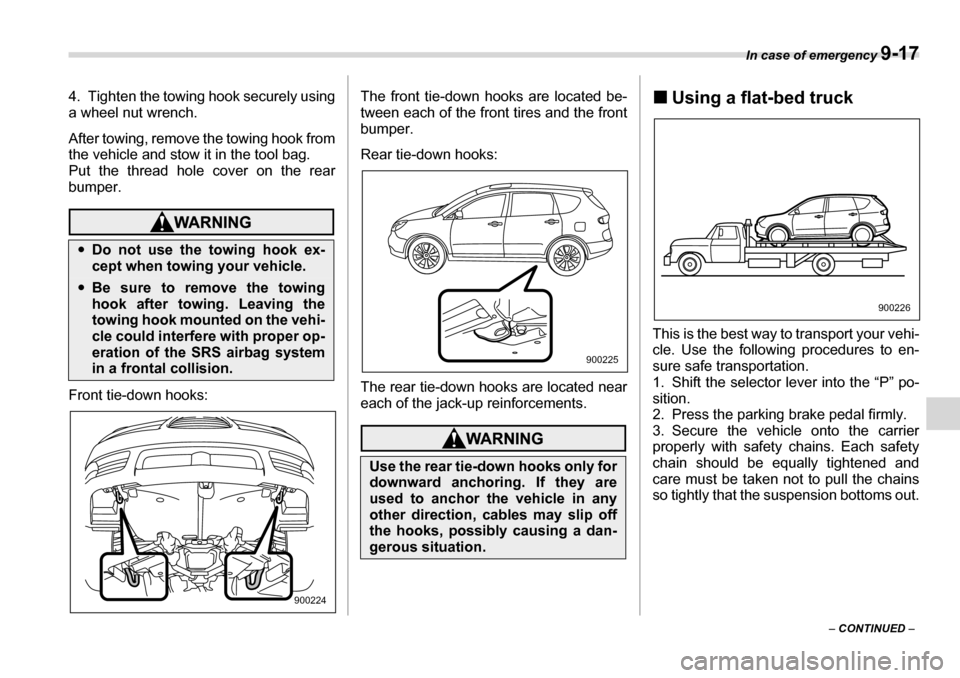
Front tie-down hooks:
The front tie-down hooks are located be-
tween each of the front tires and the front
bumper.
Rear tie-down hooks:
The rear tie-down hooks are located near
each of the jack-up reinforcements.
�„
Using a flat-bed truck
This is the best way to transport your vehi-
cle. Use the following procedures to en-
sure safe transportation.
1. Shift the selector lever into the “P” po-sition.
2. Press the parking brake pedal firmly.
3. Secure the vehicle onto the carrier
properly with safety chains. Each safety
chain should be equally tightened and
care must be taken not to pull the chains
so tightly that the suspension bottoms out.
�y Do not use the towing hook ex-
cept when towing your vehicle.
�yBe sure to remove the towing
hook after towing. Leaving the
towing hook mounted on the vehi-
cle could interfere with proper op-
eration of the SRS airbag system
in a frontal collision.
900224
Use the rear tie-down hooks only for
downward anchoring. If they are
used to anchor the vehicle in any
other direction, cables may slip off
the hooks, possibly causing a dan-
gerous situation.
900225
900226
Page 291 of 377
9-20 In case of emergency
the cargo area.
For how to use the jack, refer to the “Flat
tires” section in this chapter.
Page 298 of 377
11
Maintenance and service
Maintenance schedule ....................................... 11-3
Maintenance precautions .................................. 11-3 Before checking or servicing in the engine compartment ........................................................ 11-4
When you do checking or servicing in the
engine compartment while the engine is
running .................................................................. 11-4
Engine hood ....................................................... 11-4
Engine compartment overview ......................... 11-6
Engine oil ............................................................ 11-7 Checking the oil level ............................................. 11-7
Changing the oil and oil filter ................................ 11-7
Recommended grade and viscosity ..................... 11-9
Recommended grade and viscosity under severe driving conditions .................................... 11-10
Cooling system .................................................. 11-10 Hose and connections ........................................... 11-11
Engine coolant ........................................................ 11-11
Air cleaner element ............................................ 11-13 Replacing the air cleaner element ......................... 11-13
Spark plugs ......................................................... 11-14 Recommended spark plugs ................................... 11-14
Drive belts ........................................................... 11-15
Automatic transmission fluid ............................ 11-15 Checking the fluid level ......................................... 11-15
Recommended fluid ............................................... 11-16
Front differential gear oil ................................... 11-16 Checking the oil level ............................................. 11-16 Recommended grade and viscosity ..................... 11-17
Rear differential gear oil .................................... 11-17 Checking the gear oil level .................................... 11-17
Recommended grade and viscosity ..................... 11-18
Power steering fluid ........................................... 11-19 Checking the fluid level .......................................... 11-19
Recommended fluid ............................................... 11-19
Brake fluid ........................................................... 11-20 Checking the fluid level .......................................... 11-20
Recommended brake fluid ..................................... 11-20
Brake booster ..................................................... 11-21
Brake pedal ......................................................... 11-21 Checking the brake pedal free play ...................... 11-21
Checking the brake pedal reserve distance ......... 11-21
Replacement of brake pad and lining ............... 11-22 Breaking-in of new brake pads and linings .......... 11-22
Parking brake stroke .......................................... 11-23
Tires and wheels ................................................ 11-23 Types of tires .......................................................... 11-23
Tire pressure monitoring system (TPMS) ............ 11-23
Tire inspection ........................................................ 11-25
Tire pressures and wear ........................................ 11-25
Wheel balance ......................................................... 11-27
Wear indicators ....................................................... 11-27
Tire rotation ............................................................. 11-28
Tire replacement ..................................................... 11-28
Wheel replacement ................................................. 11-29
Aluminum wheels ............................................... 11-29
Page 320 of 377
Maintenance and service 11 - 2 3
– CONTINUED –
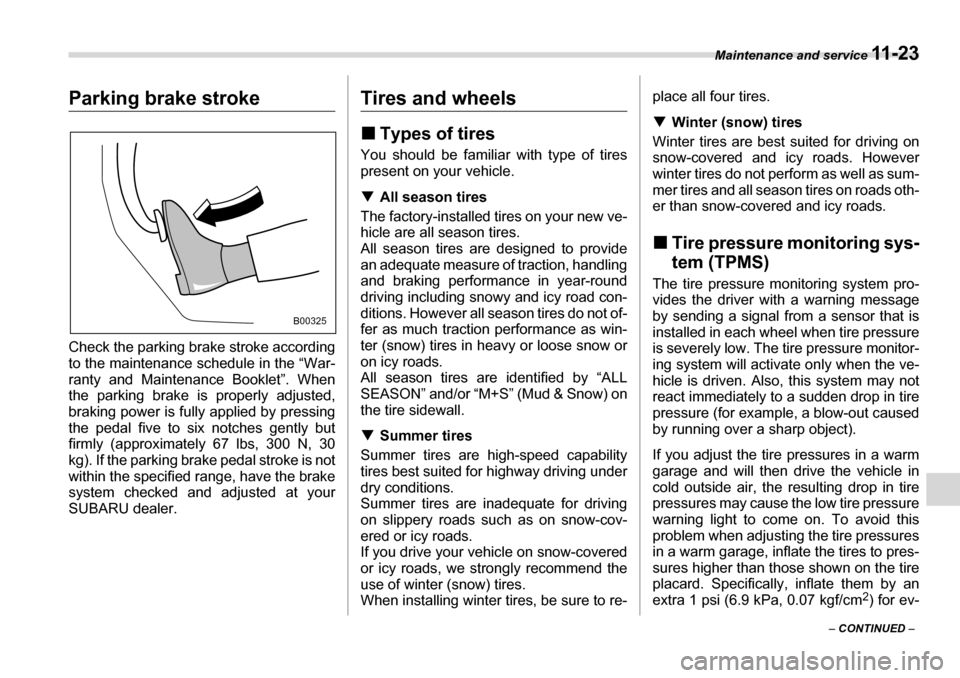
Parking brake stroke
Check the parking brake stroke according
to the maintenance schedule in the “War-
ranty and Maintenance Booklet”. When
the parking brake is properly adjusted,
braking power is fully applied by pressing
the pedal five to six notches gently but
firmly (approximately 67 lbs, 300 N, 30
kg). If the parking brake pedal stroke is not
within the specified range, have the brake
system checked and adjusted at your
SUBARU dealer.Tires and wheels �„Types of tires
You should be familiar with type of tires
present on your vehicle. �T All season tires
The factory-installed tires on your new ve-
hicle are all season tires.
All season tires are designed to provide
an adequate measure of traction, handling
and braking performance in year-round
driving including snowy and icy road con-
ditions. However all season tires do not of-
fer as much traction performance as win-
ter (snow) tires in heavy or loose snow or
on icy roads.
All season tires are identified by “ALL
SEASON” and/or “M+S” (Mud & Snow) on
the tire sidewall. �T Summer tires
Summer tires are high-speed capability
tires best suited for highway driving under
dry conditions.
Summer tires are inadequate for driving
on slippery roads such as on snow-cov-
ered or icy roads.
If you drive your vehicle on snow-covered
or icy roads, we strongly recommend the
use of winter (snow) tires.
When installing winter tires, be sure to re- place all four tires. �T
Winter (snow) tires
Winter tires are best suited for driving on
snow-covered and icy roads. However
winter tires do not perform as well as sum-
mer tires and all season tires on roads oth-
er than snow-covered and icy roads. �„ Tire pressure monitoring sys- tem (TPMS)
The tire pressure monitoring system pro-
vides the driver with a warning message
by sending a signal from a sensor that is
installed in each wheel when tire pressure
is severely low. The tire pressure monitor-
ing system will activate only when the ve-
hicle is driven. Also, this system may not
react immediately to a sudden drop in tire
pressure (for example, a blow-out caused
by running over a sharp object).
If you adjust the tire pressures in a warm
garage and will then drive the vehicle in
cold outside air, the resulting drop in tire
pressures may cause the low tire pressure
warning light to come on. To avoid this
problem when adjusting the tire pressures
in a warm garage, inflate the tires to pres-
sures higher than those shown on the tire
placard. Specifically, inflate them by an
extra 1 psi (6.9 kPa, 0.07 kgf/cm 2
) for ev-
B00325
Page 321 of 377
11 - 2 4 Maintenance and service
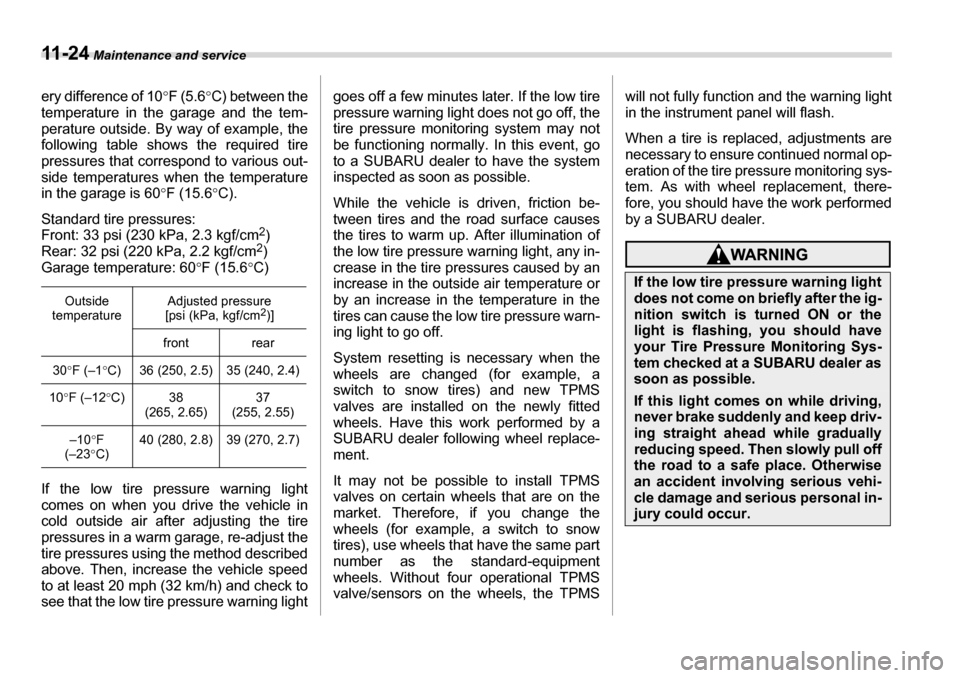
ery difference of 10 °F (5.6 °C) between the
temperature in the garage and the tem-
perature outside. By way of example, the
following table shows the required tire
pressures that correspond to various out-
side temperatures when the temperature
in the garage is 60 °F (15.6 °C).
Standard tire pressures:
Front: 33 psi (230 kPa, 2.3 kgf/cm 2
)
Rear: 32 psi (220 kPa, 2.2 kgf/cm 2
)
Garage temperature: 60 °F (15.6 °C)
If the low tire pressure warning light
comes on when you drive the vehicle in
cold outside air after adjusting the tire
pressures in a warm garage, re-adjust the
tire pressures using the method described
above. Then, increase the vehicle speed
to at least 20 mph (32 km/h) and check to
see that the low tire pressure warning light goes off a few minutes later. If the low tire
pressure warning light does not go off, the
tire pressure monitoring system may not
be functioning normally. In this event, go
to a SUBARU dealer to have the system
inspected as soon as possible.
While the vehicle is driven, friction be-
tween tires and the road surface causes
the tires to warm up. After illumination of
the low tire pressure warning light, any in-
crease in the tire pressures caused by an
increase in the outside air temperature or
by an increase in the temperature in the
tires can cause the low tire pressure warn-
ing light to go off.
System resetting is necessary when the
wheels are changed (for example, a
switch to snow tires) and new TPMS
valves are installed on the newly fitted
wheels. Have this work performed by a
SUBARU dealer following wheel replace- ment.
It may not be possible to install TPMS
valves on certain wheels that are on the
market. Therefore, if you change the
wheels (for example, a switch to snow
tires), use wheels that have the same part
number as the standard-equipment
wheels. Without four operational TPMS
valve/sensors on the wheels, the TPMS
will not fully function and the warning light
in the instrument panel will flash.
When a tire is replaced, adjustments are
necessary to ensure continued normal op- eration of the tire pressure monitoring sys-
tem. As with wheel replacement, there-
fore, you should have the work performed
by a SUBARU dealer.
Outside
temperature Adjusted pressure
[psi (kPa, kgf/cm 2
)]
front rear
30 °F (–1 °C) 36 (250, 2.5) 35 (240, 2.4)
10 °F (–12 °C) 38
(265, 2.65) 37
(255, 2.55)
–10 °F
(–23 °C) 40 (280, 2.8) 39 (270, 2.7)
If the low tire pressure warning light
does not come on briefly after the ig-
nition switch is turned ON or the
light is flashing, you should have
your Tire Pressure Monitoring Sys-
tem checked at a SUBARU dealer as
soon as possible.
If this light comes on while driving,
never brake suddenly and keep driv-
ing straight ahead while gradually
reducing speed. Then slowly pull off
the road to a safe place. Otherwise
an accident involving serious vehi-
cle damage and serious personal in-
jury could occur.
Page 322 of 377
Maintenance and service 11 - 2 5
– CONTINUED –
�„
Tire inspection
Check on a daily basis that the tires are
free from serious damage, nails, and
stones. At the same time, check the tires
for abnormal wear.
Contact your SUBARU dealer immediate-
ly if you find any problem.
NOTE �y When the wheels and tires strike curbs or are subjected to harsh treat-
ment as when the vehicle is driven on a
rough surface, they can suffer damage
that cannot be seen with the naked eye.
This type of damage does not become
evident until time has passed. Try not
to drive over curbs, potholes or on oth-
er rough surfaces. If doing so is un-
avoidable, keep the vehicle’s speed
down to a walking pace or less, and ap-
proach the curbs as squarely as possi-
ble. Also, make sure the tires are not
pressed against the curb when you
park the vehicle. �y
If you feel unusual vibration while
driving or find it difficult to steer the ve-
hicle in a straight line, one of the tires
and/or wheels may be damaged. Drive
slowly to the nearest authorized
SUBARU dealer and have the vehicle
inspected. �„ Tire pressures and wear
Maintaining the correct tire pressures
helps to maximize the tires’ service lives
and is essential for good running perfor-
mance. Check and, if necessary, adjust
the pressure of each tire (including the
spare) at least once a month (for example,
during a fuel stop) and before any long
journey. Check the tire pressures when the tires
are cold. Use a pressure gauge to adjust
the tire pressures to the values shown on
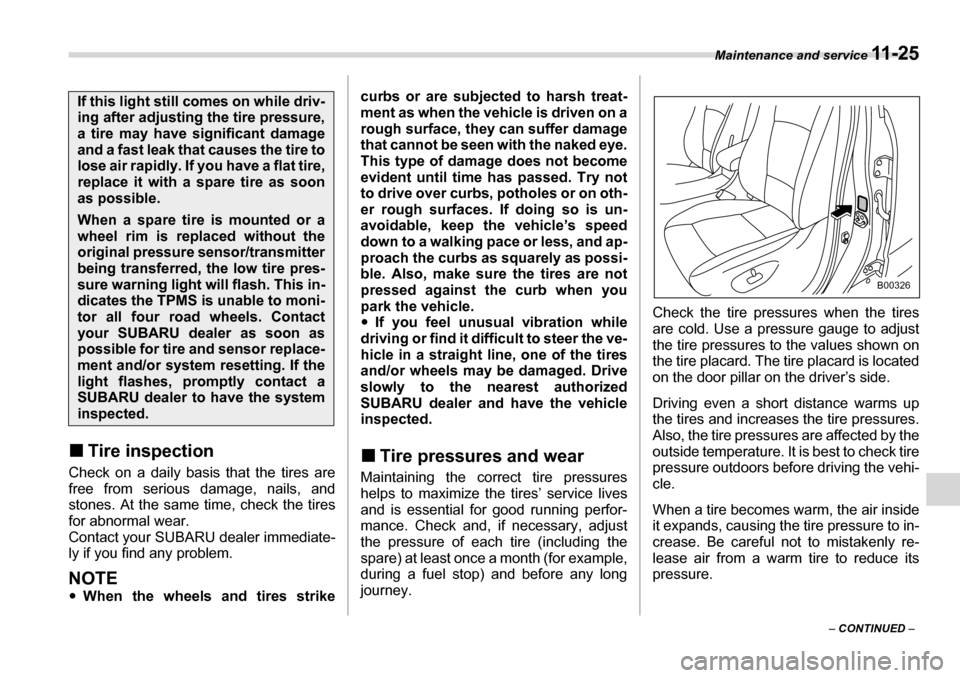
the tire placard. The tire placard is located
on the door pillar on the driver’s side.
Driving even a short distance warms up
the tires and increases the tire pressures. Also, the tire pressures are affected by the
outside temperature. It is best to check tire
pressure outdoors before driving the vehi- cle.
When a tire becomes warm, the air inside
it expands, causing the tire pressure to in-
crease. Be careful not to mistakenly re-
lease air from a warm tire to reduce its
pressure.
If this light still comes on while driv-
ing after adjusting the tire pressure,
a tire may have significant damage
and a fast leak that causes the tire to
lose air rapidly. If you have a flat tire,
replace it with a spare tire as soon
as possible.
When a spare tire is mounted or a
wheel rim is replaced without the
original pressure sensor/transmitter
being transferred, the low tire pres-
sure warning light will flash. This in-
dicates the TPMS is unable to moni-
tor all four road wheels. Contact
your SUBARU dealer as soon as
possible for tire and sensor replace-
ment and/or system resetting. If the
light flashes, promptly contact a
SUBARU dealer to have the system
inspected.
B00326
Page 323 of 377
11 - 2 6 Maintenance and service
NOTE �yThe air pressure in a tire increases
by approximately 4.3 psi (30 kPa, 0.3
kgf/cm 2
) when the tire becomes warm.
�y The tires are considered cold when
the vehicle has been parked for at least
three hours or has been driven less
than one mile (1.6 km).
Incorrect tire pressures detract from con-
trollability and ride comfort, and they
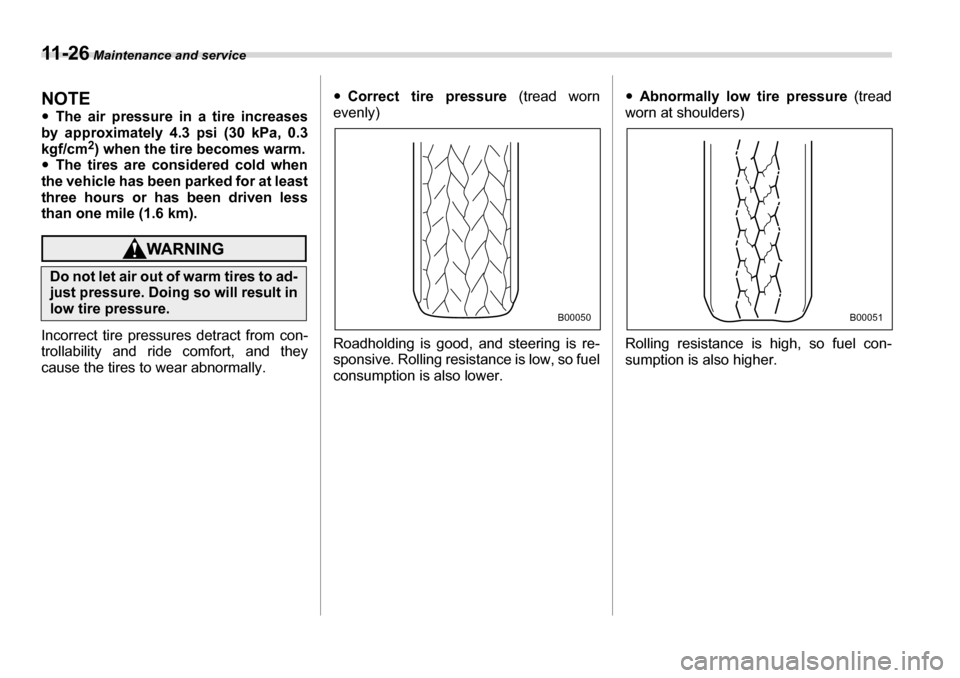
cause the tires to wear abnormally. �y
Correct tire pressure (tread worn
evenly)
Roadholding is good, and steering is re-
sponsive. Rolling resistance is low, so fuel
consumption is also lower. �y
Abnormally low tire pressure (tread
worn at shoulders)
Rolling resistance is high, so fuel con-
sumption is also higher.
Do not let air out of warm tires to ad-
just pressure. Doing so will result in
low tire pressure.
B00050B00051
Page 324 of 377
Maintenance and service 11 - 2 7
– CONTINUED –
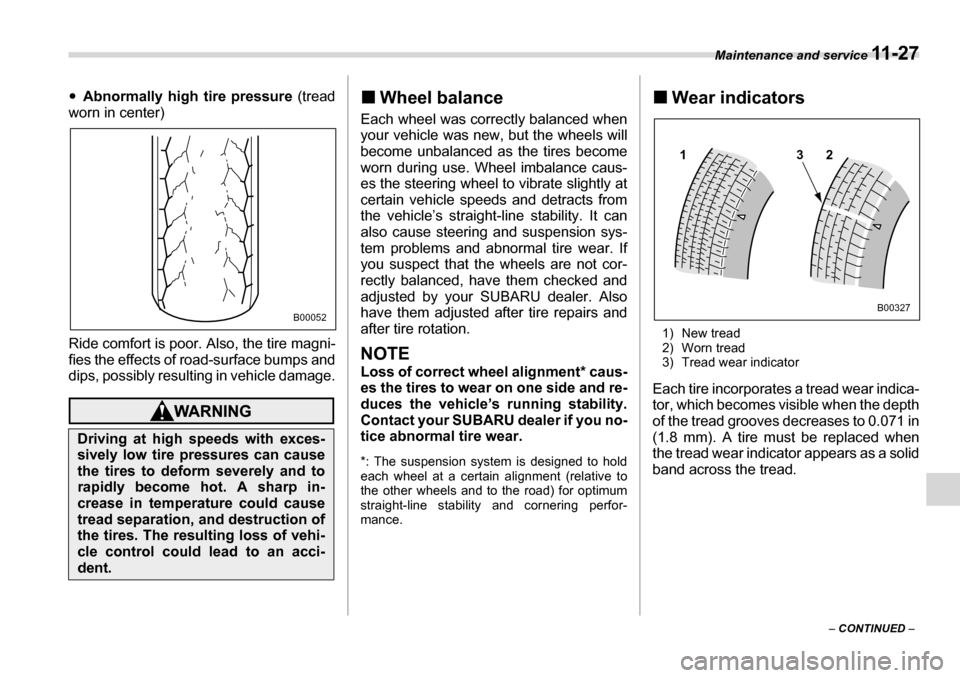
�y
Abnormally high tire pressure (tread
worn in center)
Ride comfort is poor. Also, the tire magni-
fies the effects of road-surface bumps and
dips, possibly resulting in vehicle damage.
�„ Wheel balance
Each wheel was correctly balanced when
your vehicle was new, but the wheels will
become unbalanced as the tires become
worn during use. Wheel imbalance caus-
es the steering wheel to vibrate slightly at
certain vehicle speeds and detracts from
the vehicle’s straight-line stability. It can
also cause steering and suspension sys-
tem problems and abnormal tire wear. If
you suspect that the wheels are not cor-
rectly balanced, have them checked and
adjusted by your SUBARU dealer. Also
have them adjusted after tire repairs and
after tire rotation.
NOTE
Loss of correct wheel alignment* caus-
es the tires to wear on one side and re-
duces the vehicle’s running stability.
Contact your SUBARU dealer if you no-
tice abnormal tire wear.
*: The suspension system is designed to hold
each wheel at a certain alignment (relative to
the other wheels and to the road) for optimum
straight-line stability and cornering perfor-
mance. �„
Wear indicators
1) New tread
2) Worn tread
3) Tread wear indicator
Each tire incorporates a tread wear indica-
tor, which becomes visible when the depth
of the tread grooves decreases to 0.071 in
(1.8 mm). A tire must be replaced when
the tread wear indicator appears as a solid
band across the tread.
Driving at high speeds with exces-
sively low tire pressures can cause
the tires to deform severely and to
rapidly become hot. A sharp in-
crease in temperature could cause
tread separation, and destruction of
the tires. The resulting loss of vehi-
cle control could lead to an acci-
dent.
B00052
12 3
B00327