2007 SUBARU TRIBECA lock
[x] Cancel search: lockPage 330 of 377
Maintenance and service 11 - 3 3
– CONTINUED –
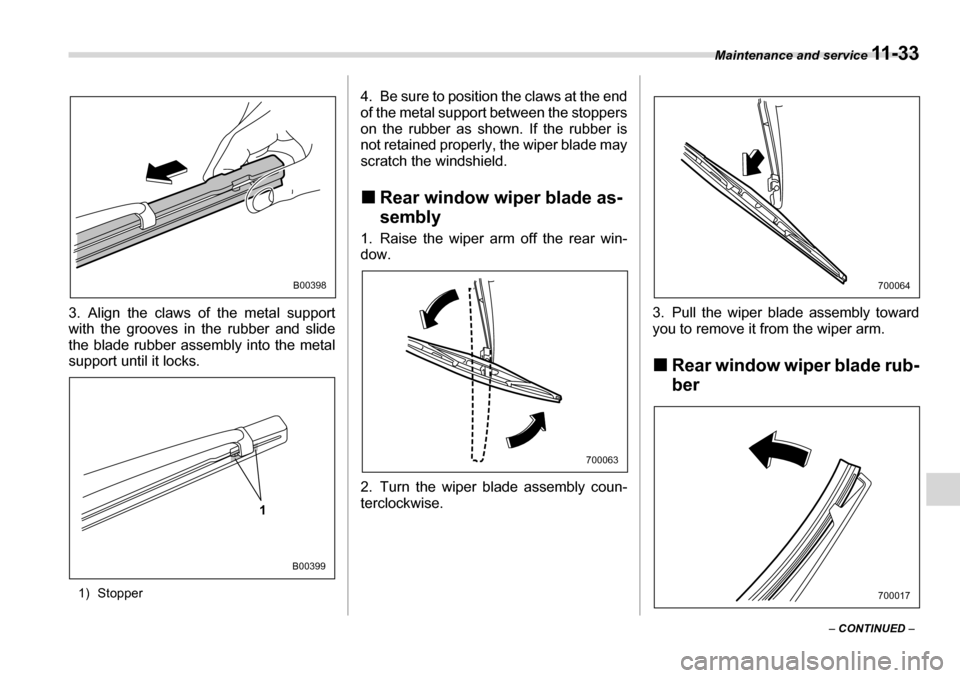
3. Align the claws of the metal support
with the grooves in the rubber and slide
the blade rubber assembly into the metal
support until it locks.
1) Stopper 4. Be sure to position the claws at the end
of the metal support between the stoppers
on the rubber as shown. If the rubber is
not retained properly, the wiper blade may
scratch the windshield. �„
Rear window wiper blade as- sembly
1. Raise the wiper arm off the rear win-
dow.
2. Turn the wiper blade assembly coun-
terclockwise. 3. Pull the wiper blade assembly toward
you to remove it from the wiper arm. �„
Rear window wiper blade rub- ber
B00398
1
B00399
700063
700064
700017
Page 331 of 377
11 - 3 4 Maintenance and service
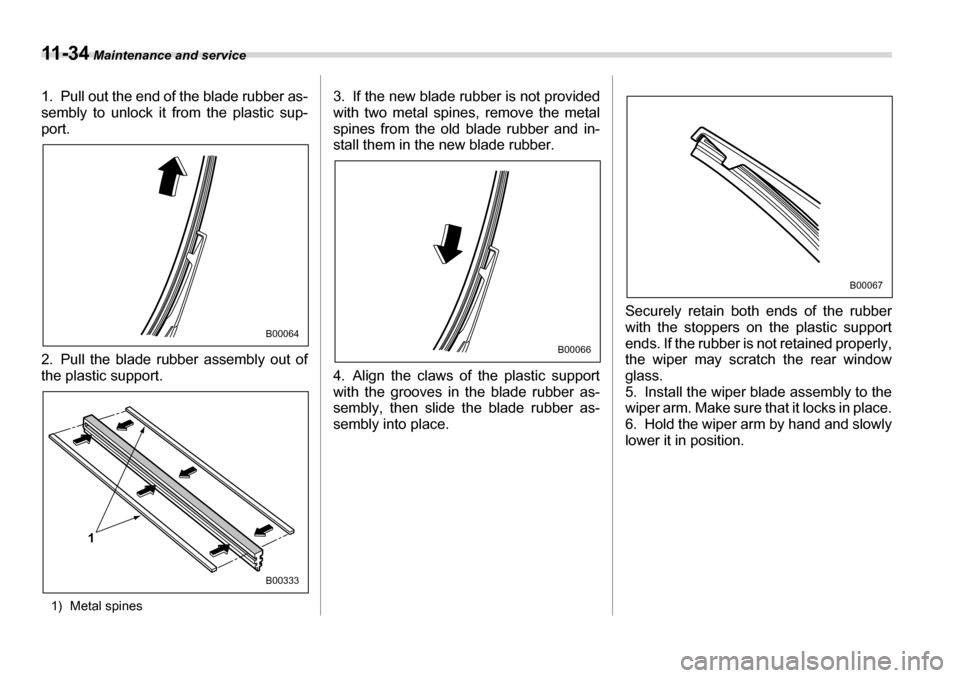
1. Pull out the end of the blade rubber as-
sembly to unlock it from the plastic sup-
port.
2. Pull the blade rubber assembly out of
the plastic support.
1) Metal spines 3. If the new blade rubber is not provided
with two metal spines, remove the metal
spines from the old blade rubber and in-
stall them in the new blade rubber.
4. Align the claws of the plastic support
with the grooves in the blade rubber as-
sembly, then slide the blade rubber as-
sembly into place.
Securely retain both ends of the rubber
with the stoppers on the plastic support
ends. If the rubber is not retained properly,
the wiper may scratch the rear window
glass.
5. Install the wiper blade assembly to the
wiper arm. Make sure that it locks in place.
6. Hold the wiper arm by hand and slowly
lower it in position.
B00064
1
B00333
B00066
B00067
Page 334 of 377

Maintenance and service 11 - 3 7
1) Good
2) Blown
If any lights, accessories or other electri-
cal controls do not operate, inspect the
corresponding fuse. If a fuse has blown,
replace it.
1. Turn the ignition switch to the “LOCK”
position and turn off all electrical accesso- ries.
2. Remove the cover.
3. Determine which fuse may be blown.
The back side of each fuse box cover and
the “Fuses and circuits” section in chapter
12 in this manual show the circuit for each fuse. 4. Pull out the fuse with the fuse puller.
5. Inspect the fuse. If it has blown, re-
place it with a spare fuse of the same rat-
ing.
6. If the same fuse blows again, this indi-
cates that its system has a problem. Con-
tact your SUBARU dealer for repairs.
Main fuse
Main fuse box
The main fuses are designed to melt dur-
ing an overload to prevent damage to the
wiring harness and electrical equipment.
Check the main fuses if any electrical
component fails to operate (except the
starter motor) and other fuses are good. A
melted main fuse must be replaced. Use
only replacements with the same speci-
fied rating as the melted main fuse. If a
main fuse blows after it is replaced, havethe electrical system checked by your
nearest SUBARU dealer.
12
B00338600160
B00336
Page 338 of 377
Maintenance and service 11 - 4 1
– CONTINUED –
�T
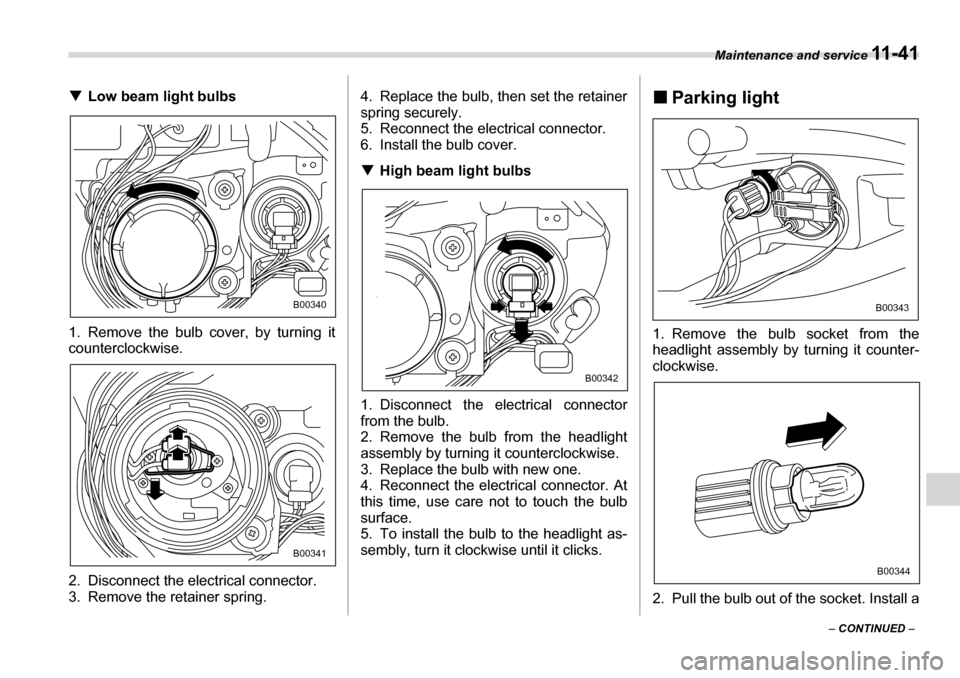
Low beam light bulbs
1. Remove the bulb cover, by turning it
counterclockwise.
2. Disconnect the electrical connector.
3. Remove the retainer spring. 4. Replace the bulb, then set the retainer spring securely.
5. Reconnect the electrical connector.
6. Install the bulb cover. �T
High beam light bulbs
1. Disconnect the electrical connector
from the bulb.
2. Remove the bulb from the headlight
assembly by turning it counterclockwise.
3. Replace the bulb with new one.
4. Reconnect the electrical connector. At
this time, use care not to touch the bulb surface.
5. To install the bulb to the headlight as-
sembly, turn it clockwise until it clicks. �„
Parking light
1. Remove the bulb socket from the
headlight assembly by turning it counter-
clockwise.
2. Pull the bulb out of the socket. Install a
B00340
B00341
B00342
B00343
B00344
Page 339 of 377
11 - 4 2 Maintenance and service
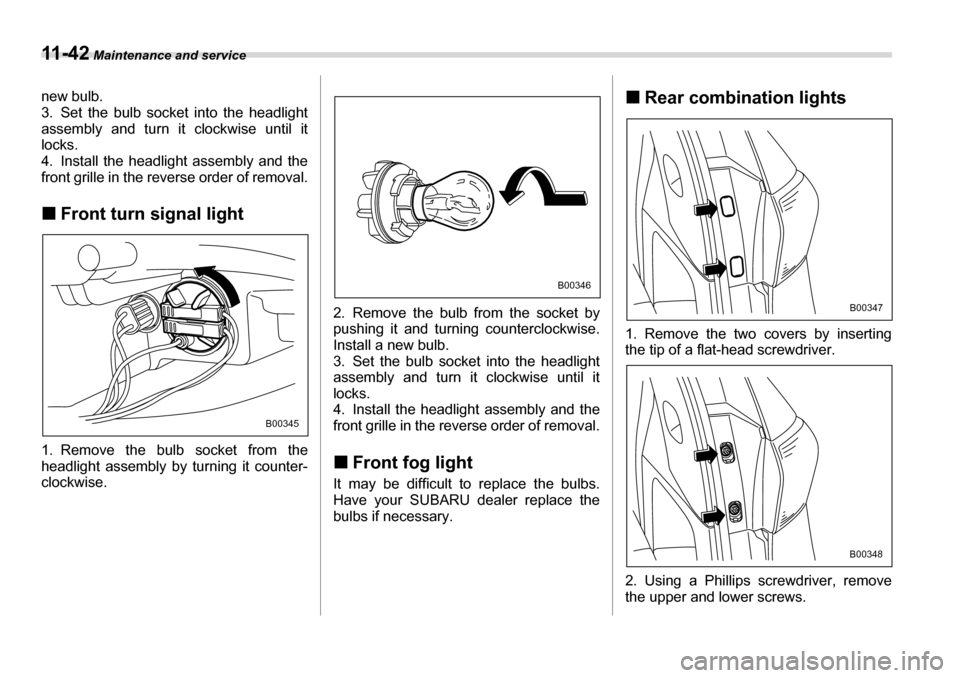
new bulb.
3. Set the bulb socket into the headlight
assembly and turn it clockwise until it
locks.
4. Install the headlight assembly and the
front grille in the reverse order of removal. �„Front turn signal light
1. Remove the bulb socket from the
headlight assembly by turning it counter- clockwise. 2. Remove the bulb from the socket by
pushing it and turning counterclockwise.
Install a new bulb.
3. Set the bulb socket into the headlight
assembly and turn it clockwise until itlocks.
4. Install the headlight assembly and the
front grille in the reverse order of removal. �„
Front fog light
It may be difficult to replace the bulbs.
Have your SUBARU dealer replace the
bulbs if necessary. �„
Rear combination lights
1. Remove the two covers by inserting
the tip of a flat-head screwdriver.
2. Using a Phillips screwdriver, remove
the upper and lower screws.
B00345
B00346
B00347
B00348
Page 340 of 377
Maintenance and service 11 - 4 3
– CONTINUED –
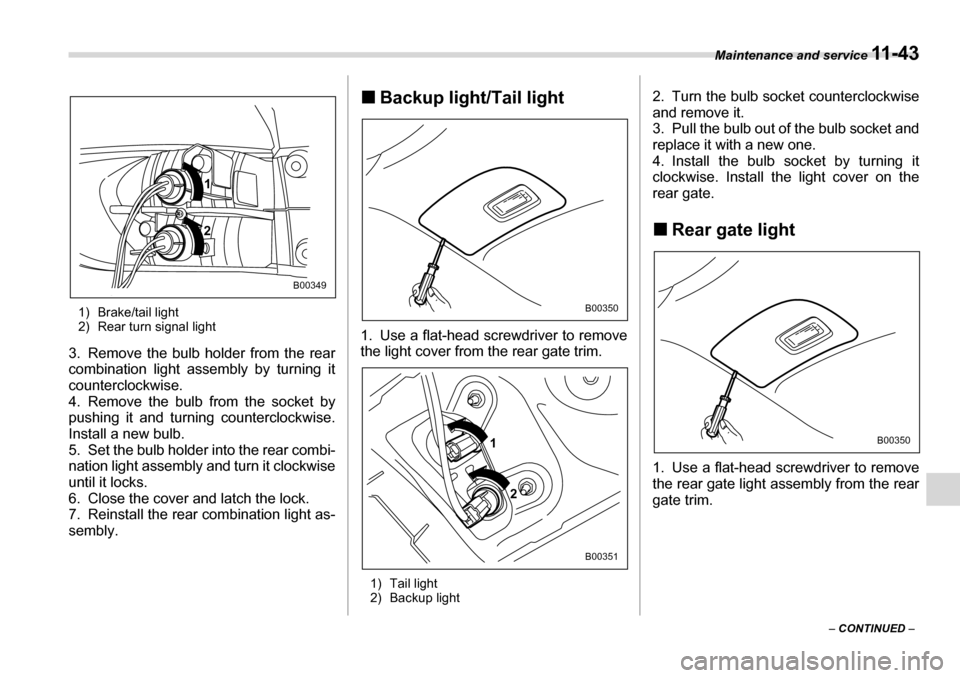
1) Brake/tail light
2) Rear turn signal light
3. Remove the bulb holder from the rear
combination light assembly by turning it
counterclockwise.
4. Remove the bulb from the socket by
pushing it and turning counterclockwise.
Install a new bulb.
5. Set the bulb holder into the rear combi-
nation light assembly and turn it clockwise
until it locks.
6. Close the cover and latch the lock.
7. Reinstall the rear combination light as-
sembly. �„
Backup light/Tail light
1. Use a flat-head screwdriver to remove
the light cover from the rear gate trim. 1) Tail light
2) Backup light 2. Turn the bulb socket counterclockwise
and remove it.
3. Pull the bulb out of the bulb socket and
replace it with a new one.
4. Install the bulb socket by turning it
clockwise. Install the light cover on the
rear gate. �„
Rear gate light
1. Use a flat-head screwdriver to remove
the rear gate light assembly from the rear
gate trim.
1
2
B00349
B00350
1
2
B00351
B00350
Page 348 of 377
Specifications 12-5
– CONTINUED –
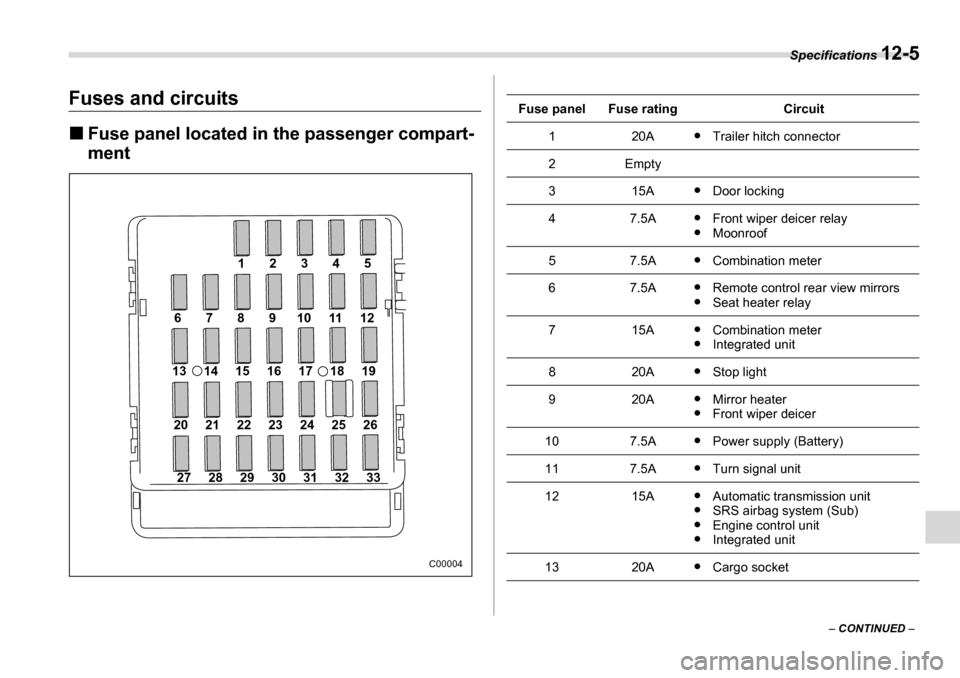
Fuses and circuits �„Fuse panel located in the passenger compart- ment
27 28 29 30 31 32 33
20 21 22 23 24 25 26
13 14 15 16 17 18 19
6789101112 12345
C00004
Fuse panelFuse ratingCircuit
120A�y
Trailer hitch connector
2Empty
315A�yDoor locking
47.5A�yFront wiper deicer relay
�y Moonroof
57.5A�yCombination meter
67.5A�yRemote control rear view mirrors
�y Seat heater relay
715A�yCombination meter
�y Integrated unit
820A�yStop light
920A�yMirror heater
�y Front wiper deicer
107.5A�yPower supply (Battery)
117.5A�yTurn signal unit
1215A�yAutomatic transmission unit
�y SRS airbag system (Sub)
�y Engine control unit
�y Integrated unit
1320A�yCargo socket
Page 369 of 377
14-2 Index
A
ABS (Anti-lock Brake System) .......................................... 7-16 Warning light ....................................................... 3-15, 7-17
Accessories .................................................................... 11-38
Accessory power outlet ...................................................... 6-8
Active head restraint ........................................................... 1-5
Air cleaner element ........................................................ 11-13
Air filtration system ........................................................... 4-11
Air flow ............................................................................... 4-2
Alarm system .................................................................... 2-14
All-Wheel Drive warning light ........................................... 3-17
Aluminum wheels ........................................................... 11-29
Antenna system ................................................................. 5-2
Anti-lock Brake System (ABS) .......................................... 7-16
Arming the system ............................................................ 2-15
Armrest ............................................................................. 1-11
AT OIL TEMPerature warning light .................................. 3-13
Audio control buttons ....................................................... 5-22
Audio set ............................................................................ 5-3
Auto-dimming mirror/compass ......................................... 3-34
Automatic climate control system ....................................... 4-5
Automatic transmission ...................................................... 7-8 Capacities .................................................................... 12-3
Fluid ........................................................................... 11-15
Manual mode ............................................................... 7-11
Selector lever ................................................................. 7-9
Shift lock release ......................................................... 7-14
Temperature warning light (AT OIL TEMP) ................. 3-13
Automatic/Emergency Locking Retractor (A/ELR) ........... 1-16 B
Battery ............................................................................ 11-35 Jump starting ............................................................... 9-11
Replacement (Remote keyless entry system) ............. 2-10
Brake
Booster ...................................................................... 11-21
Fluid ........................................................................... 11-20
Pad and lining ............................................................ 11-22
Pedal .......................................................................... 11-21
Brake pedal
Free play .................................................................... 11-21
Reserve distance ....................................................... 11-21
Brake system .................................................................... 7-15
Warning light ................................................................ 3-16
Braking ............................................................................. 7-15 Breaking-in of new brake pads and linings ................ 11-22
Tips .............................................................................. 7-15
Bulb Chart ............................................................................ 12-8
Replacing ................................................................... 11-39
C
Capacities ......................................................................... 12-3
Cargo area Light ............................................................................... 6-2
Tie-down hooks ........................................................... 6-12
Catalytic converter .............................................................. 8-3
Center Console .......................................................................... 6-5
Ventilators ...................................................................... 4-4
Changing
Flat tire ........................................................................... 9-7
Oil and oil filter ............................................................. 11-7
Charge warning light ......................................................... 3-13