Page 161 of 205
 Owners Manual 160GENERAL MAINTENANCEWarning
�In your own interest we recom-
mend using only Škoda Accesso-
ries
1) and Genuine Škoda Parts ex-
pressly approved for your car. Such
accessories and parts are your gu")
160GENERAL MAINTENANCEWarning
�In your own interest we recom-
mend using only Škoda Accesso-
ries
1) and Genuine Škoda Parts ex-
pressly approved for your car. Such
accessories and parts are your guar-
antee of reliability, safety and suit-
ability specifically for your Škoda.
� Despite constantly observing the
market, we are not in a position to as-
sess and also not to warrant other
products, even if in exceptional ca-
ses an official approval has been pro-
vided by a technical inspection au-
thority or other public institution.
1)Accessories approved by the manufacturer are
available in all countries in which Škoda is rep-
resented (by an importer).
� Approved Škoda Accessories and Ge-
nuine Škoda Parts are available from
Škoda Dealers who can also carry out pro-
fessional fitting.
� All the genuine accessories which are
listed in the catalogue, such as tilting roofs,
spoilers, wheels etc. have to have an offi-
cial approval.
� Radios, aerials and other electrical ac-
cessories should also only be installed by
authorized workshops.
� It is important to observe the specifica-
tions issued by the car manufacturer if any
technical modifications are made to your
car.
This ensures that no damage occurs to your
car, that the safety and roadworthiness of
your car is maintained and that the modifi-
cations are approved. Škoda Dealers are
also able to carry out such work in a pro-
fessional manner or, in exceptional cases,
to provide you with the address of a spe-
cialist workshop.
� Any damage resulting from technical
modifications which have not been ap-
proved by us, are not covered by the
warranty.
Technical changesInterference in the electronic components
and their software can lead to operational
faults.
This interference can also impair not di-
rectly affected systems because of the net-
working of the electronic components.
This means that the operating safety of your
vehicle can be considerably jeopardised,
a greater wear of vehicle parts can occur
and finally the vehicle registration docu-
ments expire.
We trust that you will understand that your
Škoda dealer cannot be liable for damage
resulting from unprofessional work.
We therefore recommend that you have all
work carried out with Škoda original parts
at your authorised Škoda dealer.
Warning
Work or modifications on your vehi-
cle, which have been carried out un-
professionally, can cause operational
faults - risk of accident!
Page 162 of 205
 Owners Manual 161
DO-IT-YOURSELF
First-aid box,
warning triangleApplies to models fitted with all-wheel
drive*
The first-aid box is attached to the inside
of the cover of the storage compartment on
the right.
Appli")
161
DO-IT-YOURSELF
First-aid box,
warning triangleApplies to models fitted with all-wheel
drive*
The first-aid box is attached to the inside
of the cover of the storage compartment on
the right.
Applies to models fitted with front-wheel
drive
A commercially available first-aid box to-
gether with a warning triangle fit together
in a foam base below the floor covering of
the luggage compartment.
Note
The first-aid box, the warning triangle and
the bulbs are not supplied with the car!
The warning triangle is part of the stand-
ard equipment only on all-wheel drive ve-
hicles.
Car tool kitThe car tool kit and car jack are stored in a
plastic basket in the spare wheel.
This also provides space for the detachable
ball head of the trailer hitch (only on cer-
tain models) or also, for example, for a
trailer hitch which has been sold as a Škoda
Genuine Accessory.
Depending on the model version, the ball
head of the trailer hitch may also be stored
in the well behind the spare wheel. In this
case, you then have to use the first-aid box
stored in the upholstery.
More detailed information is available from
your Škoda dealer. Warning
�
The car jack supplied is only de-
signed for your model of car. On no
account attempt to lift heavier vehi-
cles or other loads.
� Ensure that the vehicle tool kit is
safely attached in the luggage com-
partment.
Page 163 of 205
 Owners Manual 162DO-IT-YOURSELF
Tyre repair spray*� The tyre repair spray is precisely for fast
repairs on small tyre defects up to 5 mm.
The spray does not replace a permanent
tyre repair, the repair serves onl")
162DO-IT-YOURSELF
Tyre repair spray*� The tyre repair spray is precisely for fast
repairs on small tyre defects up to 5 mm.
The spray does not replace a permanent
tyre repair, the repair serves only as an in-
termediate solution until the next service.
� The repair can be directly performed on
the vehicle. Carefully read the enclosed in-
structions for direction of use.
On front-wheel drive vehicles, the spray is
located in the well at the front right of the
polypropylene part behind the spare wheel,
and on 4x4 vehicles, in the boot on the left.
Certain models are equipped with a tyre
repair set which includes a compressor and
a repair flask, instructions and accessories.
On front-wheel drive vehicles this set is lo-
cated in the well at the front right of the
polypropylene part behind the spare wheel,
and on 4x4 vehicles, in the boot on the left
next to the first-aid box.
� Apply the handbrake before jack-
ing up the car. Never start the engine
when the car is jacked up - risk of
accident.
� If it is necessary to carry out work
underneath the vehicle, ensure that
it is supported on suitable stands.
Spare wheelThe spare wheel is stowed in the well below the
floor covering of the luggage compartment and
is secured by a handwheel.
� To ensure that the spare wheel is always
ready for use, check the inflation pressure at
regular intervals.
Vehicles with tyres 205/60 R15 and wheel trims
6.5Jx15 have an emergency wheel as a spare
wheel, which has different dimensions and which
is provided with a warning sticker.
Please pay attention to the following instructions,
if you are going to use an emergency wheel:
� After fitting on the wheel, the warning sticker
must not be concealed (e.g. by the wheel trim).
� Do not drive with this spare wheel at more
than 80 km/h - risk of accident.
Avoid acceleration at full throttle, sharp braking
and fast cornering.
� The inflation pressure for this spare wheel is
identical to the inflation pressure of the standard
tyres.
� Use this spare wheel only to reach the near-
est service station, as it is not intended for con-
tinuous use.
Tyre repair set*
Page 164 of 205
 Owners Manual 163
DO-IT-YOURSELF
Changing a wheelWarning
�In the case of a flat tyre or punc-
ture, park the vehicle off the road,
switch on the hazard warning lights
and place the warning triangle in po-
sition -")
163
DO-IT-YOURSELF
Changing a wheelWarning
�In the case of a flat tyre or punc-
ture, park the vehicle off the road,
switch on the hazard warning lights
and place the warning triangle in po-
sition - note any statutory require-
ments.
� All the vehicle occupants should
leave the car and move to a safe area
(e.g. behind safety barrier).
�
Apply handbrake firmly and engage
a gear. Chock the opposite wheel with
a stone or similar if the car is stand-
ing on a slope.
� Never start the engine when the
car is jacked up - risk of accident!
� If towing a trailer, unhitch the
trailer from the car before changing
the wheel.
� Carry out wheel change on a flat, level
surface, as far as possible.
� Remove the car tool kit and spare wheel
from the luggage compartment. �
Attach the wire hook (from the car tool
kit) at the edge of the full wheel trim* oppo-
site the air valve. Push the wheel wrench
through the wire hook and pull off the wheel
trim - see illustration.
� If light-alloy wheels are fitted, use the
plastic clip supplied to pull off the covers
for the wheel bolts.
� Unscrew the safety wheel bolts* - see
page 166. �
Fit wheel wrench onto the wheel bolt as
far as the stop and turn to the left. Hold the
wrench as close as possible to its end for
this operation. If the bolts cannot be slack-
ened, you can carefully apply pressure to
the end of the wheel wrench with your foot.
Ensure that you are standing properly and
hold tight on the car. Slacken the wheel
bolts about one turn.
Page 165 of 205
 Owners Manual 164DO-IT-YOURSELF�Fit the car jack onto the car. Recesses
are provided on the lower sill (at the front
and rear). Below this is the point at which
the car jack should be positioned - see ar-
rows in t")
164DO-IT-YOURSELF�Fit the car jack onto the car. Recesses
are provided on the lower sill (at the front
and rear). Below this is the point at which
the car jack should be positioned - see ar-
rows in the illustration.
� Position the car jack so that its claw fits
around the web of the lower sill A and the
moving base plate of the car jack B is posi-
tioned flat on the ground.
Warning
� Always raise the vehicle with the
doors closed - risk of injury.
� Take suitable measures to prevent
the base of the lifting jack from slip-
ping off - risk of injury! �
Place the lifting jack only on a
solid and even surface.
� Not positioning the lifting jack at
the specified points can result in
damage to the vehicle. In addition,
the jack may slip off if it does not
have sufficient grip - risk of injury!
� Never start the engine if the vehi-
cle is lifted - risk of accident.
� Never lie under the vehicle if the
vehicle is only lifted with the vehicle
lifting jack.
� It is important to support the ve-
hicle with suitable supporting blocks
if you wish to work under the lifted
vehicle - risk of injury! -
If the surface is soft, place a large
solid base below the foot of the jack.
- Rotate the crank to raise the claws of the jack sufficiently so that the jack can just
still be fitted below the car.
- The claw of the jack must be fitted around the vertical web of the lower sill
so that the jack cannot slip off when the
car is raised.
- The base of the jack should be resting fully on a firm surface.
- Align jack and at the same time raise the claw of the jack further until the claw is
touching the web.
Page 166 of 205
 Owners Manual 165
DO-IT-YOURSELF
�Jack up car until the wheel is just clear
of the ground.
� Remove wheel bolts (after slackening)
1),
place them down on a clean surface (cloth,
paper, wheel cap) next to the car ja")
165
DO-IT-YOURSELF
�Jack up car until the wheel is just clear
of the ground.
� Remove wheel bolts (after slackening)
1),
place them down on a clean surface (cloth,
paper, wheel cap) next to the car jack and
take off wheel.
� Fit on spare wheel and attach wheel
bolts
1).
� Tighten all the wheel bolts slightly. The
wheel bolts should be clean and turn freely.
� On no account grease or oil them!
� Lower car and tighten the wheel bolts
diagonally.
� Press on the full wheel trim* first at the
valve opening and then apply pressure
around the entire circumference so that the
trim locks in position.
1)In order to accelerate the screwing out and in,
use the handle part of the screwdriver from the
car tool kit, which has on its end a hexagon
socket for the screw head.
� Place the wheel removed in the spare
wheel well and secure with the handwheel.
Notes
� After changing a wheel, pay attention to
the following points:
- Check the inflation pressure of the spare wheel fitted.
- Have the tightening torque of the wheel bolts checked with a torque wrench as
soon as possible. The tightening torque
for steel and light alloy wheels is 120 Nm.
� Have the faulty wheel repaired as quickly
as possible. Warning
In case of incorrect treatment of the
wheel bolts, the wheel can loosen
when the car is moving - risk of acci-
dent!
Wheel bolts must be clean and must
turn easily. However
, they must never
be treated with grease or oil.
If the wheel bolts are tightened to a
too low tightening torque, the trims
can loosen when the car is moving -
risk of accident! A tightening torque,
which is too high, can damage the
bolts and threads and this can result
in permanent deformation of the con-
tact surfaces on the trims.
If it is intended to subsequently fit
wheels or tyres other than the factory-
fitted versions to the car, it is essen-
tial to read the remarks on page 156.
Page 167 of 205
 Owners Manual 166DO-IT-YOURSELF
�Pull off the wheel caps and fit adapter B
onto the wheel bolt A. Turn adapter until
the splines engage.
� Slacken or tighten the wheel bolt by fit-
ting the wheel wrench to the he")
166DO-IT-YOURSELF
�Pull off the wheel caps and fit adapter B
onto the wheel bolt A. Turn adapter until
the splines engage.
� Slacken or tighten the wheel bolt by fit-
ting the wheel wrench to the hexagon of the
adapter.
� After removing the adapter, fit a protec-
tive cap onto the wheel bolt.
Note
� It is essential that the locking bolt is tight-
ened to a torque of 120 Nm . If this torque
is exceeded, the bolt and the adapter may
in certain circumstances be damaged.
� On steel wheels, the theft-deterrent
wheel bolt must always be installed in the
hole, which is close to the valve. Otherwise
the full wheel trim cannot be mounted and
the full wheel trim can be damaged during
the assembly.
� You can also obtain the wheel lock bolt
set as a Genuine Accessory from your
Škoda dealer.
Anti-theft lock of wheels*Wheel locking bolts
A - Wheel bolt
B - Adapter
If wheel locking bolts are fitted to a car (one
bolt for each wheel), these can only be
slackened and tightened using the adapter
supplied. It is good practice to note the code
No. indicated on the adapter.
If the adapter or the wheel locking bolt is
lost, contact your Škoda Dealer.
Fire extinguisher*The fire extinguisher is located in the holder
below the driver seat and is secured with
straps.
� Carefully read the instructions regarding
the fire extinguisher.
� The fire extinguisher must be inspected
once a year by a regular person or a com-
pany. Please pay attention to the different
legal regulations.
� The fire extinguisher is only delivered in
certain countries.
� Pay attention to the expiration date of the
fire extinguisher. If the fire extinguisher is
used after the expiration date, its proper
function is no longer assured.
Page 168 of 205
 Owners Manual 167
DO-IT-YOURSELF
FusesThe individual electrical circuits are pro-
tected by fuses.
The fuses are located on the left-hand face
end of the instrument cluster below the co-
ver.
Space is provided on t")
167
DO-IT-YOURSELF
FusesThe individual electrical circuits are pro-
tected by fuses.
The fuses are located on the left-hand face
end of the instrument cluster below the co-
ver.
Space is provided on the right for spare fu-
ses - see page 168.
Additional fuses are located in the engine
compartment on the battery. We recom-
mend having these fuses replaced by a
Škoda Dealer.Replacing a fuse�Switch off the ignition and the relevant
electrical component.
� To remove the cover, place a screwdriver
against the cover (arrow on cover) and ca-
refully lever it off. �
Refer to the list of fuses as shown in il-
lustration to find which fuse belongs to the
faulty component - see illustration on page
168.
� Remove the blown fuse.
� A blown fuse is recognizable from the
melted metal strip - replace with a new fuse
of the same rating.
Notes
� If a newly inserted fuse blows again af-
ter a short time, the electrical system should
then be inspected as soon as possible by
a Škoda Dealer.
� On no account „repair“ fuses as this may
cause major damage to another point of the
electrical system.
� Certain of the electrical components
listed are fitted only to particular model
versions or are optional equipment.
� We recommend always carrying with
you a box with replacement fuses, which is
available from Škoda Dealers
1).
1)In certain countries the box with replacement
fuses is part of the basic equipment.
Warning
If the fire extinguisher is not correctly
attached, in case of sudden manoeu-
vres or an accident, it can be thrown
through the interior compartment
and cause injuries.
 1
1 2
2 3
3 4
4 5
5 6
6 7
7 8
8 9
9 10
10 11
11 12
12 13
13 14
14 15
15 16
16 17
17 18
18 19
19 20
20 21
21 22
22 23
23 24
24 25
25 26
26 27
27 28
28 29
29 30
30 31
31 32
32 33
33 34
34 35
35 36
36 37
37 38
38 39
39 40
40 41
41 42
42 43
43 44
44 45
45 46
46 47
47 48
48 49
49 50
50 51
51 52
52 53
53 54
54 55
55 56
56 57
57 58
58 59
59 60
60 61
61 62
62 63
63 64
64 65
65 66
66 67
67 68
68 69
69 70
70 71
71 72
72 73
73 74
74 75
75 76
76 77
77 78
78 79
79 80
80 81
81 82
82 83
83 84
84 85
85 86
86 87
87 88
88 89
89 90
90 91
91 92
92 93
93 94
94 95
95 96
96 97
97 98
98 99
99 100
100 101
101 102
102 103
103 104
104 105
105 106
106 107
107 108
108 109
109 110
110 111
111 112
112 113
113 114
114 115
115 116
116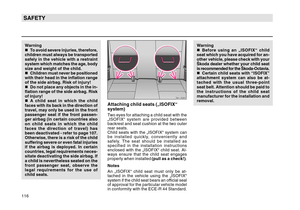 117
117 118
118 119
119 120
120 121
121 122
122 123
123 124
124 125
125 126
126 127
127 128
128 129
129 130
130 131
131 132
132 133
133 134
134 135
135 136
136 137
137 138
138 139
139 140
140 141
141 142
142 143
143 144
144 145
145 146
146 147
147 148
148 149
149 150
150 151
151 152
152 153
153 154
154 155
155 156
156 157
157 158
158 159
159 160
160 161
161 162
162 163
163 164
164 165
165 166
166 167
167 168
168 169
169 170
170 171
171 172
172 173
173 174
174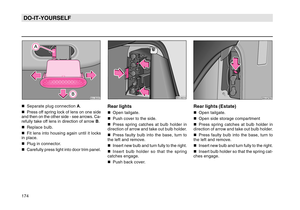 175
175 176
176 177
177 178
178 179
179 180
180 181
181 182
182 183
183 184
184 185
185 186
186 187
187 188
188 189
189 190
190 191
191 192
192 193
193 194
194 195
195 196
196 197
197 198
198 199
199 200
200 201
201 202
202 203
203 204
204