Page 9 of 12

05
08
07
06
SEEK/TRACK/FILE BUTTON
Press the SEEK/TRACK/FILE button to skip from one track to another on a CD.
Each time the b")
0102
0305
07
06
04
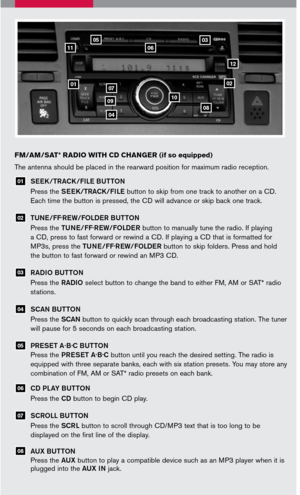
FM/AM/SAT* RADIO WITH CD C HANGER (if so equipped)
05
08
07
06
SEEK/TRACK/FILE BUTTON
Press the SEEK/TRACK/FILE button to skip from one track to another on a CD.
Each time the button is pressed, the CD will advance or skip back one track.
TUNE/FF.REW/FOLDER BUTTON
Press the TUNE/FF.REW/FOLDER button to manually tune the radio. If playing
a CD, press to fast forward or rewind a CD. If playing a CD that is formatted for
MP3s, press the TUNE/FF.REW/FOLDER button to skip folders. Press and hold
the button to fast forward or rewind an MP3 CD.
RADIO BUTTON
Press the RADIO select button to change the band to either FM, AM or SAT* radio
stations.
SCAN BUTTON
Press the SCAN button to quickly scan through each broadcasting station. The tuner
will pause for 5 seconds on each broadcasting station.
PRESET A
.B.
C BU TTON
Press the PRESET A.B.C button until you reach the desired setting. The radio is
equipped with three separate banks, each with six station presets. You may store any
combination of FM, AM or SAT* radio presets on each bank.
CD PLAY BUTTON
Press the CD button to begin CD play.
SCROLL BUTTON
Press the SCRL button to scroll through CD/MP3 text that is too long to be
displayed on the first line of the display.
AUX BUTTON
Press the AUX button to play a compatible device such as an MP3 player when it is plugged into the AUX IN jack.
04
03
02
01
0908
10
12
The antenna should be placed in the rearward position for maximum radio reception.
11
Page 10 of 12
 and beep on /off by pressing the
AUDIO button until the de")
AUDIO BUTTON
Press the AUDIO button to change the audio settings. Adjust the bass, treble,
balance, fade and Speed Sensitive Volume (SSV) and beep on /off by pressing the
AUDIO button until the desired mode appears in the display. Press the TUNE/
FF.REW/FOLDER button up or down to adjust to the desired level.
STATION AND CD SELE CT BU TTONS
To store a station in a preset you must first select A, B, or C memory bank by
pressing the PRESET A.B.C button and tune to the desired FM, AM or SAT*
station. Then press and hold the desired station select button for at least 2
seconds. When the preset indicator illuminates, a beep will sound, indicating
memorization is complete. To retrieve a previously set station, select the memory
bank where the preset was set, then press the corresponding station select button.
LOAD BUTTON
LOAD A SINGLE DISC - Press the LOAD button for less than 1.5 seconds. Select
the loading slot by pressing the CD insert button (1- 6), then insert the CD.
LOAD UP TO 6 DISCS - Press and hold the LOAD button for less than 1.5
seconds. The slot numbers (1- 6) will illuminate on the display when the CDs are
loaded into the charger.
10
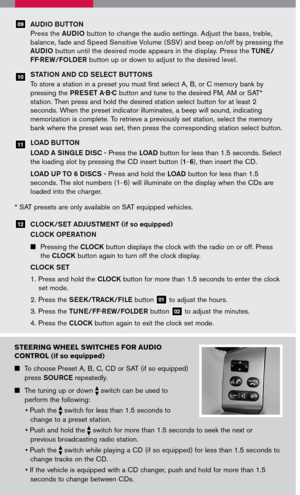
STEERING WHEEL SWITCHES FOR AUDIO
CONTROL (if so equipped)
To choose Preset A, B, C, CD or SAT (if so equipped)
press SOURCE repeatedly.
The tuning up or down switch can be used to
perform the following:
•
Push the switch for less than 1.5 seconds to
change to a preset station.
• Push and hold the
switch for more than 1.5 seconds to seek the next or
previous broadcasting radio station.
• Push the
switch while playing a CD (if so equipped) for less than 1.5 seconds to
change tracks on the CD.
• If the vehicle is equipped with a CD changer, push and hold for more than 1.5
seconds to change between CDs.
09
* SAT presets are only available on SAT equipped vehicles.
CLOCK/SET ADJUSTMENT (if so equipped)
CLOCK OPERATION
Pressing the CLOCK button displays the clock with the radio on or off. Press
the CLOCK button again to turn off the clock display.
CLOCK SET
1. Press and hold the CLOCK button for more than 1.5 seconds to enter the clock
set mode.
2. Press the SEEK/TRACK/FILE button 01 to adjust the hours.
3. Press the TUNE/FF.REW/FOLDER button 02 to adjust the minutes.
4. Press the CLOCK button again to exit the clock set mode.
12
11
Page 11 of 12

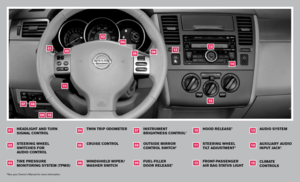
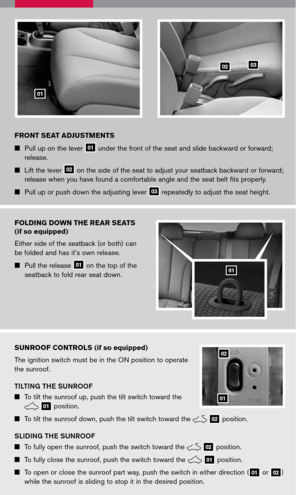
FRONT SEAT ADJUSTMENTS
Pull up on the lever 01 under the front of the seat and slide backward or forward;
release.
Lift the lever 02 on the side of the seat to adjust your seatback backward or forward;
release when you have found a comfortable angle and the seat belt fits properly.
Pull up or push down the adjusting lever 03 repeatedly to adjust the seat height.
01
0302
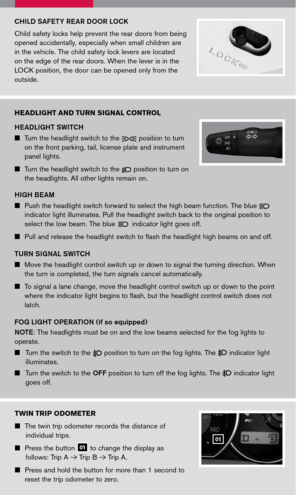
FOLDING DOWN THE REAR SEATS
(if so equipped)
Either side of the seatback (or both) can
be folded and has it’s own release.
Pull the release 01 on the top of the
seatback to fold rear seat down.01
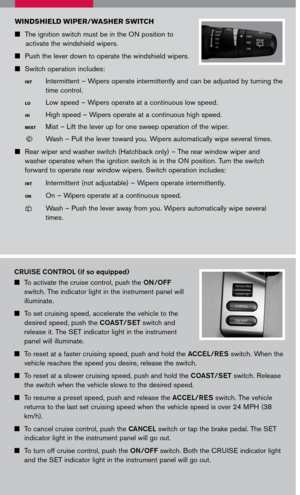
SUNROOF CONTROLS (if so equipped)
The ignition switch must be in the ON position to operate
the sunroof.
TILTING THE SUNROOF
To tilt the sunroof up, push the tilt switch toward the
LIC0977
1A
1
2 01 position.
To tilt the sunroof down, push the tilt switch toward the
LIC0977
1A
1
2
02 position.
SLIDING THE SUNROOF
To fully open the sunroof, push the switch toward the
LIC0977
1A
1
2
02 position.
To fully close the sunroof, push the switch toward the LIC0977
1A
1
2 01 position.
To open or close the sunroof part way, push the switch in either direction (01 or 02)
while the sunroof is sliding to stop it in the desired position.
01
02
Page 12 of 12
QR7E-0C11U1 Printing: October 2006 (02)
Nissan, the Nissan Brand Symbol, “SHIFT_” tagline, Z and Nissan model names are Nissan trademarks. ©2006 Nissan North America, Inc.
Sh ift_
This easy-to-use Quick Reference Guide is intended to help you more fully appreciate some of the unique features and functions of your new vehicle. However, it is not intended to replace your Owner’s Manual. The Owner’s Manual contains more detailed information to help you better understand the important safety warnings, features, operation, and maintenance of your vehicle.

Nissan, the Nissan Brand Symbol, “SHIFT_” tagline, Z and Nissan model names are Nissan trademarks. ©2006 Nissan North America, Inc")