Page 1 of 12
Sh ift_space
2007
VE R SA
Q U I C K R E F E R E N C E G U I D E
Page 2 of 12
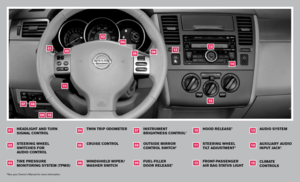
TIRE PRESSURE
MONITORING SYSTEM (TPMS)STEERING WHEEL SWITCHES FOR
AUDIO CONTROLHEADLIGHT AND TURN SIGNAL CONTROL
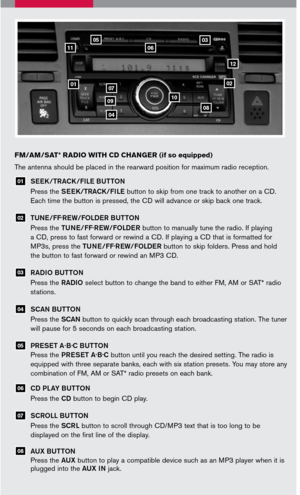
010203*See your Owner’s Manual for more information.
WINDSHIELD WIPER/WASHER SWITCHCRUISE CONTROLTWIN TRIP ODOMETER
040506
FUEL-FILLER
DOOR RELEASE*OUTSIDE MIRROR CONTROL SWITCH*INSTRUMENT BRIGHTNESS CONTROL*
070809
FRONT-PASSENGER
AIR BAG STATUS LIGHTSTEERING WHEEL TILT ADJUSTMENT*HOOD RELEASE*
101112
03
04
01
02
05
06
15
08
07
11
12
09
10
13
AUXILIARY AUDIO INPUT JACK*AUDIO SYSTEM
1314
14
CLIMATE CONTROLS
15
Page 3 of 12

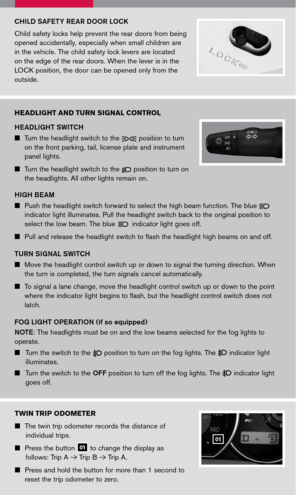
CHILD SAFETY REAR DOOR LOCK
Child safety locks help prevent the rear doors from being
opened accidentally, especially when small children are
in the vehicle. The child safety lock levers are located
on the edge of the rear doors. When the lever is in the
LOCK position, the door can be opened only from the
outside.
HEADLIGHT AND TURN SIGNAL CONTROL
HEADLIGHT SWITCH
Turn the headlight switch to the position to turn
on the front parking, tail, license plate and instrument
panel lights.
Turn the headlight switch to the position to turn on
the headlights. All other lights remain on.
HIGH BEAM
Push the headlight switch forward to select the high beam function. The blue
indicator light illuminates. Pull the headlight switch back to the original position to
select the low beam. The blue indicator light goes off.
Pull and release the headlight switch to flash the headlight high beams on and off.
TURN SIGNAL SWITCH
Move the headlight control switch up or down to signal the turning direction. When
the turn is completed, the turn signals cancel automatically.
To signal a lane change, move the headlight control switch up or down to the point
where the indicator light begins to flash, but the headlight control switch does not
latch.
FOG LIGHT OPERATION (if so equipped)
NOTE: The headlights must be on and the low beams selected for the fog lights to
operate.
Turn the switch to the position to turn on the fog lights. The indicator light
illuminates.
Turn the switch to the OFF position to turn off the fog lights. The indicator light
goes off.
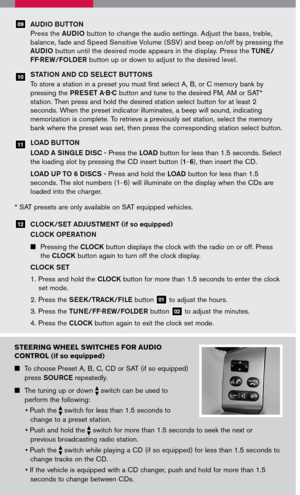
TWIN TRIP ODOMETER
The twin trip odometer records the distance of
individual trips.
Press the button 01 to change the display as
follows: Trip A Trip B Trip A.
Press and hold the button for more than 1 second to
reset the trip odometer to zero.
01
Page 4 of 12

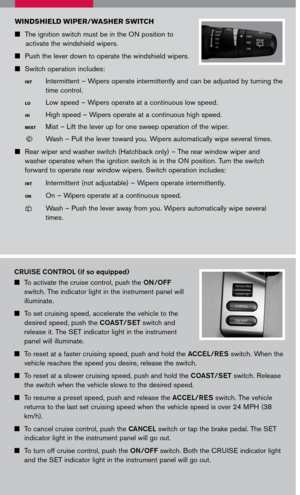
WINDSHIELD WIPER/WASHER SWITCH
The ignition switch must be in the ON position to
activate the windshield wipers.
Push the lever down to operate the windshield wipers.
Switch operation includes:
Intermittent – Wipers operate intermittently and can be adjusted by turning the
time control.
Low speed – Wipers operate at a continuous low speed.
High speed – Wipers operate at a continuous high speed.
Mist – Lift the lever up for one sweep operation of the wiper.
Wash – Pull the lever toward you. Wipers automatically wipe several times.
Rear wiper and washer switch (Hatchback only) – The rear window wiper and
washer operates when the ignition switch is in the ON position. Turn the switch
forward to operate rear window wipers. Switch operation includes:
Intermittent (not adjustable) – Wipers operate intermittently.
On – Wipers operate at a continuous speed.
Wash – Push the lever away from you. Wipers automatically wipe several
times.
INT
LO
HI
MIST
INT
ON
LCN0042
LCN0042
CRUISE CONTROL (if so equipped)
To activate the cruise control, push the ON/OFF
switch. The indicator light in the instrument panel will
illuminate.
To set cruising speed, accelerate the vehicle to the
desired speed, push the COAST/SET switch and
release it. The SET indicator light in the instrument
panel will illuminate.
To reset at a faster cruising speed, push and hold the ACCEL/RES switch. When the
vehicle reaches the speed you desire, release the switch.
To reset at a slower cruising speed, push and hold the COAST/SET switch. Release
the switch when the vehicle slows to the desired speed.
To resume a preset speed, push and release the ACCEL/RES switch. The vehicle
returns to the last set cruising speed when the vehicle speed is over 24 MPH (38
km/h).
To cancel cruise control, push the CANCEL switch or tap the brake pedal. The SET
indicator light in the instrument panel will go out.
To turn off cruise control, push the ON/OFF switch. Both the CRUISE indicator light
and the SET indicator light in the instrument panel will go out.
Page 5 of 12

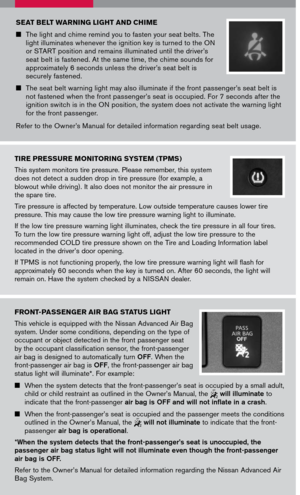
This system monitors tire pressure. Please remember, this system does not detect a sudden drop in tire pressure (for example, a blowout while driving). It also")
TIRE PRESSURE MONITORING SYSTEM (TPMS)
This system monitors tire pressure. Please remember, this system does not detect a sudden drop in tire pressure (for example, a blowout while driving). It also does not monitor the air pressure in the spare tire.
Tire pressure is affected by temperature. Low outside temperature causes lower tire pressure. This may cause the low tire pressure warning light to illuminate.
If the low tire pressure warning light illuminates, check the tire pressure in all four tires. To turn the low tire pressure warning light off, adjust the low tire pressure to the recommended COLD tire pressure shown on the Tire and Loading Information label located in the driver’s door opening.
If TPMS is not functioning properly, the low tire pressure warning light will flash for approximately 60 seconds when the key is turned on. After 60 seconds, the light will remain on. Have the system checked by a NISSAN dealer.
SEAT BELT WARNING LIGHT AND CHIME
The light and chime remind you to fasten your seat belts. The light illuminates whenever the ignition key is turned to the ON or START position and remains illuminated until the driver’s seat belt is fastened. At the same time, the chime sounds for approximately 6 seconds unless the driver’s seat belt is securely fastened.
The seat belt warning light may also illuminate if the front passenger’s seat belt is not fastened when the front passenger’s seat is occupied. For 7 seconds after the ignition switch is in the ON position, the system does not activate the warning light for the front passenger.
Refer to the Owner’s Manual for detailed information regarding seat belt usage.
FRONT-PASSENGER AIR BAG STATUS LIGHT
This vehicle is equipped with the Nissan Advanced Air Bag system. Under some conditions, depending on the type of occupant or object detected in the front passenger seat by the occupant classification sensor, the front-passenger air bag is designed to automatically turn OFF. When the front-passenger air bag is OFF, the front-passenger air bag status light will illuminate*. For example:
When the system detects that the front-passenger’s seat is occupied by a small adult, child or child restraint as outlined in the Owner’s Manual, the will illuminate to indicate that the front-passenger air bag is OFF and will not inflate in a crash.
When the front-passenger’s seat is occupied and the passenger meets the conditions outlined in the Owner’s Manual, the will not illuminate to indicate that the front-passenger air bag is operational.
*When the system detects that the front-passenger’s seat is unoccupied, the passenger air bag status light will not illuminate even though the front-passenger air bag is OFF.
Refer to the Owner’s Manual for detailed information regarding the Nissan Advanced Air Bag System.
Page 6 of 12

LOCK DOORS
Press the LPD0150 button to lock all doors.
UNLOCK DOORS
Press the
lpd0151
button once to unlock the driver’s
door only. Press the butt")
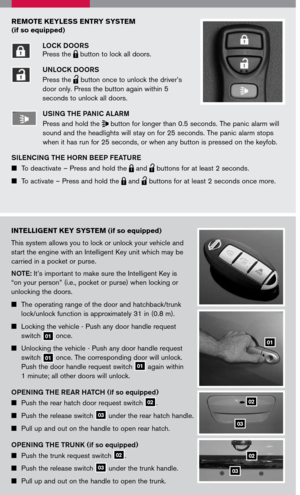
REMOTE KEYLESS ENTRY SYSTEM
(if so equipped)
LOCK DOORS
Press the LPD0150 button to lock all doors.
UNLOCK DOORS
Press the
lpd0151
button once to unlock the driver’s
door only. Press the button again within 5
seconds to unlock all doors.U SING THE PANIC ALARM
Press and hold the button for longer than 0.5 seconds. The panic alarm will
sound and the headlights will stay on for 25 seconds. The panic alarm stops
when it has run for 25 seconds, or when any button is pressed on the keyfob.
S ILENCING THE HORN BEEP FEATURE
To deactivate – Press and hold the LPD0150 and
lpd0151
buttons for at least 2 seconds.
To activate – Press and hold the LPD0150 and
lpd0151
buttons for at least 2 seconds once more.
INTELLIGENT KEY SYSTEM (if so equipped)
This system allows you to lock or unlock your vehicle and
start the engine with an Intelligent Key unit which may be
carried in a pocket or purse.
NOTE
: It’s important to make sure the Intelligent Key is
“on your person” (i.e., pocket or purse) when locking or
unlocking the doors.
The operating range of the door and hatchback/trunk
lock/unlock function is approximately 31 in (0.8 m).
Locking the vehicle - Push any door handle request
switch 01 once.
Unlocking the vehicle - Push any door handle request
switch 01 once. The corresponding door will unlock.
Push the door handle request switch 01 again within
1 minute; all other doors will unlock.
OPENING THE REAR HATCH (if so equipped)
Push the rear hatch door request switch 02.
Push the release switch 03 under the rear hatch handle.
Pull up and out on the handle to open rear hatch.
OPENING THE TRUNK (if so equipped)
Push the trunk request switch 02.
Push the release switch 03 under the trunk handle.
Pull up and out on the handle to open the trunk.
02
03
01
02
03
Page 7 of 12
 ™ (if so equipped)
The Xtronic CVT™ does not produce a gear change sensation like traditional automatic transmissions.
R (Reverse) speed,")
XTRONIC CONTINUOUSLY VARIABLE
TRANSMISSION (CVT) ™ (if so equipped)
The Xtronic CVT™ does not produce a gear change sensation like traditional automatic transmissions.
R (Reverse) speed, for CVT vehicles, is limited to 15 MPH (25 km/h).
STARTING THE ENGINE WITH CVT (Intelligent Key models only)
Push the ignition knob in.
Confirm the Intelligent Key warning light is illuminated green.
Turn the ignition knob to start the engine.
TURNING THE ENGINE OFF WITH CVT (Intelligent Key models only)
Shift transmission into P (Park).
Turn ignition knob to LOCK position.
OVERDRIVE (O/D) OFF SWITCH
Each time your vehicle is started, the transmission is automatically “reset” to Overdrive on.
To turn Overdrive mode off, push the O/D OFF switch 01. The
LCN0030
O/DOFF light in the instrument panel will illuminate.
Use the Overdrive off mode when you need improved engine braking.
The transmission in your Versa requires a special fluid (NS-2) available only at your NISSAN dealer. No other fluid will meet the exact requirements of the new Xtronic CVT™.
6-SPEED MANUAL TRANSMISSION (if so equipped)
LOCK OUT
In 6-speed manual transmission equipped vehicles, the shift lever is equipped with a Reverse lock-out feature that prevents accidental selection of Reverse (instead of 1st gear).
SHIFTING TO REVERSE
Lift up on the collar just below the shift lever, then move it to the left and up into Reverse.
PUSH RELEASE BUTTON (Intelligent Key Models with Manual Transmission only)
The ignition knob can only be turned to the LOCK position when the PUSH release button 01 has been pressed.
The LCN0129
LOCK Intelligent Key lock warning light blinks and the buzzer sounds if the PUSH release button has not been pressed completely when the ignition knob is turned to
the LOCK position.
01
01
Page 8 of 12
 or right (fast) to control fan speed.
TEMPERATURE CONTROL DIAL
Turn the tempe")
01
0203
05
07
06
04
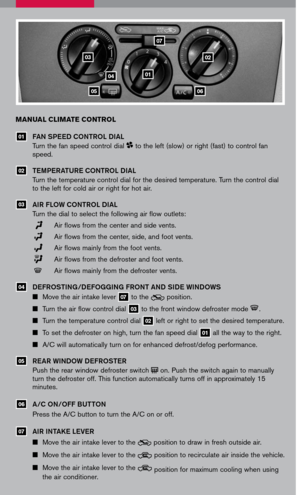
MANUAL CLIMATE CONTRO L
FAN SPEED CONTROL DIAL
Turn the fan speed control dial to the left (slow) or right (fast) to control fan speed.
TEMPERATURE CONTROL DIAL
Turn the temperature control dial for the desired temperature. Turn the control dial to the left for cold air or right for hot air.
AIR FLOW CONTROL DIAL
Turn the dial to select the following air flow outlets:
Air flows from the center and side vents.
Air flows from the center, side, and foot vents.
Air flows mainly from the foot vents.
Air flows from the defroster and foot vents.
Air flows mainly from the defroster vents.
DEFROSTING/DEFOGGING FRONT AND SIDE WINDOWS
Move the air intake lever 07 to the position.
Turn the air flow control dial 03 to the front window defroster mode .
Turn the temperature control dial 02 left or right to set the desired temperature.
To set the defroster on high, turn the fan speed dial 01 all the way to the right.
A/C will automatically turn on for enhanced defrost/defog performance.
R EAR WINDOW DEFROSTER
Push the rear window defroster switch on. Push the switch again to manually turn the defroster off. This function automatically turns off in approximately 15 minutes.
A/C ON/OFF BUTTON
Press the A/C button to turn the A/C on or off.
A IR INTAKE LEVER
Move the air intake lever to the position to draw in fresh outside air.
Move the air intake lever to the position to recirculate air inside the vehicle.
Move the air intake lever to the position for maximum cooling when using the air conditioner.
05
04
03
02
01
06
07

STEERING WHEEL SWITCHES FOR
AUDIO CONTROLHEADLIGHT AND TURN SIGNAL CONTROL
010203*See your Owner’s Manual for more information.
WINDSHIELD WIPER/WASHER S")