2007 NISSAN TIIDA hatch
[x] Cancel search: hatchPage 1307 of 5883
![NISSAN TIIDA 2007 Service Repair Manual DLK-718
< SYMPTOM DIAGNOSIS >[WITHOUT I-KEY, WITH SUPER LOCK]
DOOR LOCK FUNCTION SYMPTOMS
SYMPTOM DIAGNOSIS
DOOR LOCK FUNCTION SYMPTOMS
DOOR LOCK AND UNLOCK SWITCH
DOOR LOCK AND UNLOCK SWITCH : Sympto NISSAN TIIDA 2007 Service Repair Manual DLK-718
< SYMPTOM DIAGNOSIS >[WITHOUT I-KEY, WITH SUPER LOCK]
DOOR LOCK FUNCTION SYMPTOMS
SYMPTOM DIAGNOSIS
DOOR LOCK FUNCTION SYMPTOMS
DOOR LOCK AND UNLOCK SWITCH
DOOR LOCK AND UNLOCK SWITCH : Sympto](/manual-img/5/57395/w960_57395-1306.png)
DLK-718
< SYMPTOM DIAGNOSIS >[WITHOUT I-KEY, WITH SUPER LOCK]
DOOR LOCK FUNCTION SYMPTOMS
SYMPTOM DIAGNOSIS
DOOR LOCK FUNCTION SYMPTOMS
DOOR LOCK AND UNLOCK SWITCH
DOOR LOCK AND UNLOCK SWITCH : Symptom TableINFOID:0000000001397332
DOOR LOCK AND UNLOCK SWITCH OPERATION MALFUNCTION
NOTE:
Before performing the diagnosis in the following table, check “Work Flow”. Refer to DLK-610, "
Work Flow".
Check that vehicle is under the condition shown in “Conditions of vehicle” before starting diagnosis, and
check each symptom.
If the following symptoms are detected, check systems shown in the “Diagnosis/service procedure” column
in this order.
Conditions of Vehicle (Operating Conditions)
Except driver side, doors are closed.
Doors are not locked by keyfob.
Symptom Table
KEYFOB
Symptom Diagnosis/service procedure Reference page
Power door lock does not operate with door lock
and unlock switch.1. BCM Power supply and ground circuit check.BCS-30
2. Door lock and unlock switch check.DLK-61
3. Door lock actuator (driver side) checkDLK-108
4. Intermittent Incident check. GI
Specific door lock actuator does not operate.1a. Driver side door lock actuator check.DLK-108
1b. Passenger side door lock actuator check.DLK-109
1c. Rear LH side door lock actuator check.D L K - 111
1d. Rear RH side door lock actuator check.DLK-113
1e. Back door lock actuator (hatchback) check.DLK-114
2. Intermittent Incident check. GI
Specific door does not open from inside the vehicle.1a. Driver side super lock actuator check.DLK-108
1b. Passenger side super lock actuator check.DLK-109
1c. Rear LH side super lock actuator check.D L K - 111
1d. Rear RH side super lock actuator check.DLK-113
2. Intermittent Incident check. GI
Instrument panel warning lamp indicator does not
operate.1. Instrument panel warning lamp assembly check.DLK-293
2. Intermittent Incident check. GI
Key reminder function does not operate properly.1.Check “ANTI KEY LOCK IN FUNCTION” setting in
“WORK SUPPORT”.DLK-50
2a. Driver side door switch check.DLK-65
2b. Passenger side door switch check.DLK-67
2c. Rear LH side door switch check.DLK-69
2d. Rear RH side door switch check.DLK-71
2e. Back door switch (hatchback) check.DLK-73
3. Front door lock actuator LH (door unlock sensor) check.DLK-104
4. Replace BCM.BCS-57
Page 1326 of 5883
![NISSAN TIIDA 2007 Service Repair Manual HOOD
DLK-737
< REMOVAL AND INSTALLATION >[WITHOUT I-KEY, WITH SUPER LOCK]
C
D
E
F
G
H
I
J
L
MA
B
DLK
N
O
P
RH Drive
REMOVAL
Hood Lock
1. Remove front grille (LH or RH as necessary). Refer to EXT-19, " NISSAN TIIDA 2007 Service Repair Manual HOOD
DLK-737
< REMOVAL AND INSTALLATION >[WITHOUT I-KEY, WITH SUPER LOCK]
C
D
E
F
G
H
I
J
L
MA
B
DLK
N
O
P
RH Drive
REMOVAL
Hood Lock
1. Remove front grille (LH or RH as necessary). Refer to EXT-19, "](/manual-img/5/57395/w960_57395-1325.png)
HOOD
DLK-737
< REMOVAL AND INSTALLATION >[WITHOUT I-KEY, WITH SUPER LOCK]
C
D
E
F
G
H
I
J
L
MA
B
DLK
N
O
P
RH Drive
REMOVAL
Hood Lock
1. Remove front grille (LH or RH as necessary). Refer to EXT-19, "Removal and Installation".
2. Remove hood lock bolts.
3. Remove hood lock from hood lock cable.
Hood Lock Reinforcement
1. Remove front bumper. Refer to EXT-15, "Removal and Installation - Hatchback" or EXT-17, "Removal and
Installation - Sedan".
2. Remove crash zone sensor.
3. Remove bolts, and the hood lock reinforcement.
Hood Lock Cable
1. Remove front grille (LH/RH). Refer to EXT-19, "Removal and Installation".
2. Remove fender protector (LH or RH as necessary). Refer to EXT-22, "
Removal and Installation".
3. Remove hood lock, and remove hood lock cable from hood lock.
4. Remove radiator core upper support, hood ledge, and then remove hood lock cable.
1. Hood lock 2. Hood lock cable 3. Hood ledge upper front
4. Clip
ALKIA0638GB
1. Hood lock 2. Hood lock cable 3. Hood ledge upper front
4. Clip
23.6 N·m (2.4 kg-m, 17 ft-lb)
23.6 N·m (2.4 kg-m, 17 ft-lb)
PIIB6511E
Page 3044 of 5883

REAR FOG LAMP CIRCUIT
EXL-43
< COMPONENT DIAGNOSIS >
C
D
E
F
G
H
I
J
K
MA
B
EXL
N
O
P
REAR FOG LAMP CIRCUIT
DescriptionINFOID:0000000001527571
The BCM (Body Control Module) controls power to the rear fog lamps based on inputs from the lighting switch
(combination switch). The BCM sends a request (via CAN communication lines) to the combination meter to
turn the rear fog lamp indicator light ON.
Component Function CheckINFOID:0000000001527572
1.CHECK REAR FOG LAMP OPERATION
CONSULT-III
1. Select "RR FOG LAMP" of BCM active test item.
2. With test items operating, check that the rear fog lamps are turned ON.
Is the rear fog lamp turned ON?
YES >> Rear fog lamp circuit is normal.
NO >> Refer to EXL-43, "
Diagnosis Procedure".
Diagnosis ProcedureINFOID:0000000001527573
HATCHBACK
1.CHECK BCM POWER AND GROUND SUPPLY
Verify BCM power and ground supply. Refer to BCS-30, "
Diagnosis Procedure".
Does BCM have proper power and ground?
YES >> GO TO 2
NO >> Repair harness or connector.
2.CHECK REAR FOG LAMP OUTPUT VOLTAGE
CONSULT-III
1. Turn the ignition switch OFF.
2. Disconnect the rear fog lamp connector B89 and rear combination lamp LH connector B80.
3. Turn the ignition switch ON.
4. Select "RR FOG LAMP" of BCM active test item.
5. With RR FOG LAMP ON, check the voltage between the rear fog lamp connector B89 terminal 1, rear
combination lamp LH connector B80 terminal 2 and ground.
Is battery voltage present?
YES >> GO TO 4
NO >> GO TO 3
3.CHECK REAR FOG LAMP OPEN CIRCUIT
1. Turn the ignition switch OFF.
2. Disconnect BCM connector M20.
3. Check continuity between the BCM harness connector M20 (A) terminal 69 and the rear fog lamp harness
connector B89 (B) terminal 1 and rear combination lamp LH connector B80 (C) terminal 2. ON : Front fog lamp ON
OFF : Front fog lamp OFF
(+)
(−)Voltage
Connector Terminal
B89 1
Ground Battery voltage
B80 2
Page 3048 of 5883
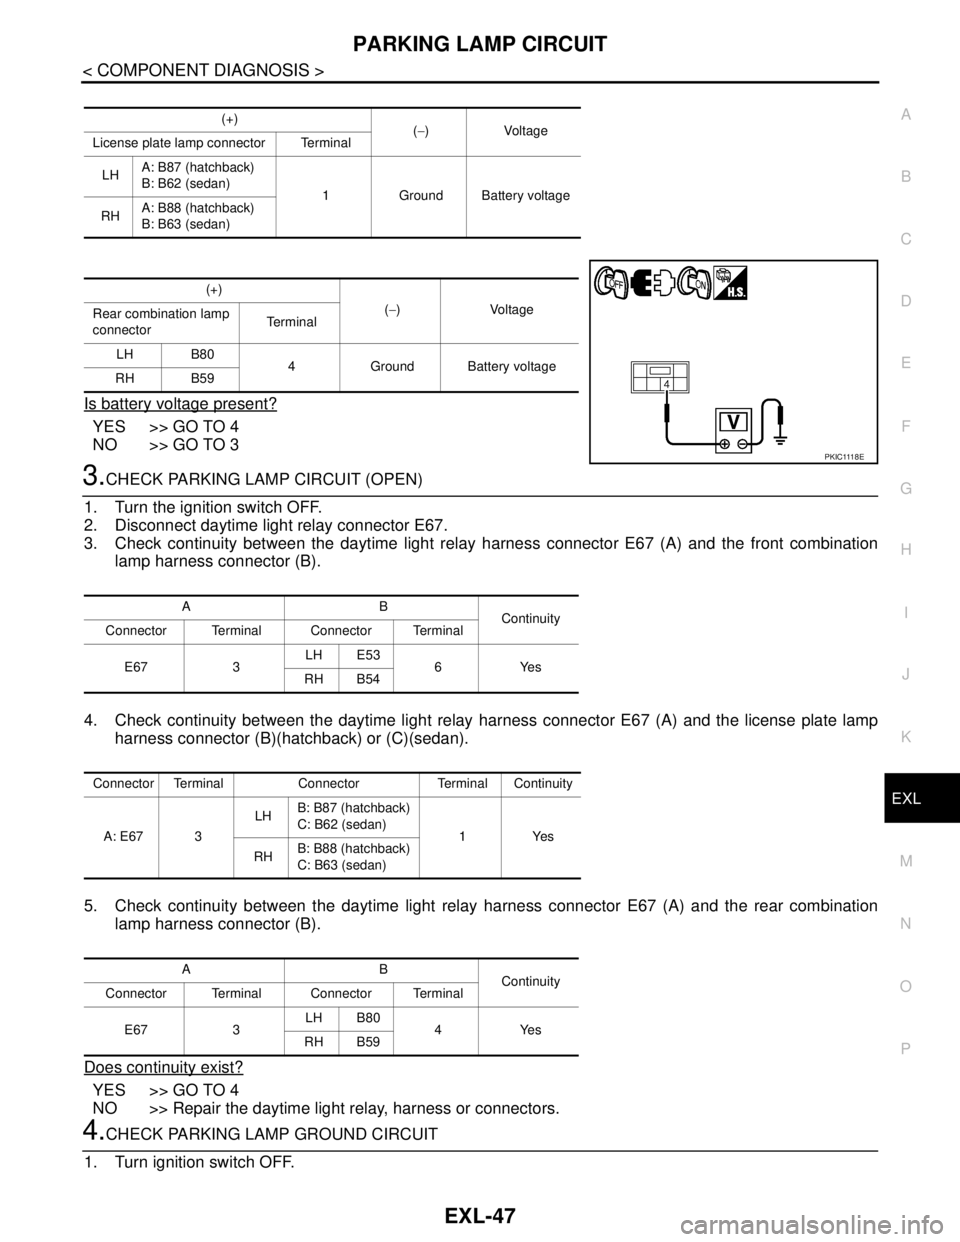
PARKING LAMP CIRCUIT
EXL-47
< COMPONENT DIAGNOSIS >
C
D
E
F
G
H
I
J
K
MA
B
EXL
N
O
P
Is battery voltage present?
YES >> GO TO 4
NO >> GO TO 3
3.CHECK PARKING LAMP CIRCUIT (OPEN)
1. Turn the ignition switch OFF.
2. Disconnect daytime light relay connector E67.
3. Check continuity between the daytime light relay harness connector E67 (A) and the front combination
lamp harness connector (B).
4. Check continuity between the daytime light relay harness connector E67 (A) and the license plate lamp
harness connector (B)(hatchback) or (C)(sedan).
5. Check continuity between the daytime light relay harness connector E67 (A) and the rear combination
lamp harness connector (B).
Does continuity exist?
YES >> GO TO 4
NO >> Repair the daytime light relay, harness or connectors.
4.CHECK PARKING LAMP GROUND CIRCUIT
1. Turn ignition switch OFF.
(+)
(−)Voltage
License plate lamp connector Terminal
LHA: B87 (hatchback)
B: B62 (sedan)
1 Ground Battery voltage
RHA: B88 (hatchback)
B: B63 (sedan)
(+)
(−)Voltage
Rear combination lamp
connectorTe r m i n a l
LH B80
4 Ground Battery voltage
RH B59
P K I C 111 8 E
AB
Continuity
Connector Terminal Connector Terminal
E67 3LH E53
6Yes
RH B54
Connector Terminal Connector Terminal Continuity
A: E67 3LHB: B87 (hatchback)
C: B62 (sedan)
1Yes
RHB: B88 (hatchback)
C: B63 (sedan)
AB
Continuity
Connector Terminal Connector Terminal
E67 3LH B80
4Yes
RH B59
Page 3049 of 5883
EXL-48
< COMPONENT DIAGNOSIS >
PARKING LAMP CIRCUIT
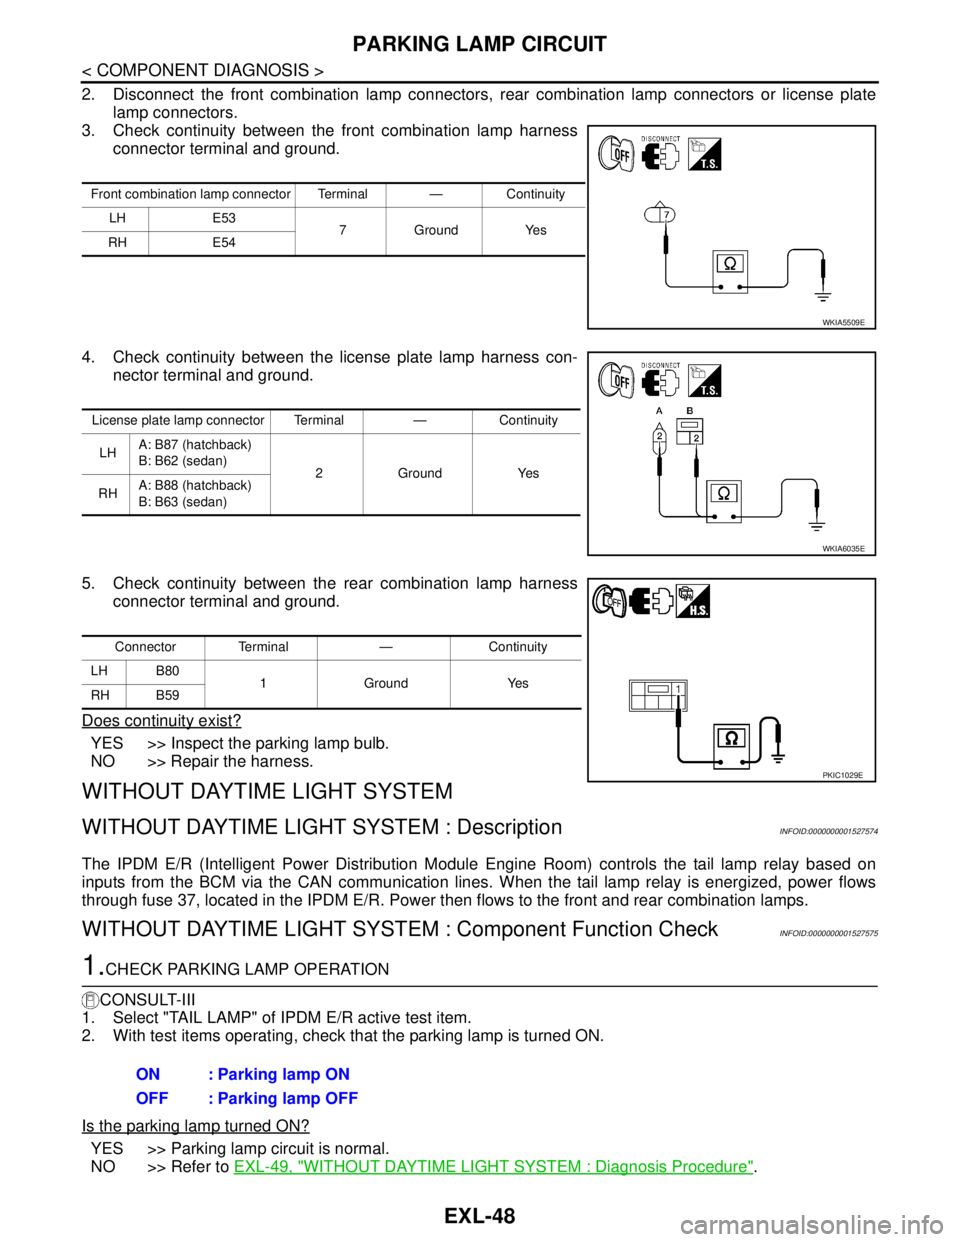
2. Disconnect the front combination lamp connectors, rear combination lamp connectors or license plate
lamp connectors.
3. Check continuity between the front combination lamp harness
connector terminal and ground.
4. Check continuity between the license plate lamp harness con-
nector terminal and ground.
5. Check continuity between the rear combination lamp harness
connector terminal and ground.
Does continuity exist?
YES >> Inspect the parking lamp bulb.
NO >> Repair the harness.
WITHOUT DAYTIME LIGHT SYSTEM
WITHOUT DAYTIME LIGHT SYSTEM : DescriptionINFOID:0000000001527574
The IPDM E/R (Intelligent Power Distribution Module Engine Room) controls the tail lamp relay based on
inputs from the BCM via the CAN communication lines. When the tail lamp relay is energized, power flows
through fuse 37, located in the IPDM E/R. Power then flows to the front and rear combination lamps.
WITHOUT DAYTIME LIGHT SYSTEM : Component Function CheckINFOID:0000000001527575
1.CHECK PARKING LAMP OPERATION
CONSULT-III
1. Select "TAIL LAMP" of IPDM E/R active test item.
2. With test items operating, check that the parking lamp is turned ON.
Is the parking lamp turned ON?
YES >> Parking lamp circuit is normal.
NO >> Refer to EXL-49, "
WITHOUT DAYTIME LIGHT SYSTEM : Diagnosis Procedure".
Front combination lamp connector Terminal — Continuity
LH E53
7GroundYes
RH E54
WKIA5509E
License plate lamp connector Terminal — Continuity
LHA: B87 (hatchback)
B: B62 (sedan)
2GroundYes
RHA: B88 (hatchback)
B: B63 (sedan)
WKIA6035E
Connector Terminal — Continuity
LH B80
1Ground Yes
RH B59
PKIC1029E
ON : Parking lamp ON
OFF : Parking lamp OFF
Page 3050 of 5883
PARKING LAMP CIRCUIT
EXL-49
< COMPONENT DIAGNOSIS >
C
D
E
F
G
H
I
J
K
MA
B
EXL
N
O
P
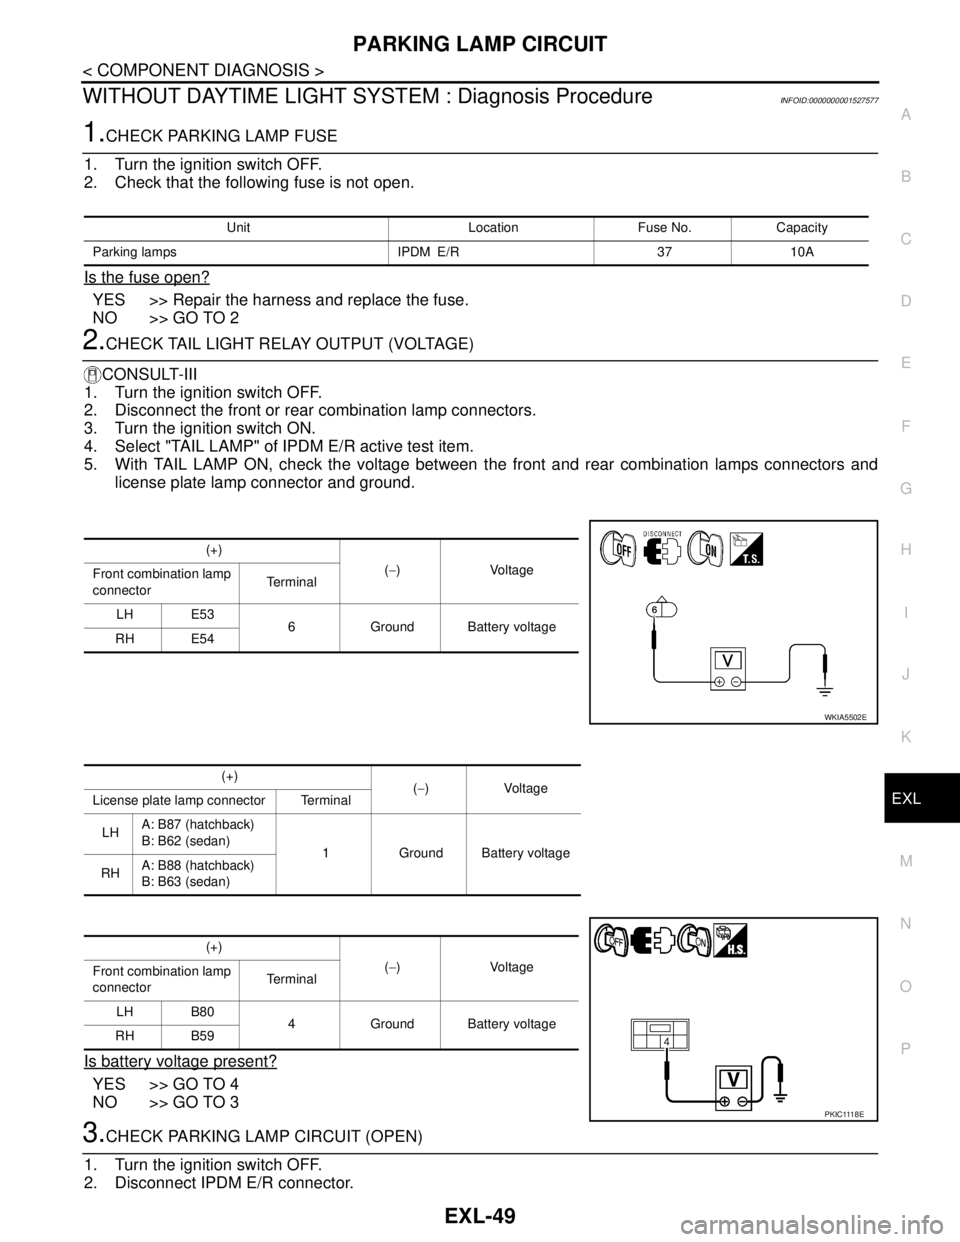
WITHOUT DAYTIME LIGHT SYSTEM : Diagnosis ProcedureINFOID:0000000001527577
1.CHECK PARKING LAMP FUSE
1. Turn the ignition switch OFF.
2. Check that the following fuse is not open.
Is the fuse open?
YES >> Repair the harness and replace the fuse.
NO >> GO TO 2
2.CHECK TAIL LIGHT RELAY OUTPUT (VOLTAGE)
CONSULT-III
1. Turn the ignition switch OFF.
2. Disconnect the front or rear combination lamp connectors.
3. Turn the ignition switch ON.
4. Select "TAIL LAMP" of IPDM E/R active test item.
5. With TAIL LAMP ON, check the voltage between the front and rear combination lamps connectors and
license plate lamp connector and ground.
Is battery voltage present?
YES >> GO TO 4
NO >> GO TO 3
3.CHECK PARKING LAMP CIRCUIT (OPEN)
1. Turn the ignition switch OFF.
2. Disconnect IPDM E/R connector.
Unit Location Fuse No. Capacity
Parking lamps IPDM E/R 37 10A
(+)
(−)Voltage
Front combination lamp
connectorTe r m i n a l
LH E53
6 Ground Battery voltage
RH E54
WKIA5502E
(+)
(−)Voltage
License plate lamp connector Terminal
LHA: B87 (hatchback)
B: B62 (sedan)
1 Ground Battery voltage
RHA: B88 (hatchback)
B: B63 (sedan)
(+)
(−)Voltage
Front combination lamp
connectorTe r m i n a l
LH B80
4 Ground Battery voltage
RH B59
P K I C 111 8 E
Page 3051 of 5883
EXL-50
< COMPONENT DIAGNOSIS >
PARKING LAMP CIRCUIT
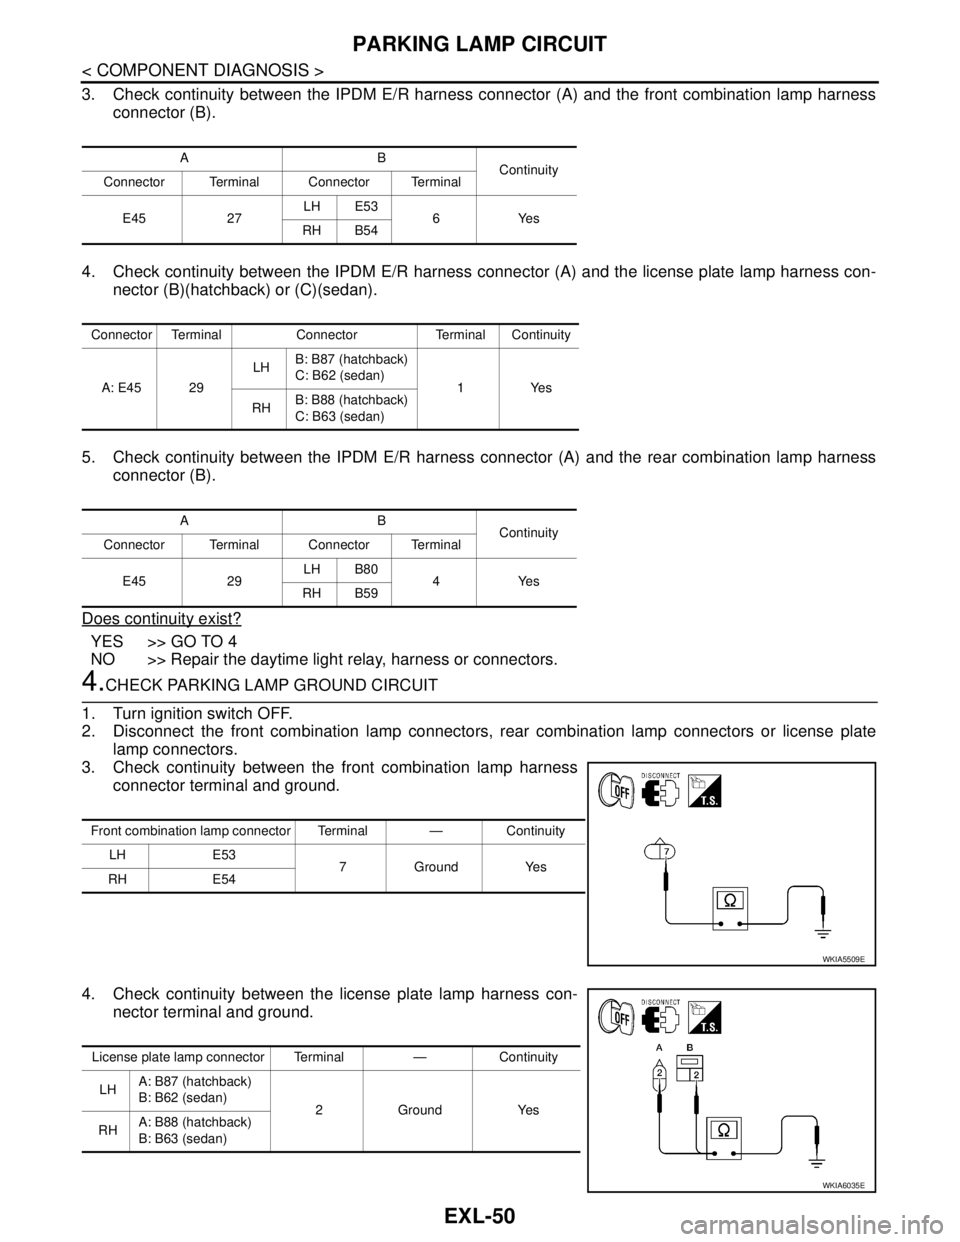
3. Check continuity between the IPDM E/R harness connector (A) and the front combination lamp harness
connector (B).
4. Check continuity between the IPDM E/R harness connector (A) and the license plate lamp harness con-
nector (B)(hatchback) or (C)(sedan).
5. Check continuity between the IPDM E/R harness connector (A) and the rear combination lamp harness
connector (B).
Does continuity exist?
YES >> GO TO 4
NO >> Repair the daytime light relay, harness or connectors.
4.CHECK PARKING LAMP GROUND CIRCUIT
1. Turn ignition switch OFF.
2. Disconnect the front combination lamp connectors, rear combination lamp connectors or license plate
lamp connectors.
3. Check continuity between the front combination lamp harness
connector terminal and ground.
4. Check continuity between the license plate lamp harness con-
nector terminal and ground.
AB
Continuity
Connector Terminal Connector Terminal
E45 27LH E53
6Yes
RH B54
Connector Terminal Connector Terminal Continuity
A: E45 29LHB: B87 (hatchback)
C: B62 (sedan)
1Yes
RHB: B88 (hatchback)
C: B63 (sedan)
AB
Continuity
Connector Terminal Connector Terminal
E45 29LH B80
4Yes
RH B59
Front combination lamp connector Terminal — Continuity
LH E53
7GroundYes
RH E54
WKIA5509E
License plate lamp connector Terminal — Continuity
LHA: B87 (hatchback)
B: B62 (sedan)
2GroundYes
RHA: B88 (hatchback)
B: B63 (sedan)
WKIA6035E
Page 3094 of 5883
REAR COMBINATION LAMP
EXL-93
< ON-VEHICLE REPAIR >
C
D
E
F
G
H
I
J
K
MA
B
EXL
N
O
P
REAR COMBINATION LAMP
Bulb ReplacementINFOID:0000000001530525
HATCHBACK
1. Remove the rear combination lamp. Refer to EXL-93, "Removal and Installation".
2. Turn the bulb socket counterclockwise to unlock it.
3. Remove the bulb.
4. Installation is in the reverse order of removal.
SEDAN
1. Remove the trunk side finisher. Refer to INT-35, "Removal and Installation".
2. Turn the bulb socket counterclockwise to unlock it.
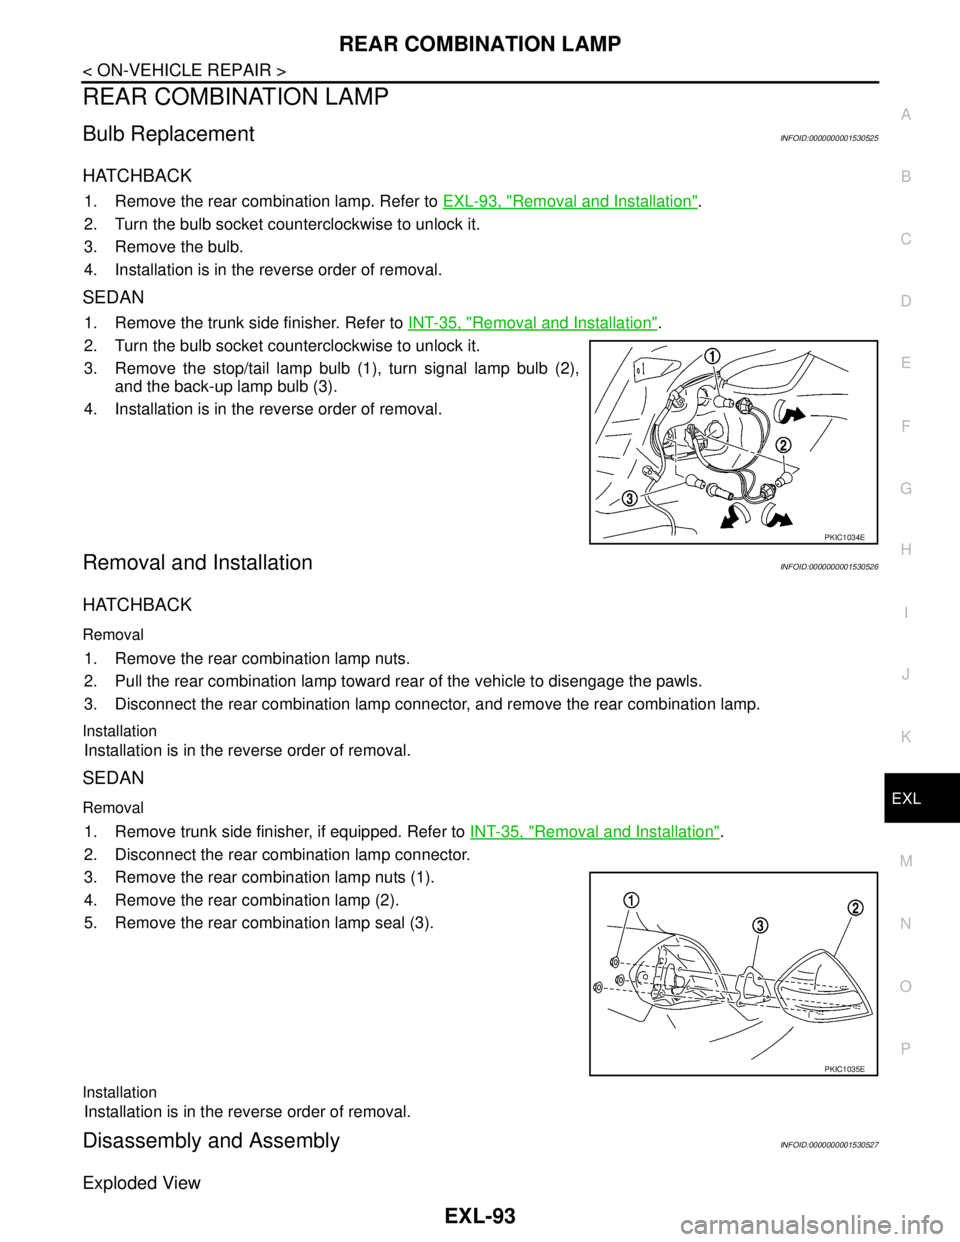
3. Remove the stop/tail lamp bulb (1), turn signal lamp bulb (2),
and the back-up lamp bulb (3).
4. Installation is in the reverse order of removal.
Removal and InstallationINFOID:0000000001530526
HATCHBACK
Removal
1. Remove the rear combination lamp nuts.
2. Pull the rear combination lamp toward rear of the vehicle to disengage the pawls.
3. Disconnect the rear combination lamp connector, and remove the rear combination lamp.
Installation
Installation is in the reverse order of removal.
SEDAN
Removal
1. Remove trunk side finisher, if equipped. Refer to INT-35, "Removal and Installation".
2. Disconnect the rear combination lamp connector.
3. Remove the rear combination lamp nuts (1).
4. Remove the rear combination lamp (2).
5. Remove the rear combination lamp seal (3).
Installation
Installation is in the reverse order of removal.
Disassembly and AssemblyINFOID:0000000001530527
Exploded View
PKIC1034E
PKIC1035E