2007 NISSAN TIIDA oil
[x] Cancel search: oilPage 4266 of 5883
MA-26
< ON-VEHICLE MAINTENANCE >
ENGINE MAINTENANCE (HR16DE)
AIR CLEANER FILTER : Removal and Installation
INFOID:0000000001730850
REMOVAL
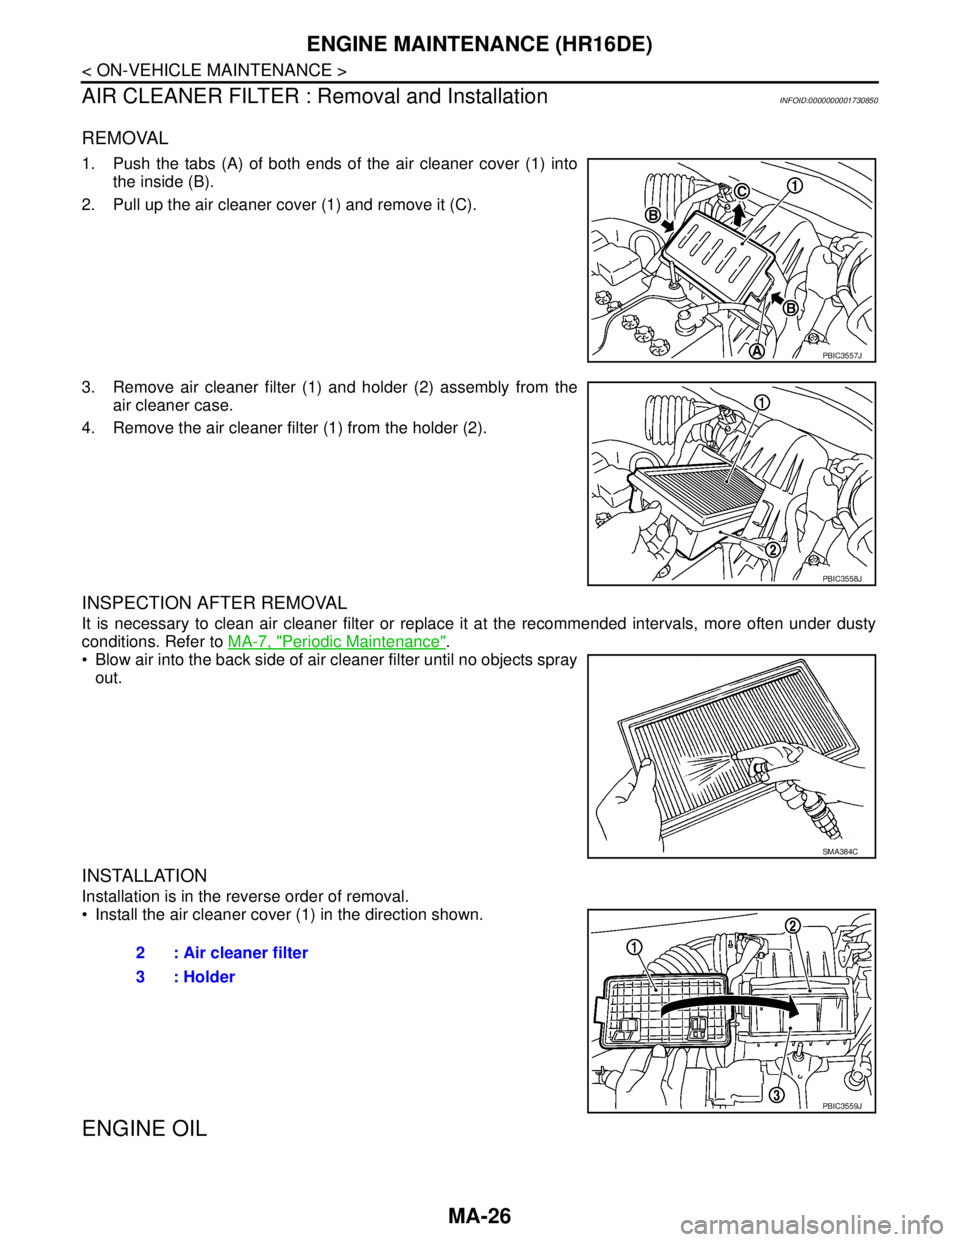
1. Push the tabs (A) of both ends of the air cleaner cover (1) into
the inside (B).
2. Pull up the air cleaner cover (1) and remove it (C).
3. Remove air cleaner filter (1) and holder (2) assembly from the
air cleaner case.
4. Remove the air cleaner filter (1) from the holder (2).
INSPECTION AFTER REMOVAL
It is necessary to clean air cleaner filter or replace it at the recommended intervals, more often under dusty
conditions. Refer to MA-7, "
Periodic Maintenance".
Blow air into the back side of air cleaner filter until no objects spray
out.
INSTALLATION
Installation is in the reverse order of removal.
Install the air cleaner cover (1) in the direction shown.
ENGINE OIL
PBIC3557J
PBIC3558J
SMA384C
2 : Air cleaner filter
3 : Holder
PBIC3559J
Page 4267 of 5883
ENGINE MAINTENANCE (HR16DE)
MA-27
< ON-VEHICLE MAINTENANCE >
C
D
E
F
G
H
I
J
K
L
MB
MAN
OA
ENGINE OIL : DrainingINFOID:0000000001730852
WARNING:
Be careful not to get burned, as engine oil may be hot.
Prolonged and repeated contact with used engine oil may cause skin cancer. Try to avoid direct skin
contact with used engine oil. If skin contact is made, wash thoroughly with soap or hand cleaner as
soon as possible.
1. Warm up the engine, and check for engine oil leakage from engine components. Refer to LU-6, "
Inspec-
tion".
2. Stop the engine and wait for 10 minutes.
3. Loosen oil filler cap.
4. Remove drain plug and then drain engine oil.
ENGINE OIL : RefillingINFOID:0000000001730853
1. Install drain plug with new washer. Refer to EM-100, "Exploded View".
CAUTION:
Be sure to clean drain plug and install with new washer.
2. Refill with new engine oil.
Engine oil specification and viscosity: Refer to MA-19, "
Fluids and Lubricants".
CAUTION:
The refill capacity depends on the engine oil temperature and drain time. Use these specifica-
tions for reference only.
Always use oil level gauge to determine the proper amount of engine oil in the engine.
3. Warm up engine and check area around drain plug and oil filter for engine oil leakage.
4. Stop engine and wait for 10 minutes.
5. Check the engine oil level. Refer to LU-6, "
Inspection".
OIL FILTER
OIL FILTER : Removal and InstallationINFOID:0000000001730854
REMOVAL
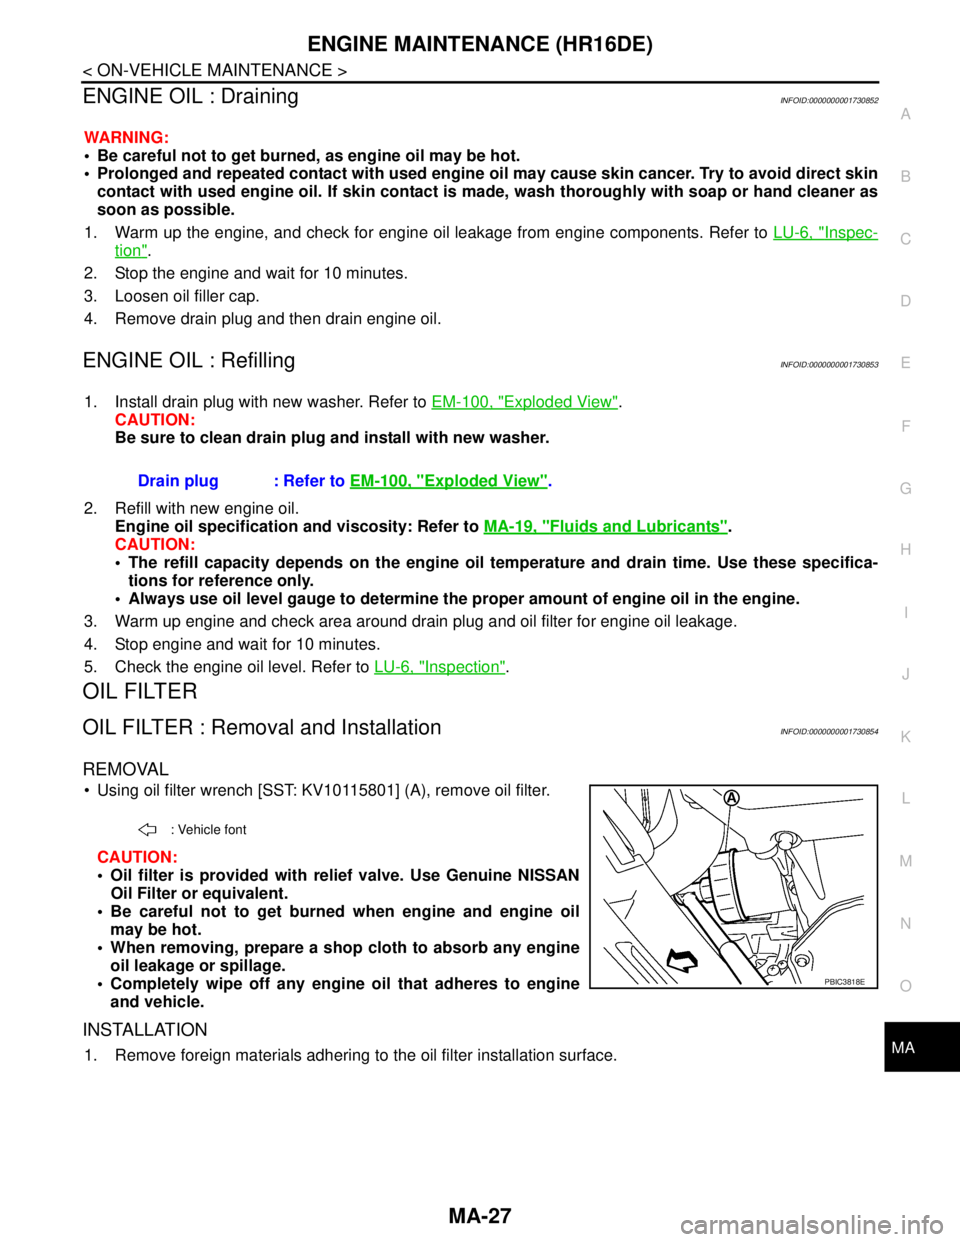
Using oil filter wrench [SST: KV10115801] (A), remove oil filter.
CAUTION:
Oil filter is provided with relief valve. Use Genuine NISSAN
Oil Filter or equivalent.
Be careful not to get burned when engine and engine oil
may be hot.
When removing, prepare a shop cloth to absorb any engine
oil leakage or spillage.
Completely wipe off any engine oil that adheres to engine
and vehicle.
INSTALLATION
1. Remove foreign materials adhering to the oil filter installation surface.Drain plug : Refer to EM-100, "
Exploded View".
: Vehicle font
PBIC3818E
Page 4268 of 5883
MA-28
< ON-VEHICLE MAINTENANCE >
ENGINE MAINTENANCE (HR16DE)
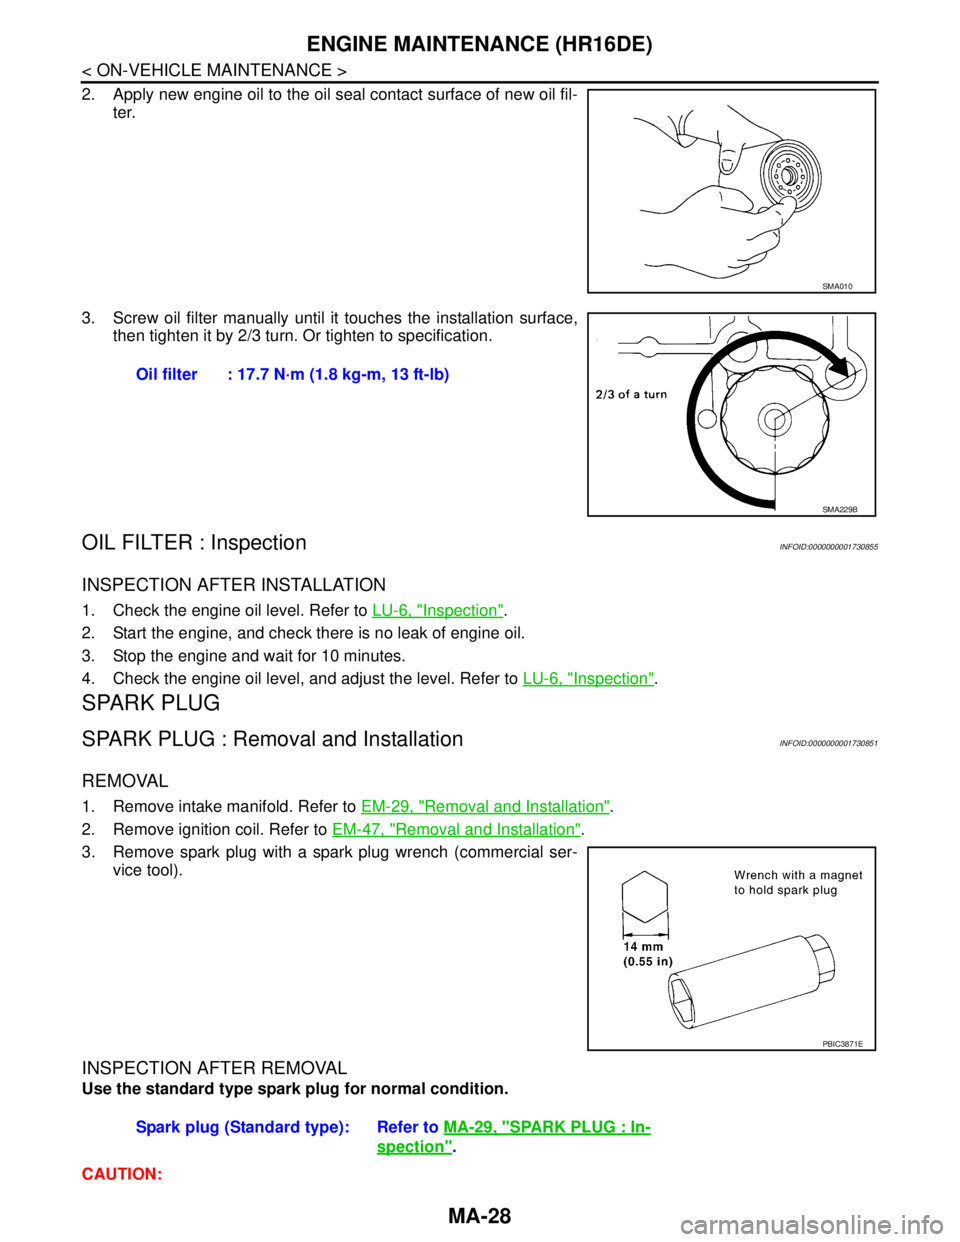
2. Apply new engine oil to the oil seal contact surface of new oil fil-
ter.
3. Screw oil filter manually until it touches the installation surface,
then tighten it by 2/3 turn. Or tighten to specification.
OIL FILTER : InspectionINFOID:0000000001730855
INSPECTION AFTER INSTALLATION
1. Check the engine oil level. Refer to LU-6, "Inspection".
2. Start the engine, and check there is no leak of engine oil.
3. Stop the engine and wait for 10 minutes.
4. Check the engine oil level, and adjust the level. Refer to LU-6, "
Inspection".
SPARK PLUG
SPARK PLUG : Removal and InstallationINFOID:0000000001730851
REMOVAL
1. Remove intake manifold. Refer to EM-29, "Removal and Installation".
2. Remove ignition coil. Refer to EM-47, "
Removal and Installation".
3. Remove spark plug with a spark plug wrench (commercial ser-
vice tool).
INSPECTION AFTER REMOVAL
Use the standard type spark plug for normal condition.
CAUTION:
SMA010
Oil filter : 17.7 N·m (1.8 kg-m, 13 ft-lb)
SMA229B
PBIC3871E
Spark plug (Standard type): Refer to MA-29, "SPARK PLUG : In-
spection".
Page 4274 of 5883
MA-34
< ON-VEHICLE MAINTENANCE >
ENGINE MAINTENANCE (MR18DE)
RADIATOR : Checking Radiator Cap
INFOID:0000000001730871
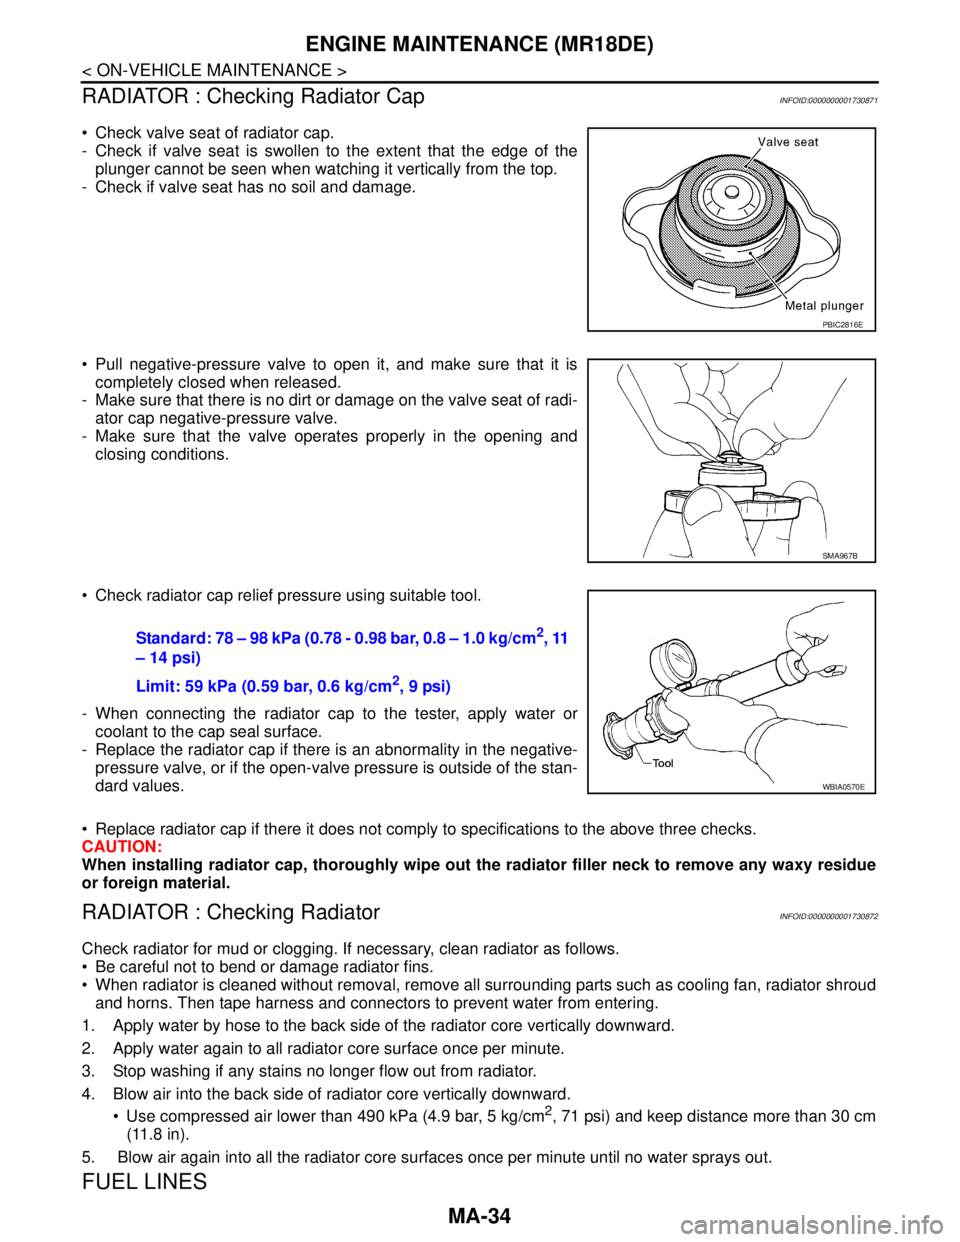
Check valve seat of radiator cap.
- Check if valve seat is swollen to the extent that the edge of the
plunger cannot be seen when watching it vertically from the top.
- Check if valve seat has no soil and damage.
Pull negative-pressure valve to open it, and make sure that it is
completely closed when released.
- Make sure that there is no dirt or damage on the valve seat of radi-
ator cap negative-pressure valve.
- Make sure that the valve operates properly in the opening and
closing conditions.
Check radiator cap relief pressure using suitable tool.
- When connecting the radiator cap to the tester, apply water or
coolant to the cap seal surface.
- Replace the radiator cap if there is an abnormality in the negative-
pressure valve, or if the open-valve pressure is outside of the stan-
dard values.
Replace radiator cap if there it does not comply to specifications to the above three checks.
CAUTION:
When installing radiator cap, thoroughly wipe out the radiator filler neck to remove any waxy residue
or foreign material.
RADIATOR : Checking RadiatorINFOID:0000000001730872
Check radiator for mud or clogging. If necessary, clean radiator as follows.
Be careful not to bend or damage radiator fins.
When radiator is cleaned without removal, remove all surrounding parts such as cooling fan, radiator shroud
and horns. Then tape harness and connectors to prevent water from entering.
1. Apply water by hose to the back side of the radiator core vertically downward.
2. Apply water again to all radiator core surface once per minute.
3. Stop washing if any stains no longer flow out from radiator.
4. Blow air into the back side of radiator core vertically downward.
Use compressed air lower than 490 kPa (4.9 bar, 5 kg/cm
2, 71 psi) and keep distance more than 30 cm
(11.8 in).
5. Blow air again into all the radiator core surfaces once per minute until no water sprays out.
FUEL LINES
PBIC2816E
SMA967B
Standard: 78 – 98 kPa (0.78 - 0.98 bar, 0.8 – 1.0 kg/cm2, 11
– 14 psi)
Limit: 59 kPa (0.59 bar, 0.6 kg/cm
2, 9 psi)
WBIA0570E
Page 4276 of 5883
MA-36
< ON-VEHICLE MAINTENANCE >
ENGINE MAINTENANCE (MR18DE)
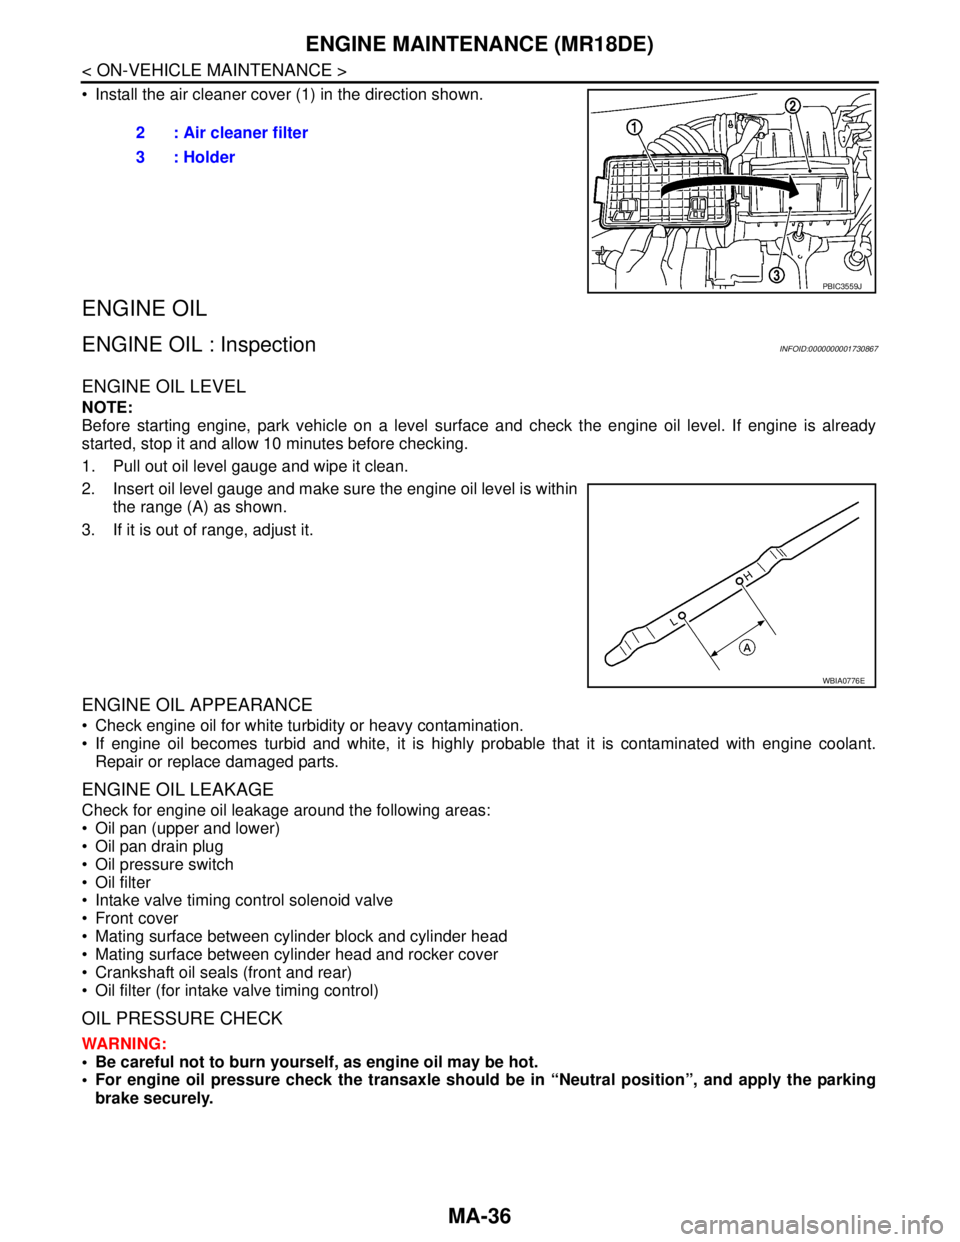
Install the air cleaner cover (1) in the direction shown.
ENGINE OIL
ENGINE OIL : InspectionINFOID:0000000001730867
ENGINE OIL LEVEL
NOTE:
Before starting engine, park vehicle on a level surface and check the engine oil level. If engine is already
started, stop it and allow 10 minutes before checking.
1. Pull out oil level gauge and wipe it clean.
2. Insert oil level gauge and make sure the engine oil level is within
the range (A) as shown.
3. If it is out of range, adjust it.
ENGINE OIL APPEARANCE
Check engine oil for white turbidity or heavy contamination.
If engine oil becomes turbid and white, it is highly probable that it is contaminated with engine coolant.
Repair or replace damaged parts.
ENGINE OIL LEAKAGE
Check for engine oil leakage around the following areas:
Oil pan (upper and lower)
Oil pan drain plug
Oil pressure switch
Oil filter
Intake valve timing control solenoid valve
Front cover
Mating surface between cylinder block and cylinder head
Mating surface between cylinder head and rocker cover
Crankshaft oil seals (front and rear)
Oil filter (for intake valve timing control)
OIL PRESSURE CHECK
WARNING:
Be careful not to burn yourself, as engine oil may be hot.
For engine oil pressure check the transaxle should be in “Neutral position”, and apply the parking
brake securely.2 : Air cleaner filter
3 : Holder
PBIC3559J
WBIA0776E
Page 4277 of 5883
ENGINE MAINTENANCE (MR18DE)
MA-37
< ON-VEHICLE MAINTENANCE >
C
D
E
F
G
H
I
J
K
L
MB
MAN
OA
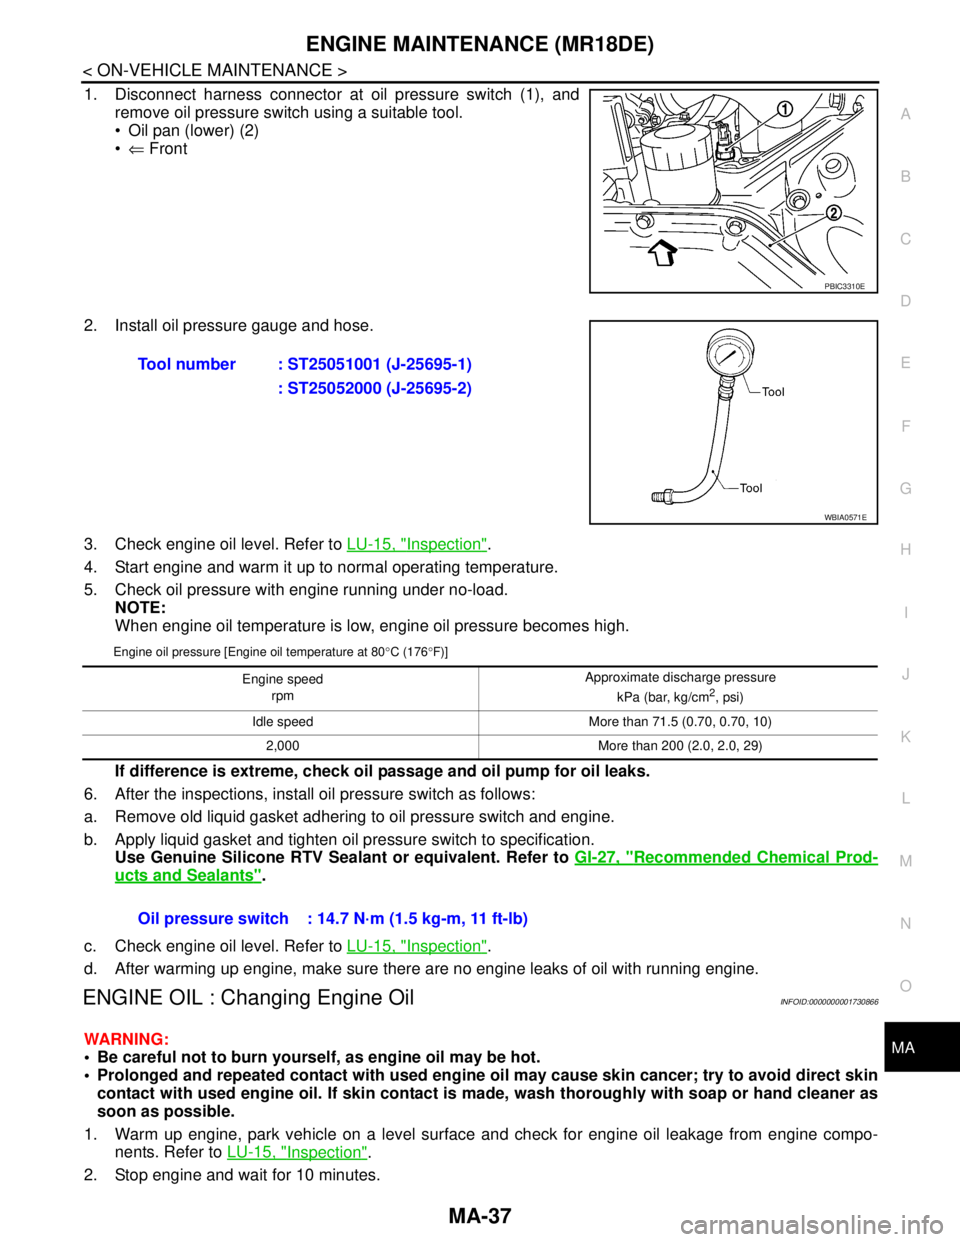
1. Disconnect harness connector at oil pressure switch (1), and
remove oil pressure switch using a suitable tool.
Oil pan (lower) (2)
⇐ Front
2. Install oil pressure gauge and hose.
3. Check engine oil level. Refer to LU-15, "
Inspection".
4. Start engine and warm it up to normal operating temperature.
5. Check oil pressure with engine running under no-load.
NOTE:
When engine oil temperature is low, engine oil pressure becomes high.
Engine oil pressure [Engine oil temperature at 80°C (176°F)]
If difference is extreme, check oil passage and oil pump for oil leaks.
6. After the inspections, install oil pressure switch as follows:
a. Remove old liquid gasket adhering to oil pressure switch and engine.
b. Apply liquid gasket and tighten oil pressure switch to specification.
Use Genuine Silicone RTV Sealant or equivalent. Refer to GI-27, "
Recommended Chemical Prod-
ucts and Sealants".
c. Check engine oil level. Refer to LU-15, "
Inspection".
d. After warming up engine, make sure there are no engine leaks of oil with running engine.
ENGINE OIL : Changing Engine OilINFOID:0000000001730866
WARNING:
Be careful not to burn yourself, as engine oil may be hot.
Prolonged and repeated contact with used engine oil may cause skin cancer; try to avoid direct skin
contact with used engine oil. If skin contact is made, wash thoroughly with soap or hand cleaner as
soon as possible.
1. Warm up engine, park vehicle on a level surface and check for engine oil leakage from engine compo-
nents. Refer to LU-15, "
Inspection".
2. Stop engine and wait for 10 minutes.
PBIC3310E
Tool number : ST25051001 (J-25695-1)
: ST25052000 (J-25695-2)
WBIA0571E
Engine speed
rpm Approximate discharge pressure
kPa (bar, kg/cm2, psi)
Idle speed More than 71.5 (0.70, 0.70, 10)
2,000 More than 200 (2.0, 2.0, 29)
Oil pressure switch : 14.7 N·m (1.5 kg-m, 11 ft-lb)
Page 4278 of 5883
MA-38
< ON-VEHICLE MAINTENANCE >
ENGINE MAINTENANCE (MR18DE)
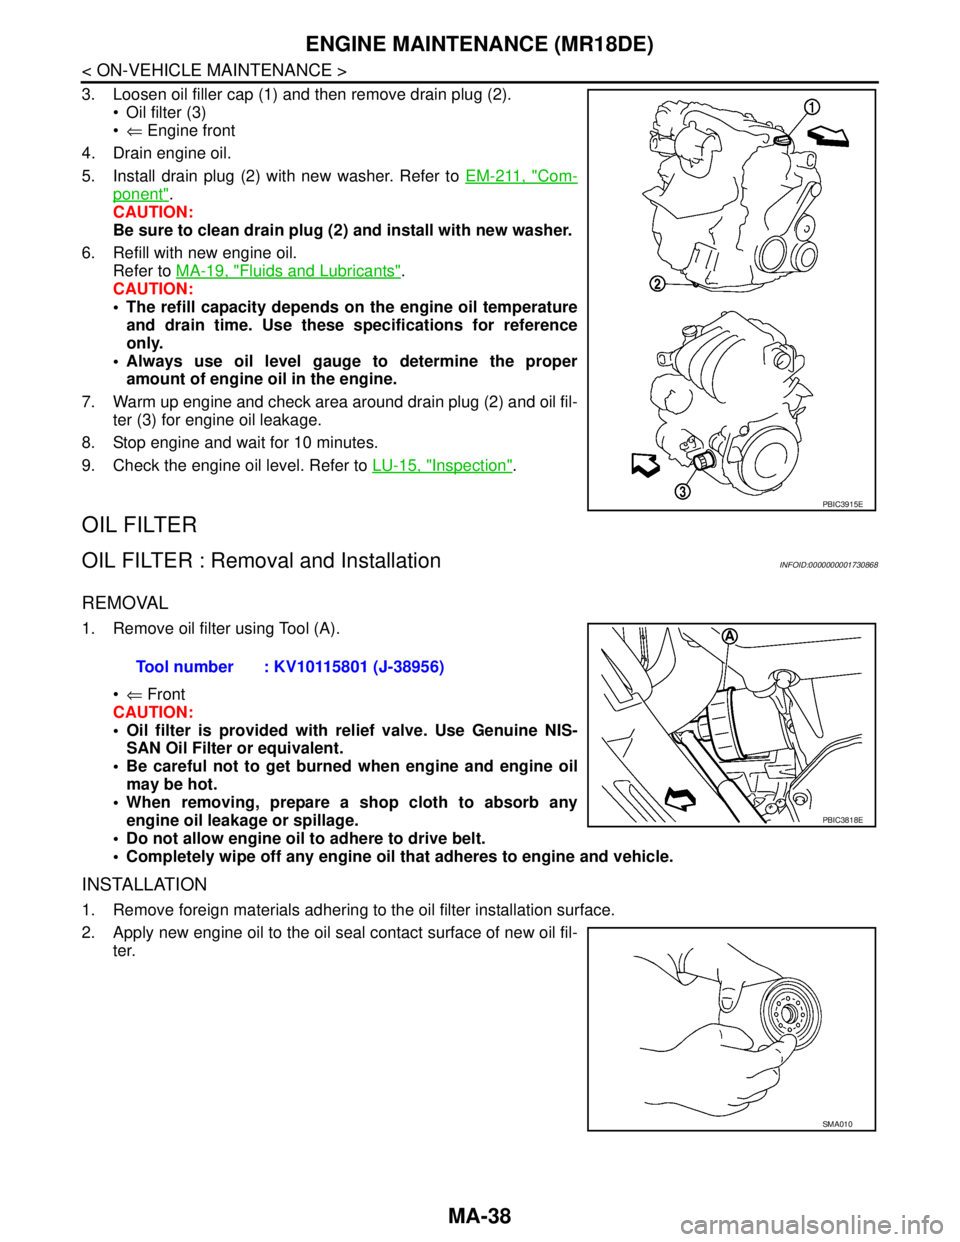
3. Loosen oil filler cap (1) and then remove drain plug (2).
Oil filter (3)
⇐ Engine front
4. Drain engine oil.
5. Install drain plug (2) with new washer. Refer to EM-211, "
Com-
ponent".
CAUTION:
Be sure to clean drain plug (2) and install with new washer.
6. Refill with new engine oil.
Refer to MA-19, "
Fluids and Lubricants".
CAUTION:
The refill capacity depends on the engine oil temperature
and drain time. Use these specifications for reference
only.
Always use oil level gauge to determine the proper
amount of engine oil in the engine.
7. Warm up engine and check area around drain plug (2) and oil fil-
ter (3) for engine oil leakage.
8. Stop engine and wait for 10 minutes.
9. Check the engine oil level. Refer to LU-15, "
Inspection".
OIL FILTER
OIL FILTER : Removal and InstallationINFOID:0000000001730868
REMOVAL
1. Remove oil filter using Tool (A).
⇐ Front
CAUTION:
Oil filter is provided with relief valve. Use Genuine NIS-
SAN Oil Filter or equivalent.
Be careful not to get burned when engine and engine oil
may be hot.
When removing, prepare a shop cloth to absorb any
engine oil leakage or spillage.
Do not allow engine oil to adhere to drive belt.
Completely wipe off any engine oil that adheres to engine and vehicle.
INSTALLATION
1. Remove foreign materials adhering to the oil filter installation surface.
2. Apply new engine oil to the oil seal contact surface of new oil fil-
ter.
PBIC3915E
Tool number : KV10115801 (J-38956)
PBIC3818E
SMA010
Page 4279 of 5883
ENGINE MAINTENANCE (MR18DE)
MA-39
< ON-VEHICLE MAINTENANCE >
C
D
E
F
G
H
I
J
K
L
MB
MAN
OA
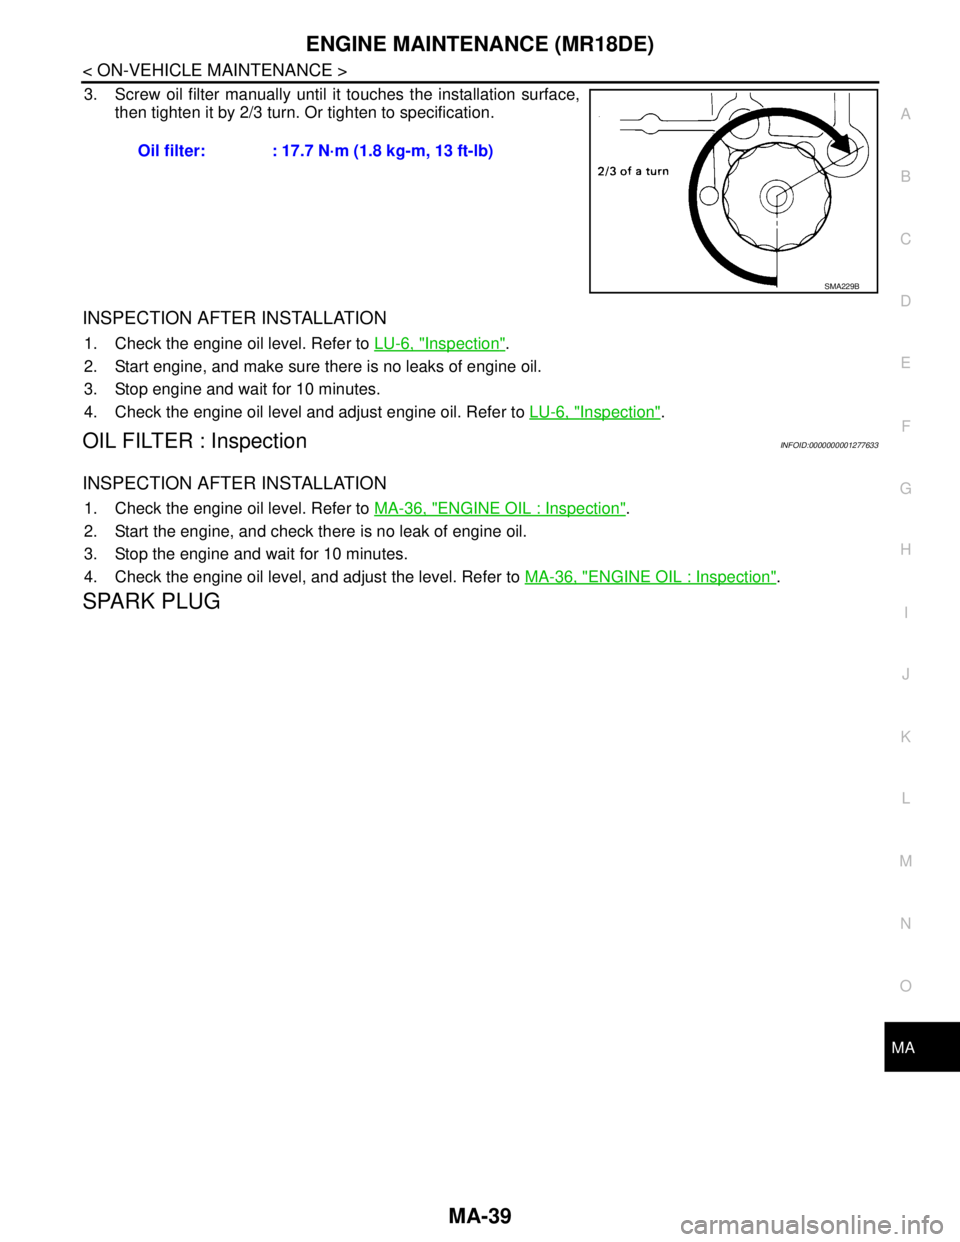
3. Screw oil filter manually until it touches the installation surface,
then tighten it by 2/3 turn. Or tighten to specification.
INSPECTION AFTER INSTALLATION
1. Check the engine oil level. Refer to LU-6, "Inspection".
2. Start engine, and make sure there is no leaks of engine oil.
3. Stop engine and wait for 10 minutes.
4. Check the engine oil level and adjust engine oil. Refer to LU-6, "
Inspection".
OIL FILTER : InspectionINFOID:0000000001277633
INSPECTION AFTER INSTALLATION
1. Check the engine oil level. Refer to MA-36, "ENGINE OIL : Inspection".
2. Start the engine, and check there is no leak of engine oil.
3. Stop the engine and wait for 10 minutes.
4. Check the engine oil level, and adjust the level. Refer to MA-36, "
ENGINE OIL : Inspection".
SPARK PLUG
Oil filter: : 17.7 N·m (1.8 kg-m, 13 ft-lb)
SMA229B