2007 NISSAN TIIDA brake
[x] Cancel search: brakePage 4257 of 5883
PERIODIC MAINTENANCE
MA-17
< ON-VEHICLE MAINTENANCE >
C
D
E
F
G
H
I
J
K
L
MB
MAN
OA
NOTE:
(1) Inspect once per year.
Maintenance items with “ ” should be performed more frequently according to “Maintenance Under Severe Driving Con-
ditions”.
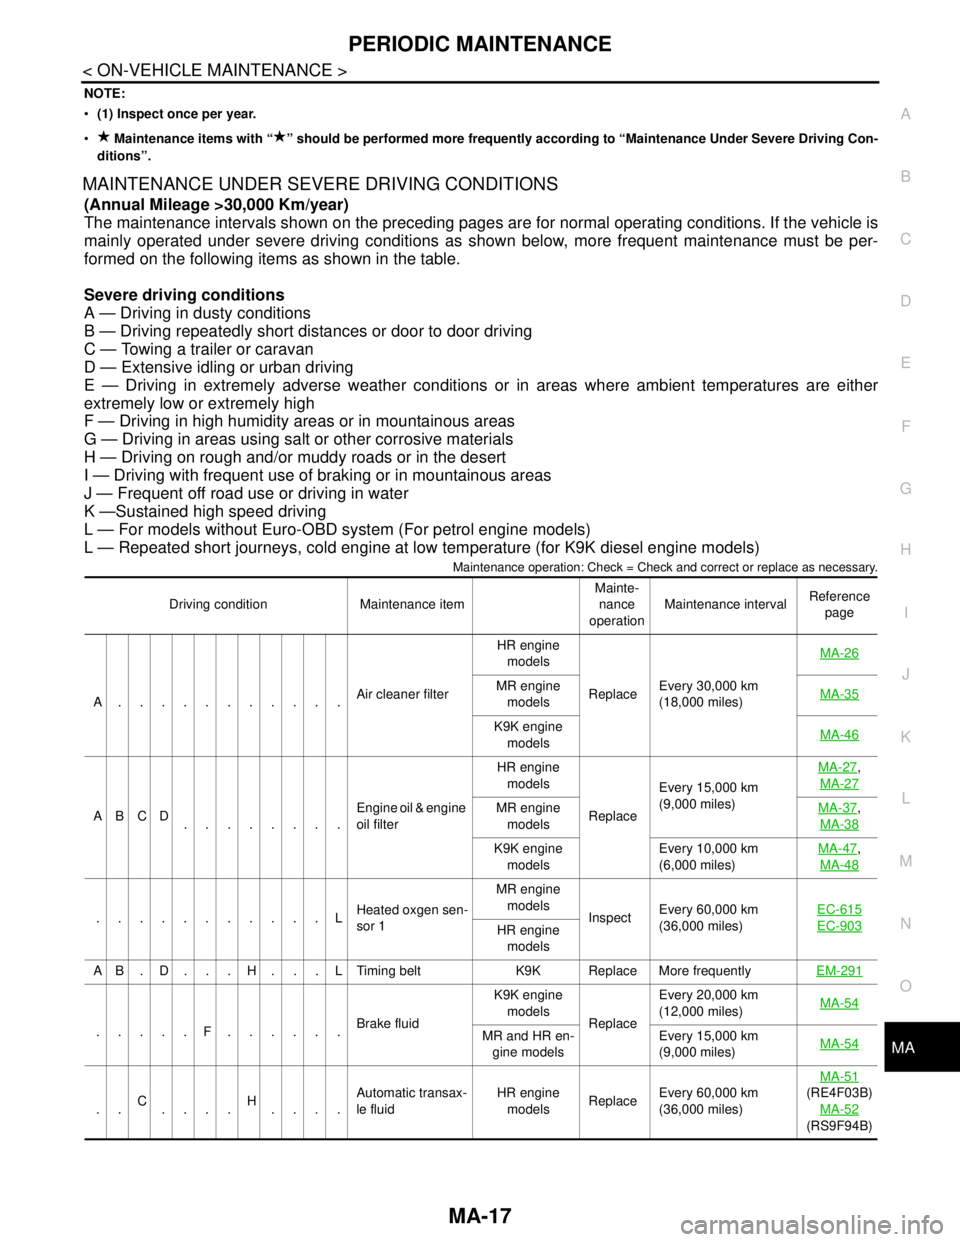
MAINTENANCE UNDER SEVERE DRIVING CONDITIONS
(Annual Mileage >30,000 Km/year)
The maintenance intervals shown on the preceding pages are for normal operating conditions. If the vehicle is
mainly operated under severe driving conditions as shown below, more frequent maintenance must be per-
formed on the following items as shown in the table.
Severe driving conditions
A — Driving in dusty conditions
B — Driving repeatedly short distances or door to door driving
C — Towing a trailer or caravan
D — Extensive idling or urban driving
E — Driving in extremely adverse weather conditions or in areas where ambient temperatures are either
extremely low or extremely high
F — Driving in high humidity areas or in mountainous areas
G — Driving in areas using salt or other corrosive materials
H — Driving on rough and/or muddy roads or in the desert
I — Driving with frequent use of braking or in mountainous areas
J — Frequent off road use or driving in water
K —Sustained high speed driving
L — For models without Euro-OBD system (For petrol engine models)
L — Repeated short journeys, cold engine at low temperature (for K9K diesel engine models)
Maintenance operation: Check = Check and correct or replace as necessary.
Driving condition Maintenance itemMainte-
nance
operationMaintenance intervalReference
page
A...........Air cleaner filterHR engine
models
ReplaceEvery 30,000 km
(18,000 miles) MA-26
MR engine
modelsMA-35
K9K engine
modelsMA-46
ABCD
........Engine oil & engine
oil filter HR engine
models
ReplaceEvery 15,000 km
(9,000 miles) MA-27
,
MA-27
MR engine
modelsMA-37,
MA-38
K9K engine
modelsEvery 10,000 km
(6,000 miles) MA-47,
MA-48
...........LHeated oxgen sen-
sor 1MR engine
models
InspectEvery 60,000 km
(36,000 miles) EC-615EC-903HR engine
models
A B . D . . . H . . . L Timing belt K9K Replace More frequentlyEM-291
.....F......Brake fluidK9K engine
models
ReplaceEvery 20,000 km
(12,000 miles) MA-54MR and HR en-
gine modelsEvery 15,000 km
(9,000 miles) MA-54
..C
....H
....Automatic transax-
le fluidHR engine
modelsReplaceEvery 60,000 km
(36,000 miles) MA-51
(RE4F03B)
MA-52
(RS9F94B)
Page 4258 of 5883
MA-18
< ON-VEHICLE MAINTENANCE >
PERIODIC MAINTENANCE
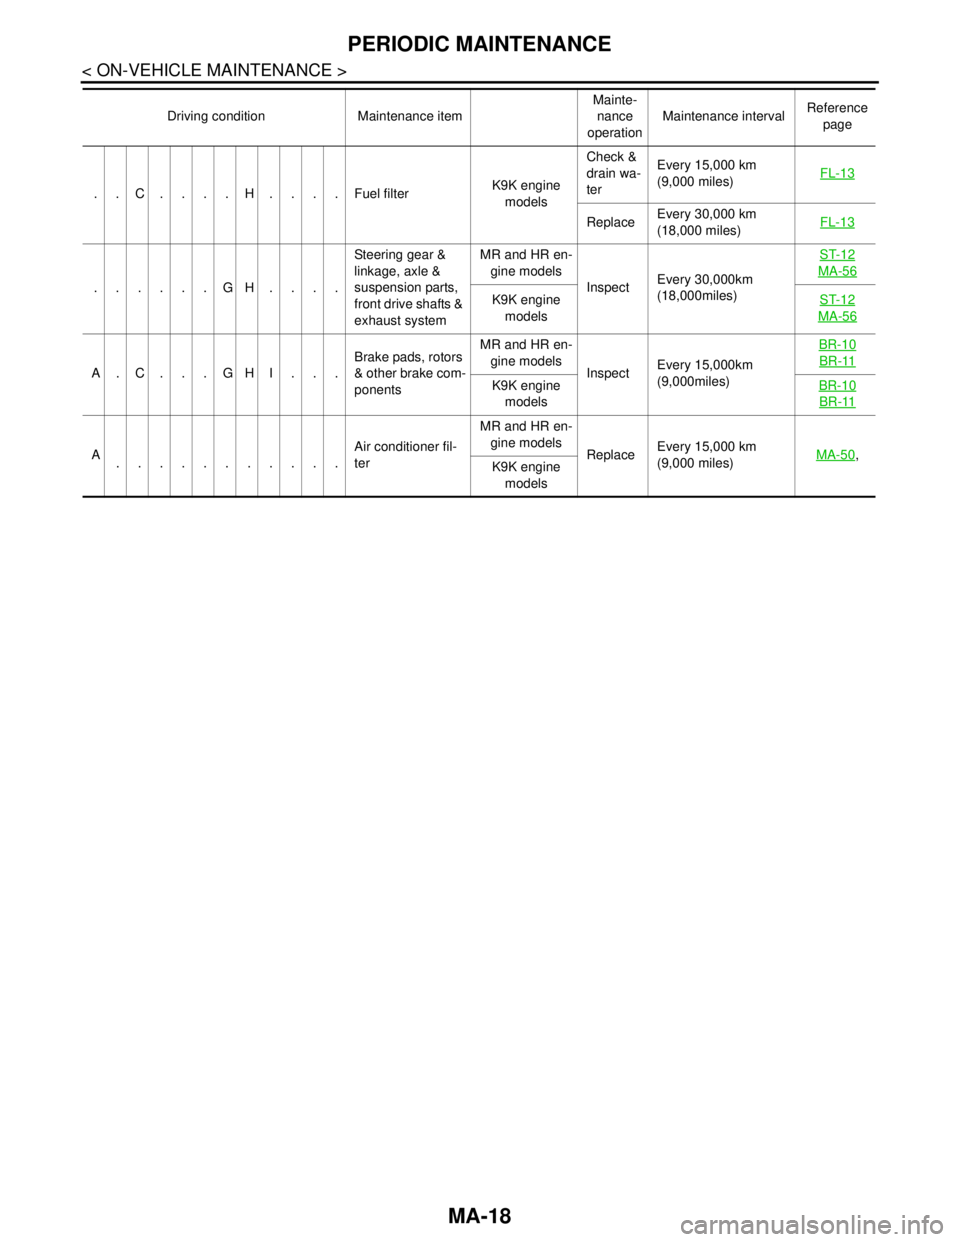
..C....H....Fuel filter K9K engine
modelsCheck &
drain wa-
terEvery 15,000 km
(9,000 miles) FL-13
ReplaceEvery 30,000 km
(18,000 miles)FL-13
......GH....Steering gear &
linkage, axle &
suspension parts,
front drive shafts &
exhaust systemMR and HR en-
gine models
InspectEvery 30,000km
(18,000miles)ST-12
MA-56
K9K engine
modelsST-12
MA-56
A.C...GHI...Brake pads, rotors
& other brake com-
ponentsMR and HR en-
gine models
InspectEvery 15,000km
(9,000miles) BR-10BR-11
K9K engine
modelsBR-10
BR-11
A
...........Air conditioner fil-
terMR and HR en-
gine models
ReplaceEvery 15,000 km
(9,000 miles)MA-50,
K9K engine
models Driving condition Maintenance itemMainte-
nance
operationMaintenance intervalReference
page
Page 4259 of 5883

RECOMMENDED FLUIDS AND LUBRICANTS
MA-19
< ON-VEHICLE MAINTENANCE >
C
D
E
F
G
H
I
J
K
L
MB
MAN
OA
RECOMMENDED FLUIDS AND LUBRICANTS
Fluids and LubricantsINFOID:0000000001277599
*1: For further details, see “SAE Viscosity Number”.
*2: Use Genuine NISSAN Engine Coolant or equivalent in its quality, in order to avoid possible aluminum corrosion within the engine
cooling system caused by the use of non-genuine engine coolant.
Note that any repairs for the incidents within the engine cooling system while using non-genuine engine coolant may not be
covered by the warranty even if such incidents occurred during the warranty period.
*3: Contact a NISSAN dealership for more information regarding suitable fluids, including recommended brand(s) of DEXTRON™™
Automatic Transaxle Fluid.
*4: Never mix different types of fluid (DOT 3 and DOT 4).Capacity (Approximate)
Recommended Fluids/Lubricants
LiterImp mea-
sure
Engine oil
Drain and
refillWith oil filter
changeHR engine 4.6 4 qt
HR and MR engines
Genuine NISSAN engine oil*1
API SL or SM*1
ILSAC grade GF-3 or GF-4*1
ACEA A1/B1, A3/B3, A3/B4, A5/B5,
C2 or C3
*1
K9K engine
Genuine NISSAN engine oil *1
ACEA A1-B1*1 MR engine 3.4 3 qt
K9K engine 4.4 3-7/8 qt
Without oil
filter changeHR engine 4.4 3-7/8 qt
MR engine 3.2 2-7/8 qt
K9K engine 4.24 3-3/4 qt
Dry engine (engine over-
haul)HR engine 4.8 4-1/4 qt
MR engine 3.9 3-3/8 qt
K9K engine 4.56 4 qt
Cooling system (with res-
ervoir)HR engineM/T models
without A/C5.6 4-7/8 qt
Genuine NISSAN Engine Coolant or
equivalent in its quality*2 M/T models
with A/C6.0 5-1/4 qt
A/T models 5.4 4-3/4 qt
MR engineWithout A/C 4.9 4-5/8 qt
With A/C 5.3 4-3/8 qt
K9K engine 6.0 5-1/4 qt
Reservoir tankHR engineM/T models
without A/C0.7 5/8 qt
M/T models
with A/C1.2 1-1/8 qt
A/T models 0.7 5/8 qt
MR engineWithout A/C 1.2 1-1/8 qt
With A/C 0.7 5/8 qt
K9K engine 1.2 1-1/8 qt
Manual transaxle gear oilJH3 2.6 4-5/8 pt
Genuine NISSAN gear oil Passenger
Car or API GL-4, Viscosity SAE 75W-80
JR5 2.5 4-3/8 pt
Automatic transaxle fluid 7.7 6-3/4 qtGenuine NISSAN ATF Matic D or equiv-
alent*3
Brake and clutch fluid — —Genuine NISSAN brake fluid or equiva-
lent DOT 4 (US FMVSS No. 116)*4
Multi-purpose grease — — NLGI No. 2 (Lithium soap base)
Page 4276 of 5883
MA-36
< ON-VEHICLE MAINTENANCE >
ENGINE MAINTENANCE (MR18DE)
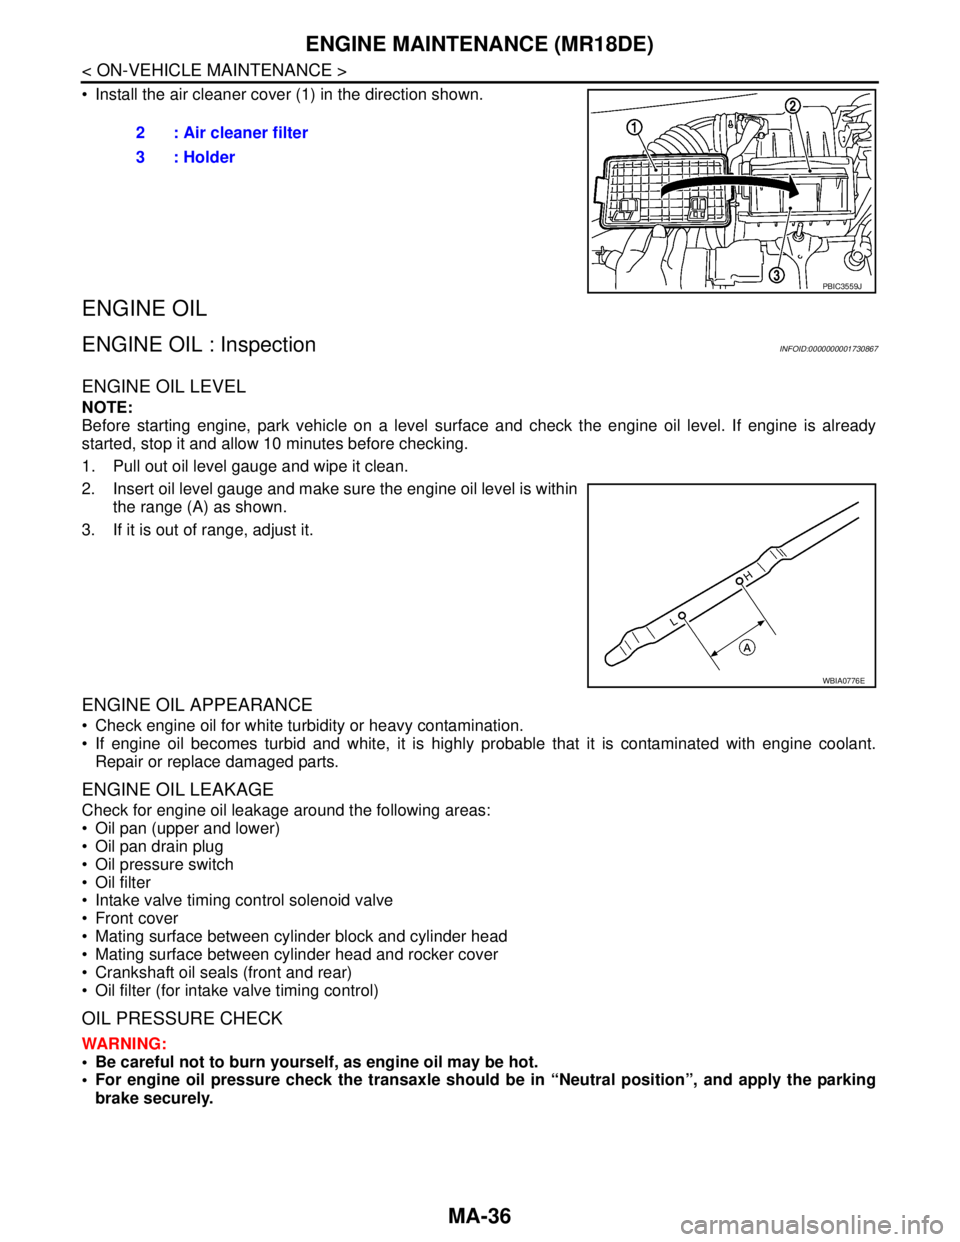
Install the air cleaner cover (1) in the direction shown.
ENGINE OIL
ENGINE OIL : InspectionINFOID:0000000001730867
ENGINE OIL LEVEL
NOTE:
Before starting engine, park vehicle on a level surface and check the engine oil level. If engine is already
started, stop it and allow 10 minutes before checking.
1. Pull out oil level gauge and wipe it clean.
2. Insert oil level gauge and make sure the engine oil level is within
the range (A) as shown.
3. If it is out of range, adjust it.
ENGINE OIL APPEARANCE
Check engine oil for white turbidity or heavy contamination.
If engine oil becomes turbid and white, it is highly probable that it is contaminated with engine coolant.
Repair or replace damaged parts.
ENGINE OIL LEAKAGE
Check for engine oil leakage around the following areas:
Oil pan (upper and lower)
Oil pan drain plug
Oil pressure switch
Oil filter
Intake valve timing control solenoid valve
Front cover
Mating surface between cylinder block and cylinder head
Mating surface between cylinder head and rocker cover
Crankshaft oil seals (front and rear)
Oil filter (for intake valve timing control)
OIL PRESSURE CHECK
WARNING:
Be careful not to burn yourself, as engine oil may be hot.
For engine oil pressure check the transaxle should be in “Neutral position”, and apply the parking
brake securely.2 : Air cleaner filter
3 : Holder
PBIC3559J
WBIA0776E
Page 4291 of 5883
CHASSIS AND BODY MAINTENANCE
MA-51
< ON-VEHICLE MAINTENANCE >
C
D
E
F
G
H
I
J
K
L
MB
MAN
OA
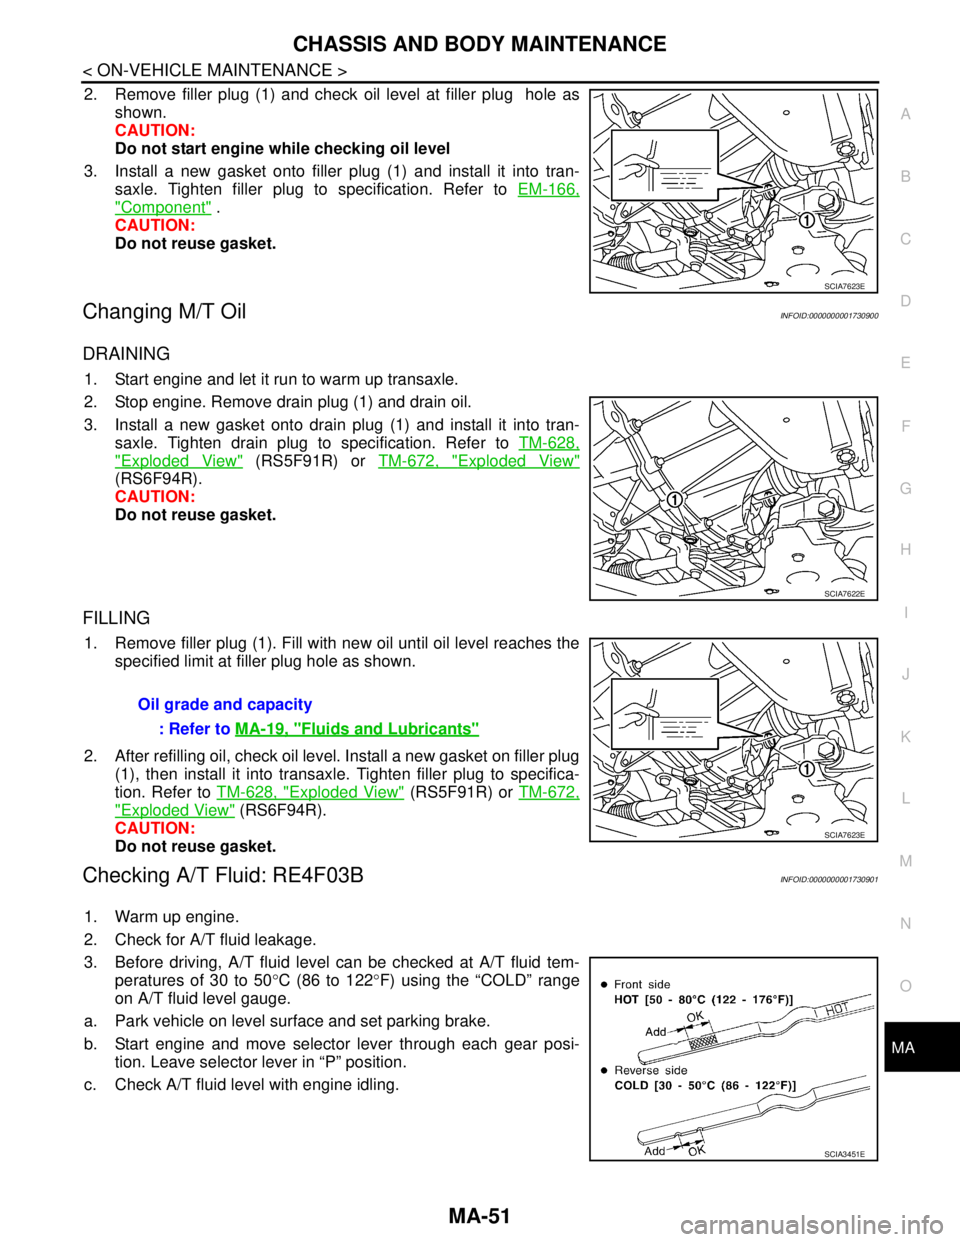
2. Remove filler plug (1) and check oil level at filler plug hole as
shown.
CAUTION:
Do not start engine while checking oil level
3. Install a new gasket onto filler plug (1) and install it into tran-
saxle. Tighten filler plug to specification. Refer to EM-166,
"Component" .
CAUTION:
Do not reuse gasket.
Changing M/T OilINFOID:0000000001730900
DRAINING
1. Start engine and let it run to warm up transaxle.
2. Stop engine. Remove drain plug (1) and drain oil.
3. Install a new gasket onto drain plug (1) and install it into tran-
saxle. Tighten drain plug to specification. Refer to TM-628,
"Exploded View" (RS5F91R) or TM-672, "Exploded View"
(RS6F94R).
CAUTION:
Do not reuse gasket.
FILLING
1. Remove filler plug (1). Fill with new oil until oil level reaches the
specified limit at filler plug hole as shown.
2. After refilling oil, check oil level. Install a new gasket on filler plug
(1), then install it into transaxle. Tighten filler plug to specifica-
tion. Refer to TM-628, "
Exploded View" (RS5F91R) or TM-672,
"Exploded View" (RS6F94R).
CAUTION:
Do not reuse gasket.
Checking A/T Fluid: RE4F03BINFOID:0000000001730901
1. Warm up engine.
2. Check for A/T fluid leakage.
3. Before driving, A/T fluid level can be checked at A/T fluid tem-
peratures of 30 to 50°C (86 to 122°F) using the “COLD” range
on A/T fluid level gauge.
a. Park vehicle on level surface and set parking brake.
b. Start engine and move selector lever through each gear posi-
tion. Leave selector lever in “P” position.
c. Check A/T fluid level with engine idling.
SCIA7623E
SCIA7622E
Oil grade and capacity
: Refer to MA-19, "
Fluids and Lubricants"
SCIA7623E
SCIA3451E
Page 4294 of 5883
MA-54
< ON-VEHICLE MAINTENANCE >
CHASSIS AND BODY MAINTENANCE
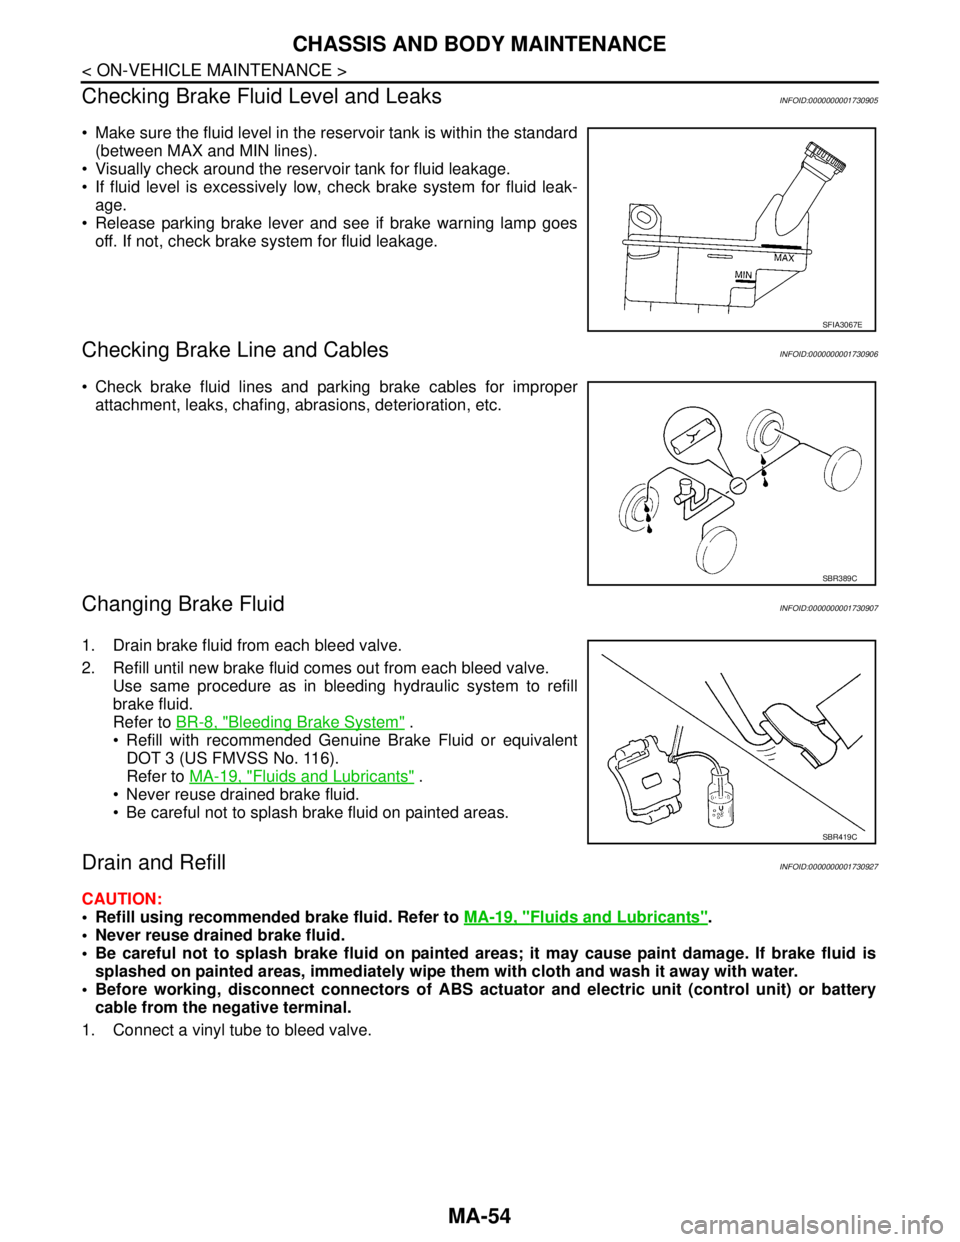
Checking Brake Fluid Level and Leaks
INFOID:0000000001730905
Make sure the fluid level in the reservoir tank is within the standard
(between MAX and MIN lines).
Visually check around the reservoir tank for fluid leakage.
If fluid level is excessively low, check brake system for fluid leak-
age.
Release parking brake lever and see if brake warning lamp goes
off. If not, check brake system for fluid leakage.
Checking Brake Line and CablesINFOID:0000000001730906
Check brake fluid lines and parking brake cables for improper
attachment, leaks, chafing, abrasions, deterioration, etc.
Changing Brake FluidINFOID:0000000001730907
1. Drain brake fluid from each bleed valve.
2. Refill until new brake fluid comes out from each bleed valve.
Use same procedure as in bleeding hydraulic system to refill
brake fluid.
Refer to BR-8, "
Bleeding Brake System" .
Refill with recommended Genuine Brake Fluid or equivalent
DOT 3 (US FMVSS No. 116).
Refer to MA-19, "
Fluids and Lubricants" .
Never reuse drained brake fluid.
Be careful not to splash brake fluid on painted areas.
Drain and RefillINFOID:0000000001730927
CAUTION:
Refill using recommended brake fluid. Refer to MA-19, "
Fluids and Lubricants".
Never reuse drained brake fluid.
Be careful not to splash brake fluid on painted areas; it may cause paint damage. If brake fluid is
splashed on painted areas, immediately wipe them with cloth and wash it away with water.
Before working, disconnect connectors of ABS actuator and electric unit (control unit) or battery
cable from the negative terminal.
1. Connect a vinyl tube to bleed valve.
SFIA3067E
SBR389C
SBR419C
Page 4295 of 5883
CHASSIS AND BODY MAINTENANCE
MA-55
< ON-VEHICLE MAINTENANCE >
C
D
E
F
G
H
I
J
K
L
MB
MAN
OA
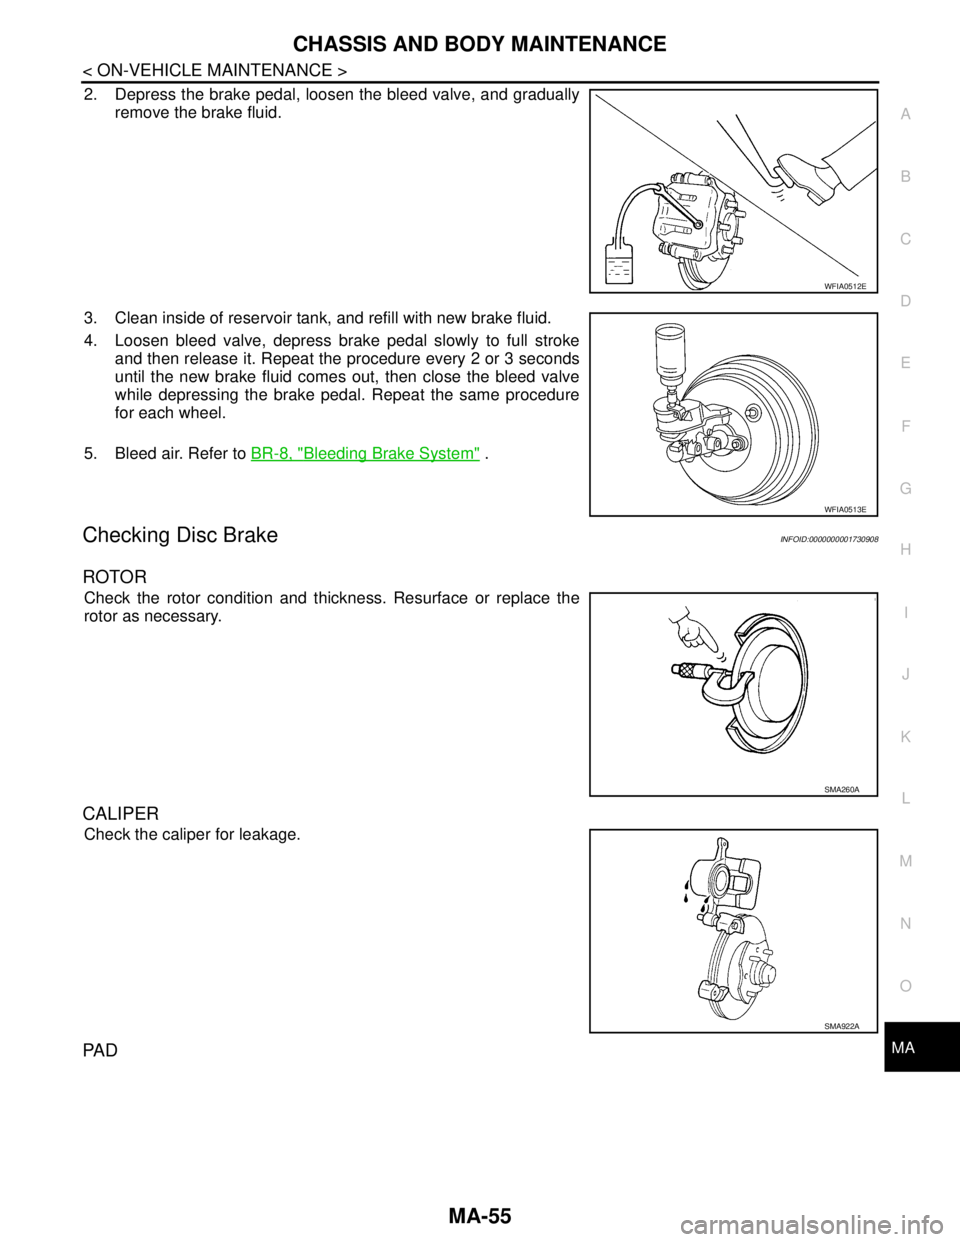
2. Depress the brake pedal, loosen the bleed valve, and gradually
remove the brake fluid.
3. Clean inside of reservoir tank, and refill with new brake fluid.
4. Loosen bleed valve, depress brake pedal slowly to full stroke
and then release it. Repeat the procedure every 2 or 3 seconds
until the new brake fluid comes out, then close the bleed valve
while depressing the brake pedal. Repeat the same procedure
for each wheel.
5. Bleed air. Refer to BR-8, "
Bleeding Brake System" .
Checking Disc BrakeINFOID:0000000001730908
ROTOR
Check the rotor condition and thickness. Resurface or replace the
rotor as necessary.
CALIPER
Check the caliper for leakage.
PA D
WFIA0512E
WFIA0513E
SMA260A
SMA922A
Page 4296 of 5883
MA-56
< ON-VEHICLE MAINTENANCE >
CHASSIS AND BODY MAINTENANCE
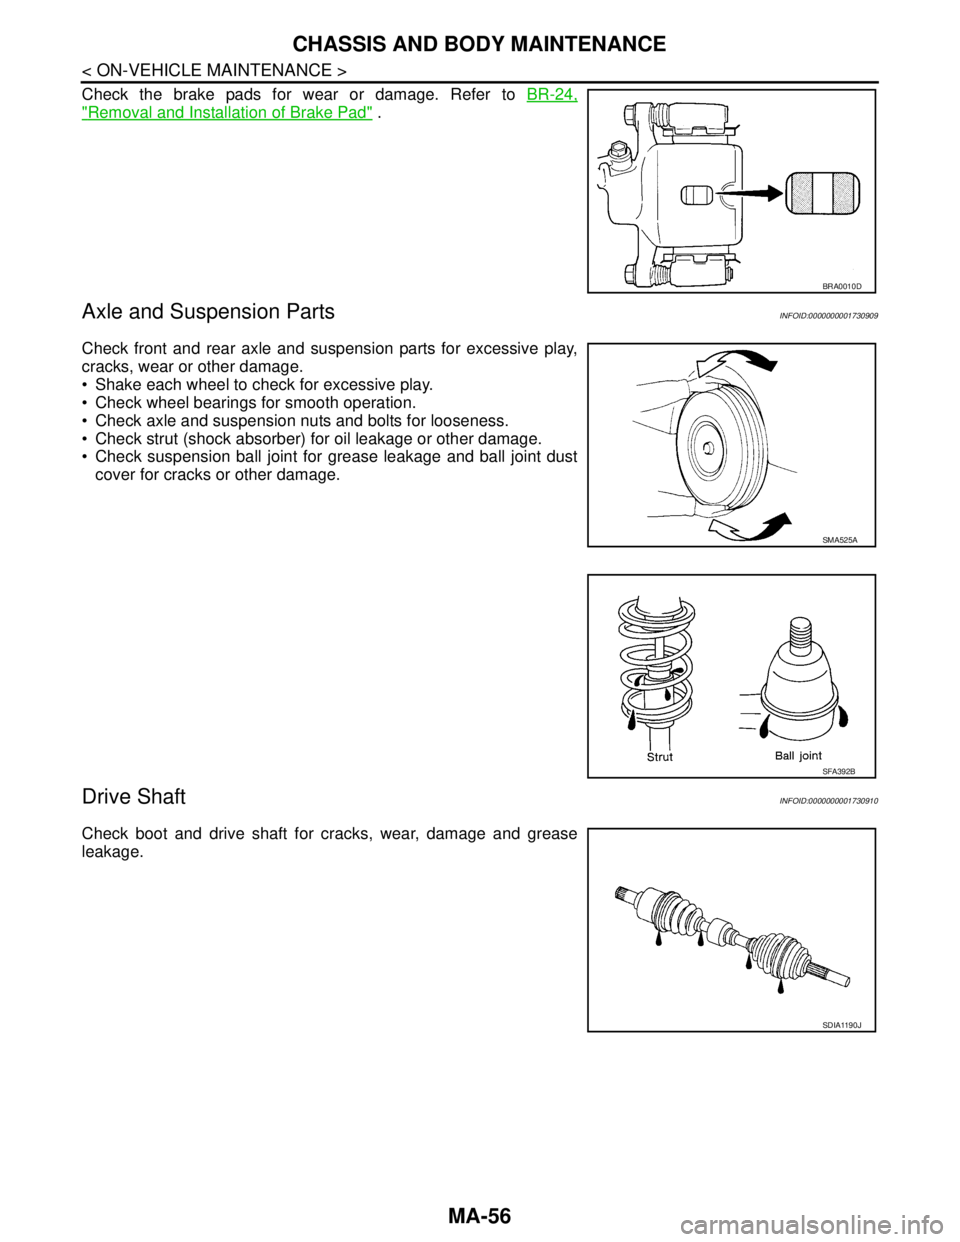
Check the brake pads for wear or damage. Refer to BR-24,
"Removal and Installation of Brake Pad" .
Axle and Suspension PartsINFOID:0000000001730909
Check front and rear axle and suspension parts for excessive play,
cracks, wear or other damage.
Shake each wheel to check for excessive play.
Check wheel bearings for smooth operation.
Check axle and suspension nuts and bolts for looseness.
Check strut (shock absorber) for oil leakage or other damage.
Check suspension ball joint for grease leakage and ball joint dust
cover for cracks or other damage.
Drive ShaftINFOID:0000000001730910
Check boot and drive shaft for cracks, wear, damage and grease
leakage.
BRA0010D
SMA525A
SFA392B
SDIA1190J