2007 NISSAN TIIDA belt
[x] Cancel search: beltPage 458 of 5883

CHG
CHARGING SYSTEM PRELIMINARY INSPECTION
CHG-37
< COMPONENT DIAGNOSIS >[K9K]
C
D
E
F
G
H
I
J
K
L B A
O
P N
COMPONENT DIAGNOSIS
CHARGING SYSTEM PRELIMINARY INSPECTION
Inspection ProcedureINFOID:0000000001724507
1.CHECK BATTERY TERMINALS CONNECTION
Check if battery terminals are clean and tight.
Is the inspection result normal?
YES >> GO TO 2
NO >> Repair battery terminals connection.
2.CHECK FUSE
Check for blown fuse and fusible link.
Is the inspection result normal?
YES >> GO TO 3
NO >> Be sure to eliminate cause of malfunction before installing new fuse or fusible link.
3.CHECK GENERATOR CASE GROUND
Verify generator case ground is clean and tight.
Is the inspection result normal?
YES >> GO TO 4
NO >> Repair connection.
4.CHECK DRIVE BELT TENSION
Check drive belt tension. Refer to XX-XX, "*****"
.
Is the inspection result normal?
YES >> Inspection end.
NO >> Repair as needed.
Unit Power supply terminals Power source
GeneratorBattery (terminal 3) IPDM E/R
Battery (terminal 1) Fusible Link A
Combination meter Ignition switch ON (terminal 2) Fuse 14
Page 464 of 5883
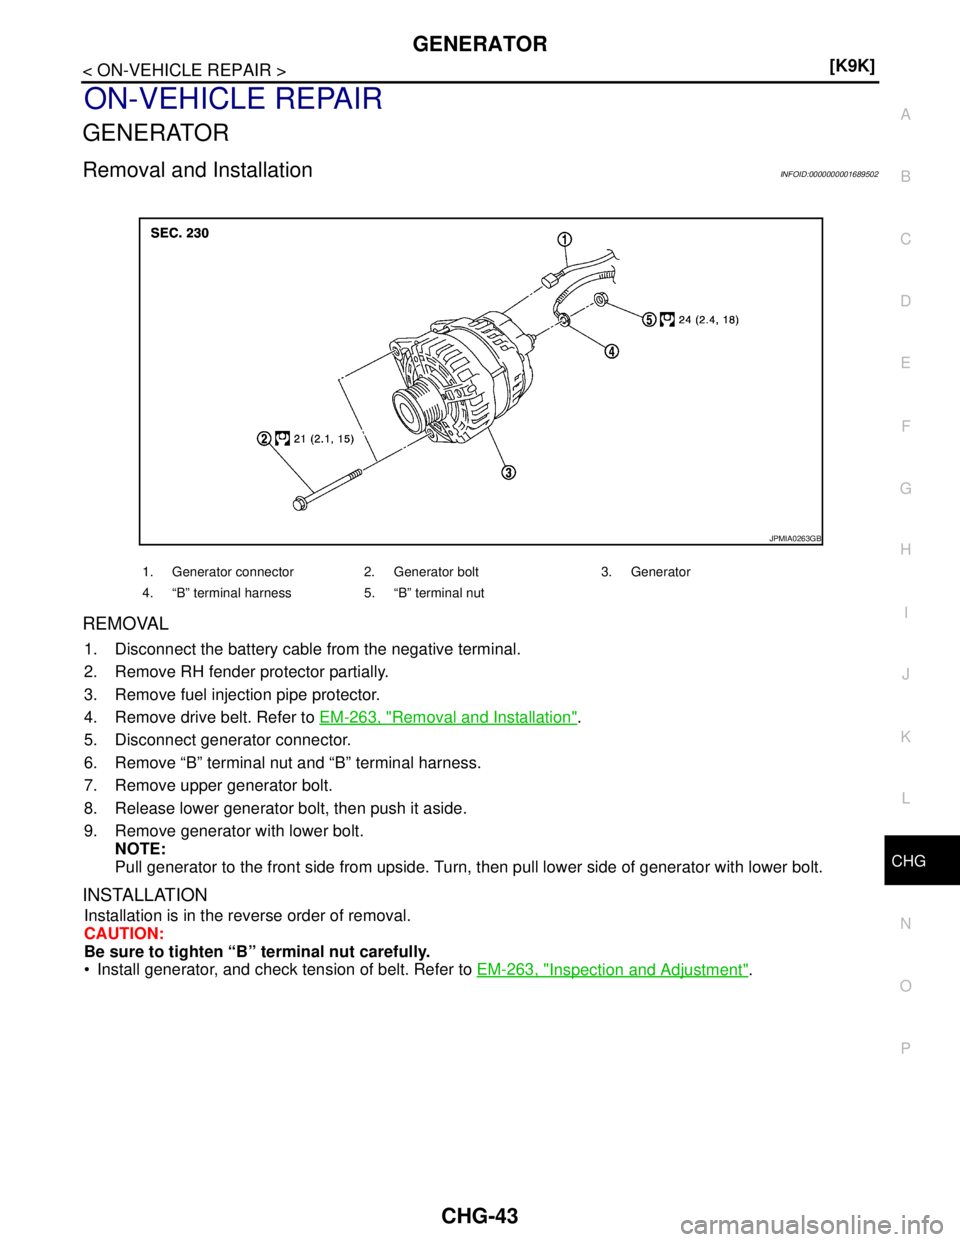
CHG
GENERATOR
CHG-43
< ON-VEHICLE REPAIR >[K9K]
C
D
E
F
G
H
I
J
K
L B A
O
P N
ON-VEHICLE REPAIR
GENERATOR
Removal and InstallationINFOID:0000000001689502
REMOVAL
1. Disconnect the battery cable from the negative terminal.
2. Remove RH fender protector partially.
3. Remove fuel injection pipe protector.
4. Remove drive belt. Refer to EM-263, "
Removal and Installation".
5. Disconnect generator connector.
6. Remove “B” terminal nut and “B” terminal harness.
7. Remove upper generator bolt.
8. Release lower generator bolt, then push it aside.
9. Remove generator with lower bolt.
NOTE:
Pull generator to the front side from upside. Turn, then pull lower side of generator with lower bolt.
INSTALLATION
Installation is in the reverse order of removal.
CAUTION:
Be sure to tighten “B” terminal nut carefully.
Install generator, and check tension of belt. Refer to EM-263, "
Inspection and Adjustment".
1. Generator connector 2. Generator bolt 3. Generator
4. “B” terminal harness 5. “B” terminal nut
JPMIA0263GB
Page 466 of 5883

CL-1
TRANSMISSION & DRIVELINE
C
E
F
G
H
I
J
K
L
M
SECTION CL
A
B
CL
N
O
P
CONTENTS
CLUTCH
SERVICE INFORMATION ............................2
PRECAUTIONS ...................................................2
Precaution for Supplemental Restraint System
(SRS) "AIR BAG" and "SEAT BELT PRE-TEN-
SIONER" ...................................................................
2
Service Notice or Precaution .....................................2
PREPARATION ...................................................3
Special Service Tool .................................................3
Commercial Service Tool ..........................................3
NOISE, VIBRATION AND HARSHNESS
(NVH) TROUBLESHOOTING .............................
4
NVH Troubleshooting Chart ......................................4
CLUTCH PEDAL .................................................5
On-vehicle Inspection and Adjustment ......................5
Removal and Installation ...........................................6
CLUTCH FLUID ...................................................8
Air Bleeding Procedure .............................................8
CLUTCH MASTER CYLINDER .........................9
Removal and Installation ..........................................9
CSC (CONCENTRIC SLAVE CYLINDER) .......11
Removal and Installation .........................................11
CLUTCH PIPING ...............................................12
Removal and Installation .........................................12
CLUTCH DISC, CLUTCH COVER AND FLY-
WHEEL ..............................................................
13
Removal and Installation .........................................13
SERVICE DATA AND SPECIFICATIONS
(SDS) .................................................................
16
Clutch Control System .............................................16
Clutch Pedal ............................................................16
Clutch Disc ..............................................................16
Clutch Cover ............................................................16
Page 467 of 5883

CL-2
< SERVICE INFORMATION >
PRECAUTIONS
SERVICE INFORMATION
PRECAUTIONS
Precaution for Supplemental Restraint System (SRS) "AIR BAG" and "SEAT BELT
PRE-TENSIONER"
INFOID:0000000001375288
The Supplemental Restraint System such as “AIR BAG” and “SEAT BELT PRE-TENSIONER”, used along
with a front seat belt, helps to reduce the risk or severity of injury to the driver and front passenger for certain
types of collision. This system includes seat belt switch inputs and dual stage front air bag modules. The SRS
system uses the seat belt switches to determine the front air bag deployment, and may only deploy one front
air bag, depending on the severity of a collision and whether the front occupants are belted or unbelted.
Information necessary to service the system safely is included in the SRS and SB section of this Service Man-
ual.
WARNING:
• To avoid rendering the SRS inoperative, which could increase the risk of personal injury or death in
the event of a collision which would result in air bag inflation, all maintenance must be performed by
an authorized NISSAN/INFINITI dealer.
Improper maintenance, including incorrect removal and installation of the SRS, can lead to personal
injury caused by unintentional activation of the system. For removal of Spiral Cable and Air Bag
Module, see the SRS section.
Do not use electrical test equipment on any circuit related to the SRS unless instructed to in this
Service Manual. SRS wiring harnesses can be identified by yellow and/or orange harnesses or har-
ness connectors.
Service Notice or PrecautionINFOID:0000000001375289
Use recommended brake fluid when adding fluid to the clutch reservoir tank. Refer to MA-19, "Fluids
and Lubricants".
Do not reuse fluid drained from clutch system.
Do not splash brake fluid on painted areas.
Use new brake fluid to clean or wash all parts of master cylinder and operating cylinder.
Do not use mineral oils such as gasoline or kerosene. It will ruin the rubber parts of the hydraulic
system.
If transaxle assembly is removed from the vehicle, always replace CSC (Concentric slave cylinder).
Return CSC to original position to remove transaxle assembly. Dust on clutch disc sliding parts may
damage CSC seal and may cause clutch fluid leakage.
Do not disassemble clutch master cylinder and CSC.
WARNING:
After cleaning clutch disc, clean it with a dust collector. Do not use compressed air.
Page 482 of 5883

CO-1
ENGINE
C
D
E
F
G
H
I
J
K
L
M
SECTION CO
A
CO
N
O
P
CONTENTS
ENGINE COOLING SYSTEM
HR16DE
FUNCTION DIAGNOSIS ...............................
4
DESCRIPTION ....................................................4
Engine Cooling System .............................................4
Engine Cooling System Schematic ...........................5
SYMPTOM DIAGNOSIS ...............................6
OVERHEATING CAUSE ANALYSIS ..................6
Troubleshooting Chart ...............................................6
PRECAUTION ...............................................8
PRECAUTIONS ...................................................8
Precaution for Supplemental Restraint System
(SRS) "AIR BAG" and "SEAT BELT PRE-TEN-
SIONER" ...................................................................
8
Precaution Necessary for Steering Wheel Rota-
tion After Battery Disconnect .....................................
8
Precaution for Liquid Gasket .....................................8
PREPARATION ...........................................10
PREPARATION ..................................................10
Special Service Tool ...............................................10
Commercial Service Tool ........................................10
ON-VEHICLE MAINTENANCE ....................11
ENGINE COOLANT ...........................................11
Inspection ................................................................11
Changing Engine Coolant .......................................11
RADIATOR .........................................................14
Checking Radiator Cap ...........................................14
Checking Radiator ...................................................14
ON-VEHICLE REPAIR .................................16
RADIATOR .........................................................16
Component ..............................................................16
Removal and Installation .........................................16
COOLING FAN ..................................................18
Component (Models with A/C) .................................18
Component (Models without A/C) ............................18
Removal and Installation .........................................19
WATER PUMP ..................................................20
Exploded View .........................................................20
Removal and Installation .........................................20
Inspection ................................................................21
THERMOSTAT ..................................................22
Exploded View .........................................................22
Removal and Installation .........................................22
Inspection ................................................................23
WATER OUTLET ..............................................24
Exploded View .........................................................24
Removal and Installation .........................................24
Inspection ................................................................25
DISASSEMBLY AND ASSEMBLY ..............26
COOLING FAN ..................................................26
DISASSEMBLY AND ASSEMBLY ..........................26
SERVICE DATA AND SPECIFICATIONS
(SDS) ............................................................
27
SERVICE DATA AND SPECIFICATIONS
(SDS) .................................................................
27
Periodical Maintenance Specification ......................27
Radiator ...................................................................27
Thermostat ..............................................................27
MR18DE
FUNCTION DIAGNOSIS ..............................
28
COOLING SYSTEM ..........................................28
Cooling Circuit .........................................................28
Page 483 of 5883

CO-2
SYMPTOM DIAGNOSIS .............................30
OVERHEATING CAUSE ANALYSIS ................30
Troubleshooting Chart ............................................30
PRECAUTION .............................................32
PRECAUTIONS .................................................32
Precaution for Supplemental Restraint System
(SRS) "AIR BAG" and "SEAT BELT PRE-TEN-
SIONER" .................................................................
32
Precaution Necessary for Steering Wheel Rota-
tion After Battery Disconnect ..................................
32
Precaution for Liquid Gasket ..................................32
PREPARATION ...........................................34
PREPARATION .................................................34
Special Service Tool ...............................................34
Commercial Service Tool .......................................34
ON-VEHICLE MAINTENANCE ...................35
ENGINE COOLANT ...........................................35
Inspection ...............................................................35
Changing Engine Coolant .......................................35
RADIATOR ........................................................38
Checking Radiator Cap ..........................................38
Checking Radiator ..................................................38
ON-VEHICLE REPAIR ................................40
RADIATOR ........................................................40
Component .............................................................40
Removal and Installation ........................................40
COOLING FAN ..................................................42
Component (Models with A/C) ................................42
Component (Models without A/C) ...........................42
Removal and Installation ........................................43
WATER PUMP ...................................................44
Component .............................................................44
Removal and Installation ........................................44
THERMOSTAT ..................................................45
Component .............................................................45
Removal and Installation ........................................45
WATER OUTLET AND WATER CONTROL
VALVE ...............................................................
47
Component .............................................................47
Removal and Installation ........................................47
DISASSEMBLY AND ASSEMBLY .............50
COOLING FAN ..................................................50
DISASSEMBLY AND ASSEMBLY .........................50
SERVICE DATA AND SPECIFICATIONS
(SDS) ...........................................................
51
SERVICE DATA AND SPECIFICATIONS
(SDS) .................................................................
51
Standard and Limit ..................................................51
K9K
FUNCTION DIAGNOSIS ............................
52
DESCRIPTION ...................................................52
Engine Cooling System .........................................52
SYMPTOM DIAGNOSIS ............................53
OVERHEATING CAUSE ANALYSIS ................53
Troubleshooting Chart ............................................53
PRECAUTION ............................................55
PRECAUTIONS .................................................55
Precaution for Supplemental Restraint System
(SRS) "AIR BAG" and "SEAT BELT PRE-TEN-
SIONER" .................................................................
55
Precaution Necessary for Steering Wheel Rota-
tion After Battery Disconnect ..................................
55
Precaution for Liquid Gasket ...................................55
PREPARATION ..........................................57
PREPARATION .................................................57
Special Service Tools .............................................57
Commercial Service Tools ......................................57
ON-VEHICLE MAINTENANCE ..................58
ENGINE COOLANT ...........................................58
Inspection ................................................................58
Draining ...................................................................58
Refilling ...................................................................58
Flushing ..................................................................59
RADIATOR ........................................................60
Checking Radiator Cap ...........................................60
Checking Radiator ..................................................60
ON-VEHICLE REPAIR ...............................62
RADIATOR ........................................................62
Exploded View ........................................................62
Removal and Installation .........................................62
Inspection ................................................................63
COOLING FAN ..................................................64
Exploded View ........................................................64
Removal and Installation .........................................64
Disassembly and Assembly ....................................65
Inspection ................................................................65
WATER PUMP ...................................................66
Exploded View ........................................................66
Removal and Installation .........................................66
Inspection ................................................................66
Page 487 of 5883

CO-6
< SYMPTOM DIAGNOSIS >[HR16DE]
OVERHEATING CAUSE ANALYSIS
SYMPTOM DIAGNOSIS
OVERHEATING CAUSE ANALYSIS
Troubleshooting ChartINFOID:0000000001381552
Symptom Check items
Cooling sys-
tem parts
malfunctionPoor heat transferWater pump malfunction Worn or loose drive belt
— Thermostat stuck closed —
Damaged finsDust contamination or pa-
per clogging
Physical damage
Clogged radiator cooling
tubeExcess foreign material
(rust, dirt, sand, etc.)
Reduced air flowCooling fan does not oper-
ate
Fan assembly — High resistance to fan rota-
tion
Damaged fan blades
Damaged radiator shroud — — —
Improper engine coolant
mixture ratio———
Poor engine coolant quality — Engine coolant viscosity —
Insufficient engine coolantEngine coolant leaksCooling hoseLoose clamp
Cracked hose
Water pump Poor sealing
Reservoir tank capLoose
Poor sealing
RadiatorO-ring for damage, deterio-
ration or improper fitting
Cracked radiator tank
Cracked radiator core
Reservoir tank Cracked reservoir tank
Overflowing reservoir tankExhaust gas leaks into cool-
ing systemCylinder head deterioration
Cylinder head gasket deteri-
oration
Page 489 of 5883

CO-8
< PRECAUTION >[HR16DE]
PRECAUTIONS
PRECAUTION
PRECAUTIONS
Precaution for Supplemental Restraint System (SRS) "AIR BAG" and "SEAT BELT
PRE-TENSIONER"
INFOID:0000000001534589
The Supplemental Restraint System such as “AIR BAG” and “SEAT BELT PRE-TENSIONER”, used along
with a front seat belt, helps to reduce the risk or severity of injury to the driver and front passenger for certain
types of collision. Information necessary to service the system safely is included in the SR and SB section of
this Service Manual.
WARNING:
• To avoid rendering the SRS inoperative, which could increase the risk of personal injury or death in
the event of a collision which would result in air bag inflation, all maintenance must be performed by
an authorized NISSAN/INFINITI dealer.
Improper maintenance, including incorrect removal and installation of the SRS, can lead to personal
injury caused by unintentional activation of the system. For removal of Spiral Cable and Air Bag
Module, see the SR section.
Do not use electrical test equipment on any circuit related to the SRS unless instructed to in this
Service Manual. SRS wiring harnesses can be identified by yellow and/or orange harnesses or har-
ness connectors.
Precaution Necessary for Steering Wheel Rotation After Battery Disconnect
INFOID:0000000001534590
NOTE:
This Procedure is applied only to models with Intelligent Key system and NATS (NISSAN ANTI-THEFT SYS-
TEM).
Remove and install all control units after disconnecting both battery cables with the ignition knob in the
″LOCK″ position.
Always use CONSULT-II to perform self-diagnosis as a part of each function inspection after finishing work.
If DTC is detected, perform trouble diagnosis according to self-diagnostic results.
For models equipped with the Intelligent Key system and NATS, an electrically controlled steering lock mech-
anism is adopted on the key cylinder.
For this reason, if the battery is disconnected or if the battery is discharged, the steering wheel will lock and
steering wheel rotation will become impossible.
If steering wheel rotation is required when battery power is interrupted, follow the procedure below before
starting the repair operation.
OPERATION PROCEDURE
1. Connect both battery cables.
NOTE:
Supply power using jumper cables if battery is discharged.
2. Use the Intelligent Key or mechanical key to turn the ignition switch to the ″ACC″ position. At this time, the
steering lock will be released.
3. Disconnect both battery cables. The steering lock will remain released and the steering wheel can be
rotated.
4. Perform the necessary repair operation.
5. When the repair work is completed, return the ignition switch to the ″LOCK″ position before connecting
the battery cables. (At this time, the steering lock mechanism will engage.)
6. Perform a self-diagnosis check of all control units using CONSULT-II.
Precaution for Liquid GasketINFOID:0000000001534591
REMOVAL OF LIQUID GASKET SEALING
After removing nuts and bolts, separate the mating surface, using Tool and remove old liquid gasket sealing.