2007 NISSAN TIIDA Trunk
[x] Cancel search: TrunkPage 3121 of 5883
REAR BUMPER
EXT-17
< ON-VEHICLE REPAIR >
C
D
E
F
G
H
I
J
L
MA
B
EXT
N
O
P
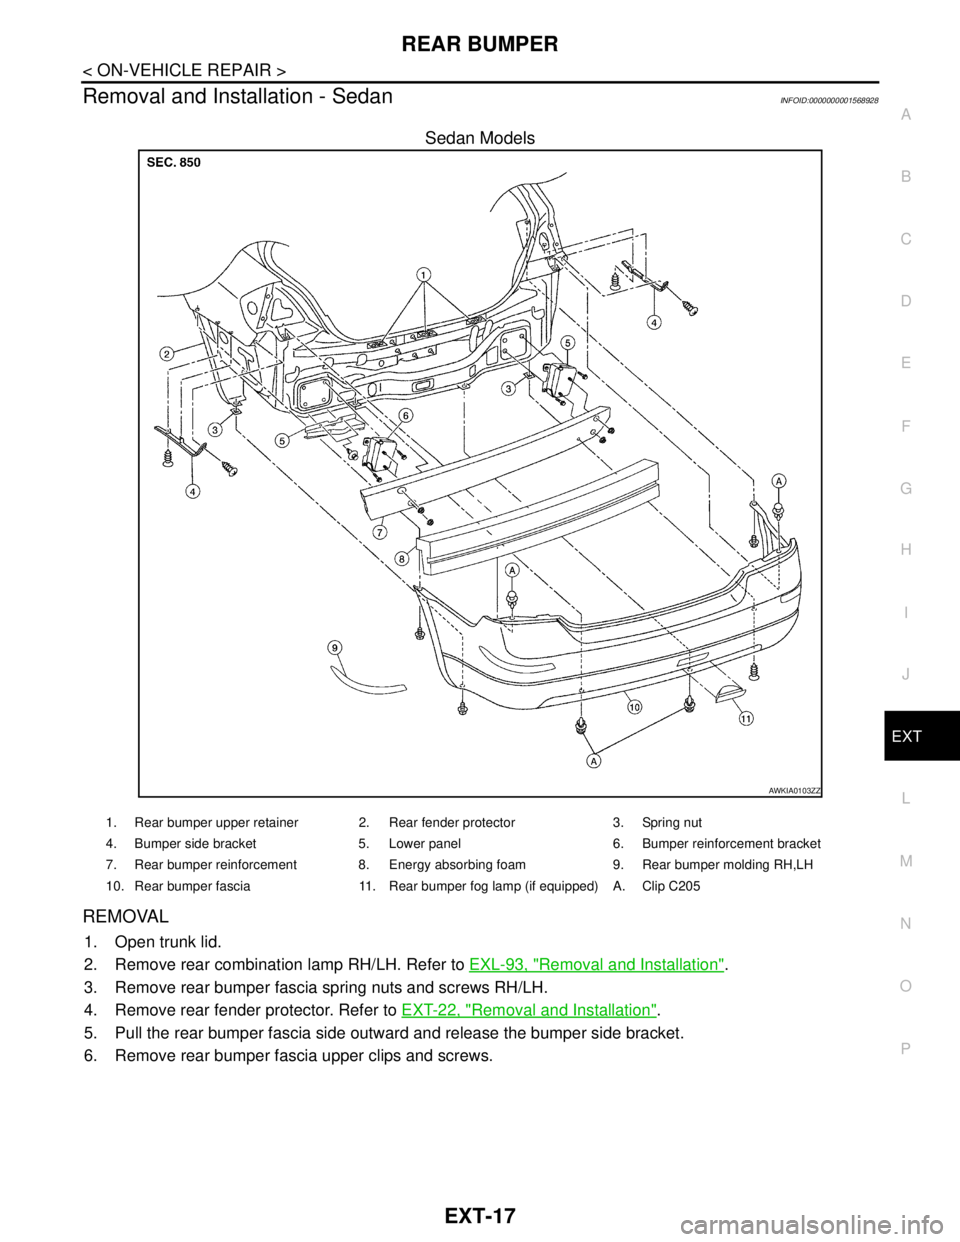
Removal and Installation - SedanINFOID:0000000001568928
Sedan Models
REMOVAL
1. Open trunk lid.
2. Remove rear combination lamp RH/LH. Refer to EXL-93, "
Removal and Installation".
3. Remove rear bumper fascia spring nuts and screws RH/LH.
4. Remove rear fender protector. Refer to EXT-22, "
Removal and Installation".
5. Pull the rear bumper fascia side outward and release the bumper side bracket.
6. Remove rear bumper fascia upper clips and screws.
AWKIA0103ZZ
1. Rear bumper upper retainer 2. Rear fender protector 3. Spring nut
4. Bumper side bracket 5. Lower panel 6. Bumper reinforcement bracket
7. Rear bumper reinforcement 8. Energy absorbing foam 9. Rear bumper molding RH,LH
10. Rear bumper fascia 11. Rear bumper fog lamp (if equipped) A. Clip C205
Page 3133 of 5883
TRUNK LID FINISHER
EXT-29
< ON-VEHICLE REPAIR >
C
D
E
F
G
H
I
J
L
MA
B
EXT
N
O
P
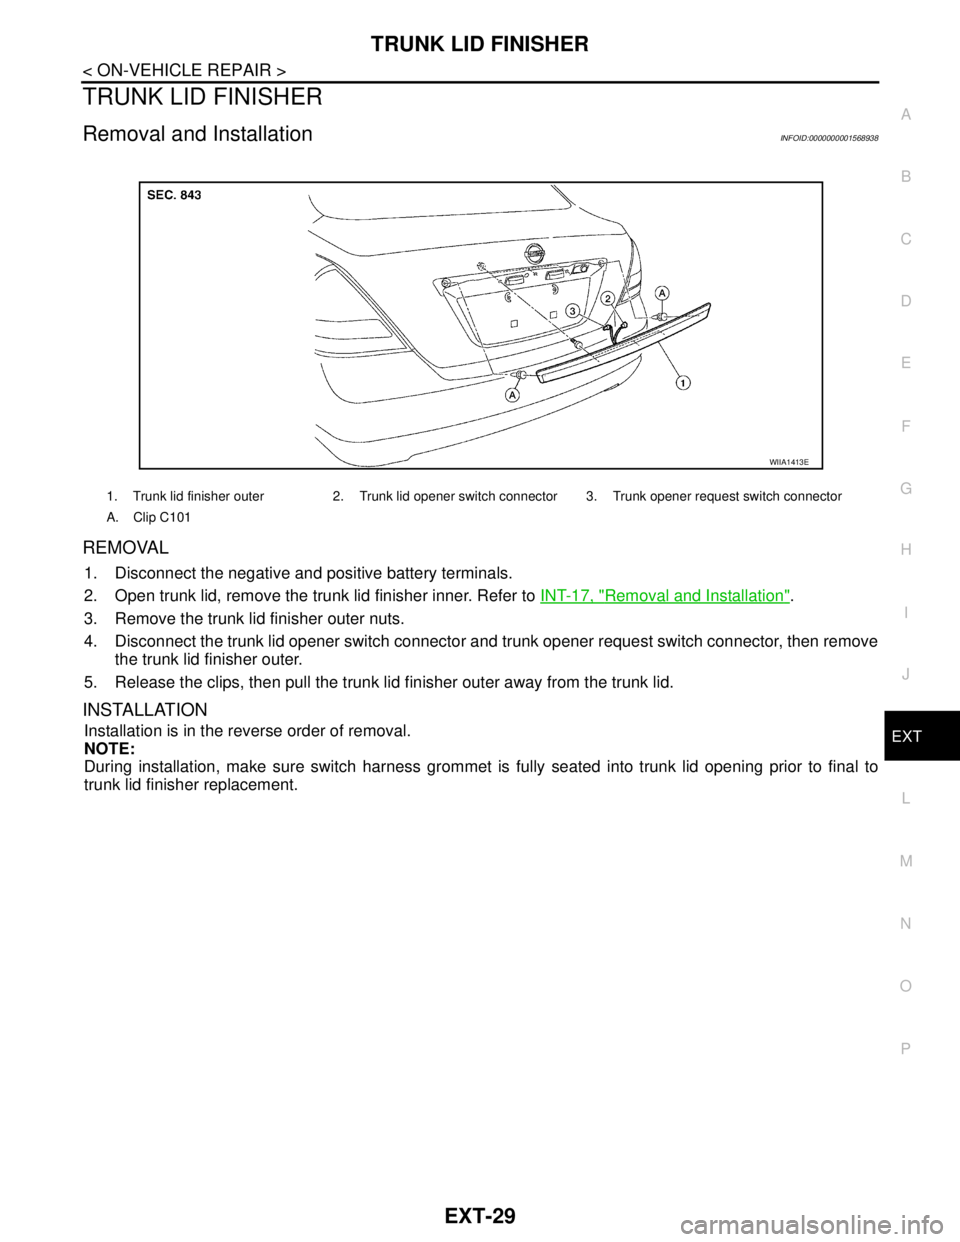
TRUNK LID FINISHER
Removal and InstallationINFOID:0000000001568938
REMOVAL
1. Disconnect the negative and positive battery terminals.
2. Open trunk lid, remove the trunk lid finisher inner. Refer to INT-17, "
Removal and Installation".
3. Remove the trunk lid finisher outer nuts.
4. Disconnect the trunk lid opener switch connector and trunk opener request switch connector, then remove
the trunk lid finisher outer.
5. Release the clips, then pull the trunk lid finisher outer away from the trunk lid.
INSTALLATION
Installation is in the reverse order of removal.
NOTE:
During installation, make sure switch harness grommet is fully seated into trunk lid opening prior to final to
trunk lid finisher replacement.
1. Trunk lid finisher outer 2. Trunk lid opener switch connector 3. Trunk opener request switch connector
A. Clip C101
WIIA1413E
Page 3208 of 5883
GI-14
< HOW TO USE THIS MANUAL >
HOW TO USE THIS MANUAL
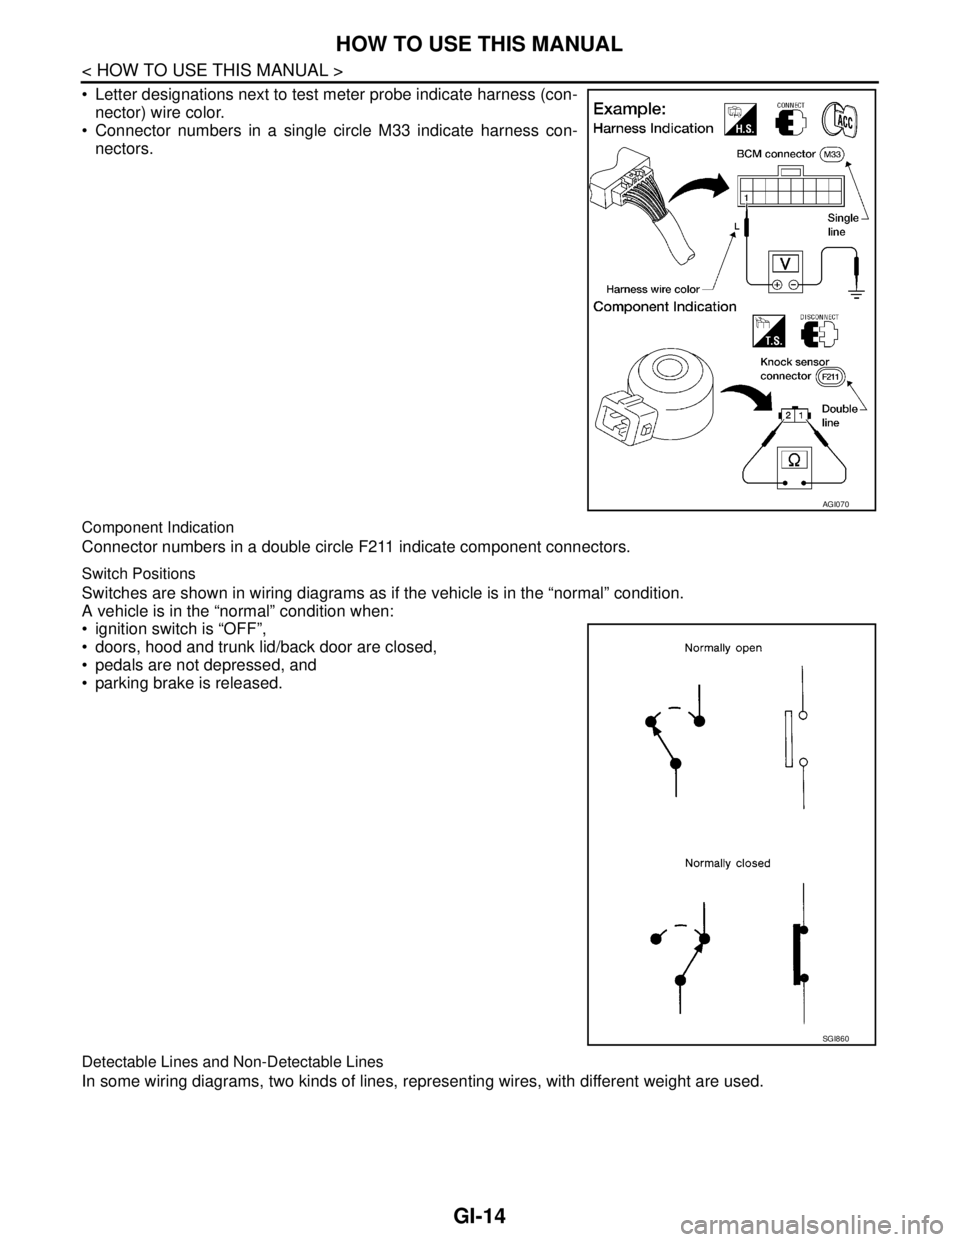
Letter designations next to test meter probe indicate harness (con-
nector) wire color.
Connector numbers in a single circle M33 indicate harness con-
nectors.
Component Indication
Connector numbers in a double circle F211 indicate component connectors.
Switch Positions
Switches are shown in wiring diagrams as if the vehicle is in the “normal” condition.
A vehicle is in the “normal” condition when:
ignition switch is “OFF”,
doors, hood and trunk lid/back door are closed,
pedals are not depressed, and
parking brake is released.
Detectable Lines and Non-Detectable Lines
In some wiring diagrams, two kinds of lines, representing wires, with different weight are used.
AGI070
SGI860
Page 3218 of 5883
GI-24
< HOW TO USE THIS MANUAL >
HOW TO READ WIRING DIAGRAMS
ignition switch is “OFF”,
doors, hood and trunk lid/back door are closed,
pedals are not depressed, and
parking brake is released.
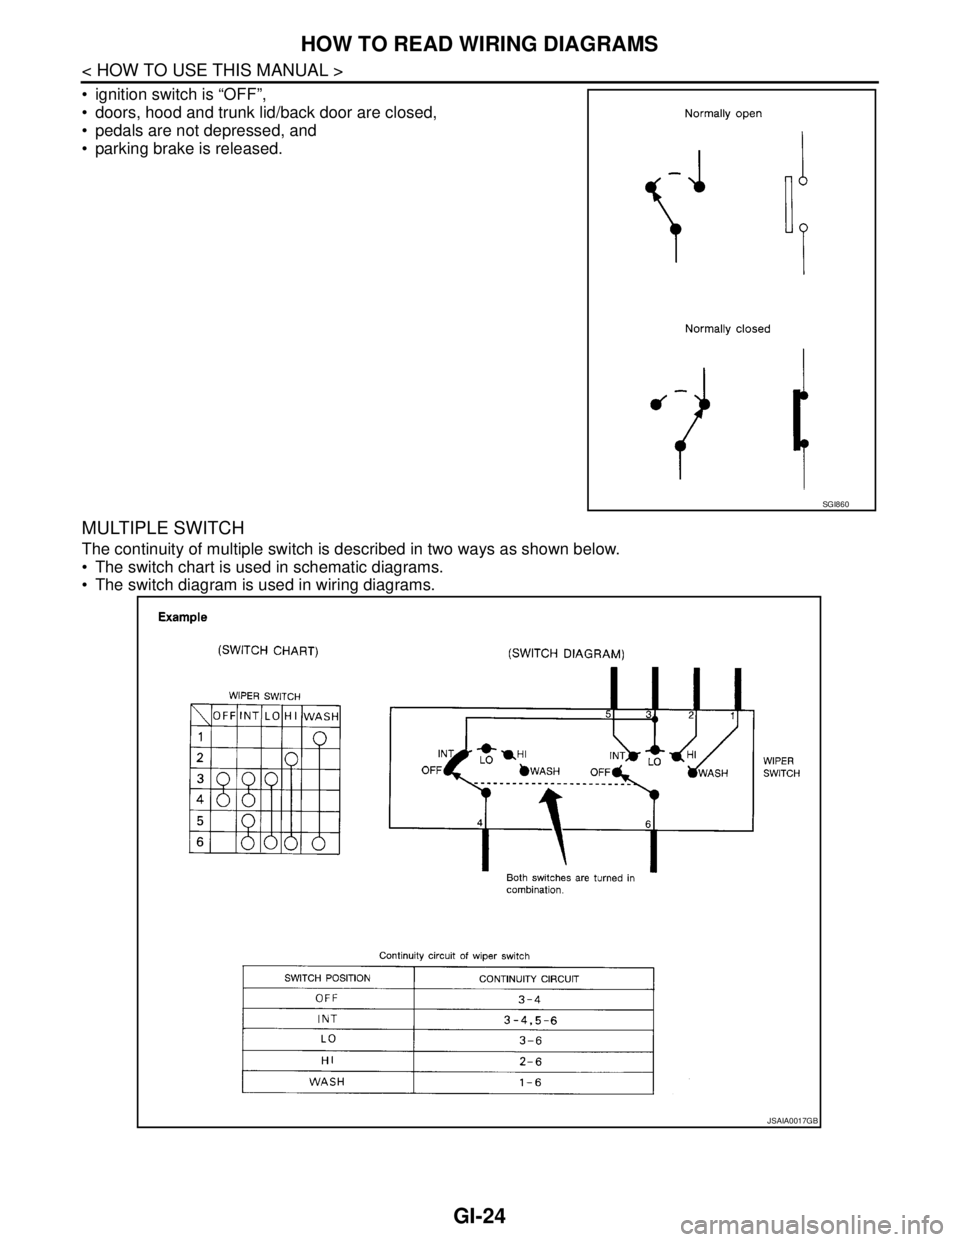
MULTIPLE SWITCH
The continuity of multiple switch is described in two ways as shown below.
The switch chart is used in schematic diagrams.
The switch diagram is used in wiring diagrams.
SGI860
JSAIA0017GB
Page 3263 of 5883

GW-4
< SYMPTOM DIAGNOSIS >
SQUEAK AND RATTLE TROUBLE DIAGNOSES
68370-4B000: 15×25 mm (0.59×0.98 in) pad/68239-13E00: 5 mm (0.20 in) wide tape roll. The following
materials not found in the kit can also be used to repair squeaks and rattles.
UHMW (TEFLON) TAPE
Insulates where slight movement is present. Ideal for instrument panel applications.
SILICONE GREASE
Used instead of UHMW tape that will be visible or not fit.
Note: Will only last a few months.
SILICONE SPRAY
Use when grease cannot be applied.
DUCT TAPE
Use to eliminate movement.
CONFIRM THE REPAIR
Confirm that the cause of a noise is repaired by test driving the vehicle. Operate the vehicle under the same
conditions as when the noise originally occurred. Refer to the notes on the Diagnostic Worksheet.
Generic Squeak and Rattle TroubleshootingINFOID:0000000001716816
Refer to Table of Contents for specific component removal and installation information.
INSTRUMENT PANEL
Most incidents are caused by contact and movement between:
1. The cluster lid A and instrument panel
2. Acrylic lens and combination meter housing
3. Instrument panel to front pillar garnish
4. Instrument panel to windshield
5. Instrument panel mounting pins
6. Wiring harnesses behind the combination meter
7. A/C defroster duct and duct joint
These incidents can usually be located by tapping or moving the components to duplicate the noise or by
pressing on the components while driving to stop the noise. Most of these incidents can be repaired by apply-
ing felt cloth tape or silicone spray (in hard to reach areas). Urethane pads can be used to insulate wiring har-
ness.
CAUTION:
Do not use silicone spray to isolate a squeak or rattle. If you saturate the area with silicone, you will
not be able to recheck the repair.
CENTER CONSOLE
Components to pay attention to include:
1. Shifter assembly cover to finisher
2. A/C control unit and cluster lid C
3. Wiring harnesses behind audio and A/C control unit
The instrument panel repair and isolation procedures also apply to the center console.
DOORS
Pay attention to the:
1. Finisher and inner panel making a slapping noise
2. Inside handle escutcheon to door finisher
3. Wiring harnesses tapping
4. Door striker out of alignment causing a popping noise on starts and stops
Tapping or moving the components or pressing on them while driving to duplicate the conditions can isolate
many of these incidents. You can usually insulate the areas with felt cloth tape or insulator foam blocks from
the NISSAN Squeak and Rattle Kit (J-43980) to repair the noise.
TRUNK
Trunk noises are often caused by a loose jack or loose items put into the trunk by the owner.
In addition look for:
1. Trunk lid bumpers out of adjustment
Page 3264 of 5883

SQUEAK AND RATTLE TROUBLE DIAGNOSES
GW-5
< SYMPTOM DIAGNOSIS >
C
D
E
F
G
H
I
J
L
MA
B
GW
N
O
P
2. Trunk lid striker out of adjustment
3. The trunk lid torsion bars knocking together
4. A loose license plate or bracket
Most of these incidents can be repaired by adjusting, securing or insulating the item(s) or component(s) caus-
ing the noise.
SUNROOF/HEADLINING
Noises in the sunroof/headlining area can often be traced to one of the following:
1. Sunroof lid, rail, linkage or seals making a rattle or light knocking noise
2. Sun visor shaft shaking in the holder
3. Front or rear windshield touching headliner and squeaking
Again, pressing on the components to stop the noise while duplicating the conditions can isolate most of these
incidents. Repairs usually consist of insulating with felt cloth tape.
OVERHEAD CONSOLE (FRONT AND REAR)
Overhead console noises are often caused by the console panel clips not being engaged correctly. Most of
these incidents are repaired by pushing up on the console at the clip locations until the clips engage.
In addition look for:
1. Loose harness or harness connectors.
2. Front console map/reading lamp lense loose.
3. Loose screws at console attachment points.
SEATS
When isolating seat noise it's important to note the position the seat is in and the load placed on the seat when
the noise is present. These conditions should be duplicated when verifying and isolating the cause of the
noise.
Cause of seat noise include:
1. Headrest rods and holder
2. A squeak between the seat pad cushion and frame
3. The rear seatback lock and bracket
These noises can be isolated by moving or pressing on the suspected components while duplicating the con-
ditions under which the noise occurs. Most of these incidents can be repaired by repositioning the component
or applying urethane tape to the contact area.
UNDERHOOD
Some interior noise may be caused by components under the hood or on the engine wall. The noise is then
transmitted into the passenger compartment.
Causes of transmitted underhood noise include:
1. Any component mounted to the engine wall
2. Components that pass through the engine wall
3. Engine wall mounts and connectors
4. Loose radiator mounting pins
5. Hood bumpers out of adjustment
6. Hood striker out of adjustment
These noises can be difficult to isolate since they cannot be reached from the interior of the vehicle. The best
method is to secure, move or insulate one component at a time and test drive the vehicle. Also, engine RPM
or load can be changed to isolate the noise. Repairs can usually be made by moving, adjusting, securing, or
insulating the component causing the noise.
Page 3278 of 5883
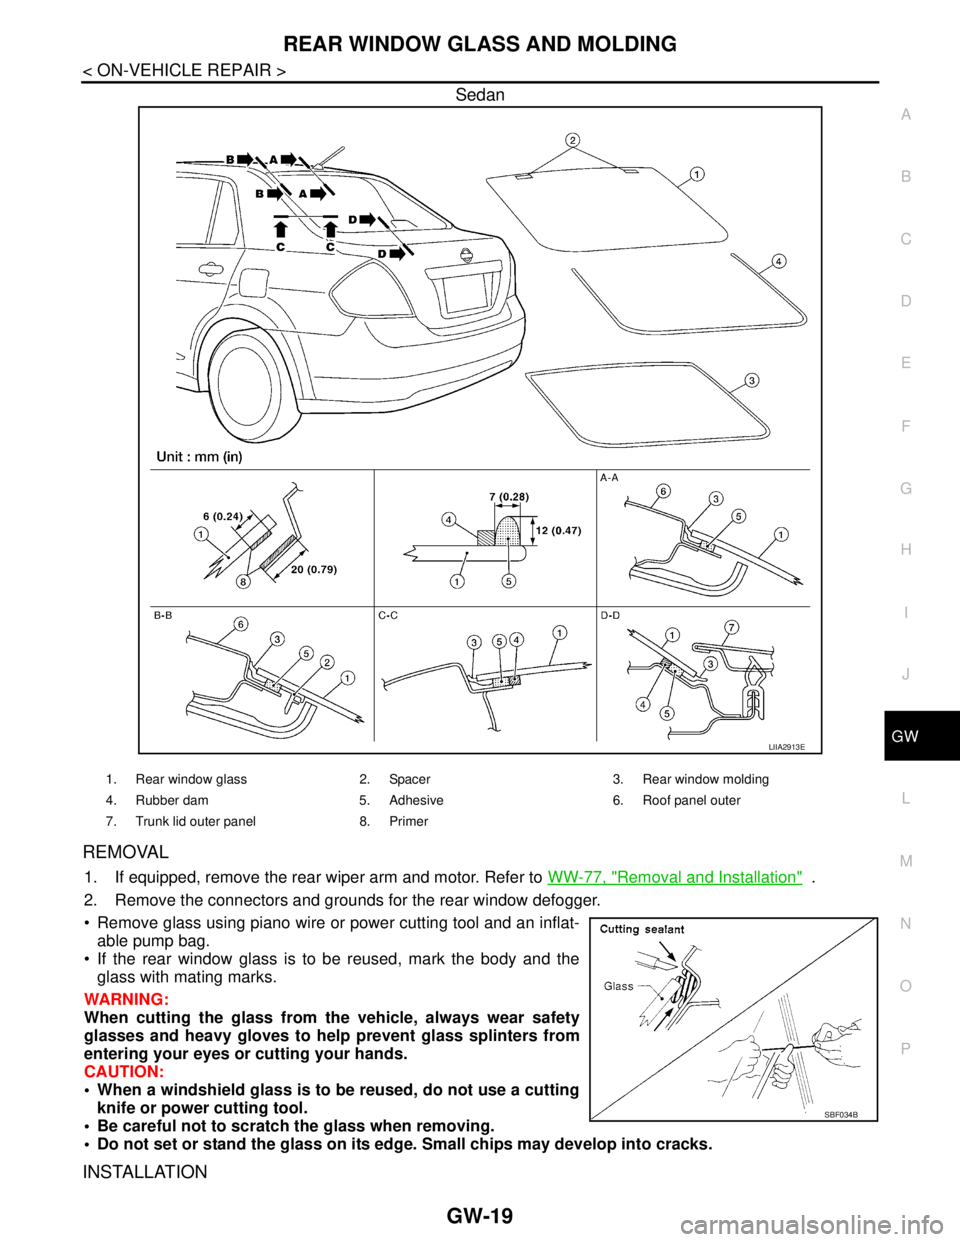
REAR WINDOW GLASS AND MOLDING
GW-19
< ON-VEHICLE REPAIR >
C
D
E
F
G
H
I
J
L
MA
B
GW
N
O
P
Sedan
REMOVAL
1. If equipped, remove the rear wiper arm and motor. Refer to WW-77, "Removal and Installation" .
2. Remove the connectors and grounds for the rear window defogger.
Remove glass using piano wire or power cutting tool and an inflat-
able pump bag.
If the rear window glass is to be reused, mark the body and the
glass with mating marks.
WARNING:
When cutting the glass from the vehicle, always wear safety
glasses and heavy gloves to help prevent glass splinters from
entering your eyes or cutting your hands.
CAUTION:
When a windshield glass is to be reused, do not use a cutting
knife or power cutting tool.
Be careful not to scratch the glass when removing.
Do not set or stand the glass on its edge. Small chips may develop into cracks.
INSTALLATION
LIIA2913E
1. Rear window glass 2. Spacer 3. Rear window molding
4. Rubber dam 5. Adhesive 6. Roof panel outer
7. Trunk lid outer panel 8. Primer
SBF034B
Page 3656 of 5883

INTERIOR ROOM LAMP CONTROL SYSTEM
INL-5
< FUNCTION DIAGNOSIS >
C
D
E
F
G
H
I
J
K
MA
B
INL
N
O
P
FUNCTION DIAGNOSIS
INTERIOR ROOM LAMP CONTROL SYSTEM
System DiagramINFOID:0000000001728854
System DescriptionINFOID:0000000001728855
OUTLINE
• Interior room lamps* are controlled by the interior room lamp timer control function of the BCM.
*Map lamp, interior room lamp, vanity lamps and trunk room lamp.
The timer control functions of the BCM activate based on inputs from the remote keyless entry receiver, the
key cylinder lock/unlock switch, the door switches, the key switch and key lock solenoid (without Intelligent
Key) or the key switch and ignition knob switch (with Intelligent Key).
ROOM LAMP TIMER OPERATION
When the interior room lamp switch is in the DOOR position and when all conditions below are met, the BCM
begins timer control (maximum 30 seconds) for interior room lamp ON/OFF.
When the front door LH is unlocked [with Intelligent Key, main power window and door lock/unlock switch, or
front door lock assembly (key cylinder switch)].
When a door opens → closes and the Intelligent Key is not inserted in the key slot.
Timer control is canceled under the following conditions.
When the front door LH is locked [with Intelligent Key, main power window and door lock/unlock switch, or
front door lock assembly (key cylinder switch)].
A door is opened (door switch turns ON).
Intelligent Key is inserted into the key slot.
Interior lamp operational settings can be changed with the function setting of CONSULT-III.
INTERIOR LAMP BATTERY SAVER CONTROL
If an interior lamp is left ON and does not turn OFF even when the doors are closed, the BCM turns off power
to the interior lamps automatically to save the battery 30 minutes after the ignition switch is turned OFF.
The BCM controls power and ground to all interior lamps.
After the battery saver system turns the lamps OFF, the lamps will illuminate again when
ALNIA0892GB