2007 NISSAN TIIDA front
[x] Cancel search: frontPage 4258 of 5883
MA-18
< ON-VEHICLE MAINTENANCE >
PERIODIC MAINTENANCE
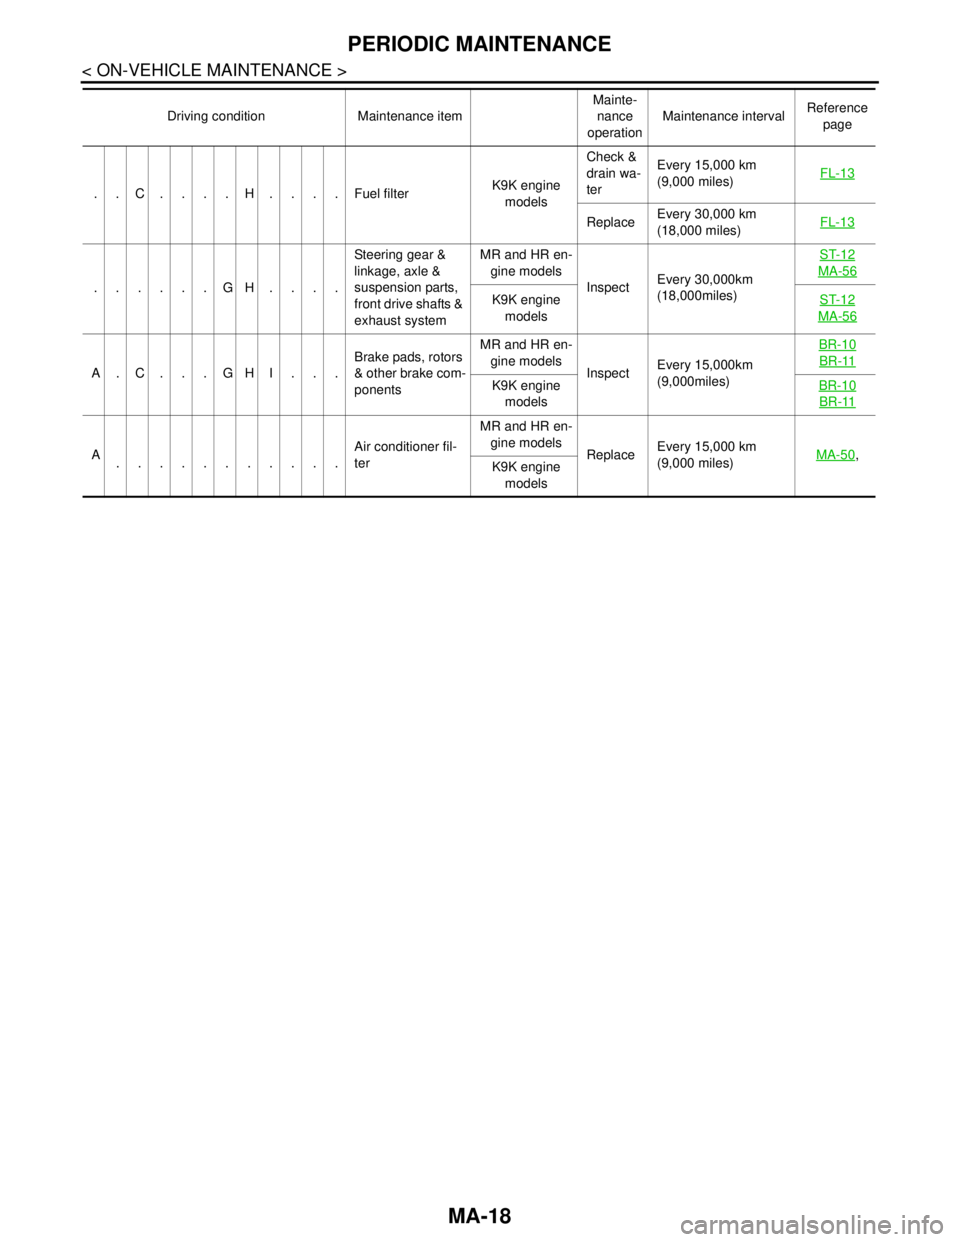
..C....H....Fuel filter K9K engine
modelsCheck &
drain wa-
terEvery 15,000 km
(9,000 miles) FL-13
ReplaceEvery 30,000 km
(18,000 miles)FL-13
......GH....Steering gear &
linkage, axle &
suspension parts,
front drive shafts &
exhaust systemMR and HR en-
gine models
InspectEvery 30,000km
(18,000miles)ST-12
MA-56
K9K engine
modelsST-12
MA-56
A.C...GHI...Brake pads, rotors
& other brake com-
ponentsMR and HR en-
gine models
InspectEvery 15,000km
(9,000miles) BR-10BR-11
K9K engine
modelsBR-10
BR-11
A
...........Air conditioner fil-
terMR and HR en-
gine models
ReplaceEvery 15,000 km
(9,000 miles)MA-50,
K9K engine
models Driving condition Maintenance itemMainte-
nance
operationMaintenance intervalReference
page
Page 4264 of 5883
MA-24
< ON-VEHICLE MAINTENANCE >
ENGINE MAINTENANCE (HR16DE)
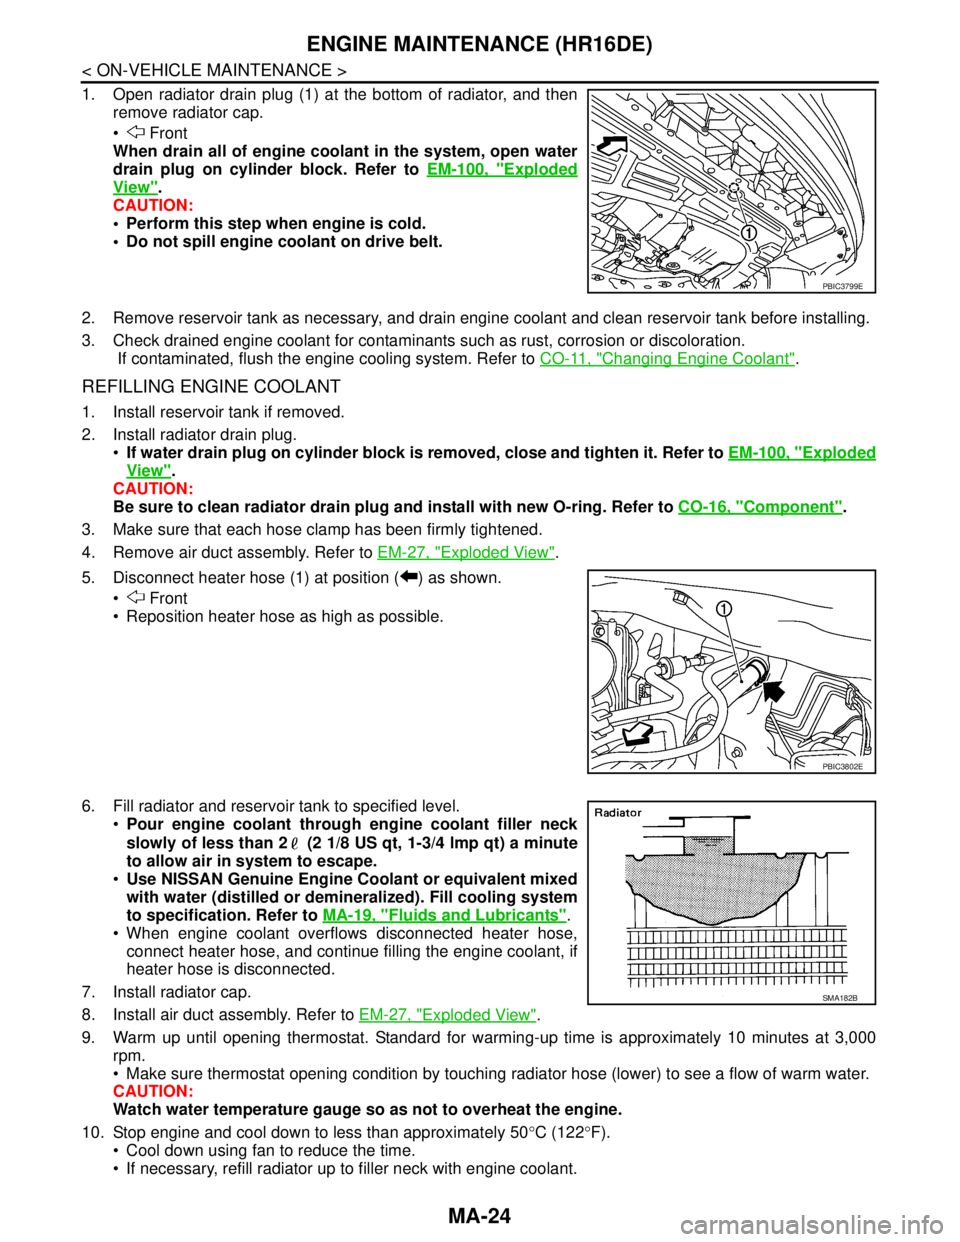
1. Open radiator drain plug (1) at the bottom of radiator, and then
remove radiator cap.
Front
When drain all of engine coolant in the system, open water
drain plug on cylinder block. Refer to EM-100, "
Exploded
View".
CAUTION:
Perform this step when engine is cold.
Do not spill engine coolant on drive belt.
2. Remove reservoir tank as necessary, and drain engine coolant and clean reservoir tank before installing.
3. Check drained engine coolant for contaminants such as rust, corrosion or discoloration.
If contaminated, flush the engine cooling system. Refer to CO-11, "
Changing Engine Coolant".
REFILLING ENGINE COOLANT
1. Install reservoir tank if removed.
2. Install radiator drain plug.
If water drain plug on cylinder block is removed, close and tighten it. Refer to EM-100, "
Exploded
View".
CAUTION:
Be sure to clean radiator drain plug and install with new O-ring. Refer to CO-16, "
Component".
3. Make sure that each hose clamp has been firmly tightened.
4. Remove air duct assembly. Refer to EM-27, "
Exploded View".
5. Disconnect heater hose (1) at position ( ) as shown.
Front
Reposition heater hose as high as possible.
6. Fill radiator and reservoir tank to specified level.
Pour engine coolant through engine coolant filler neck
slowly of less than 2 (2 1/8 US qt, 1-3/4 lmp qt) a minute
to allow air in system to escape.
Use NISSAN Genuine Engine Coolant or equivalent mixed
with water (distilled or demineralized). Fill cooling system
to specification. Refer to MA-19, "
Fluids and Lubricants".
When engine coolant overflows disconnected heater hose,
connect heater hose, and continue filling the engine coolant, if
heater hose is disconnected.
7. Install radiator cap.
8. Install air duct assembly. Refer to EM-27, "
Exploded View".
9. Warm up until opening thermostat. Standard for warming-up time is approximately 10 minutes at 3,000
rpm.
Make sure thermostat opening condition by touching radiator hose (lower) to see a flow of warm water.
CAUTION:
Watch water temperature gauge so as not to overheat the engine.
10. Stop engine and cool down to less than approximately 50°C (122°F).
Cool down using fan to reduce the time.
If necessary, refill radiator up to filler neck with engine coolant.
PBIC3799E
PBIC3802E
SMA182B
Page 4272 of 5883
MA-32
< ON-VEHICLE MAINTENANCE >
ENGINE MAINTENANCE (MR18DE)
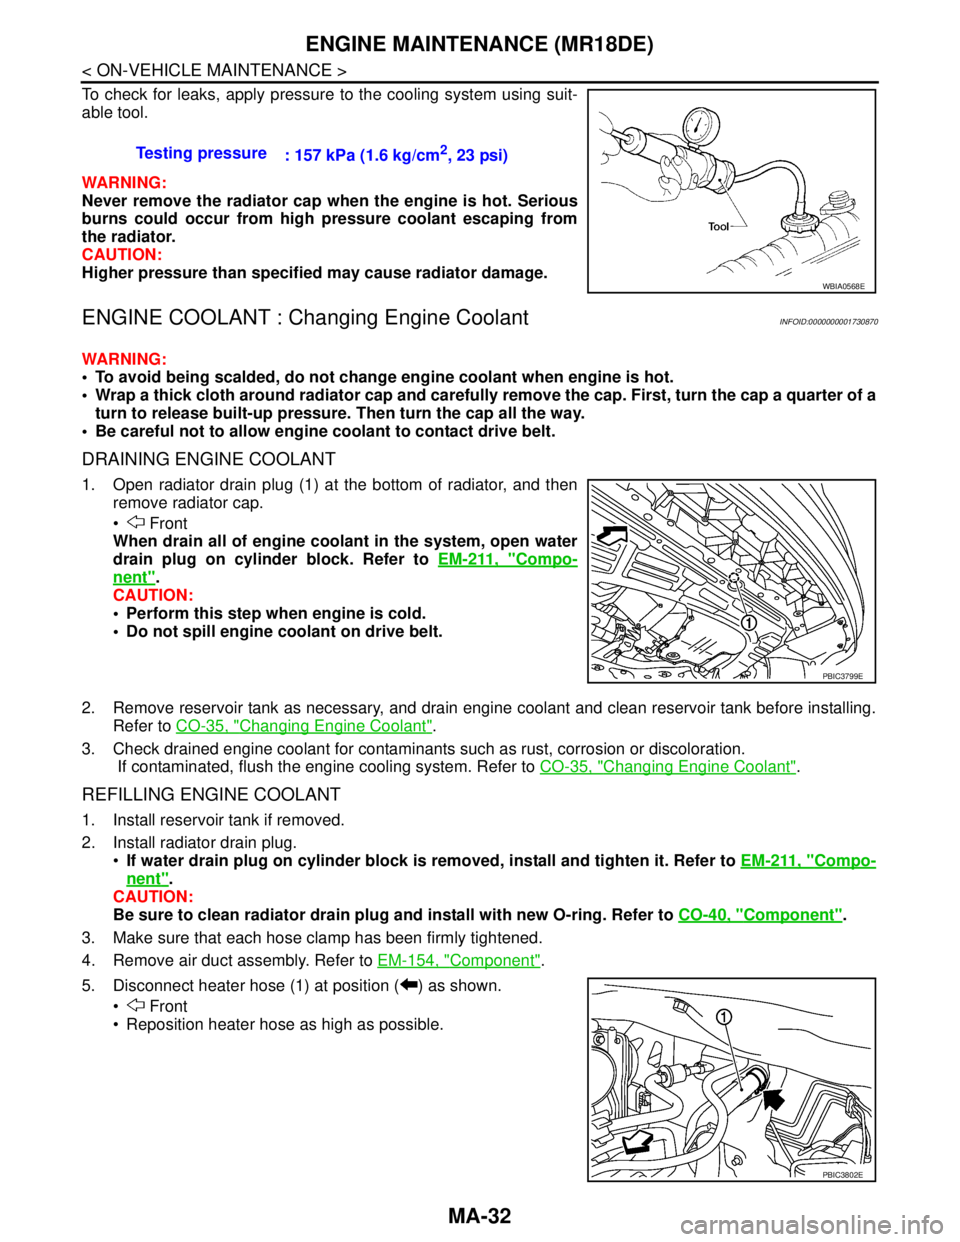
To check for leaks, apply pressure to the cooling system using suit-
able tool.
WARNING:
Never remove the radiator cap when the engine is hot. Serious
burns could occur from high pressure coolant escaping from
the radiator.
CAUTION:
Higher pressure than specified may cause radiator damage.
ENGINE COOLANT : Changing Engine CoolantINFOID:0000000001730870
WARNING:
To avoid being scalded, do not change engine coolant when engine is hot.
Wrap a thick cloth around radiator cap and carefully remove the cap. First, turn the cap a quarter of a
turn to release built-up pressure. Then turn the cap all the way.
Be careful not to allow engine coolant to contact drive belt.
DRAINING ENGINE COOLANT
1. Open radiator drain plug (1) at the bottom of radiator, and then
remove radiator cap.
Front
When drain all of engine coolant in the system, open water
drain plug on cylinder block. Refer to EM-211, "
Compo-
nent".
CAUTION:
Perform this step when engine is cold.
Do not spill engine coolant on drive belt.
2. Remove reservoir tank as necessary, and drain engine coolant and clean reservoir tank before installing.
Refer to CO-35, "
Changing Engine Coolant".
3. Check drained engine coolant for contaminants such as rust, corrosion or discoloration.
If contaminated, flush the engine cooling system. Refer to CO-35, "
Changing Engine Coolant".
REFILLING ENGINE COOLANT
1. Install reservoir tank if removed.
2. Install radiator drain plug.
If water drain plug on cylinder block is removed, install and tighten it. Refer to EM-211, "
Compo-
nent".
CAUTION:
Be sure to clean radiator drain plug and install with new O-ring. Refer to CO-40, "
Component".
3. Make sure that each hose clamp has been firmly tightened.
4. Remove air duct assembly. Refer to EM-154, "
Component".
5. Disconnect heater hose (1) at position ( ) as shown.
Front
Reposition heater hose as high as possible.Testing pressure
: 157 kPa (1.6 kg/cm
2, 23 psi)
WBIA0568E
PBIC3799E
PBIC3802E
Page 4276 of 5883
MA-36
< ON-VEHICLE MAINTENANCE >
ENGINE MAINTENANCE (MR18DE)
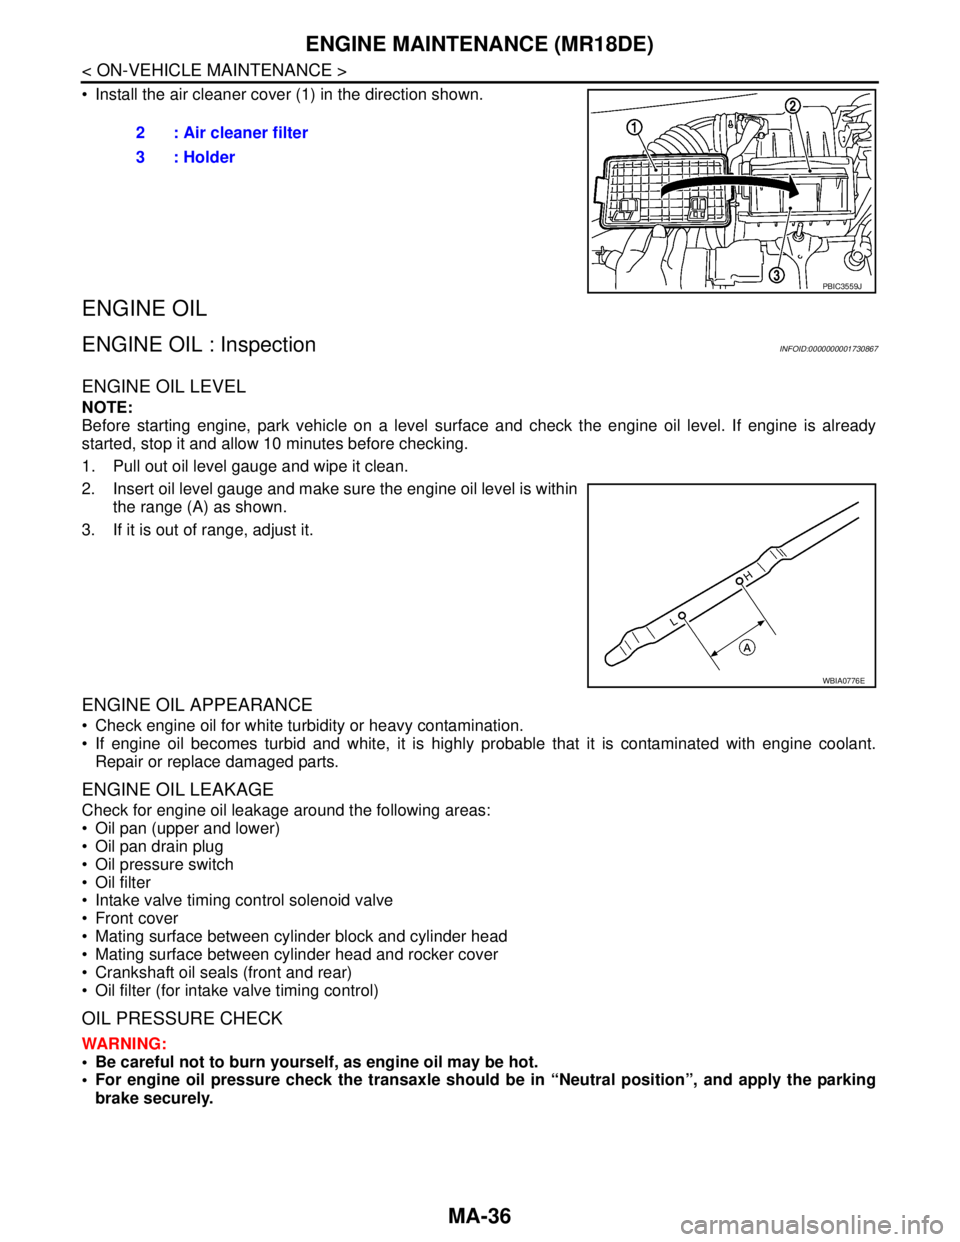
Install the air cleaner cover (1) in the direction shown.
ENGINE OIL
ENGINE OIL : InspectionINFOID:0000000001730867
ENGINE OIL LEVEL
NOTE:
Before starting engine, park vehicle on a level surface and check the engine oil level. If engine is already
started, stop it and allow 10 minutes before checking.
1. Pull out oil level gauge and wipe it clean.
2. Insert oil level gauge and make sure the engine oil level is within
the range (A) as shown.
3. If it is out of range, adjust it.
ENGINE OIL APPEARANCE
Check engine oil for white turbidity or heavy contamination.
If engine oil becomes turbid and white, it is highly probable that it is contaminated with engine coolant.
Repair or replace damaged parts.
ENGINE OIL LEAKAGE
Check for engine oil leakage around the following areas:
Oil pan (upper and lower)
Oil pan drain plug
Oil pressure switch
Oil filter
Intake valve timing control solenoid valve
Front cover
Mating surface between cylinder block and cylinder head
Mating surface between cylinder head and rocker cover
Crankshaft oil seals (front and rear)
Oil filter (for intake valve timing control)
OIL PRESSURE CHECK
WARNING:
Be careful not to burn yourself, as engine oil may be hot.
For engine oil pressure check the transaxle should be in “Neutral position”, and apply the parking
brake securely.2 : Air cleaner filter
3 : Holder
PBIC3559J
WBIA0776E
Page 4277 of 5883
ENGINE MAINTENANCE (MR18DE)
MA-37
< ON-VEHICLE MAINTENANCE >
C
D
E
F
G
H
I
J
K
L
MB
MAN
OA
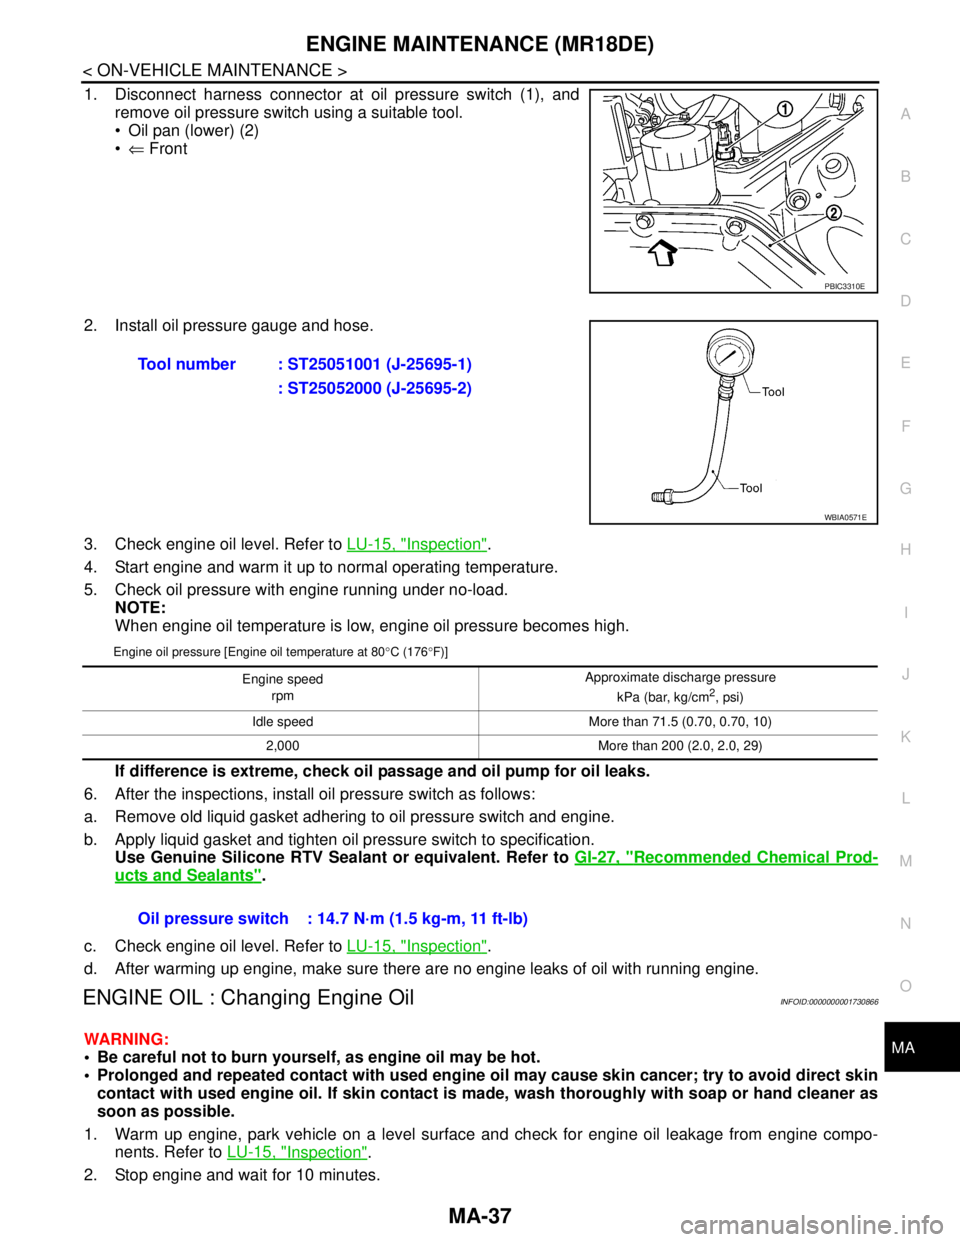
1. Disconnect harness connector at oil pressure switch (1), and
remove oil pressure switch using a suitable tool.
Oil pan (lower) (2)
⇐ Front
2. Install oil pressure gauge and hose.
3. Check engine oil level. Refer to LU-15, "
Inspection".
4. Start engine and warm it up to normal operating temperature.
5. Check oil pressure with engine running under no-load.
NOTE:
When engine oil temperature is low, engine oil pressure becomes high.
Engine oil pressure [Engine oil temperature at 80°C (176°F)]
If difference is extreme, check oil passage and oil pump for oil leaks.
6. After the inspections, install oil pressure switch as follows:
a. Remove old liquid gasket adhering to oil pressure switch and engine.
b. Apply liquid gasket and tighten oil pressure switch to specification.
Use Genuine Silicone RTV Sealant or equivalent. Refer to GI-27, "
Recommended Chemical Prod-
ucts and Sealants".
c. Check engine oil level. Refer to LU-15, "
Inspection".
d. After warming up engine, make sure there are no engine leaks of oil with running engine.
ENGINE OIL : Changing Engine OilINFOID:0000000001730866
WARNING:
Be careful not to burn yourself, as engine oil may be hot.
Prolonged and repeated contact with used engine oil may cause skin cancer; try to avoid direct skin
contact with used engine oil. If skin contact is made, wash thoroughly with soap or hand cleaner as
soon as possible.
1. Warm up engine, park vehicle on a level surface and check for engine oil leakage from engine compo-
nents. Refer to LU-15, "
Inspection".
2. Stop engine and wait for 10 minutes.
PBIC3310E
Tool number : ST25051001 (J-25695-1)
: ST25052000 (J-25695-2)
WBIA0571E
Engine speed
rpm Approximate discharge pressure
kPa (bar, kg/cm2, psi)
Idle speed More than 71.5 (0.70, 0.70, 10)
2,000 More than 200 (2.0, 2.0, 29)
Oil pressure switch : 14.7 N·m (1.5 kg-m, 11 ft-lb)
Page 4278 of 5883
MA-38
< ON-VEHICLE MAINTENANCE >
ENGINE MAINTENANCE (MR18DE)
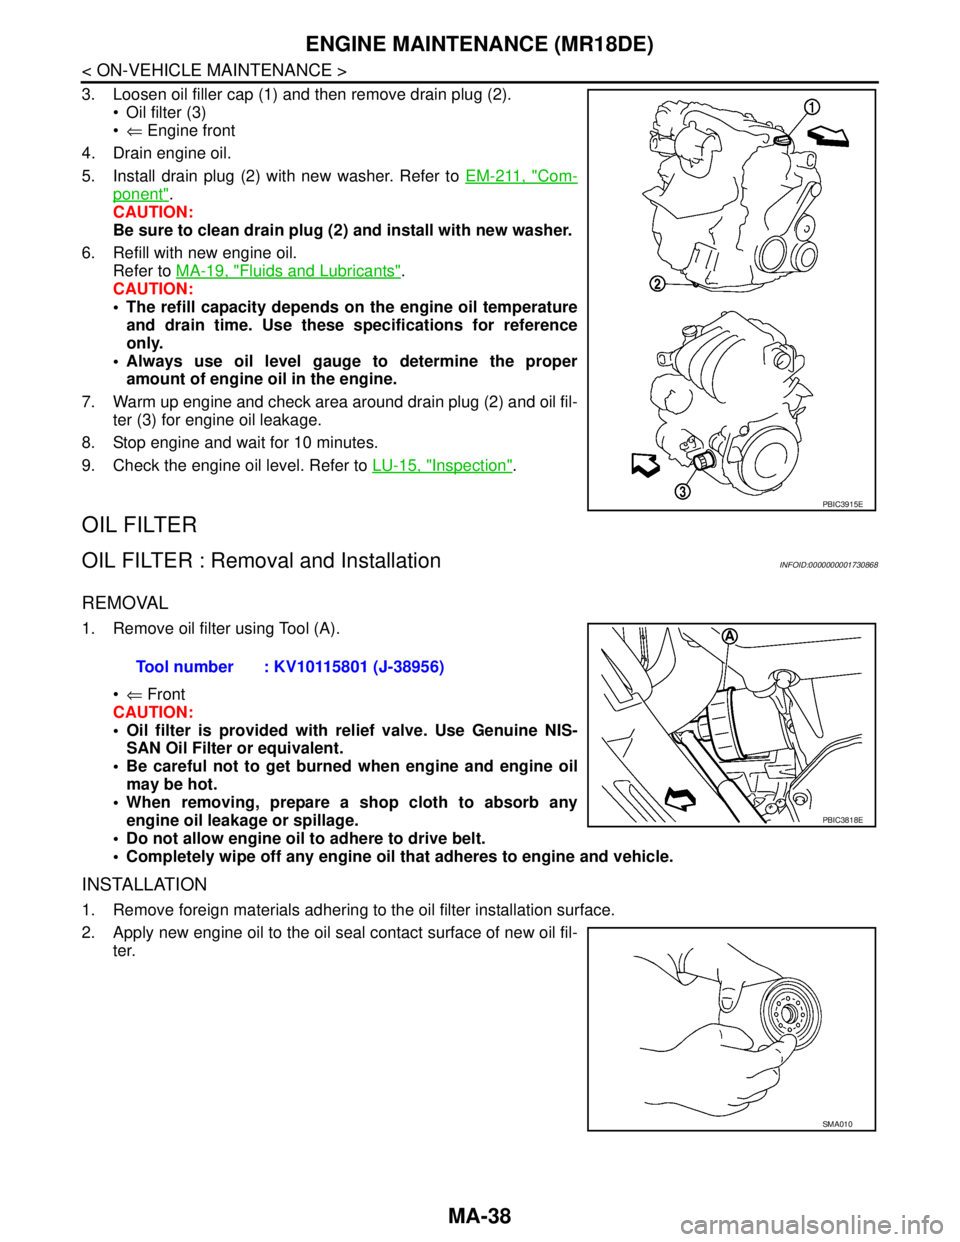
3. Loosen oil filler cap (1) and then remove drain plug (2).
Oil filter (3)
⇐ Engine front
4. Drain engine oil.
5. Install drain plug (2) with new washer. Refer to EM-211, "
Com-
ponent".
CAUTION:
Be sure to clean drain plug (2) and install with new washer.
6. Refill with new engine oil.
Refer to MA-19, "
Fluids and Lubricants".
CAUTION:
The refill capacity depends on the engine oil temperature
and drain time. Use these specifications for reference
only.
Always use oil level gauge to determine the proper
amount of engine oil in the engine.
7. Warm up engine and check area around drain plug (2) and oil fil-
ter (3) for engine oil leakage.
8. Stop engine and wait for 10 minutes.
9. Check the engine oil level. Refer to LU-15, "
Inspection".
OIL FILTER
OIL FILTER : Removal and InstallationINFOID:0000000001730868
REMOVAL
1. Remove oil filter using Tool (A).
⇐ Front
CAUTION:
Oil filter is provided with relief valve. Use Genuine NIS-
SAN Oil Filter or equivalent.
Be careful not to get burned when engine and engine oil
may be hot.
When removing, prepare a shop cloth to absorb any
engine oil leakage or spillage.
Do not allow engine oil to adhere to drive belt.
Completely wipe off any engine oil that adheres to engine and vehicle.
INSTALLATION
1. Remove foreign materials adhering to the oil filter installation surface.
2. Apply new engine oil to the oil seal contact surface of new oil fil-
ter.
PBIC3915E
Tool number : KV10115801 (J-38956)
PBIC3818E
SMA010
Page 4296 of 5883
MA-56
< ON-VEHICLE MAINTENANCE >
CHASSIS AND BODY MAINTENANCE
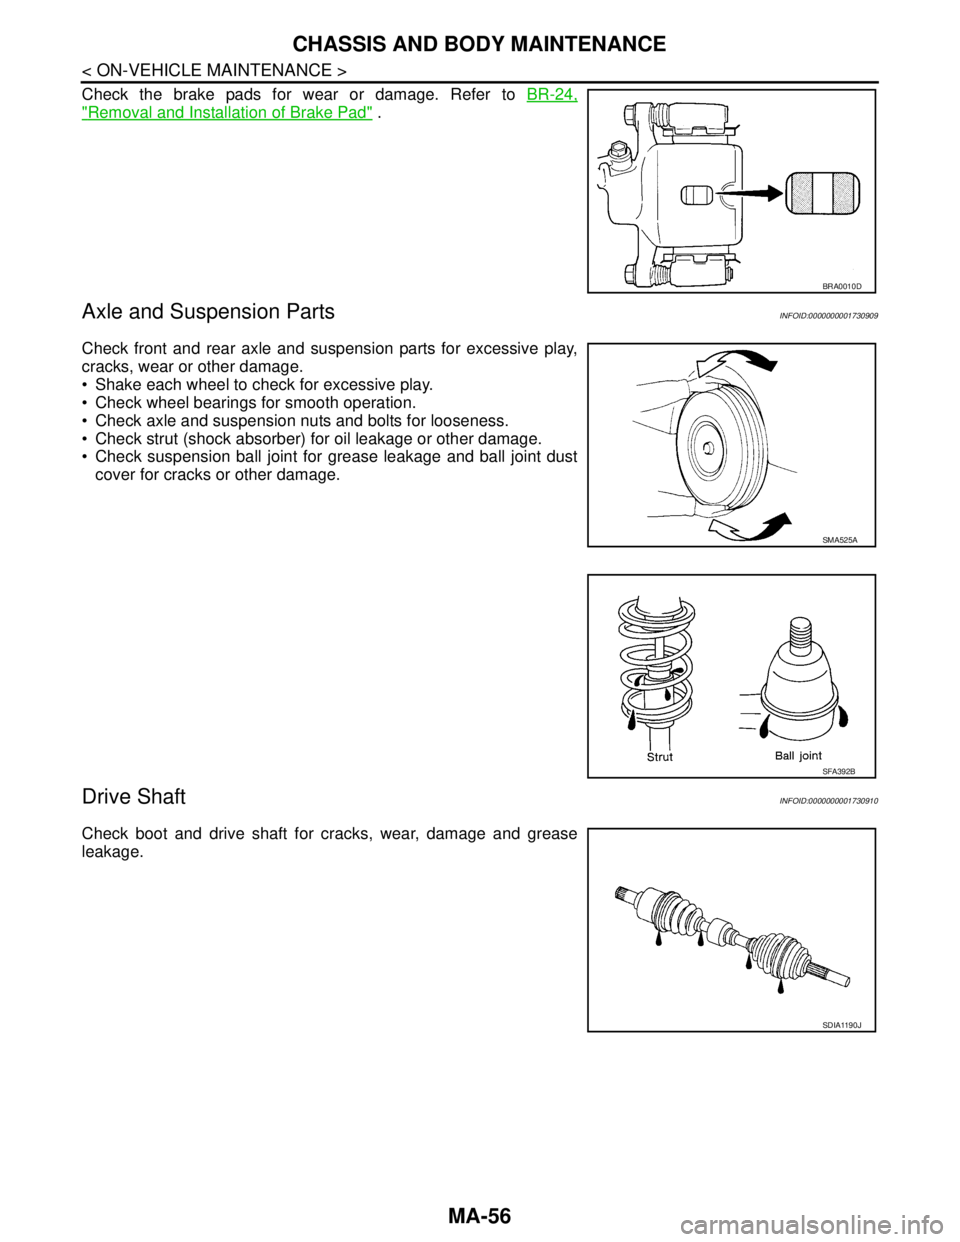
Check the brake pads for wear or damage. Refer to BR-24,
"Removal and Installation of Brake Pad" .
Axle and Suspension PartsINFOID:0000000001730909
Check front and rear axle and suspension parts for excessive play,
cracks, wear or other damage.
Shake each wheel to check for excessive play.
Check wheel bearings for smooth operation.
Check axle and suspension nuts and bolts for looseness.
Check strut (shock absorber) for oil leakage or other damage.
Check suspension ball joint for grease leakage and ball joint dust
cover for cracks or other damage.
Drive ShaftINFOID:0000000001730910
Check boot and drive shaft for cracks, wear, damage and grease
leakage.
BRA0010D
SMA525A
SFA392B
SDIA1190J
Page 4297 of 5883
CHASSIS AND BODY MAINTENANCE
MA-57
< ON-VEHICLE MAINTENANCE >
C
D
E
F
G
H
I
J
K
L
MB
MAN
OA
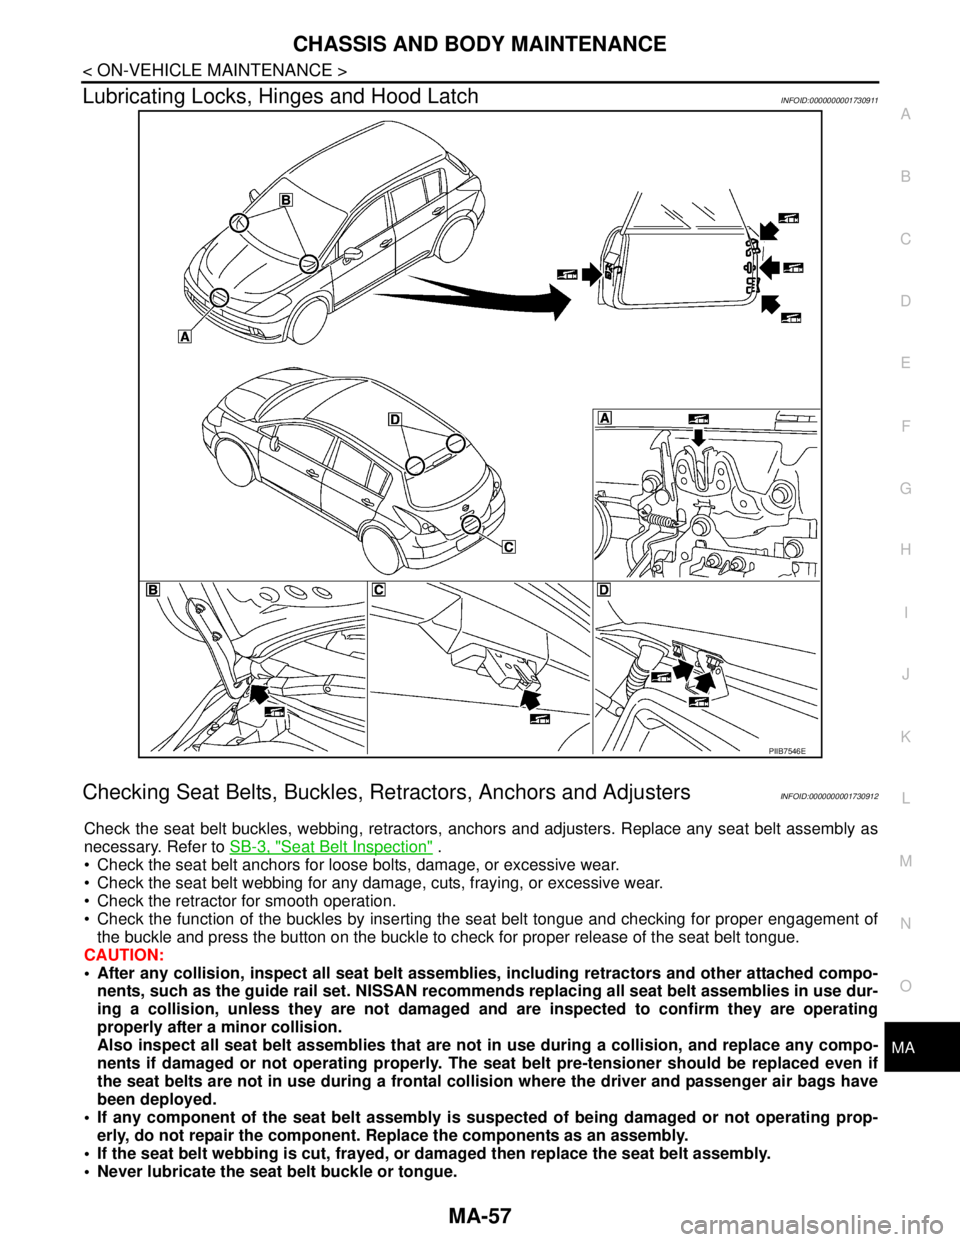
Lubricating Locks, Hinges and Hood LatchINFOID:0000000001730911
Checking Seat Belts, Buckles, Retractors, Anchors and AdjustersINFOID:0000000001730912
Check the seat belt buckles, webbing, retractors, anchors and adjusters. Replace any seat belt assembly as
necessary. Refer to SB-3, "
Seat Belt Inspection" .
Check the seat belt anchors for loose bolts, damage, or excessive wear.
Check the seat belt webbing for any damage, cuts, fraying, or excessive wear.
Check the retractor for smooth operation.
Check the function of the buckles by inserting the seat belt tongue and checking for proper engagement of
the buckle and press the button on the buckle to check for proper release of the seat belt tongue.
CAUTION:
After any collision, inspect all seat belt assemblies, including retractors and other attached compo-
nents, such as the guide rail set. NISSAN recommends replacing all seat belt assemblies in use dur-
ing a collision, unless they are not damaged and are inspected to confirm they are operating
properly after a minor collision.
Also inspect all seat belt assemblies that are not in use during a collision, and replace any compo-
nents if damaged or not operating properly. The seat belt pre-tensioner should be replaced even if
the seat belts are not in use during a frontal collision where the driver and passenger air bags have
been deployed.
If any component of the seat belt assembly is suspected of being damaged or not operating prop-
erly, do not repair the component. Replace the components as an assembly.
If the seat belt webbing is cut, frayed, or damaged then replace the seat belt assembly.
Never lubricate the seat belt buckle or tongue.
PIIB7546E