Page 93 of 130
SOFT TOP
RF-93
C
D
E
F
G
H
J
K
L
MA
B
RF
Revision: 2006 November2007 350Z
15. Open soft top about 90 degrees.
16. Remove clips on the top of C link and 5th bow weather strip.
17. Fully open soft top.
18. Put matching marks to installation position on C link retainer.
19. Remove screws, and then remove C link retainer.
20. Remove clips on the bottom edge of C link and 5th bow weath-
erstrip.
PIIB1288E
PIIB1293E
PIIB1295E
PIIB1294E
Page 94 of 130
RF-94
SOFT TOP
Revision: 2006 November2007 350Z
21. Remove C link and 5th bow weather strip from 5th bow.
22. Remove screws, and then remove 5th bow retainer.
23. Shave rivets head of soft top cover 5th bow by using a drill.
[Drill bit diameter: 5.5 mm (0.22 in)]
CAUTION:
Do not attempt to remove rivets completely.
PIIB1317E
PIIB1319E
PIIB1297E
PIIB1596E
Page 95 of 130
SOFT TOP
RF-95
C
D
E
F
G
H
J
K
L
MA
B
RF
Revision: 2006 November2007 350Z
24. Close soft top, and then Shave rivets head and of C link by using
a drill.
[Drill bit diameter: 5.5 mm (0.22 in)]
CAUTION:
Do not attempt to remove rivets completely.
25. Cut EPT seal and remove screws on the bottom of C link.
NOTE:
Check the position when cutting EPT seal.
26. Pull up soft top cover from 5th bow finisher.
27. Shave rivets head of 5th bow finisher upper surface, and then remove rivets head and remove retainer.
[Drill bit diameter: 5.5 mm (0.22 in)]
CAUTION:
�Do not attempt to remove rivets completely.
�Be careful not to damage soft top when using a drill.
28. Pull up cover from the bottom of C link.
PIIB1298E
PIIB1299E
PIIB1400E
PIIB1300E
Page 97 of 130
SOFT TOP
RF-97
C
D
E
F
G
H
J
K
L
MA
B
RF
Revision: 2006 November2007 350Z
35. Pull up 2nd bow retainer by using a screwdriver, and then
remove soft top cover from 2nd bow.
36. Pull up 3rd bow retainer by using a screwdriver, and then remove soft top cover from 3rd bow.
37. Pull out glass stay and defogger harness from sleeve on rear
window glass side.
38. Pull out soft top cover from 4th bow and remove soft top cover completely from frame.
INSTALLATION
CAUTION:
Make sure that the limit switch contact around the rotation axis
of the 5th bow on the left side of soft top is protected with tape.
PIIB1306E
PIIA9858E
PIIB1307E
PIIB1286E
Page 98 of 130
RF-98
SOFT TOP
Revision: 2006 November2007 350Z
Preparation Work
1. Remove 5th bow finisher pads.
NOTE:
Put matching marks so as to check the position when installing.
2. Remove screws, and then remove 5th bow side finisher (RH/
LH).
3. Remove clips, and then remove 5th bow finisher.
4. Remove rivets head of 5th bow finisher retainer.
CAUTION:
Do not attempt to remove rivets completely.
PIIB1402E
PIIB1412E
PIIB1309E
PIIB1602E
Page 99 of 130
SOFT TOP
RF-99
C
D
E
F
G
H
J
K
L
MA
B
RF
Revision: 2006 November2007 350Z
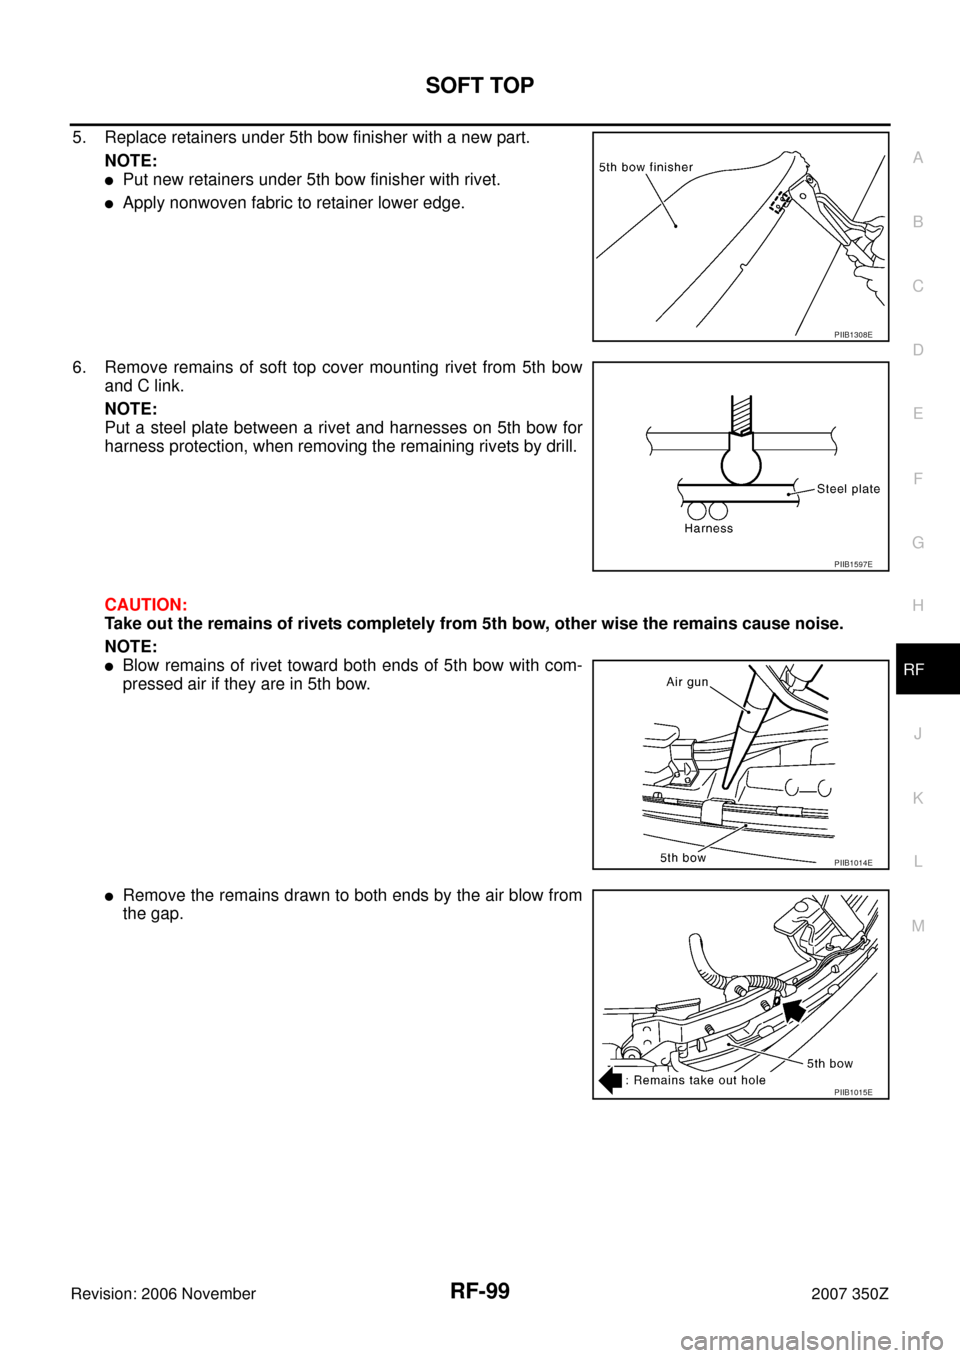
5. Replace retainers under 5th bow finisher with a new part.
NOTE:
�Put new retainers under 5th bow finisher with rivet.
�Apply nonwoven fabric to retainer lower edge.
6. Remove remains of soft top cover mounting rivet from 5th bow
and C link.
NOTE:
Put a steel plate between a rivet and harnesses on 5th bow for
harness protection, when removing the remaining rivets by drill.
CAUTION:
Take out the remains of rivets completely from 5th bow, other wise the remains cause noise.
NOTE:
�Blow remains of rivet toward both ends of 5th bow with com-
pressed air if they are in 5th bow.
�Remove the remains drawn to both ends by the air blow from
the gap.
PIIB1308E
PIIB1597E
PIIB1014E
PIIB1015E
Page 100 of 130
RF-100
SOFT TOP
Revision: 2006 November2007 350Z
7. Install 5th bow finisher to 5th bow.
8. Install 5th bow side finisher (RH/LH) to 5th bow.
9. Install new pads and fabric tapes.
10. Secure 5th bow finisher harness with new nonwoven fabric if necessary.
Installation
1. Apply double faced adhesive tape for frame.
2. Put soft top cover on frame.
PIIB1309E
PIIB1412E
PIIB1599E
A: Upper side of 1st bow
B: Under side of 1st bow
C: Outer side of A link (between grommets)
D: Outer and under side of 1st bow edge
PIIB1322E
Page 103 of 130
SOFT TOP
RF-103
C
D
E
F
G
H
J
K
L
MA
B
RF
Revision: 2006 November2007 350Z
15. Open 5th bow then secure soft top cover to 5th bow finisher
upper surface with rivet.
16. Close 5th bow then wrap soft top cover around 5th bow.
17. Secure soft top cover to 5th bow with rivet.
18. Secure soft top cover to C link with rivet.
19. Align screw hole on soft top cover and the bottom of C link, and
then tighten with screw.
NOTE:
�During tighten up the screw, insert a thin metal rod such as a
nail [diameter: 4mm (0.16in)] to a clip hole near the screw to
align holes of soft top cloth and its backing plastic plate, and C
link frame.
�Tighten screw while holding soft top at certain angle for easy
screw installation.
PIIB1313E
PIIB1003E
PIIB1315E
PIIB1299E


![NISSAN 350Z 2007 Z33 Roof Workshop Manual SOFT TOP
RF-95
C
D
E
F
G
H
J
K
L
MA
B
RF
Revision: 2006 November2007 350Z
24. Close soft top, and then Shave rivets head and of C link by using
a drill.
[Drill bit diameter: 5.5 mm (0.22 in)]
CAUTION:](/manual-img/5/786/w960_786-94.png "NISSAN 350Z 2007 Z33 Roof Workshop Manual SOFT TOP
RF-95
C
D
E
F
G
H
J
K
L
MA
B
RF
Revision: 2006 November2007 350Z
24. Close soft top, and then Shave rivets head and of C link by using
a drill.
[Drill bit diameter: 5.5 mm (0.22 in)]
CAUTION:")


 to 5th bow.
9. Install new pads and fabric tapes.
10. Secure 5th bow f")
