Page 114 of 130
RF-114
SOFT TOP
Revision: 2006 November2007 350Z
4. Replace rivet retainer on back of 5th bow finisher with a new one.
5. Secure 5th bow finisher with rivet, and then apply nonwoven fabric.
6. Install 5th bow finisher and 5th bow finisher (RH/LH).
7. Apply pad on 5th bow finisher.
NOTE:
Apply pad to the original position.
Installation
Install in the reverse order of removal.
PIIB0726E
PIIA9853E
Page 116 of 130
RF-116
SOFT TOP
Revision: 2006 November2007 350Z
Repairing Method for Water Leakage Around DoorsNIS0007X
WATER LEAKAGE FROM A
Water may be entering passenger room through back of front pillar.
Cause: Butyl tape on back of glass run assembly may be separating from roof panel.
Repair Procedure 1
Apply butyl tape on back of glass run assembly again, and correct
installing position.
Water may be entering through connection between front pillar and front edge of soft top.
Cause: There may be a gap between glass run assembly and weather strip of soft top.
1. Soft top assembly 2. Windshield glass 3. Door glass
4. Glass run assembly 5. A link weather strip 6. B link weather strip
7 C link and 5th bow weather strip
PIIA7647J
PIIB1168E
Page 118 of 130

RF-118
SOFT TOP
Revision: 2006 November2007 350Z
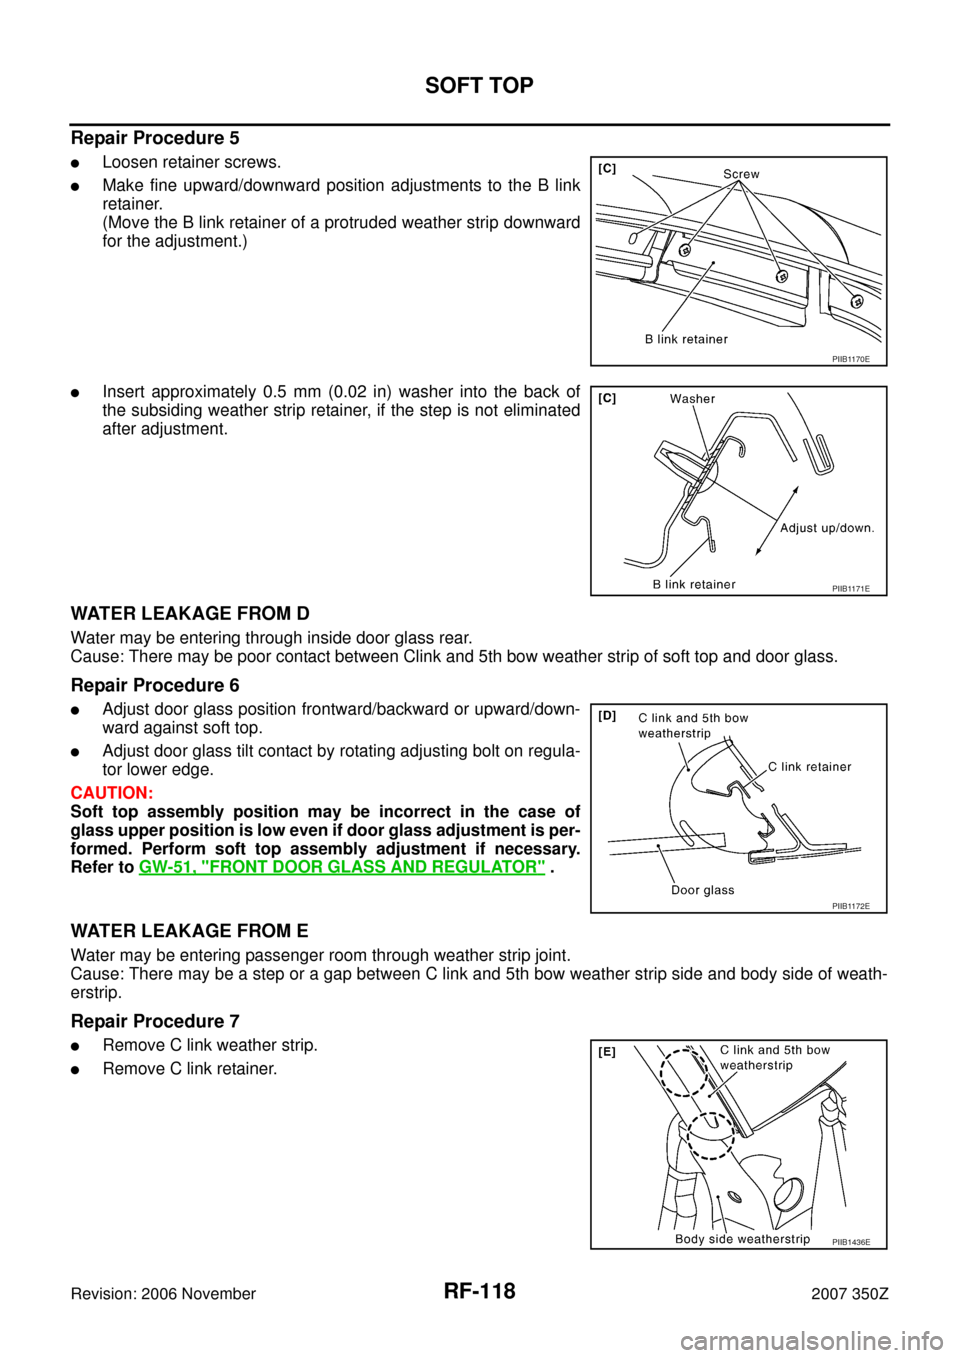
Repair Procedure 5
�Loosen retainer screws.
�Make fine upward/downward position adjustments to the B link
retainer.
(Move the B link retainer of a protruded weather strip downward
for the adjustment.)
�Insert approximately 0.5 mm (0.02 in) washer into the back of
the subsiding weather strip retainer, if the step is not eliminated
after adjustment.
WATER LEAKAGE FROM D
Water may be entering through inside door glass rear.
Cause: There may be poor contact between Clink and 5th bow weather strip of soft top and door glass.
Repair Procedure 6
�Adjust door glass position frontward/backward or upward/down-
ward against soft top.
�Adjust door glass tilt contact by rotating adjusting bolt on regula-
tor lower edge.
CAUTION:
Soft top assembly position may be incorrect in the case of
glass upper position is low even if door glass adjustment is per-
formed. Perform soft top assembly adjustment if necessary.
Refer to GW-51, "
FRONT DOOR GLASS AND REGULATOR" .
WATER LEAKAGE FROM E
Water may be entering passenger room through weather strip joint.
Cause: There may be a step or a gap between C link and 5th bow weather strip side and body side of weath-
erstrip.
Repair Procedure 7
�Remove C link weather strip.
�Remove C link retainer.
PIIB1170E
PIIB1171E
PIIB1172E
PIIB1436E
Page 121 of 130

SOFT TOP
RF-121
C
D
E
F
G
H
J
K
L
MA
B
RF
Revision: 2006 November2007 350Z
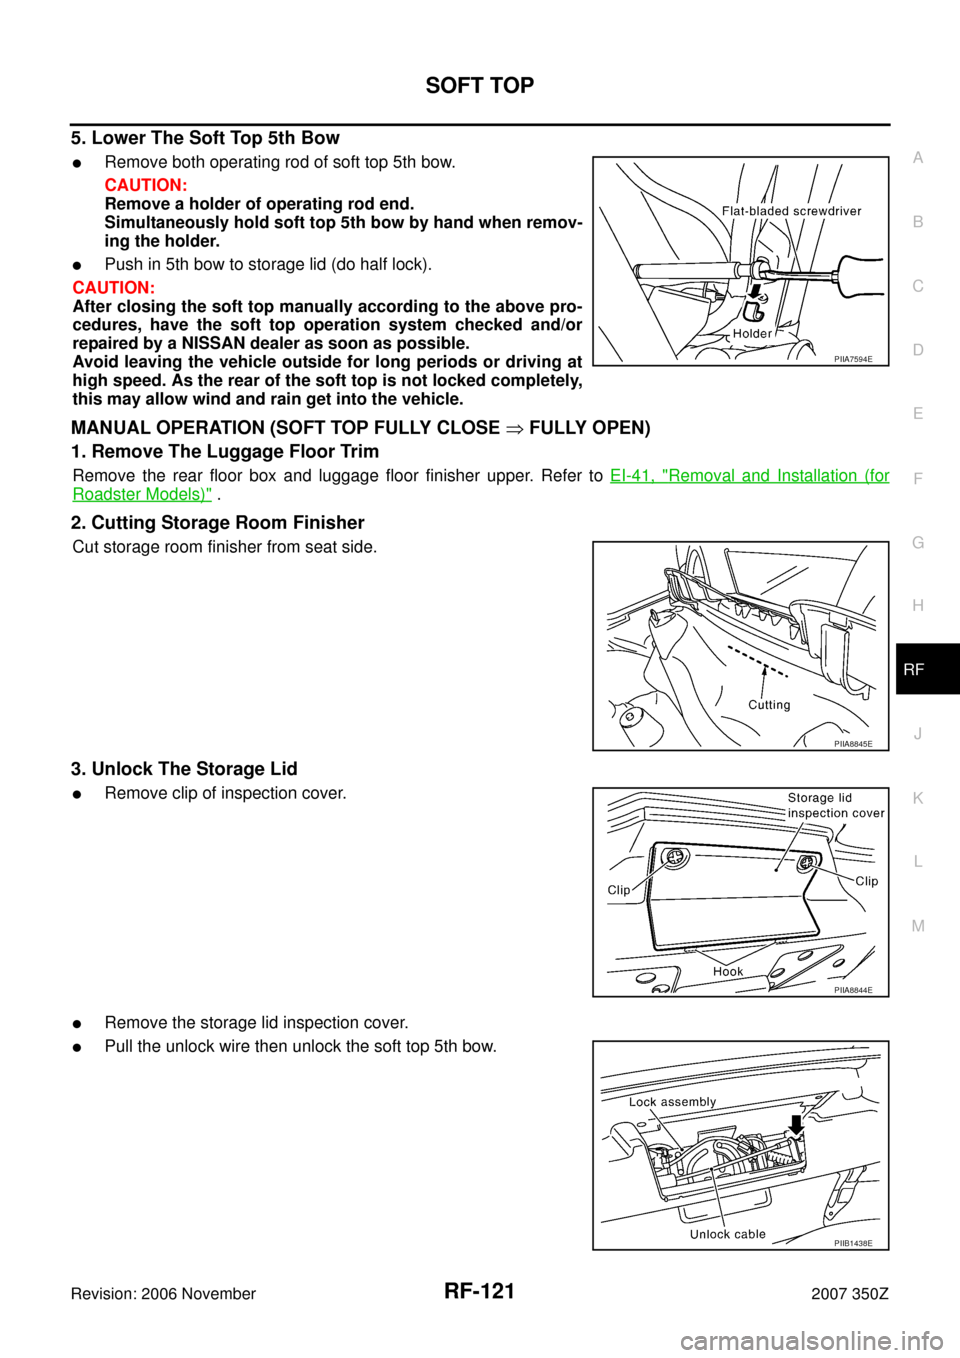
5. Lower The Soft Top 5th Bow
�Remove both operating rod of soft top 5th bow.
CAUTION:
Remove a holder of operating rod end.
Simultaneously hold soft top 5th bow by hand when remov-
ing the holder.
�Push in 5th bow to storage lid (do half lock).
CAUTION:
After closing the soft top manually according to the above pro-
cedures, have the soft top operation system checked and/or
repaired by a NISSAN dealer as soon as possible.
Avoid leaving the vehicle outside for long periods or driving at
high speed. As the rear of the soft top is not locked completely,
this may allow wind and rain get into the vehicle.
MANUAL OPERATION (SOFT TOP FULLY CLOSE � FULLY OPEN)
1. Remove The Luggage Floor Trim
Remove the rear floor box and luggage floor finisher upper. Refer to EI-41, "Removal and Installation (for
Roadster Models)" .
2. Cutting Storage Room Finisher
Cut storage room finisher from seat side.
3. Unlock The Storage Lid
�Remove clip of inspection cover.
�Remove the storage lid inspection cover.
�Pull the unlock wire then unlock the soft top 5th bow.
PIIA7594E
PIIA8845E
PIIA8844E
PIIB1438E
Page 122 of 130

RF-122
SOFT TOP
Revision: 2006 November2007 350Z
4. Open The Soft Top 5th Bow
�Remove both shock absorber of soft top 5th bow.
�Open the soft top 5th bow (approximate 90 degrees)
5. Open The Trunk Lid
�Pull the emergency cable.
�Open the trunk lid.
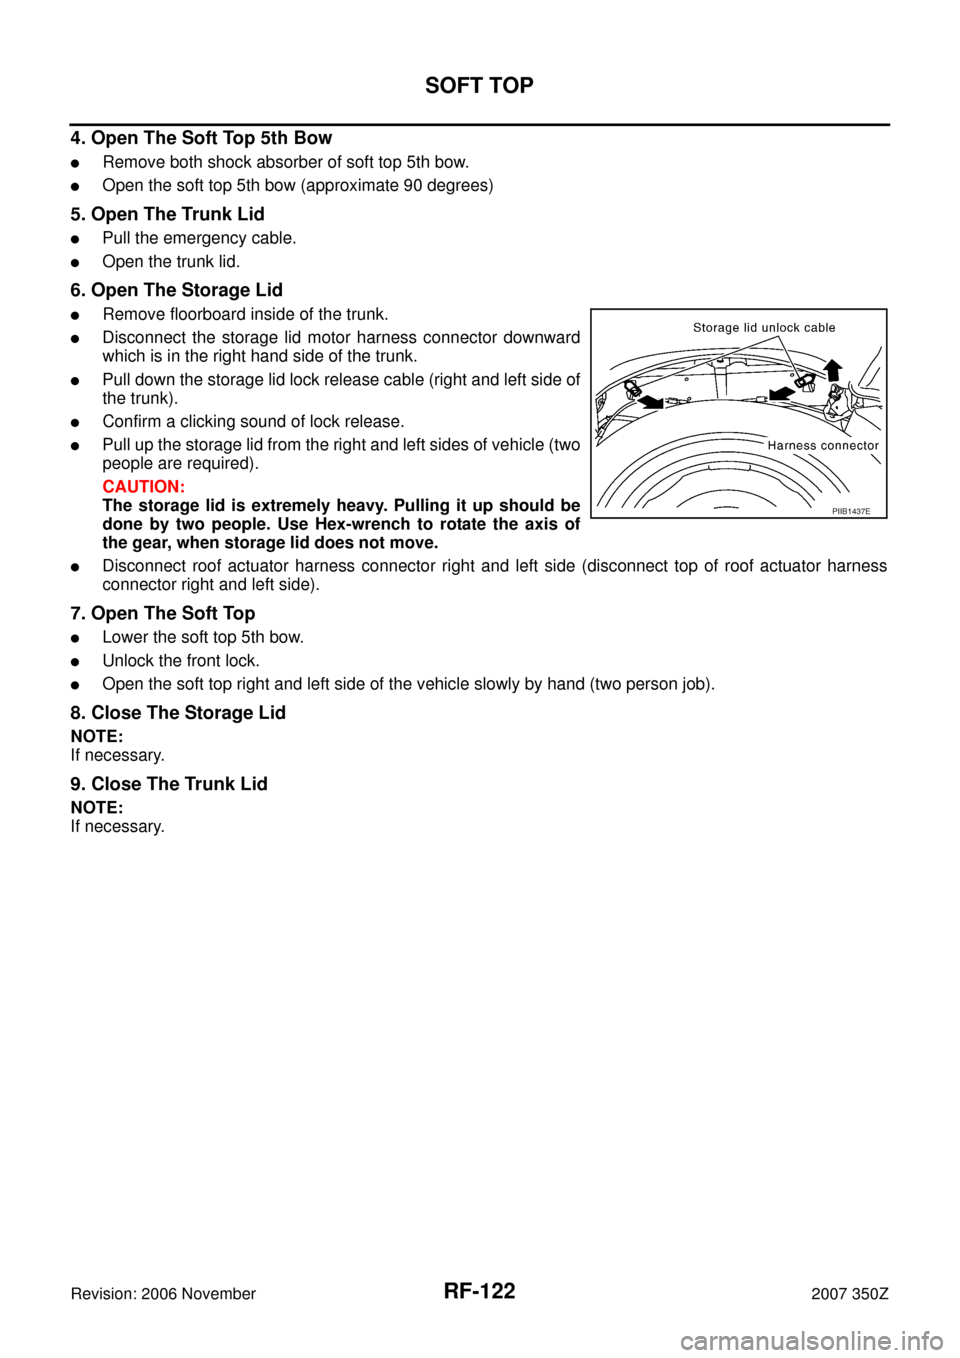
6. Open The Storage Lid
�Remove floorboard inside of the trunk.
�Disconnect the storage lid motor harness connector downward
which is in the right hand side of the trunk.
�Pull down the storage lid lock release cable (right and left side of
the trunk).
�Confirm a clicking sound of lock release.
�Pull up the storage lid from the right and left sides of vehicle (two
people are required).
CAUTION:
The storage lid is extremely heavy. Pulling it up should be
done by two people. Use Hex-wrench to rotate the axis of
the gear, when storage lid does not move.
�Disconnect roof actuator harness connector right and left side (disconnect top of roof actuator harness
connector right and left side).
7. Open The Soft Top
�Lower the soft top 5th bow.
�Unlock the front lock.
�Open the soft top right and left side of the vehicle slowly by hand (two person job).
8. Close The Storage Lid
NOTE:
If necessary.
9. Close The Trunk Lid
NOTE:
If necessary.
PIIB1437E
Page 123 of 130
STORAGE LID
RF-123
C
D
E
F
G
H
J
K
L
MA
B
RF
Revision: 2006 November2007 350Z
STORAGE LIDPFP:97002
Removal and Installation of Storage Lid AssemblyNIS0007Z
REMOVAL
1. Disconnect storage lid actuator connector.
2. Remove bolts, and then remove storage lid striker.
NOTE:
�2 or more workers are required.
�Paint matching marks to check location for installation.
3. Remove nuts which is connecting the storage lid upper bracket
and the storage lid lower bracket.
NOTE:
Paint matching marks to check location for installation.
4. Remove nuts of storage lid hinge, and then remove storage lid,
spacers and shims.
INSTALLATION
1. Install in the reverse order of removal.
2. Install storage lid, and then adjust fitting of lid.
1. Storage lid 2. Storage outer protector 3. Spacer
4. Shim 5. Storage lid hinge 6. Storage lid striker
7. Storage lid upper bracket 8. Storage lid lower bracket 9. 5th bow lock
10. 5th bow unlock actuator 11. 5th bow closure motor
PIIA8284E
PIIA7953E
Page 127 of 130

STORAGE LID
RF-127
C
D
E
F
G
H
J
K
L
MA
B
RF
Revision: 2006 November2007 350Z
6. Lift up back panel finisher clips using remover tools, and then remove front side of storage room finisher.
INSTALLATION
Install in the reverse order of removal.
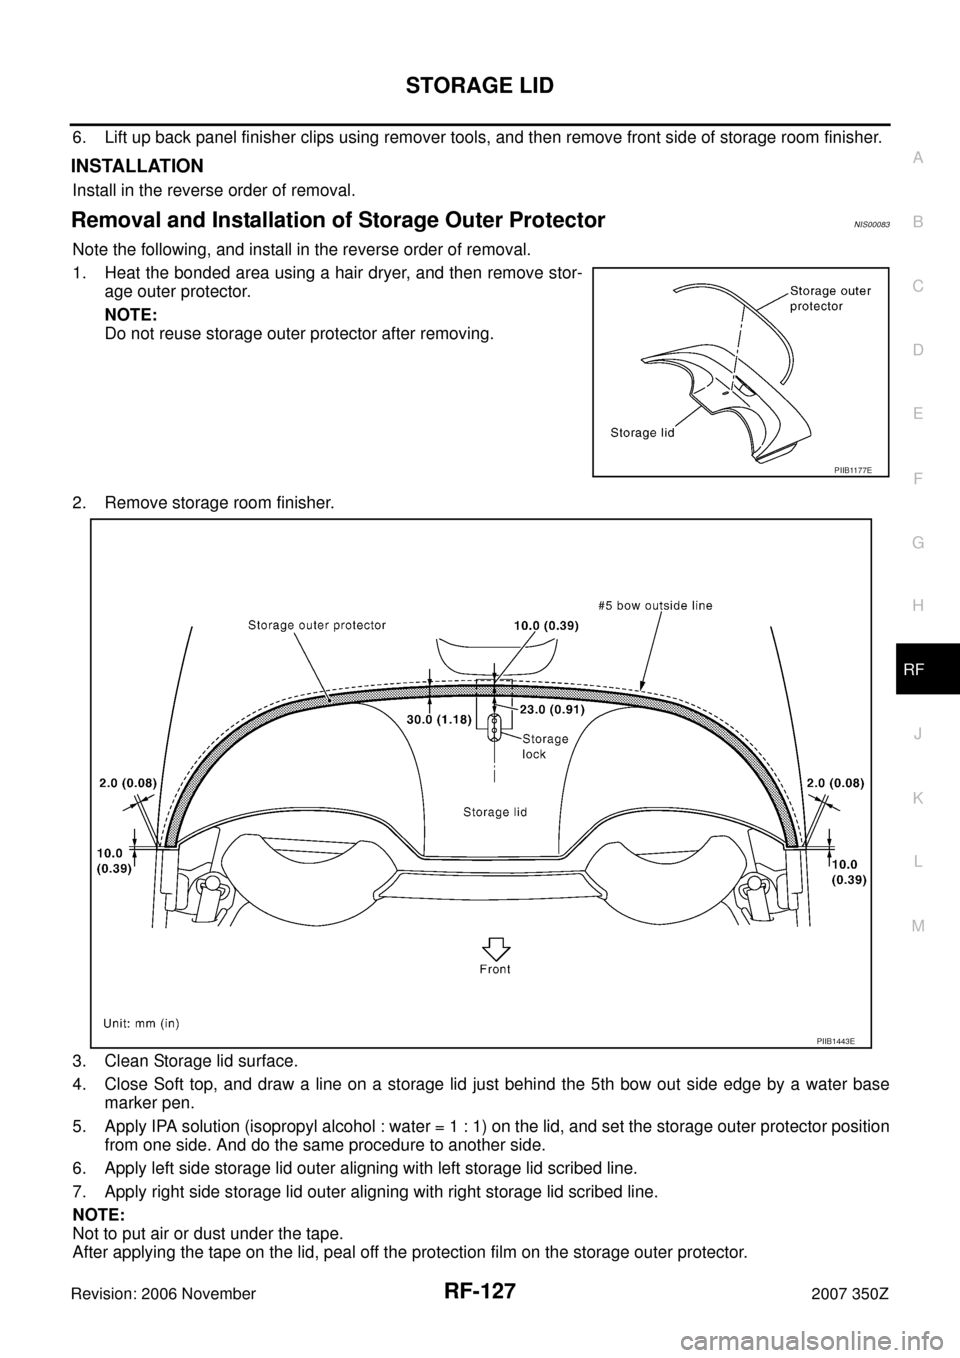
Removal and Installation of Storage Outer Protector NIS00083
Note the following, and install in the reverse order of removal.
1. Heat the bonded area using a hair dryer, and then remove stor-
age outer protector.
NOTE:
Do not reuse storage outer protector after removing.
2. Remove storage room finisher.
3. Clean Storage lid surface.
4. Close Soft top, and draw a line on a storage lid just behind the 5th bow out side edge by a water base
marker pen.
5. Apply IPA solution (isopropyl alcohol : water = 1 : 1) on the lid, and set the storage outer protector position
from one side. And do the same procedure to another side.
6. Apply left side storage lid outer aligning with left storage lid scribed line.
7. Apply right side storage lid outer aligning with right storage lid scribed line.
NOTE:
Not to put air or dust under the tape.
After applying the tape on the lid, peal off the protection film on the storage outer protector.
PIIB1177E
PIIB1443E