Page 4 of 10
PR-4
NOISE, VIBRATION AND HARSHNESS (NVH) TROUBLESHOOTING
Revision: 2006 November2007 350Z
NOISE, VIBRATION AND HARSHNESS (NVH) TROUBLESHOOTINGPFP:00003
NVH Troubleshooting ChartNDS00003
Use the chart below to help you find the cause of the symptom. If necessary, repair or replace these parts.
×: ApplicableReference page
PR-5—
—
—
—
PR-5PR-7
NVH in RFD section
NVH in FAX, RAX, FSU, and RSU section
NVH in WT section
NVH in WT section
NVH in RAX section
NVH in BR section
NVH in PS section
Possible cause and SUSPECTED PARTS
Uneven rotating torque
Center bearing improper installation
Excessive center bearing axial end play
Center bearing mounting (insulator) cracks, damage or deterioration
Excessive joint angle
Rotation imbalance
Excessive runout
DIFFERENTIAL
AXLE AND SUSPENSION
TIRES
ROAD WHEEL
DRIVE SHAFT
BRAKES
STEERING
SymptomNoise××××××××××××××
Shake× × ××××××
Vibration××××××× ×× × ×
Page 8 of 10

PR-8
REAR PROPELLER SHAFT
Revision: 2006 November2007 350Z
INSTALLATION
When Installing New Propeller Shaft
CAUTION:
�When installing propeller shaft, handle it carefully.
�Propeller shaft must be installed with packing material attached (delivered condition). Do not
install propeller shaft with packing material removed.
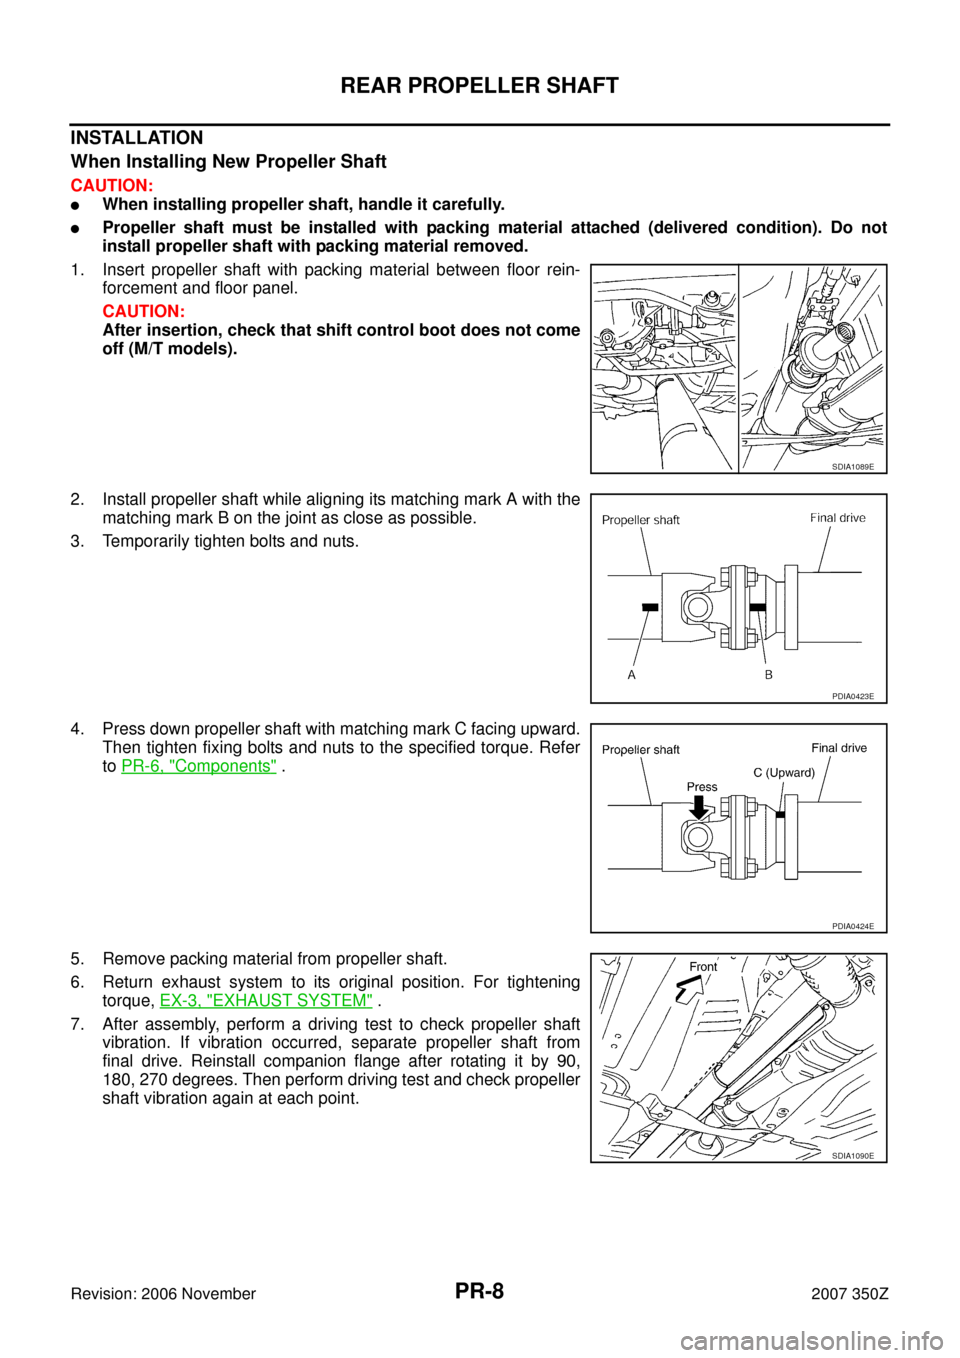
1. Insert propeller shaft with packing material between floor rein-
forcement and floor panel.
CAUTION:
After insertion, check that shift control boot does not come
off (M/T models).
2. Install propeller shaft while aligning its matching mark A with the
matching mark B on the joint as close as possible.
3. Temporarily tighten bolts and nuts.
4. Press down propeller shaft with matching mark C facing upward.
Then tighten fixing bolts and nuts to the specified torque. Refer
to PR-6, "
Components" .
5. Remove packing material from propeller shaft.
6. Return exhaust system to its original position. For tightening
torque, EX-3, "
EXHAUST SYSTEM" .
7. After assembly, perform a driving test to check propeller shaft
vibration. If vibration occurred, separate propeller shaft from
final drive. Reinstall companion flange after rotating it by 90,
180, 270 degrees. Then perform driving test and check propeller
shaft vibration again at each point.
SDIA1089E
PDIA0423E
PDIA0424E
SDIA1090E
Page 9 of 10
REAR PROPELLER SHAFT
PR-9
C
E
F
G
H
I
J
K
L
MA
B
PR
Revision: 2006 November2007 350Z
When Installing Reused Propeller Shaft
CAUTION:
When installing propeller shaft, handle it carefully.
1. With protector (special service tool) attached, align matching marks to install propeller shaft to final drive
companion flange, and then tighten to specified torque. Refer to PR-6, "
Components" .
2. Remove protector (special service tool) from propeller shaft.
3. Return exhaust system to its original position. For tightening torque, EX-3, "
EXHAUST SYSTEM" .
4. After assembly, perform a driving test to check propeller shaft vibration. If vibration occurred, separate
propeller shaft from final drive. Reinstall companion flange after rotating it by 90, 180, 270 degrees. Then
perform driving test and check propeller shaft vibration again at each point.