Page 100 of 720
EC-100
TROUBLE DIAGNOSIS
Revision: 2006 November2007 350Z
Vacuum Hose DrawingNBS0003J
Refer to EC-24, "System Diagram" for Vacuum Control System.
1. Intake manifold collector 2. EVAP canister purge volume control solenoid valve
PBIB3515E
Page 101 of 720
TROUBLE DIAGNOSIS
EC-101
C
D
E
F
G
H
I
J
K
L
MA
EC
Revision: 2006 November2007 350Z
Circuit DiagramNBS0003K
TBWT1612E
Page 142 of 720
EC-142
POWER SUPPLY AND GROUND CIRCUIT
Revision: 2006 November2007 350Z
POWER SUPPLY AND GROUND CIRCUITPFP:24110
Wiring DiagramNBS0003X
TBWT1614E
Page 146 of 720

EC-146
POWER SUPPLY AND GROUND CIRCUIT
Revision: 2006 November2007 350Z
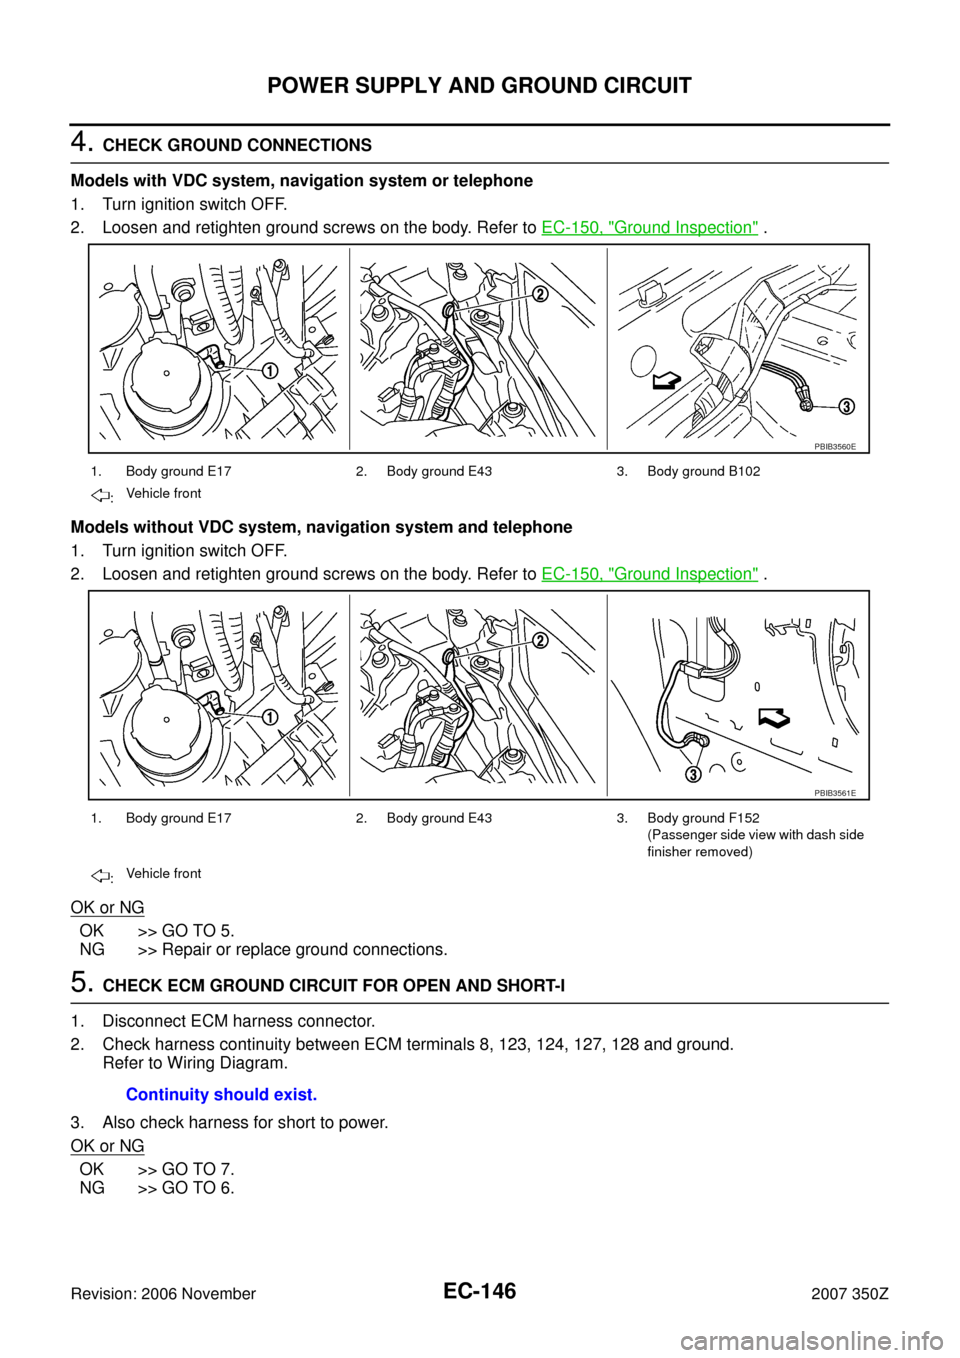
4. CHECK GROUND CONNECTIONS
Models with VDC system, navigation system or telephone
1. Turn ignition switch OFF.
2. Loosen and retighten ground screws on the body. Refer to EC-150, "
Ground Inspection" .
Models without VDC system, navigation system and telephone
1. Turn ignition switch OFF.
2. Loosen and retighten ground screws on the body. Refer to EC-150, "
Ground Inspection" .
OK or NG
OK >> GO TO 5.
NG >> Repair or replace ground connections.
5. CHECK ECM GROUND CIRCUIT FOR OPEN AND SHORT-I
1. Disconnect ECM harness connector.
2. Check harness continuity between ECM terminals 8, 123, 124, 127, 128 and ground.
Refer to Wiring Diagram.
3. Also check harness for short to power.
OK or NG
OK >> GO TO 7.
NG >> GO TO 6.
1. Body ground E17 2. Body ground E43 3. Body ground B102
:Vehicle front
1. Body ground E17 2. Body ground E43 3. Body ground F152
(Passenger side view with dash side
finisher removed)
:Vehicle front
PBIB3560E
PBIB3561E
Continuity should exist.
Page 148 of 720

EC-148
POWER SUPPLY AND GROUND CIRCUIT
Revision: 2006 November2007 350Z
10. CHECK ECM POWER SUPPLY CIRCUIT-V
1. Disconnect ECM harness connector.
2. Disconnect IPDM E/R harness connector E7.
3. Check harness continuity between ECM terminals 125 and IPDM E/R terminal 18.
Refer to Wiring Diagram.
4. Also check harness for short to ground and short to power.
OK or NG
OK >> GO TO 18.
NG >> GO TO 11.
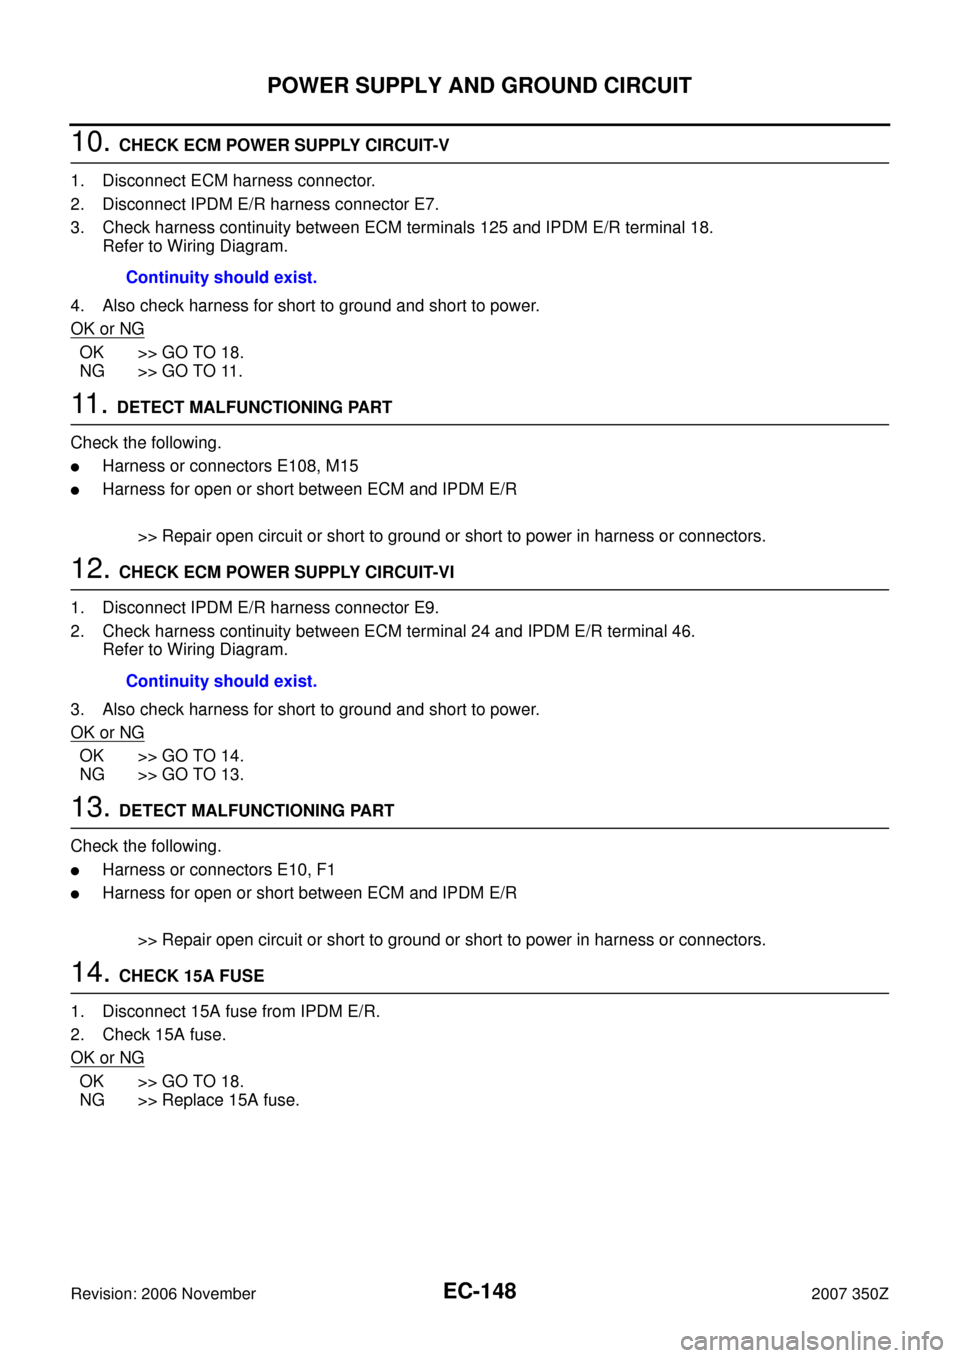
11 . DETECT MALFUNCTIONING PART
Check the following.
�Harness or connectors E108, M15
�Harness for open or short between ECM and IPDM E/R
>> Repair open circuit or short to ground or short to power in harness or connectors.
12. CHECK ECM POWER SUPPLY CIRCUIT-VI
1. Disconnect IPDM E/R harness connector E9.
2. Check harness continuity between ECM terminal 24 and IPDM E/R terminal 46.
Refer to Wiring Diagram.
3. Also check harness for short to ground and short to power.
OK or NG
OK >> GO TO 14.
NG >> GO TO 13.
13. DETECT MALFUNCTIONING PART
Check the following.
�Harness or connectors E10, F1
�Harness for open or short between ECM and IPDM E/R
>> Repair open circuit or short to ground or short to power in harness or connectors.
14. CHECK 15A FUSE
1. Disconnect 15A fuse from IPDM E/R.
2. Check 15A fuse.
OK or NG
OK >> GO TO 18.
NG >> Replace 15A fuse.Continuity should exist.
Continuity should exist.
Page 149 of 720

POWER SUPPLY AND GROUND CIRCUIT
EC-149
C
D
E
F
G
H
I
J
K
L
MA
EC
Revision: 2006 November2007 350Z
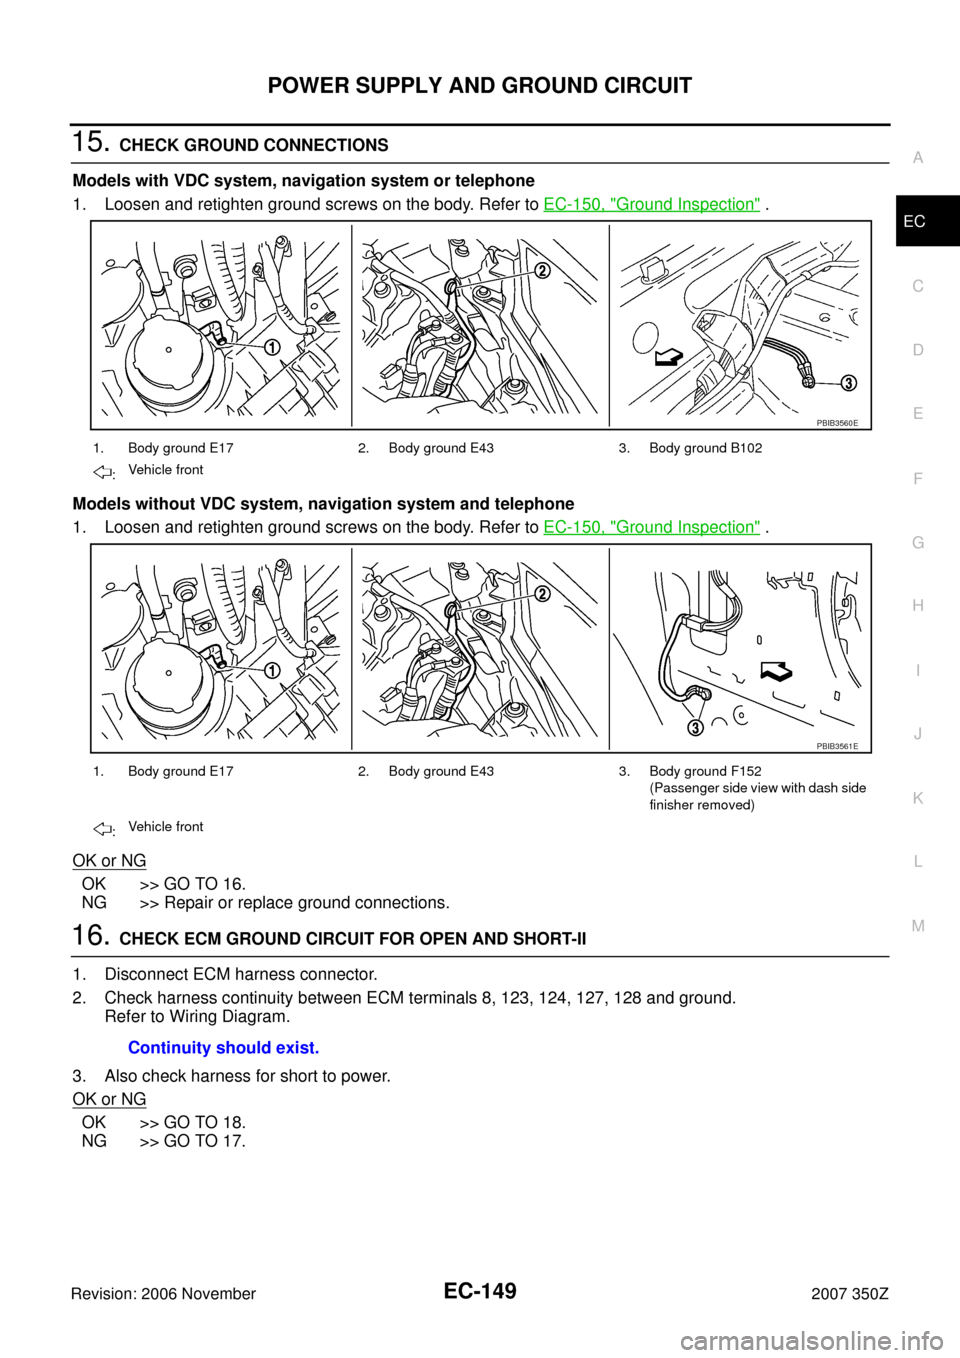
15. CHECK GROUND CONNECTIONS
Models with VDC system, navigation system or telephone
1. Loosen and retighten ground screws on the body. Refer to EC-150, "
Ground Inspection" .
Models without VDC system, navigation system and telephone
1. Loosen and retighten ground screws on the body. Refer to EC-150, "
Ground Inspection" .
OK or NG
OK >> GO TO 16.
NG >> Repair or replace ground connections.
16. CHECK ECM GROUND CIRCUIT FOR OPEN AND SHORT-II
1. Disconnect ECM harness connector.
2. Check harness continuity between ECM terminals 8, 123, 124, 127, 128 and ground.
Refer to Wiring Diagram.
3. Also check harness for short to power.
OK or NG
OK >> GO TO 18.
NG >> GO TO 17.
1. Body ground E17 2. Body ground E43 3. Body ground B102
:Vehicle front
1. Body ground E17 2. Body ground E43 3. Body ground F152
(Passenger side view with dash side
finisher removed)
:Vehicle front
PBIB3560E
PBIB3561E
Continuity should exist.
Page 152 of 720
EC-152
DTC U1000, U1001 CAN COMMUNICATION LINE
Revision: 2006 November2007 350Z
Wiring DiagramNBS006T2
TBWT1616E
Page 159 of 720

DTC P0011, P0021 IVT CONTROL
EC-159
C
D
E
F
G
H
I
J
K
L
MA
EC
Revision: 2006 November2007 350Z
6. CHECK TIMING CHAIN INSTALLATION
Check service records for any recent repairs that may cause timing chain misaligned.
Are there any service records that may cause timing chain misaligned?
Ye s o r N o
Yes >> Check timing chain installation. Refer to EM-53, "TIMING CHAIN" .
No >> GO TO 7.
7. CHECK LUBRICATION CIRCUIT
Refer to EM-74, "
INSPECTION AFTER REMOVAL" .
OK or NG
OK >> GO TO 8.
NG >> Clean lubrication line.
8. CHECK INTERMITTENT INCIDENT
Refer to EC-141, "
TROUBLE DIAGNOSIS FOR INTERMITTENT INCIDENT" .
For Wiring Diagram, refer to EC-388
for crankshaft position sensor (POS) and EC-397 for camshaft position
sensor (PHASE).
>>INSPECTION END
Component InspectionNBS0004A
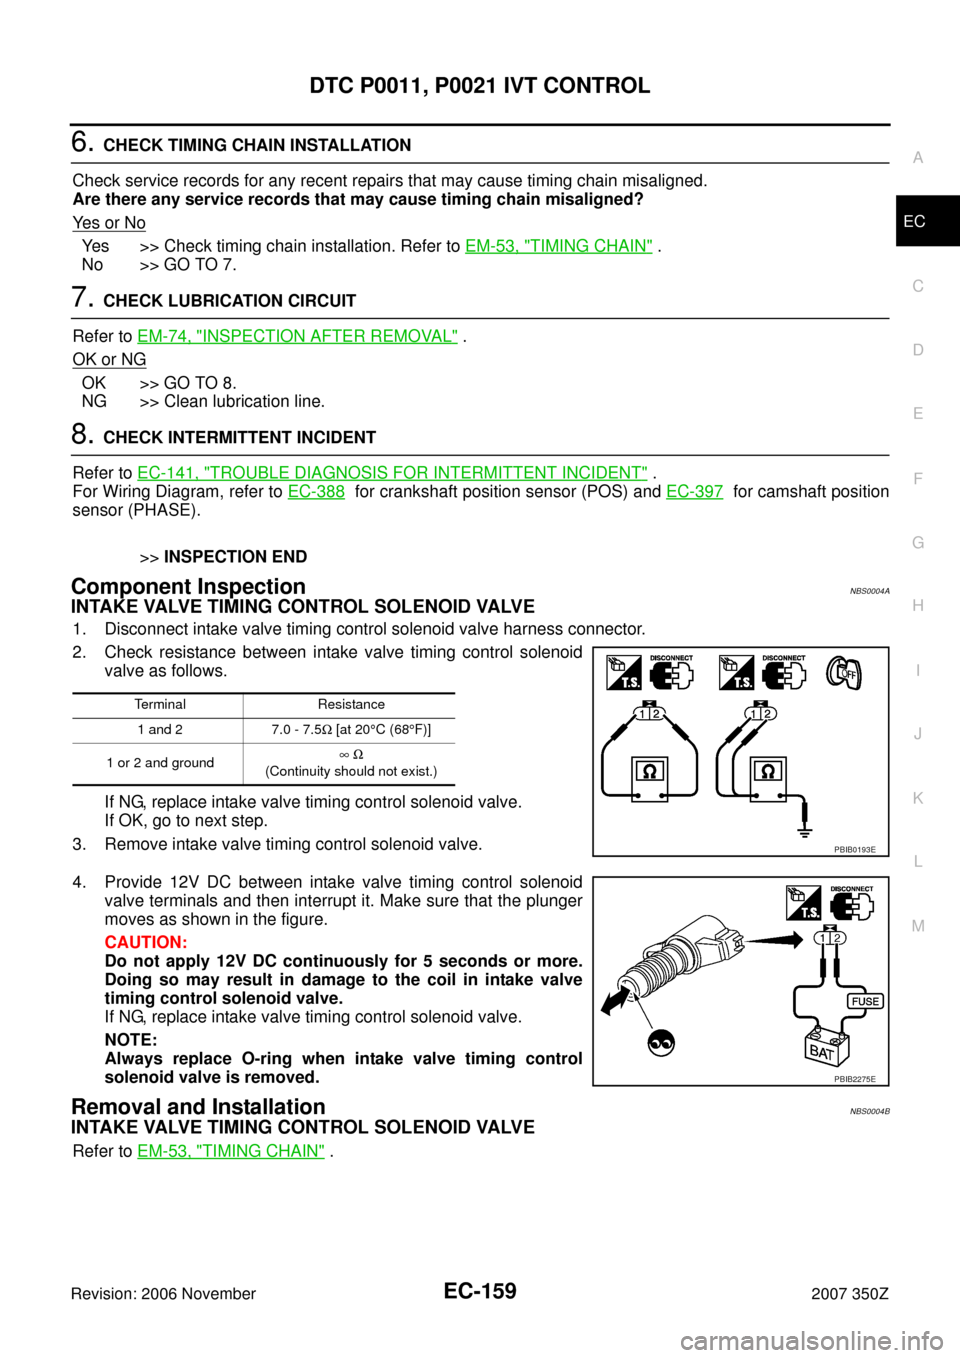
INTAKE VALVE TIMING CONTROL SOLENOID VALVE
1. Disconnect intake valve timing control solenoid valve harness connector.
2. Check resistance between intake valve timing control solenoid
valve as follows.
If NG, replace intake valve timing control solenoid valve.
If OK, go to next step.
3. Remove intake valve timing control solenoid valve.
4. Provide 12V DC between intake valve timing control solenoid
valve terminals and then interrupt it. Make sure that the plunger
moves as shown in the figure.
CAUTION:
Do not apply 12V DC continuously for 5 seconds or more.
Doing so may result in damage to the coil in intake valve
timing control solenoid valve.
If NG, replace intake valve timing control solenoid valve.
NOTE:
Always replace O-ring when intake valve timing control
solenoid valve is removed.
Removal and InstallationNBS0004B
INTAKE VALVE TIMING CONTROL SOLENOID VALVE
Refer to EM-53, "TIMING CHAIN" .
Terminal Resistance
1 and 2 7.0 - 7.5Ω [at 20°C (68°F)]
1 or 2 and ground∞ Ω
(Continuity should not exist.)
PBIB0193E
PBIB2275E