Page 15 of 260
HOOD
BL-15
C
D
E
F
G
H
J
K
L
MA
B
BL
Revision: 2006 November2007 350Z
Removal and Installation of Hood AssemblyNIS0000B
REMOVAL
Remove the hinge mounting nuts on the hood to remove the hood assembly.
CAUTION:
Operate with two workers, because of its heavy weight.
INSTALLATION
Install in the reverse order of removal.
CAUTION:
�Before installing hood hinge, apply anticorrosive agent onto the mounting surface of the vehicle
body.
�After installing, perform hood fitting adjustment. Refer to BL-13, "Fitting Adjustment" .
1. Hood assembly 2. Hood hinge 3. Hood lock assembly
PIIB1388E
Page 20 of 260

BL-20
RADIATOR CORE SUPPORT
Revision: 2006 November2007 350Z
10. Remove horn connectors.
11. Remove mounting harness clip on radiator core support center and side to separate the harness.
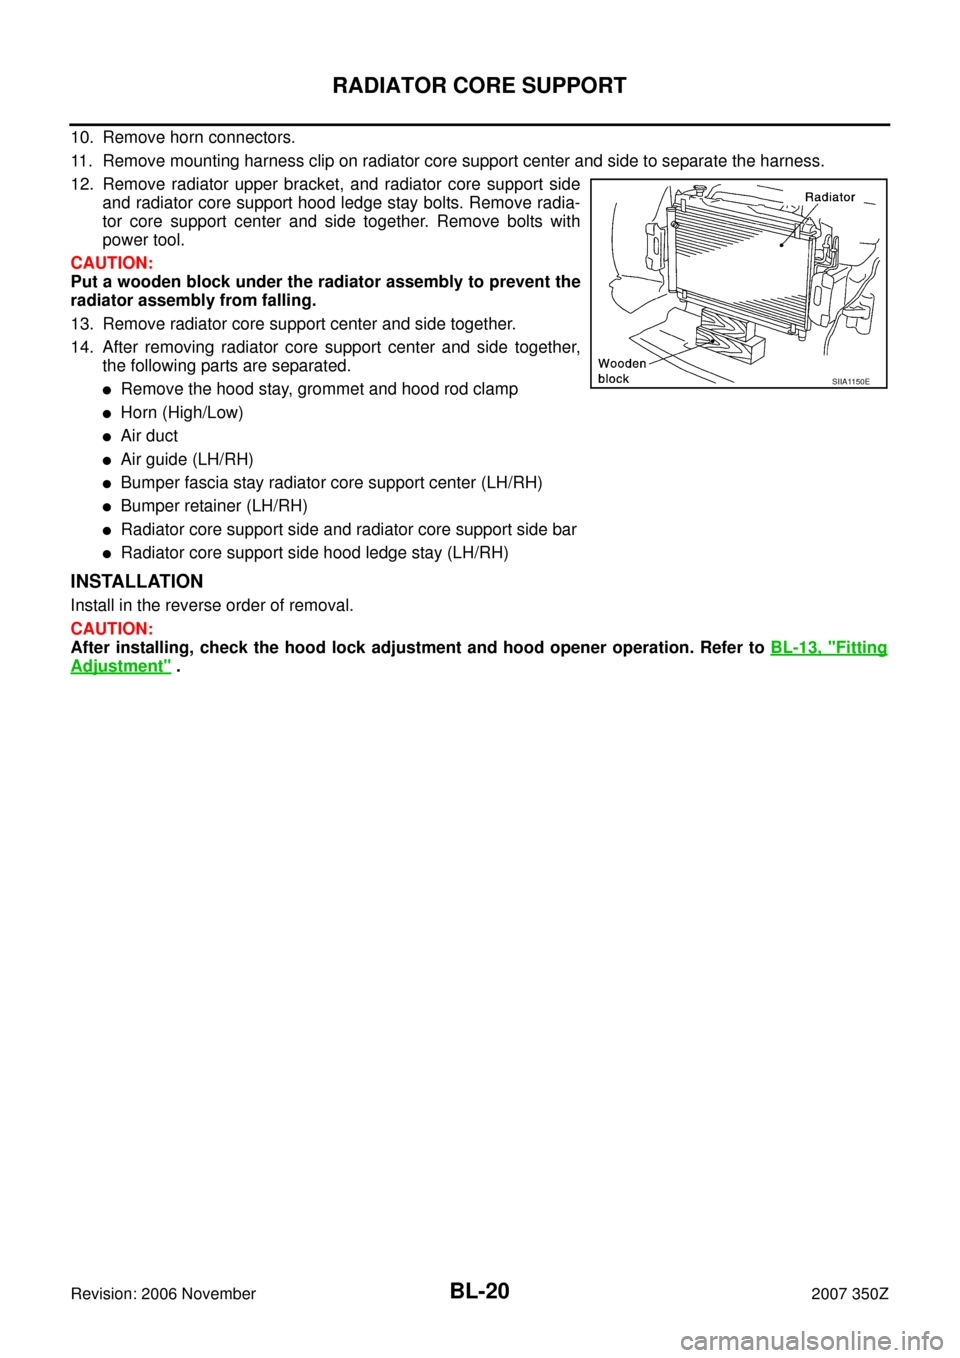
12. Remove radiator upper bracket, and radiator core support side
and radiator core support hood ledge stay bolts. Remove radia-
tor core support center and side together. Remove bolts with
power tool.
CAUTION:
Put a wooden block under the radiator assembly to prevent the
radiator assembly from falling.
13. Remove radiator core support center and side together.
14. After removing radiator core support center and side together,
the following parts are separated.
�Remove the hood stay, grommet and hood rod clamp
�Horn (High/Low)
�Air duct
�Air guide (LH/RH)
�Bumper fascia stay radiator core support center (LH/RH)
�Bumper retainer (LH/RH)
�Radiator core support side and radiator core support side bar
�Radiator core support side hood ledge stay (LH/RH)
INSTALLATION
Install in the reverse order of removal.
CAUTION:
After installing, check the hood lock adjustment and hood opener operation. Refer to BL-13, "
Fitting
Adjustment" .
SIIA1150E
Page 92 of 260
BL-92
REMOTE KEYLESS ENTRY SYSTEM
Revision: 2006 November2007 350Z
Removal and Installation of Remote Keyless Entry ReceiverNIS0001W
REMOVAL
1. Remove the instrument passenger panel lower. Refer to IP-13, "(L) Instrument Passenger Panel Lower" .
2. Remove the screw and remote keyless entry receiver connector.
3. Remove the remote keyless entry receiver.
INSTALLATION
Install in the reverse order of removal.
PIIB3798E
Page 96 of 260

BL-96
DOOR
Revision: 2006 November2007 350Z
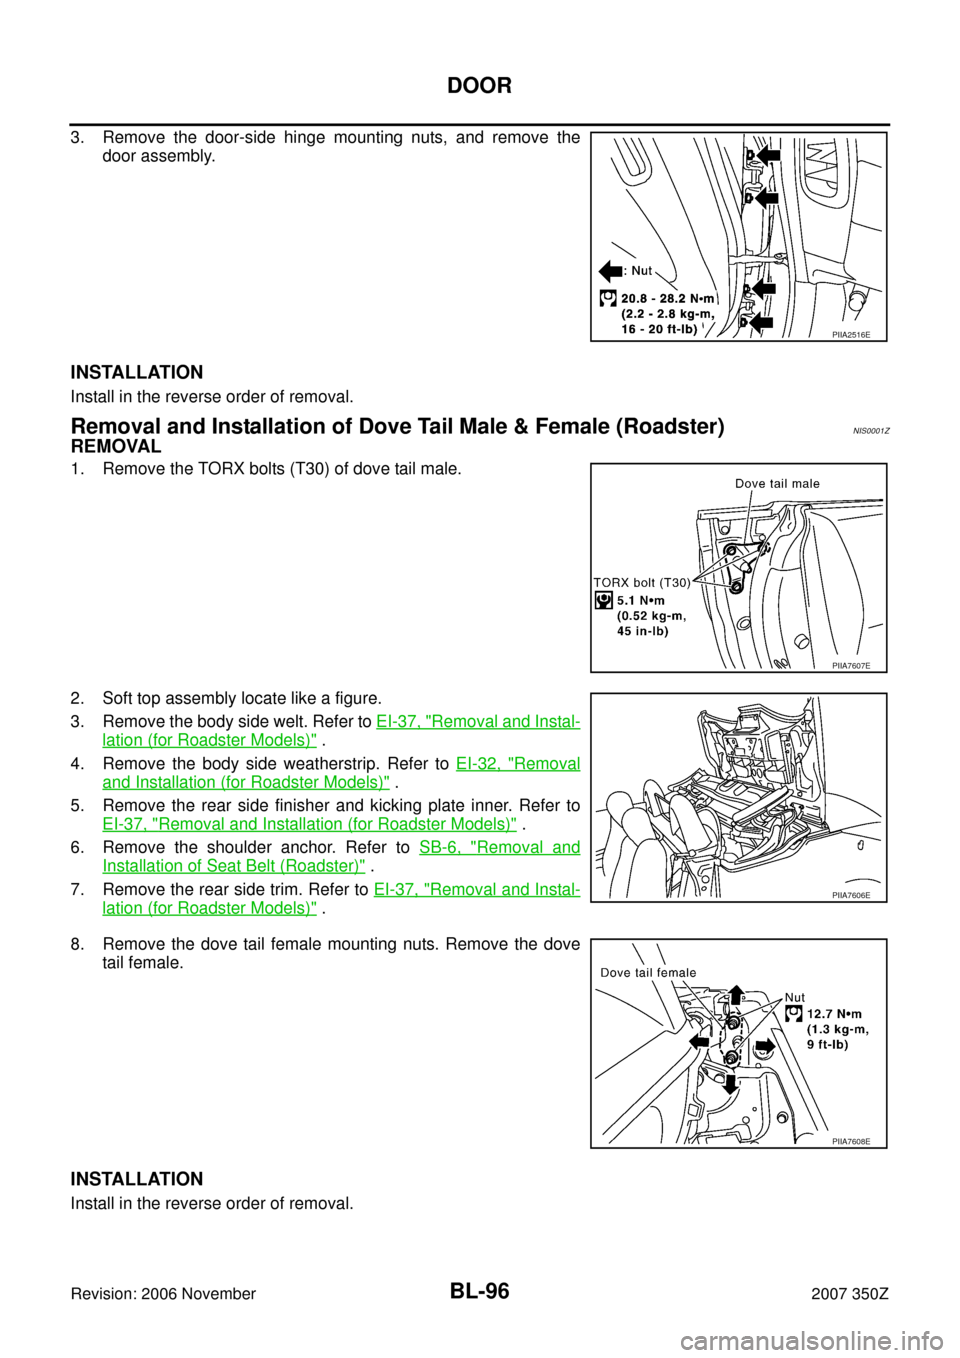
3. Remove the door-side hinge mounting nuts, and remove the
door assembly.
INSTALLATION
Install in the reverse order of removal.
Removal and Installation of Dove Tail Male & Female (Roadster)NIS0001Z
REMOVAL
1. Remove the TORX bolts (T30) of dove tail male.
2. Soft top assembly locate like a figure.
3. Remove the body side welt. Refer to EI-37, "
Removal and Instal-
lation (for Roadster Models)" .
4. Remove the body side weatherstrip. Refer to EI-32, "
Removal
and Installation (for Roadster Models)" .
5. Remove the rear side finisher and kicking plate inner. Refer to
EI-37, "
Removal and Installation (for Roadster Models)" .
6. Remove the shoulder anchor. Refer to SB-6, "
Removal and
Installation of Seat Belt (Roadster)" .
7. Remove the rear side trim. Refer to EI-37, "
Removal and Instal-
lation (for Roadster Models)" .
8. Remove the dove tail female mounting nuts. Remove the dove
tail female.
INSTALLATION
Install in the reverse order of removal.
PIIA2516E
PIIA7607E
PIIA7606E
PIIA7608E
Page 97 of 260
DOOR
BL-97
C
D
E
F
G
H
J
K
L
MA
B
BL
Revision: 2006 November2007 350Z
Door WeatherstripNIS00020
REMOVAL
Remove the weatherstrip clips and remove weatherstrip.
INSTALLATION
Install in the reverse order of removal.
PIIA2335E
Page 99 of 260

DOOR LOCK
BL-99
C
D
E
F
G
H
J
K
L
MA
B
BL
Revision: 2006 November2007 350Z
4. Reach to separate the key cylinder (driver side only) rod and outside handle rod connection (on the han-
dle).
5. Disconnect the door lock actuator connector.
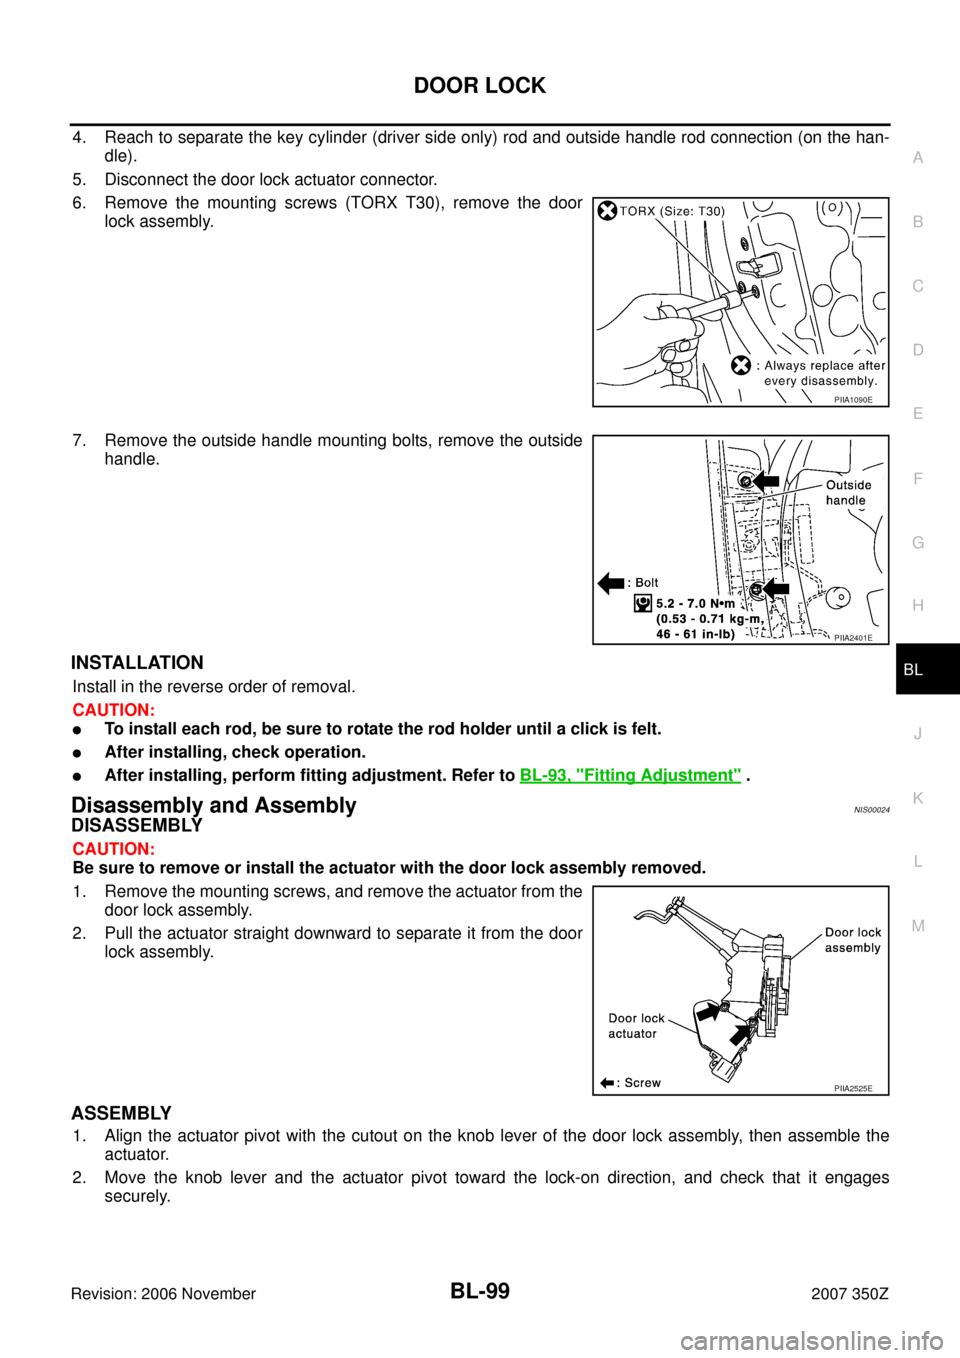
6. Remove the mounting screws (TORX T30), remove the door
lock assembly.
7. Remove the outside handle mounting bolts, remove the outside
handle.
INSTALLATION
Install in the reverse order of removal.
CAUTION:
�To install each rod, be sure to rotate the rod holder until a click is felt.
�After installing, check operation.
�After installing, perform fitting adjustment. Refer to BL-93, "Fitting Adjustment" .
Disassembly and AssemblyNIS00024
DISASSEMBLY
CAUTION:
Be sure to remove or install the actuator with the door lock assembly removed.
1. Remove the mounting screws, and remove the actuator from the
door lock assembly.
2. Pull the actuator straight downward to separate it from the door
lock assembly.
ASSEMBLY
1. Align the actuator pivot with the cutout on the knob lever of the door lock assembly, then assemble the
actuator.
2. Move the knob lever and the actuator pivot toward the lock-on direction, and check that it engages
securely.
PIIA1090E
PIIA2401E
PIIA2525E
Page 101 of 260
BACK DOOR
BL-101
C
D
E
F
G
H
J
K
L
MA
B
BL
Revision: 2006 November2007 350Z
4. Remove stud balls on back door.
5. Remove hinge mount nuts of the body and remove back door
assembly.
INSTALLATION
Install in the reverse order of removal.
CAUTION:
�After installing, check operation.
�After installing, perform fitting adjustment.
INSPECTION
1. Check hinges for the following items.
�Malfunction noise or door closing and opening effort
�Component wear or damage
2. Apply body grease to the rotating part of the hinge.
Removal and Installation of Back Door StrikerNIS00027
REMOVAL
1. Remove back door finisher lower. Refer to EI-48, "BACK DOOR
FINISHER" .
2. Remove mounting screws, and remove striker from the vehicle.
PIIA2531E
PIIA2405E
PIIA2404E
PIIA2338E
Page 102 of 260
BL-102
BACK DOOR
Revision: 2006 November2007 350Z
INSTALLATION
Install in the reverse order of removal.
CAUTION:
After installing, perform fitting adjustment.
Removal and Installation of Back Door StayNIS00028
REMOVAL
1. Support the back door striker with a proper material to prevent it
from falling.
WARNING:
Body injury may occur if no supporting rod is holding the
back door open when removing the damper stay.
2. Remove stud balls on back door.
3. Remove back door stay assembly (gas stay) bracket adjusting
nuts and remove back door stay assembly.
INSTALLATION
Install in the reverse order of removal.
CAUTION:
After installing, check operation.
PIIA3078E
PIIA2531E
PIIA2540E