Page 999 of 1449

REAR AXLE -Differential Carrier 27B-53
INSPECTION
DIFFERENTIAL CASE INTERNAL PARTS CONTACT/
SLIDING SURFACE CHECK
1. Clean the disassembled parts with cleaning oil and dry
them with compressed air.
2. Check each plate, disc, and pressure ring for the following:
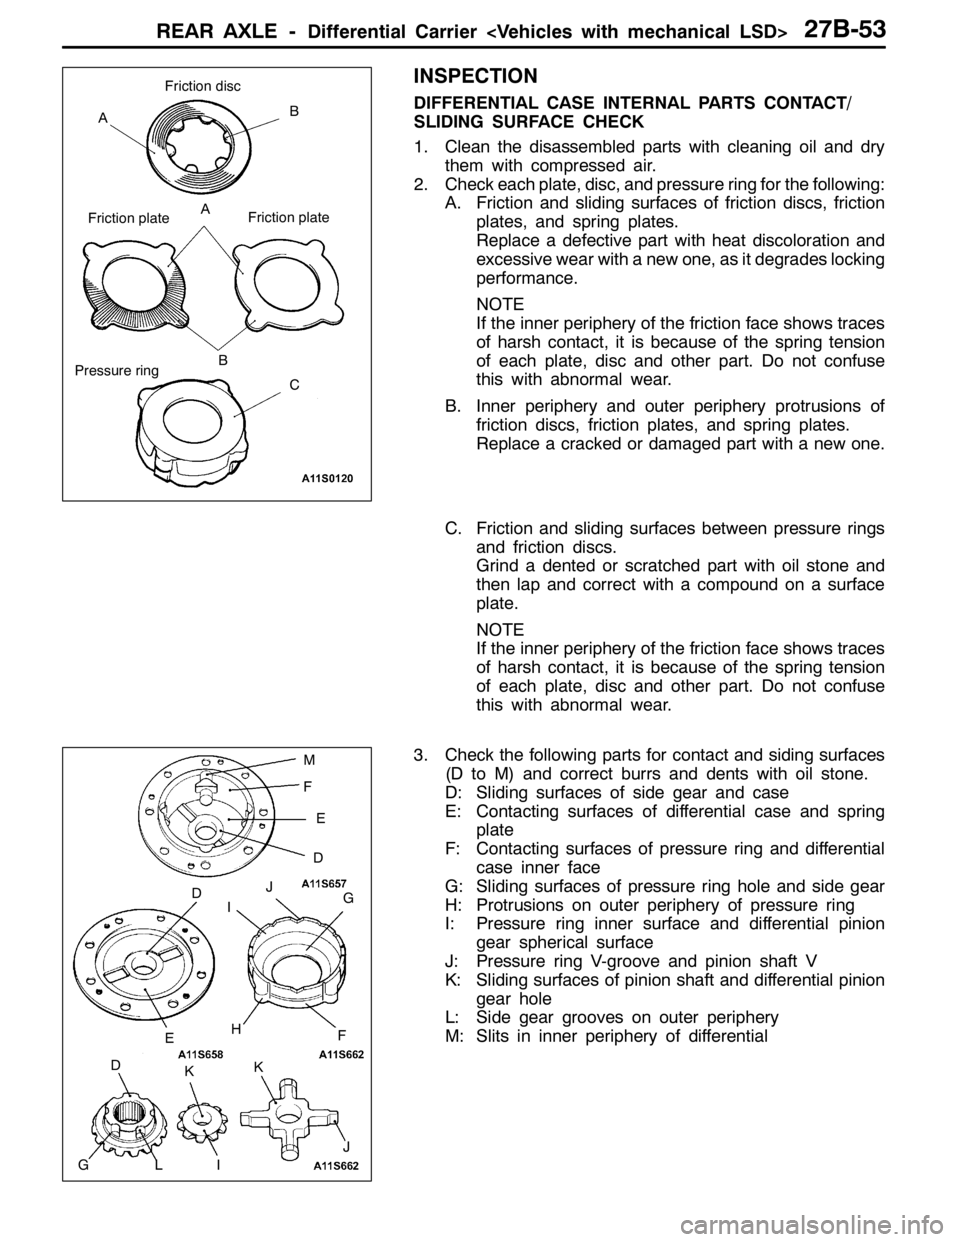
A. Friction and sliding surfaces of friction discs, friction
plates, and spring plates.
Replace a defective part with heat discoloration and
excessive wear with a new one, as it degrades locking
performance.
NOTE
If the inner periphery of the friction face shows traces
of harsh contact, it is because of the spring tension
of each plate, disc and other part. Do not confuse
this with abnormal wear.
B. Inner periphery and outer periphery protrusions of
friction discs, friction plates, and spring plates.
Replace a cracked or damaged part with a new one.
C. Friction and sliding surfaces between pressure rings
and friction discs.
Grind a dented or scratched part with oil stone and
then lap and correct with a compound on a surface
plate.
NOTE
If the inner periphery of the friction face shows traces
of harsh contact, it is because of the spring tension
of each plate, disc and other part. Do not confuse
this with abnormal wear.
3. Check the following parts for contact and siding surfaces
(D to M) and correct burrs and dents with oil stone.
D: Sliding surfaces of side gear and case
E: Contacting surfaces of differential case and spring
plate
F: Contacting surfaces of pressure ring and differential
case inner face
G: Sliding surfaces of pressure ring hole and side gear
H: Protrusions on outer periphery of pressure ring
I: Pressure ring inner surface and differential pinion
gear spherical surface
J: Pressure ring V-groove and pinion shaft V
K: Sliding surfaces of pinion shaft and differential pinion
gear hole
L: Side gear grooves on outer periphery
M: Slits in inner periphery of differential
Friction disc
A
AB
C B Friction plateFriction plate
Pressure ring
E
D M
F
J
I
H D
G
F
D
K
K
I GLJ E
Page 1000 of 1449
REAR AXLE -Differential Carrier 27B-54
FRICTION PLATE AND FRICTION DISC DISTORTION
CHECK
Apply a dial indicator to the friction plate or disc on a surface
plate and, turning the friction plate or disc, measure the
distortion (flatness).
Limit: 0.08 mm (total runout)
FRICTION PLATE, FRICTION DISC, AND SPRING
PLATE WEAR CHECK
1. For the purpose of determining wear, measure thickness
(A, B) of the friction surface and protrusion at several
places and find the difference between the two.
Limit: 0.1 mm
2. If the wear exceeds the limit, replace the part with a
new one.
A
B
A B
Page 1001 of 1449

REAR AXLE -Differential Carrier 27B-55
DIFFERENTIAL CARRIER
REMOVAL AND INSTALLATION
Pre-removal Operation
DHydraulic Piping Fluid Draining
DDifferential Gear Oil Draining (Refer to P. 27B-17.)
DLower Arm Assembly Removal (Refer to GROUP
34.)
DRear Stabilizer Removal (Refer to GROUP 34.)
DDrive Shaft Removal (Refer to P. 27B-29.)Post-installation Operation
DDrive Shaft Installation (Refer to P. 27B-29.)
DRear Stabilizer Installation (Refer to GROUP 34.)
DLower Arm Assembly Installation (Refer to GROUP
34.)
DDifferential Gear Oil Filling (Refer to P. 27B-17.)
DHydraulic Piping Fluid Filling and Bleeding (Refer
to P.27B-17 and P.27B-19.)
1
2
88�¶10 N��m
7 6
5
48
9
10 3
11
44�¶10 N��m
120�¶10 N��m34�¶5N��m*
1
32�¶2N��m
12�¶2N��m 26�¶4N��m*
2
88�¶10 N��m
88�¶10 N��m 88�¶10 N��m 88�¶10 N��mNOTE:
*1:Thread is not lubricated
*2:Thread is lubricated
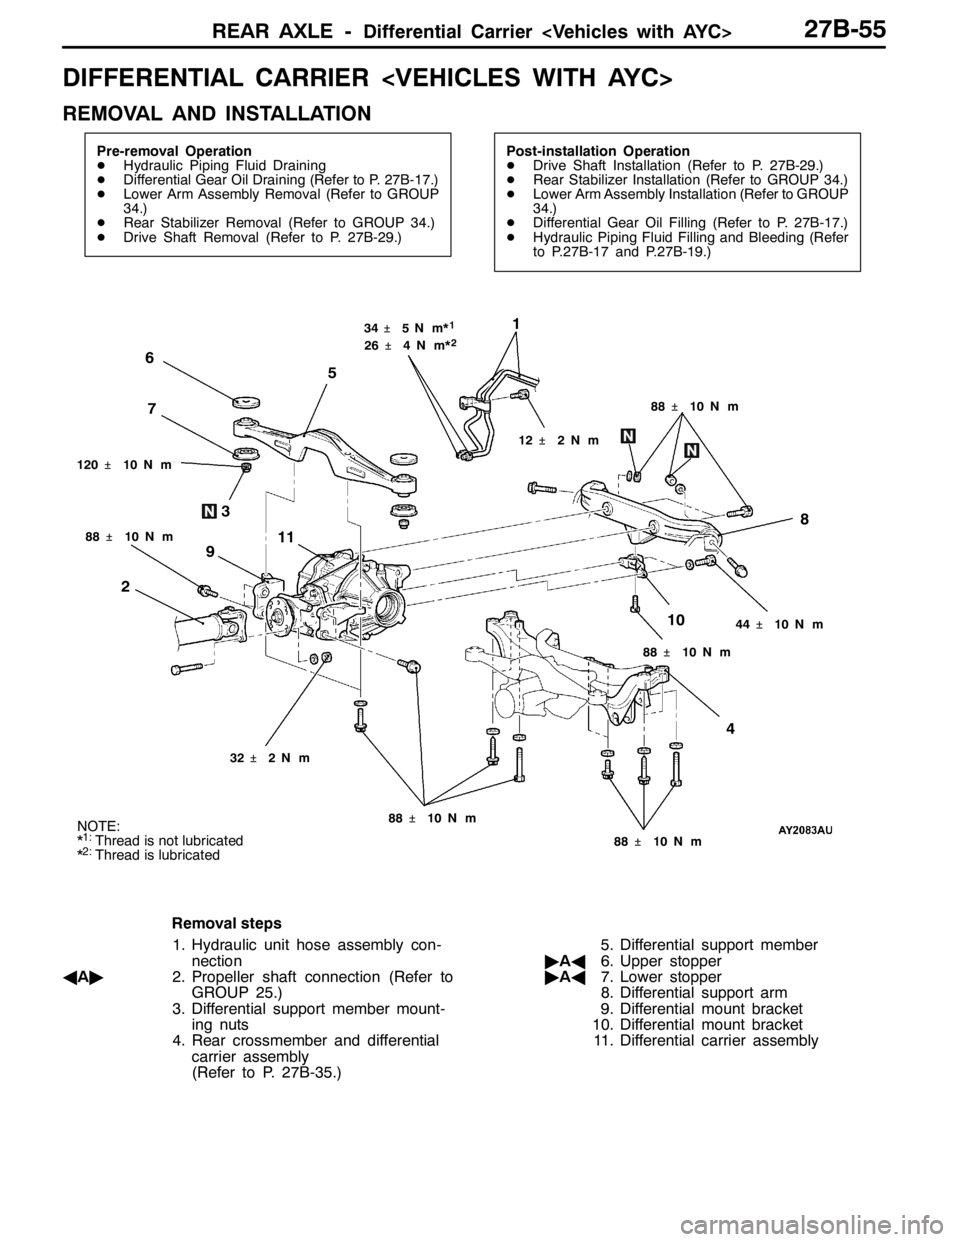
Removal steps
1. Hydraulic unit hose assembly con-
nection
AA"2. Propeller shaft connection (Refer to
GROUP 25.)
3. Differential support member mount-
ing nuts
4. Rear crossmember and differential
carrier assembly
(Refer to P. 27B-35.)5. Differential support member
"AA6. Upper stopper
"AA7. Lower stopper
8. Differential support arm
9. Differential mount bracket
10. Differential mount bracket
11. Differential carrier assembly
Page 1002 of 1449
REAR AXLE -Differential Carrier 27B-56
REMOVAL SERVICE POINT
AA"PROPELLER SHAFT DISCONNECTION
Suspend the removed propeller shaft from the body with a
wire to prevent bending.
INSTALLATION SERVICE POINTS
"AALOWER STOPPER/UPPER STOPPER
INSTALLATION
Install the lower and upper stopper as shown in the illustration.Upper stopper
Lower stopper
Page 1003 of 1449
REAR AXLE -Differential Carrier 27B-57
BUSHING REPLACEMENT
1. Remove and press fit the bush with special tool.
2. Press fit th bush so that the hollow of the bush is on
the position shown as the illustration.
3. Press fill the bush until the surface of the outer sleeve
of the bush,differential support member or differential
support arm contact.
Removal
Press-fitting Bush
Hollow Differential
support
member
Bush
Differential
support arm
HollowMB990641
MB991439 Steel block
Steel blockSteel block
Page 1004 of 1449
REAR AXLE -Differential Carrier 27B-58
TORQUE TRANSFER DIFFERENTIAL
DISASSEMBLY AND REASSEMBLY
Caution
1. The differential carrier assembly is non-maintainable.
2. No foreign matter should be allowed inside and at the joints of the differential carrier assembly.
14
2
6
4
35
7
1
9
10
8
3
4
11
13
12
186�¶29 N��m
32�¶2N��m 49�¶10 N��m
5�¶1N��m
9�¶1N��m 49�¶10 N��m
Disassembly steps
1. Drain plug
2. Packing
3. Filler plug
4. Gasket
5. Vent plug
6. Bleeder screw
7. CoverAA"8. Self-locking nut
9. Washer
10. Companion flange
11. Oil seal
"BA12. Oil seal
"AA13. Oil seal
14. Differential carrier assembly
Page 1005 of 1449
REAR AXLE -Differential Carrier 27B-59
Lubrication and Adhesive Points
Grease: VaselineSealant: 3M ATD Part
No.8661, 8663 or equivalent
Sealant: 3M ATD Part
No.8661, 8663 or equivalent
DISASSEMBLY SERVICE POINT
AA"SELF-LOCKING NUT REMOVAL
MB990850
Page 1006 of 1449
REAR AXLE -Differential Carrier 27B-60
ASSEMBLY SERVICE POINTS
"AAOIL SEAL PRESS-FITTING
1. Using the special tool, pressfit the oil seal as far as it
will go.
2. Apply the specified grease to the oil seal lip.
Specified grease: Vaseline
"BADRIVE PINION REAR BEARING OUTER RACE
PRESS-FITTING
1. Using the special tool, pressfit the oil seal as far as the
oil seal will go.
2. Apply the multipurpose grease to the oil seal lip.
MD998829
MD998812
MD998813
MB990938
MB991115