Page 395 of 473
394 Practical hintsLocking/unlocking in an emergencyLowering the load assist manually
If the load assist feature does not fully low-
er the retractable hardtop into the trunk
compartment and you are unable to close
the trunk lid, follow the instructions below.
1Hex-socket wrench
2Locking screw�
Remove the trunk floor from the trunk.
�
Lift up the lid located at the lower left
side of the trunk.
�
Have a second person lift and hold the
retracted hardtop.
�
Using hex-socket 1 wrench provided
in the vehicle tool kit, carefully turn the
locking screw 2 approximately one
quarter of a turn.
�
Hook luggage cover into holders
(�page 205).
�
Let go of the hardtop.
It should gradually lower into the trunk.
�
When top is completely lowered, return
locking screw 2 to its original posi-
tion.
�
Close the lid.
�
Replace the trunk floor.
�
Visit an authorized Mercedes-Benz
Center as soon as possible.
!
Do not overtighten the screw.
Page 396 of 473

395 Practical hints
Replacing SmartKey batteries
�Replacing SmartKey batteries
If the batteries in the SmartKey or the
SmartKey with KEYLESS-GO* are dis-
charged, the vehicle can no longer be
locked or unlocked. It is recommended to
have the batteries replaced at an autho-
rized Mercedes-Benz Center.Batteries contain materials that can harm
the environment if disposed of improperly.
Recycling of batteries is the preferred
method of disposal. Many states require
sellers of batteries to accept old batteries
for recycling.
�
Remove the mechanical key from the
SmartKey or SmartKey with
KEYLESS-GO* (
�page 391).
1Mechanical key
2Battery compartment
�
Insert mechanical key 1 into opening.
�
Press mechanical key 1 in direction of
arrow.
The battery compartment is unlatched.
�
Pull battery compartment 2 out of the
housing.
Warning!
G
Batteries contain poisonous and corrosive
substances. Therefore keep the batteries
out of reach of children.
If a battery is swallowed, seek medical help
immediately.
i
When inserting batteries, make sure they
are clean and free of lint.
i
When replacing batteries, always replace
both batteries.
The required replacement batteries (Lithium,
type CR 2025 or equivalent) are available at any
authorized Mercedes-Benz Center.
��
Page 397 of 473
396 Practical hintsReplacing SmartKey batteries3Batteries
4Contact spring�
Pull out batteries3.
�
Using a lint-free cloth, insert new bat-
teries 3 under contact springs 4 with
the positive terminal (+) side facing up.
�
Return battery compartment 2 into
housing until it locks into place.
�
Slide mechanical key 1 back into
SmartKey or SmartKey with
KEYLESS-GO*.
�
Check the operation of the SmartKey
or SmartKey with KEYLESS-GO* as well
as the KEYLESS-GO* function.
��
Page 401 of 473

400 Practical hintsReplacing bulbs4High beam bulbs
5Locking mechanism
6Parking and standing lampsFront turn signal bulb
�
Turn bulb socket 1 counterclockwise
and pull it out.
�
Push the bulb into socket 1, turn
socket 1 counterclockwise and re-
move it.
�
Insert the new bulb in socket 1, push
and turn bulb socket 1 clockwise.
�
Reinsert bulb socket 1 in lamp and
turn bulb socket 1 clockwise.High beam/ high beam flasher bulbs
�
Press ends of headlamp cover tab to-
gether and remove high beam head-
lamp cover 2.
�
Pull the electrical connector off.
�
Turn locking mechanism 5 counter-
clockwise and take out the bulb.
�
Insert the new bulb so that the base lo-
cates in the recess on the holder.
�
Turn locking mechanism 5 clockwise.
�
Plug the connector onto the bulb.
�
Align high beam headlamp cover 2
and click it into place.
Warning!
G
Do not remove the cover for the Xenon or
Bi-Xenon* headlamp. Because of high volt-
age in Xenon and Bi-Xenon* lamps, it is dan-
gerous to replace the bulb or repair the lamp
and its components. We recommend that
you have such work done by a qualified
technician.
Page 403 of 473
402 Practical hintsReplacing bulbsReplacing bulbs for rear lamps
Before you start to replace a bulb for a rear
lamp, do the following first:�
Turn the exterior lamp switch to posi-
tion M (
�page 128).
�
Open the trunk (
�page 111).
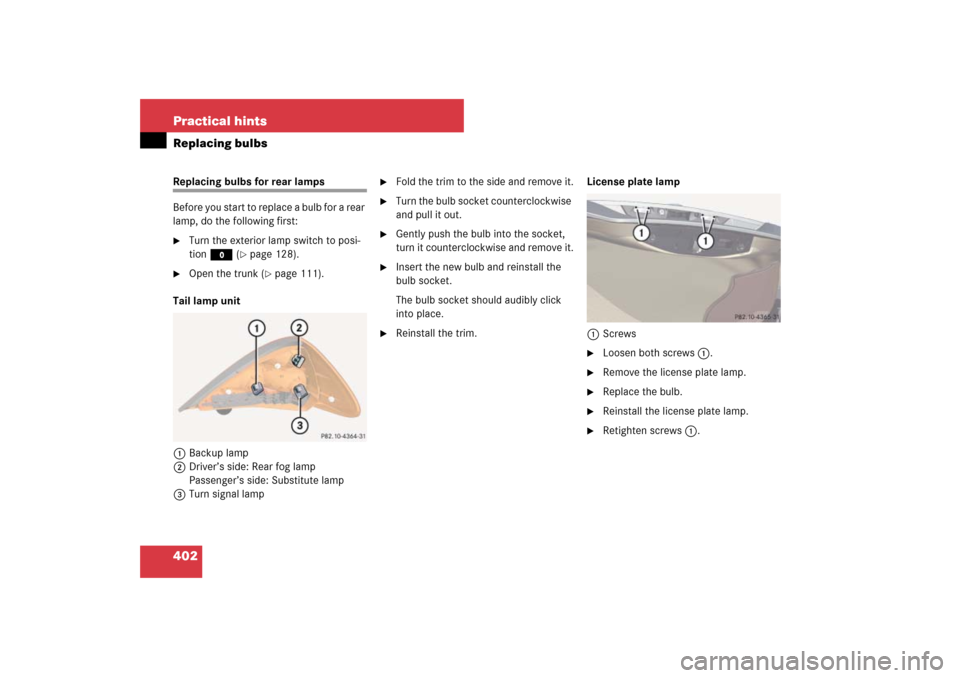
Tail lamp unit
1Backup lamp
2Driver’s side: Rear fog lamp
Passenger’s side: Substitute lamp
3Turn signal lamp
�
Fold the trim to the side and remove it.
�
Turn the bulb socket counterclockwise
and pull it out.
�
Gently push the bulb into the socket,
turn it counterclockwise and remove it.
�
Insert the new bulb and reinstall the
bulb socket.
The bulb socket should audibly click
into place.
�
Reinstall the trim.License plate lamp
1Screws
�
Loosen both screws 1.
�
Remove the license plate lamp.
�
Replace the bulb.
�
Reinstall the license plate lamp.
�
Retighten screws 1.
Page 407 of 473
.
�
Turn spare wheel bracket counter-
clockwise to loosen.
�
Take the spare wheel out of the trunk
(�pag")
406 Practical hintsFlat tirePreparing the vehicle
Prepare the vehicle as described
(�page 405).
�
Turn spare wheel bracket counter-
clockwise to loosen.
�
Take the spare wheel out of the trunk
(�page 389).
Removing tensioning straps
(vehicles with 19" spare wheel only)
A 19" spare wheel has two tensioning
straps on it that must both be removed be-
fore mounting the spare wheel.1Buckle
2Clip
�
Press on both clips 2 simultaneously
to release buckle 1.Lifting the vehicle
�
Prevent the vehicle from rolling away
by blocking wheels with wheel chocks
(not included) or other sizable objects.
When changing wheel on a level sur-
face:�
Place one wheel chock or other
sizable object in front of and anoth-
er wheel chock or sizable object be-
hind the wheel that is diagonally
opposite to the wheel being
changed.
Always try lifting the vehicle using the
jack on a level surface. However,
should circumstances require you to do
so on a hill, place a wheel chock or oth-
er sizable object and the other wheel
chock or sizeable object as follows:
�
Place wheel chocks or other sizable
objects on the downhill side block-
ing both wheels of the axle not be-
ing worked on.
i
The tensioning straps are shown in red for
illustration purposes. The tensioning straps on
the spare wheel of your vehicle are black.
i
Keep the tensioning straps in a safe place.
You will need them to store the spare wheel in
the trunk after use (
�page 390).
Page 408 of 473
.
�
On wheel to be changed, loosen but do
not yet remove the")
407 Practical hints
Flat tire
�
Take the vehicle tool kit and the jack
out of the storage compartment under
the trunk floor (
�page 388).
�
On wheel to be changed, loosen but do
not yet remove the wheel bolts (ap-
proximately one full turn with wrench).
The jack support tubes are located behind
the front wheel housings and in front of the
rear wheel housings.
Warning!
G
The jack is designed exclusively for jacking
up the vehicle at the jack tubes built into
both sides of the vehicle. To help avoid per-
sonal injury, use the jack only to lift the ve-
hicle during a wheel change. Never get
beneath the vehicle while it is supported by
the jack. Keep hands and feet away from the
area under the lifted vehicle. Always firmly
set parking brake and block wheels before
raising vehicle with jack.
Do not disengage parking brake while the
vehicle is raised. Be certain that the jack is
always vertical (plumb line) when in use, es-
pecially on hills. Always try to use the jack
on level surface. Be sure that the jack arm is
fully inserted in the jack tube. Always lower
the vehicle onto sufficient capacity jack-
stands before working under the vehicle.
Warning!
G
When turning the wheel wrench to loosen
the wheel bolts, make sure you position
hands on the wrench in such a way that you
avoid injury to yourself, such as scraping
your hands against the wheel. Make sure
turning the wheel wrench will not scratch or
damage the wheel rim.
��
Page 409 of 473
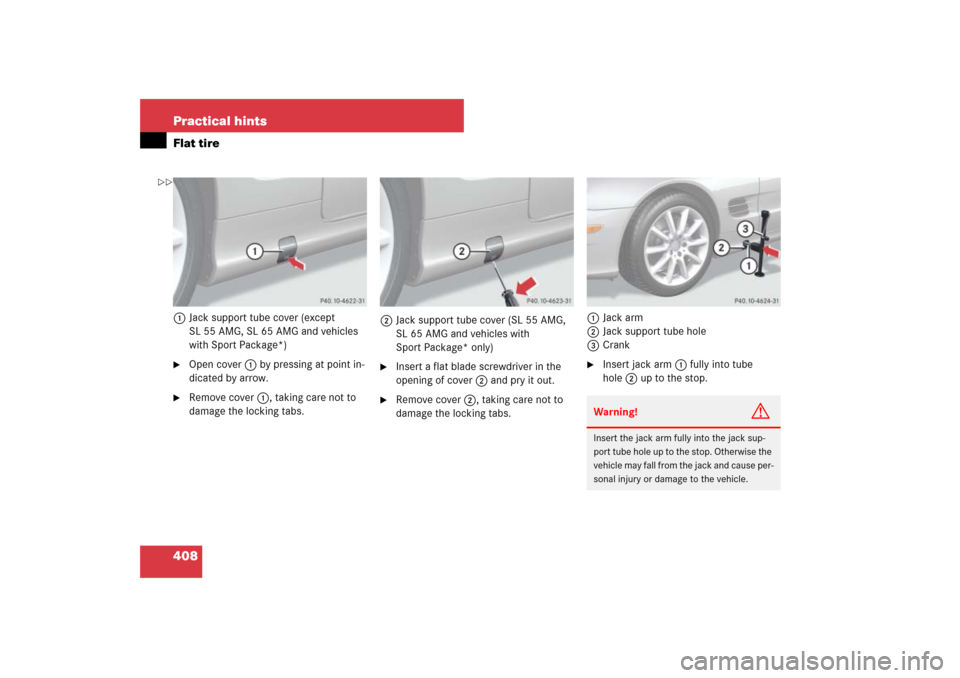
408 Practical hintsFlat tire1Jack support tube cover (except
SL 55 AMG, SL 65 AMG and vehicles
with Sport Package*)�
Open cover1 by pressing at point in-
dicated by arrow.
�
Remove cover1, taking care not to
damage the locking tabs.2Jack support tube cover (SL 55 AMG,
SL 65 AMG and vehicles with
Sport Package* only)
�
Insert a flat blade screwdriver in the
opening of cover2 and pry it out.
�
Remove cover2, taking care not to
damage the locking tabs.1Jack arm
2Jack support tube hole
3Crank
�
Insert jack arm1 fully into tube
hole2 up to the stop.Warning!
G
Insert the jack arm fully into the jack sup-
port tube hole up to the stop. Otherwise the
vehicle may fall from the jack and cause per-
sonal injury or damage to the vehicle.
��