Page 378 of 473
377 Practical hints
What to do if …
Left display
Right display
Possible cause/consequence
Possible solution
A
Fuel cap
open
A loss of pressure has been detect-
ed in the fuel system. The fuel cap
may not be closed properly or the
fuel system may be leaky.
�
Check the fuel cap (
�page 271).
If it is not closed properly:
�
Close the fuel cap.
If it is closed properly:
�
Have the fuel system checked by an autho-
rized Mercedes-Benz Center.
K
being lowered
The retractable hardtop is not com-
pletely opened or closed. The roof
hydraulics will start to lose pres-
sure.
�
Make sure the retractable hardtop is com-
pletely opened or closed (
�page 199).
locked
in driving mode
You have attempted to open the re-
tractable hardtop while driving.
�
Stop the vehicle in a safe location and try to
open the hardtop again.
O
You are driving with the hood open.
Risk of accident!�
Stop the vehicle in a safe location or as soon
as it is safe to do so.
�
Close the hood (
�page 275).
Page 380 of 473

379 Practical hints
What to do if …
Left display
Right display
Possible cause/consequence
Possible solution
F
Key
not detected
The SmartKey with KEYLESS-GO* is
not recognized while the engine is
running because:�
The SmartKey with
KEYLESS-GO* is not in the vehi-
cle.
�
There is strong radio-frequency
interference.
�
Stop the vehicle in a safe location or as soon
as it is safe to do so.
�
Search for the SmartKey with KEYLESS-GO*.
Otherwise the vehicle cannot be centrally
locked nor can the engine be started again af-
ter the engine is stopped.
�
Operate the vehicle with the SmartKey with
KEYLESS-GO* in the starter switch
Key
not detected
The SmartKey with KEYLESS-GO* is
not recognized when attempting to
start the engine with the
KEYLESS-GO start/stop button* on
the gear selector lever because:�
The SmartKey with
KEYLESS-GO* is not in the vehi-
cle.
�
The battery in the SmartKey
with KEYLESS-GO* is not insert-
ed properly or completely dis-
charged.
�
Change the position of the SmartKey with
KEYLESS-GO* in the vehicle.
�
Make sure the batteries in the SmartKey with
KEYLESS-GO* are properly inserted
(�page 395) and are not discharged
(�page 110).
�
Start the engine with the SmartKey with
KEYLESS-GO* in the starter switch if
necessary.
Page 381 of 473

380 Practical hintsWhat to do if …Left display
Right display
Possible cause/consequence
Possible solution
F
Key
still
in vehicle
A SmartKey with KEYLESS-GO* left
in the vehicle was recognized while
locking the vehicle from the out-
side.
�
Take the SmartKey with KEYLESS-GO* out of
the vehicle.
.
3rd brake lamp
The high mounted brake lamp is
malfunctioning.
�
Contact an authorized Mercedes-Benz Center
as soon as possible.
AUTO light
inoperative
The light sensor is malfunctioning.
The headlamps switch on automati-
cally.
�
In the control system, set lamp operation to
manual mode (
�page 159).
�
Switch on headlamps using the exterior lamp
switch.
�
Contact an authorized Mercedes-Benz Center
as soon as possible.
Brake lamp
left
Auxiliary bulb on
The left brake lamp is malfunction-
ing. An auxiliary bulb has been
brought into use.
�
Contact an authorized Mercedes-Benz Center
as soon as possible.
Brake lamp
Right
Substitute
bulb on
The right brake lamp is malfunction-
ing. A substitute bulb has been
brought into use.
�
Contact an authorized Mercedes-Benz Center
as soon as possible.
Front foglamp
left
The left front fog lamp or left cor-
ner-illuminating front fog lamp is
malfunctioning.
�
Contact an authorized Mercedes-Benz Center
as soon as possible.
Page 389 of 473

388 Practical hintsWhere will I find ...?First aid kit
The first aid kit is located in storage com-
partment under the passenger seat.
1Handle
2Lid�
Pull handle 1 up.
�
Fold lid 2 down.
You can now remove the first-aid kit.
Vehicle tool kit, jack, and spare wheel
The vehicle tool kit, jack, and spare wheel
are stored in the space underneath the
trunk floor.
�
Lift up the trunk floor cover.
You can now remove the tools and ac-
cessories.
The vehicle tool kit includes�
One pair of universal pliers
�
Two open-end wrenches
�
One hex-socket wrench
�
One interchangeable slot/Phillips
screwdriver
�
One towing eye bolt
�
One alignment bolt
�
One fuse extractor
�
One fuse chart
�
Spare fuses
i
Check expiration dates and contents for
completeness at least once a year and replace
missing/expired items.
Warning!
G
The jack is designed exclusively for jacking
up the vehicle at the jack tubes built into
both sides of the vehicle. To help avoid per-
sonal injury, use the jack only to lift the ve-
hicle during a wheel change. Never get
beneath the vehicle while it is supported by
the jack. Keep hands and feet away from the
area under the lifted vehicle. Always firmly
set parking brake and block wheels before
raising vehicle with jack.
Do not disengage parking brake while the
vehicle is raised. Be certain that the jack is
always vertical (plumb line) when in use, es-
pecially on hills. Always try to use the jack
on a hard level surface. Be sure that the jack
arm is fully inserted in the jack tube. Always
lower the vehicle onto sufficient capacity
jackstands before working under the vehi-
cle.
Page 390 of 473
389 Practical hints
Where will I find ...?
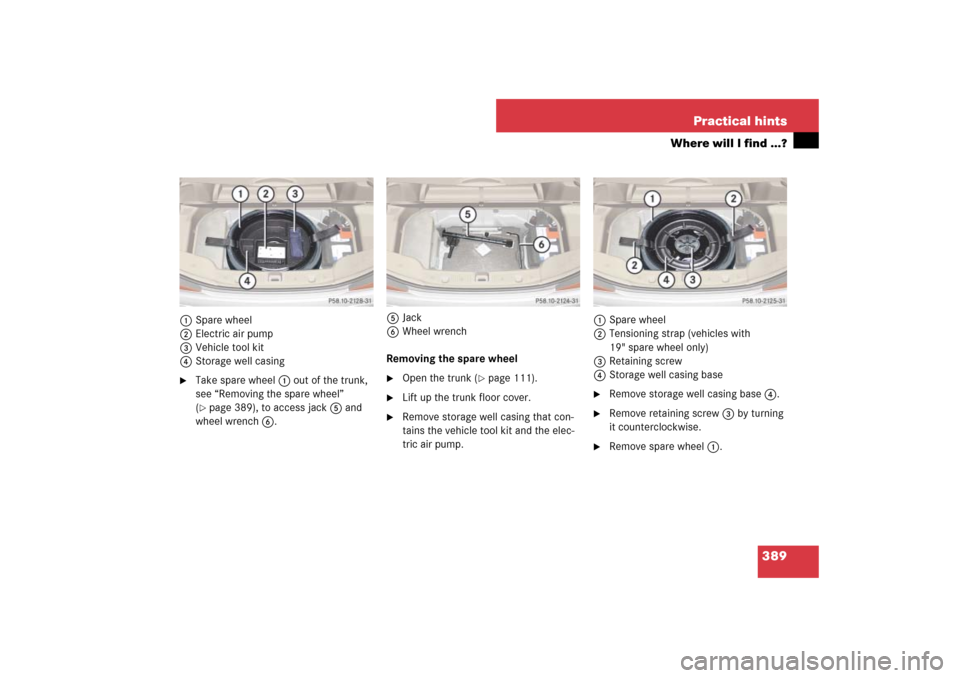
1Spare wheel
2Electric air pump
3Vehicle tool kit
4Storage well casing�
Take spare wheel 1 out of the trunk,
see “Removing the spare wheel”
(�page 389), to access jack 5 and
wheel wrench 6.5Jack
6Wheel wrench
Removing the spare wheel
�
Open the trunk (
�page 111).
�
Lift up the trunk floor cover.
�
Remove storage well casing that con-
tains the vehicle tool kit and the elec-
tric air pump.1Spare wheel
2Tensioning strap (vehicles with
19" spare wheel only)
3Retaining screw
4Storage well casing base
�
Remove storage well casing base 4.
�
Remove retaining screw 3 by turning
it counterclockwise.
�
Remove spare wheel 1.
Page 392 of 473
391 Practical hints
Locking/unlocking in an emergency
�Locking/unlocking in an emergency
Unlocking the vehicle
If you cannot unlock the vehicle using the
SmartKey or KEYLESS-GO*, unlock the
driver’s door and the trunk using the me-
chanical key.
1Mechanical key locking tab
2Mechanical key
�
Move locking tab 1 direction of arrow
and slide the mechanical key 2 out of
the housing.Unlocking the driver’s door
1Unlocking
2Mechanical key
�
Insert mechanical key 2 into the lock
until it stops.
�
Turn mechanical key 2 counterclock-
wise to position 1.
The driver’s door is unlocked. You can
now open the driver’s door.
i
Unlocking the vehicle with the mechanical
key and opening the driver’s door or the trunk
will trigger the anti-theft alarm system
(
�page 96).
To cancel the alarm, insert the SmartKey or the
SmartKey with KEYLESS-GO* in the starter
switch.
Page 393 of 473
 is required to open the trunk lid.
1Unlocking in an emergency
2Handle�
Insert the")
392 Practical hintsLocking/unlocking in an emergencyUnlocking the trunk
A minimum height clearance of 6.2 ft
(1.89 m) is required to open the trunk lid.
1Unlocking in an emergency
2Handle�
Insert the mechanical key into the
trunk lid lock until it stops.
�
Turn the mechanical key counterclock-
wise to position 1.
The trunk is unlocked
�
Pull handle 2 and lift lid.
�
Turn the mechanical key back and re-
move it from the trunk lid lock.Unlocking the glove box
Lockable storage areas in the passenger
compartment include:
�
the glove box
�
the storage compartment under the
armrest
�
the rear storage compartments
If these cannot be unlocked by means of
the SmartKey or the SmartKey with
KEYLESS-GO*, use the mechanical key to
unlock the glove box.1Separately unlocking the glove box
�
Slide mechanical key out of SmartKey
housing (
�page 391).
�
Insert the mechanical key into the
glove box lock and turn it to
position1.
You can now open the glove box.
i
To unlock the remaining storage compart-
ments, the cause for the malfunction of the
SmartKey or the SmartKey with KEYLESS-GO*
must be determined and corrected, see
(
�page 104) and (
�page 109).
Page 394 of 473

393 Practical hints
Locking/unlocking in an emergency
Locking the vehicle
If you cannot lock the vehicle with the
SmartKey, lock it with the mechanical key
as follows:�
Close the passenger door and the
trunk.
�
Press the central locking switch in the
center console (
�page 119).
�
Check whether the locking knob on the
passenger door has moved down.
�
If necessary push it down manually.
�
Remove the mechanical key from of
the SmartKey (
�page 391).
�
Check whether the trunk is locked.
�
If necessary, lock the trunk with the
mechanical key (
�page 117).
Except for the driver’s door, the vehicle
should now be locked.1Locking
2Mechanical key
�
Insert mechanical key 2 (
�page 391)
into the driver’s door lock until it stops.
�
Turn mechanical key 2 clockwise to
position 1.
The driver’s door is locked.
i
Unlocking the glove box with the mechanical
key will trigger the anti-theft alarm system. To
cancel the alarm, do one of the following:
�
Press button Œ or ‹ on the
SmartKey.
�
Insert the SmartKey in the starter switch.
�
Press the KEYLESS-GO* start/stop button
(�page 40).
�
Grasp an outside door handle (vehicles with
KEYLESS-GO* only).
i
This procedure does not arm the anti-theft
alarm system, nor does it lock the fuel filler flap
and the storage compartments.
The storage compartments can be locked
separately (
�page 235).