Page 234 of 473

233 Controls in detail
Useful features
�Useful features
Storage compartments Glove box
1Glove box lid release
2Glove box lid
Opening glove box
�
Press glove box lid release1.
Glove box lid 2 opens downward.
Closing glove box
�
Push glove box lid 2 up to close.Door storage compartments
1Release button
2Storage compartment lid
Warning!
G
To help avoid personal injury during a colli-
sion or sudden maneuver, exercise care
when storing objects in the vehicle. Put lug-
gage or cargo in the trunk if possible. Do not
pile luggage or cargo higher than the seat
backs. Do not place anything on shelf be-
hind roll bar.
Parcel nets cannot secure hard or heavy ob-
jects.
Keep compartment lids closed. This will help
to prevent stored objects from being thrown
about and injuring vehicle occupants during
an accident.
Warning!
G
Keep the door storage compartments
closed while vehicle is in motion. Failure to
do so may cause the seat belt to catch at the
rear and prevent proper positioning of the
seat belt.
Page 238 of 473
237 Controls in detail
Useful features
Parcel nets in trunk
There are three nets available in the trunk
to secure loads:�
a pocket net on each side of the right
and left trunk side walls
�
a trunk floor net
�
Pull the trunk floor net from the trunk
back wall towards the front over the
luggage.
�
Hang the hooks of the net on the eyes
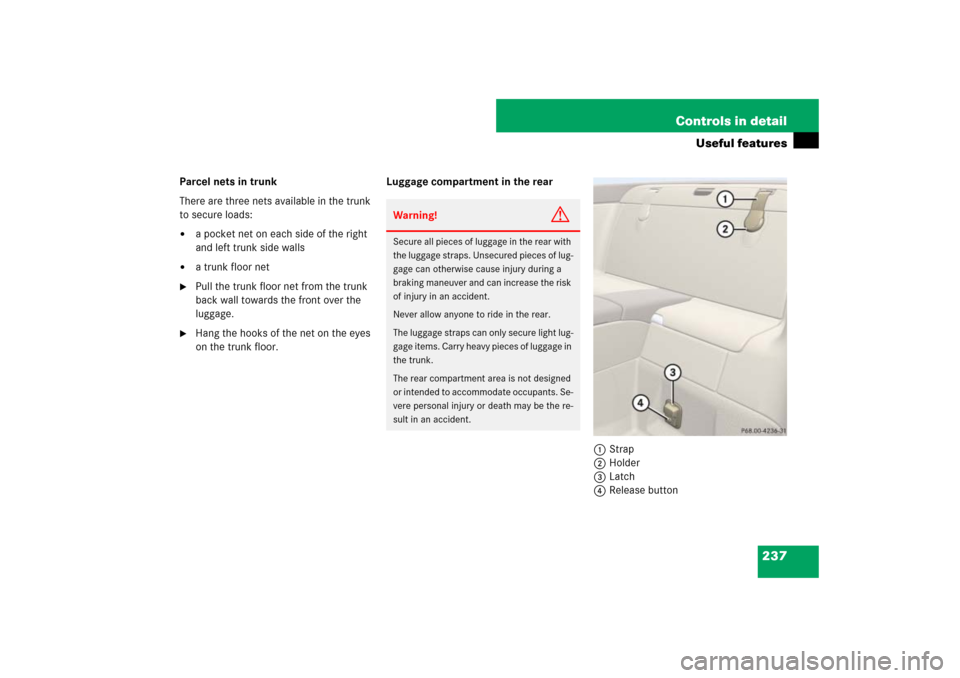
on the trunk floor.Luggage compartment in the rear
1Strap
2Holder
3Latch
4Release button
Warning!
G
Secure all pieces of luggage in the rear with
the luggage straps. Unsecured pieces of lug-
gage can otherwise cause injury during a
braking maneuver and can increase the risk
of injury in an accident.
Never allow anyone to ride in the rear.
The luggage straps can only secure light lug-
gage items. Carry heavy pieces of luggage in
the trunk.
The rear compartment area is not designed
or intended to accommodate occupants. Se-
vere personal injury or death may be the re-
sult in an accident.
Page 239 of 473

238 Controls in detailUseful features�
Pull strap1 out of holder2.
�
Secure the luggage with the strap so
that it cannot move.
�
Insert strap1 into latch3.
Releasing strap
�
Press release button4 and guide
strap1 back to holder2.
Cup holders
1Left cup holder
2Right cup holder
Opening
�
Briefly press cup holder cover.
The cup holder opens automatically.
Warning!
G
The shelf below the rear window should not
be used to carry objects. This will avoid such
objects from being thrown about and injur-
ing vehicle occupants during an accident or
sudden maneuver.
The trunk is the preferred place to carry ob-
jects.
Warning!
G
In order to help prevent spilling liquids on
vehicle occupants and/or vehicle equip-
ment, only use containers that fit into the
cup holder. Use lids on open containers and
do not fill containers to a height where the
contents, especially hot liquids, could spill
during braking, vehicle maneuvers, or in an
accident. Liquids spilled on vehicle occu-
pants may cause serious personal injury.
Liquids spilled on vehicle equipment may
cause damage not covered by the
Mercedes-Benz Limited Warranty.
When not in use, keep the cup holder
closed. An open cup holder may cause injury
to or others when contacted during braking,
vehicle maneuvers, or in an accident.
Keep in mind that objects placed in the cup
holder may come lose during braking, vehi-
cle maneuvers, or in an accident and be
thrown around in the vehicle interior. Ob-
jects thrown around in the vehicle interior
may cause an accident and/or serious per-
sonal injury.
Page 240 of 473

239 Controls in detail
Useful features
Ashtray
1Cover plate
2Sliding knob
Opening ashtray�
Briefly touch cover plate1.
The ashtray opens automatically.
Closing ashtray
�
Press cover plate1 down until it
latches.Removing the ashtray insert
�
Secure vehicle from movement by set-
ting the parking brake. Move the gear
selector lever to positionN.
Now you have more room to take out
the insert.
�
Press sliding knob2 to the right.
The insert will eject a short distance.
Replacing the ashtray insert
�
Press the insert into the frame until it
snaps into place.
Cigarette lighter�
Switch on the ignition (
�page 39).
Warning!
G
Remove ashtray only with vehicle standing
still. Set the parking brake to secure vehicle
from movement. Move gear selector lever to
positionN. With gear selector lever in
positionN, turn off the engine.
Warning!
G
Never touch the heating element or sides of
the lighter; they are extremely hot. Hold the
knob only.
Make sure that any children traveling with
you do not injure themselves or start a fire
with the hot cigarette lighter.
When leaving the vehicle, always remove the
SmartKey or the SmartKey with
KEYLESS-GO* from the starter switch, take
it with you, and lock the vehicle. Do not
leave children unattended in the vehicle, or
with access to an unlocked vehicle. Unsu-
pervised use of vehicle equipment may
cause serious personal injury.
��
Page 269 of 473

268 OperationDriving instructionsPassenger compartmentDriving abroad
Abroad, there is an extensive
Mercedes-Benz service network at your
disposal. If you plan to drive into areas
which are not listed in the index of your
Mercedes-Benz Center directory, you
should request pertinent information from
an authorized Mercedes-Benz Center.Control and operation of radio trans-
mitters
COMAND, radio and telephoneTelephones and two-way radios
Radio transmitters, such as a portable tele-
phone or a citizens band unit should only
be used inside the vehicle if they are con-
nected to an antenna that is installed on
the outside of the vehicle.
Refer to the radio transmitter operation in-
structions regarding use of an external an-
tenna.
Warning!
G
Always fasten items being carried as secure-
ly as possible.
In an accident, during hard braking or sud-
den maneuvers, loose items will be thrown
around inside the vehicle, and cause injury
to vehicle occupants unless the items are
securely fastened in the vehicle.
The trunk is the preferred place to carry ob-
jects.
Warning!
G
Please do not forget that your primary re-
sponsibility is to drive the vehicle safely.
Only operate the COMAND (Cockpit Man-
agement and Data System), radio or tele-
phone
1 if road, weather, and traffic
conditions permit.
Bear in mind that at a speed of just 30 mph
(approximately 50 km/h), your vehicle is
covering a distance of 44 feet (approximate-
ly 14 m) every second.
1Observe all legal requirements.
Warning!
G
Never operate radio transmitters equipped
with a built-in or attached antenna (i.e. with-
out being connected to an external antenna)
from inside the vehicle while the engine is
running. Doing so could lead to a malfunc-
tion of the vehicle’s electronic system, pos-
sibly resulting in an accident and/or
personal injury.
Page 276 of 473

275 Operation
Engine compartment
�
Pull hood release1.
The hood is unlocked.
2Lever for opening the hood
�
Push lever2 on the hood upwards.
�
Pull up on the hood and then release it.
The hood will be automatically held
open at shoulder height by gas-filled
struts. Closing
�
Let the hood drop from a height of ap-
proximately 1
1/2ft (50 cm).
The hood will lock audibly.
�
Check to make sure the hood is fully
closed.
If you can raise the hood at a point
above the headlamps, then it is not
properly closed. Open it again and let it
drop with somewhat greater force.
Engine oil
The amount of oil your engine needs will
depend on a number of factors, including
driving style. Higher oil consumption can
occur when�
the vehicle is new
�
the vehicle is driven frequently at
higher engine speeds
Engine oil consumption checks should only
be made after the vehicle break-in period.
!
To avoid damage to the windshield wipers or
hood, never open the hood if the wiper arms are
folded forward away from the windshield.
Warning!
G
When closing the hood, use extreme caution
not to catch hand or fingers. Be careful that
you do not close the hood on anyone.
Make sure the hood is securely engaged be-
fore driving. Do not continue driving if the
hood can no longer engage after an accident
for example. The hood could otherwise
come loose while the vehicle is in motion
and injure you and/or others.
i
Do not use any special lubricant additives,
as these may damage the drive assemblies. Us-
ing special additives not approved by
Mercedes-Benz may cause damage not covered
by the Mercedes-Benz Limited Warranty. More
information on this subject is available at any
Mercedes-Benz Center.
Page 353 of 473

352 Practical hintsWhat to do if …Left display
Right display
Possible cause/consequence
Possible solution
ABS
ABS, ESP
inoperative
See
Oper. Manual
The ABS and ESP
® have switched off
due to a malfunction.
The BAS is also deactivated.
The electro-hydraulic brake system is
still functioning normally but without
the ABS, the ESP®, and the BAS avail-
able.
�
Continue driving with added caution.
Wheels may lock during hard braking,
reducing steering capability.
�
Have the system checked at an authorized
Mercedes-Benz Center as soon as
possible.
Failure to follow these instructions increases
the risk of an accident.
––– mph
Cruise control
You have attempted to set a speed be-
low 20 mph (30 km/h).
�
Accelerate to a speed exceeding
20 mph (30 km/h) and set the speed
(�page 210).
The ESP
® is switched off.
�
Switch on the ESP
® (�page 92).
The gear selector lever is set to posi-
tion P, R, or N.
�
Move the gear selector lever or position D.
The vehicle is secured with the parking
brake.
�
Release the parking brake (
�page 54).
Page 354 of 473
.
�
Acce")
353 Practical hints
What to do if …
Left display
Right display
Possible cause/consequence
Possible solution
––– mph
Distronic
You have attempted to set a speed be-
low 20 mph (30 km/h).
�
Accelerate to a speed exceeding
20 mph (30 km/h) and set the speed
(�page 210).
The ESP
® is switched off.
�
Switch on the ESP
® (�page 92).
The gear selector lever is set to posi-
tion P, R, or N.
�
Move the gear selector lever or position D.
The vehicle is secured with the parking
brake.
�
Release the parking brake (
�page 54).
DISTRONIC
Inoperative
Distronic* is malfunctioning or the dis-
play is malfunctioning.
�
Visit an authorized Mercedes-Benz Center
as soon as possible.
Currently
unavailable.
See
Oper. Manual
Distronic* is deactivated because the
functionality is impaired by external in-
terferences, e.g. high-frequency sourc-
es such as too stations, speed
measuring systems etc.
�
Leave the area of the external interfer-
ence.
�
Activate Distronic* again (
�page 218)
when the message
DISTRONIC available
again
appears.
Distronic* is deactivated because the
Distronic* sensor has not sensed any
other vehicles or objects, e.g. road
sign or such, for a long time.
�
Try to activate Distronic* again
(�page 218) when the message
DISTRONIC available again
appears.