Page 229 of 473

228 Controls in detailDriving systemsSuspension for sporty driving style
The setting for sporty driving is selected
when indicator lamp2 is illuminated.�
Press button1.
Indicator lamp2 comes on.
Suspension for regular driving style
The setting for regular driving is selected
when the indicator lamp2 is off.
�
Press button1.
Indicator lamp2 goes out.
Parktronic system* (Parking assist)
The Parktronic system is an electronic aid
with ultrasonic sensors. It is designed to
assist the driver during parking maneu-
vers. It visually and audibly indicates the
relative distance between the vehicle and
an obstacle.
The Parktronic system is automatically ac-
tivated when you switch on the ignition, re-
lease the parking brake, or place the gear
selector lever in position D, R, or N. The
Parktronic system deactivates at speeds
exceeding approximately 11 mph
(18 km/h). At lower vehicle speeds the
Parktronic system turns on again. Warning!
G
Parktronic is a supplemental system. It is
not intended to, nor does it replace, the
need for extreme care. The responsibility
during parking and other critical maneuvers
always rests with the driver.
Special attention must be paid to objects
with smooth surfaces or low silhouettes
(e.g. trailer couplings, painted posts, or road
curbs). Such objects may not be detected by
the system and can damage the vehicle.
The operational function of the Parktronic
system can be affected by dirty sensors, es-
pecially at times of snow and ice. See
“Cleaning the Parktronic* system sensors”
(�page 326).
Warning!
G
Make sure no persons or animals are in the
area in which you are maneuvering. Other-
wise you run the risk of causing injury.!
Interference caused by other ultrasonic sig-
nals (e.g. working jackhammers, car wash, or the
air brakes of trucks) can cause the system to
send erratic indications, and should be taken
into consideration.
Page 230 of 473

229 Controls in detail
Driving systems
The Parktronic system also deactivates
when you place the gear selector lever in
position P or depress the parking brake
pedal.
The Parktronic system monitors the sur-
roundings of your vehicle with six sensors
in the front bumper and four sensors in the
rear bumper.
1Sensors in the front bumperRange of the sensorsFront sensors
Rear sensorsi
To function properly, the sensors must be
free of dirt, ice, snow and slush. Clean the sen-
sors regularly, being careful not to scratch or
damage the sensors, see “Cleaning the Park-
tronic system* sensors” (
�page 326).
Center
approx. 40 in (100 cm)
Corners
approx. 24 in (60 cm)
Center
approx. 48 in (120 cm)
Corners
approx. 32 in (80 cm)
!
During parking maneuvers, pay special at-
tention to objects located above or below the
height of the sensors (e.g. planters or trailer
hitches). The Parktronic system will not detect
such objects at close range and damage to your
vehicle or the object may result.
Ultrasonic signals from outside sources (e.g.
truck air brakes, car wash, or jackhammers) may
impair the operation of the Parktronic system.
Page 232 of 473

231 Controls in detail
Driving systems
As your vehicle approaches an object, one
or more distance segments will illuminate,
depending on the distance. When the
eighth distance segment illuminates, you
have reached the minimum distance.�
Front area: An intermittent acoustic
warning will sound as the first red dis-
tance segment illuminates and a con-
stant acoustic warning lasting a
maximum of 2 seconds will sound for
the second distance segment. The sig-
nal is canceled when the gear selector
lever is placed in position P or the park-
ing brake is set.
�
Rear area: An intermittent acoustic
warning will sound when the first dis-
tance segment illuminates. This signal
quickens with each additional distance
segment lit. When the eighth distance
segment illuminates, the acoustic
warning becomes a constant signal.
The signal is canceled when the gear
selector lever is placed in positionD
orP or the parking brake is set.Switching the Parktronic system
on/off
You can switch off the Parktronic system
manually.
The Parktronic switch is located in the low-
er part of the center console (
�page 32).
1Parktronic switch
2Indicator lamp
Switching off
�
Press Parktronic switch1.
Indicator lamp2 comes on.Switching on
�
Press Parktronic switch1 once more.
Indicator lamp2 goes out.
Parktronic system malfunction
If only the red distance segments illumi-
nate and an acoustic warning sounds,
there is a malfunction in the Parktronic
system. The Parktronic system will auto-
matically switch off after 20 seconds and
the indicator lamp in the Parktronic switch
comes on.
�
Have the Parktronic system checked
by an authorized Mercedes-Benz
Center as soon as possible.
i
The Parktronic system switches on automat-
ically when you switch on the ignition
(
�page 39).
Page 233 of 473
232 Controls in detailDriving systemsIf only the red distance segments illumi-
nate and no acoustic warning sounds, the
Parktronic system sensors are dirty or
there is an interference from other radio or
ultrasonic signals. The Parktronic system
will automatically switch off after
20 seconds and the indicator lamp in the
Parktronic switch comes on.�
Switch off the ignition (
�page 39).
�
Clean the Parktronic system sensors
(�page 326).
�
Switch on the ignition (
�page 39).
or
�
Check the Parktronic system operation
at another location to rule out interfer-
ence from outside radio or ultrasonic
signals.
Page 235 of 473
234 Controls in detailUseful featuresOpening�
Press release button 1.
Storage compartment lid 2 lid opens
upwards.
Armrest storage compartments
The release buttons are located under the
cushion of the armrest.
1Storage tray release
2Storage compartment releaseOpening storage tray
�
Press button1 and lift the armrest.
Opening storage compartment
�
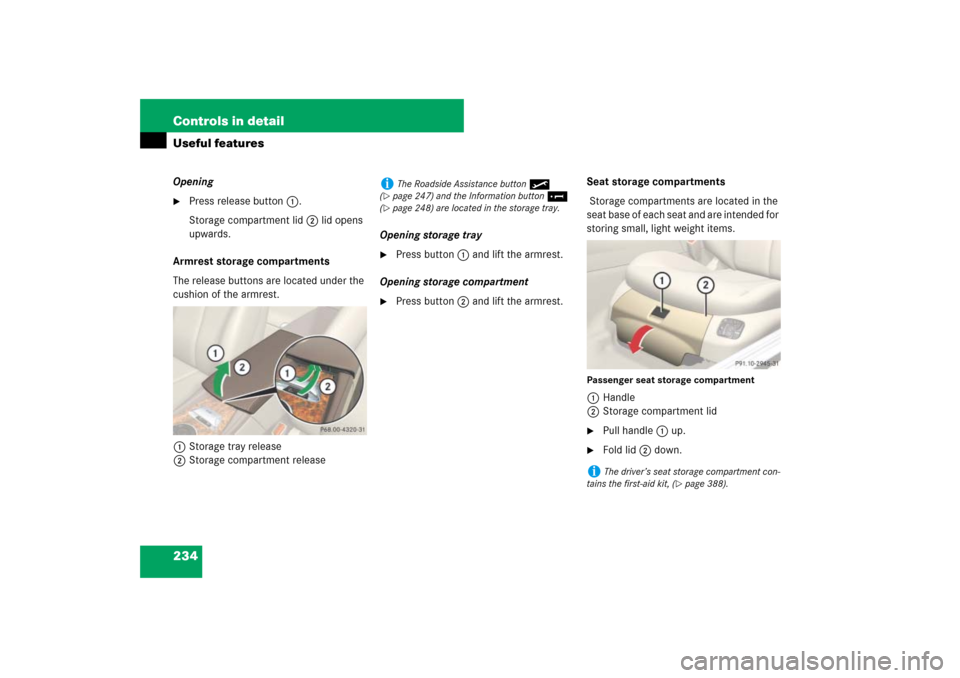
Press button2 and lift the armrest.Seat storage compartments
Storage compartments are located in the
seat base of each seat and are intended for
storing small, light weight items.
Passenger seat storage compartment1Handle
2Storage compartment lid�
Pull handle 1 up.
�
Fold lid 2 down.
i
The Roadside Assistance button•
(
�page 247) and the Information button¡
(�page 248) are located in the storage tray.
i
The driver’s seat storage compartment con-
tains the first-aid kit, (
�page 388).
Page 236 of 473
235 Controls in detail
Useful features
Rear storage compartments
The CD changer is located in the driver’s
side storage compartment.
For instructions on the CD changer, see
separate COMAND Operator’s Manual.Driver’s side rear storage compartment1Release button
2Storage compartment lid�
Press release button 1.
Storage compartment lid 2 lid opens
upwards.Locking storage compartments
The storage compartments are centrally
locked when you lock the vehicle from the
outside.
You can also lock the storage compart-
ments separately, see “Locking the stor-
age compartments separately”
(
�page 235).Locking the storage compartments
separately
You can lock the storage compartments
separately, e.g. when the vehicle is in the
shop for service.
1Separately unlocking storage compart-
ments
2Separately locking storage compart-
ments
�
Remove the mechanical key from the
SmartKey (
�page 391).
��
Page 237 of 473

236 Controls in detailUseful features�
Insert the mechanical key into the
glove box lock.
�
Turn the mechanical key to
position2.
The following storage compartments
will be locked. They remain locked,
even when the vehicle is unlocked with
the SmartKey or with the SmartKey
with KEYLESS-GO*:�
Glove box
�
Armrest storage compartments
�
Rear storage compartmentsUnlocking the storage compartments
separately
�
Insert the mechanical key into the
glove box lock.
�
Turn the mechanical key to
position1.
You can now open the storage com-
partments.Parcel net in passenger footwell
A small convenience parcel net is located
in the passenger footwell. It is for small
and light items, such as road maps, mail,
etc.
i
The separate locking status of these storage
compartments can only be canceled with the
mechanical key.
The storage compartments in the doors cannot
be locked.
i
If the glove box cannot be unlocked using
the SmartKey or SmartKey with KEYLESS-GO*,
see “Unlocking the glove box” (
�page 392).
Warning!
G
The parcel net is intended for storing
light-weight items only.
Heavy objects, objects with sharp edges or
fragile objects may not be transported in the
parcel net. In an accident, during hard brak-
ing, or sudden maneuvers, they could be
thrown around inside the vehicle and cause
injury to vehicle occupants.
The parcel net cannot protect transported
goods in the event of an accident.
��
Page 240 of 473

239 Controls in detail
Useful features
Ashtray
1Cover plate
2Sliding knob
Opening ashtray�
Briefly touch cover plate1.
The ashtray opens automatically.
Closing ashtray
�
Press cover plate1 down until it
latches.Removing the ashtray insert
�
Secure vehicle from movement by set-
ting the parking brake. Move the gear
selector lever to positionN.
Now you have more room to take out
the insert.
�
Press sliding knob2 to the right.
The insert will eject a short distance.
Replacing the ashtray insert
�
Press the insert into the frame until it
snaps into place.
Cigarette lighter�
Switch on the ignition (
�page 39).
Warning!
G
Remove ashtray only with vehicle standing
still. Set the parking brake to secure vehicle
from movement. Move gear selector lever to
positionN. With gear selector lever in
positionN, turn off the engine.
Warning!
G
Never touch the heating element or sides of
the lighter; they are extremely hot. Hold the
knob only.
Make sure that any children traveling with
you do not injure themselves or start a fire
with the hot cigarette lighter.
When leaving the vehicle, always remove the
SmartKey or the SmartKey with
KEYLESS-GO* from the starter switch, take
it with you, and lock the vehicle. Do not
leave children unattended in the vehicle, or
with access to an unlocked vehicle. Unsu-
pervised use of vehicle equipment may
cause serious personal injury.
��