Page 206 of 473

205 Controls in detail
Retractable hardtop
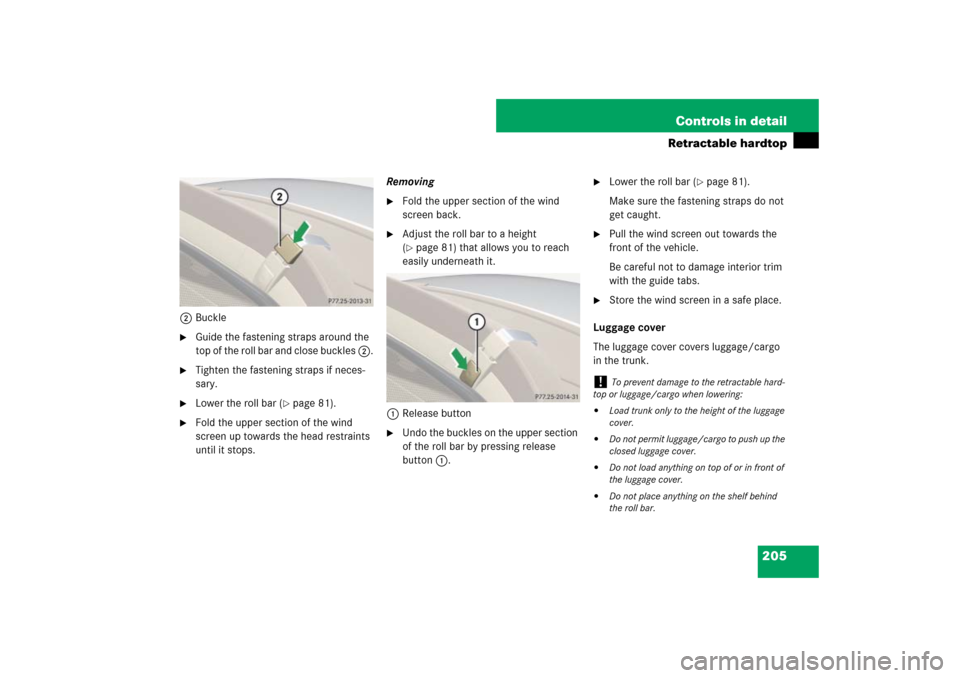
2Buckle�
Guide the fastening straps around the
top of the roll bar and close buckles 2.
�
Tighten the fastening straps if neces-
sary.
�
Lower the roll bar (
�page 81).
�
Fold the upper section of the wind
screen up towards the head restraints
until it stops.Removing
�
Fold the upper section of the wind
screen back.
�
Adjust the roll bar to a height
(�page 81) that allows you to reach
easily underneath it.
1Release button
�
Undo the buckles on the upper section
of the roll bar by pressing release
button1.
�
Lower the roll bar (
�page 81).
Make sure the fastening straps do not
get caught.
�
Pull the wind screen out towards the
front of the vehicle.
Be careful not to damage interior trim
with the guide tabs.
�
Store the wind screen in a safe place.
Luggage cover
The luggage cover covers luggage/cargo
in the trunk.
!
To prevent damage to the retractable hard-
top or luggage/cargo when lowering:
�
Load trunk only to the height of the luggage
cover.
�
Do not permit luggage/cargo to push up the
closed luggage cover.
�
Do not load anything on top of or in front of
the luggage cover.
�
Do not place anything on the shelf behind
the roll bar.
Page 207 of 473
206 Controls in detailRetractable hardtopClosing luggage coverClosed luggage cover1Luggage cover
2Zipper
3Side holder
4Handle�
Pull out luggage cover 1 in direction of
arrow using handle4.
�
Hook luggage cover 1 into left and
right side holders3.Opening luggage cover
�
Unhook luggage cover 1 from side
holders 3.
�
While holding on to handle4, guide
luggage cover 1 in the opposite
direction of arrow.
Removing luggage cover
Closed luggage cover1Luggage cover
2Zipper
3Side holder
4Handle�
Fold back the entire length of the zip-
per’s cloth cover.
�
Completely open zipper 2 while the
luggage cover is closed.
�
Open luggage cover 1 see “Opening
luggage cover” (
�page 206).
The tensioning clasps are on the left and
right sides of the trunk.
Opened luggage cover5Tensioning clasp
6Retainer spring
Page 208 of 473
207 Controls in detail
Retractable hardtop
�
Open tensioning clasps 5 by pulling
them downward.
�
Unhook retainer springs 6 from hold-
ers and flip retainer springs all the way
up.7Luggage cover
8Cloth end
9Cloth holder
�
Carefully tilt luggage cover 7 in direc-
tion of arrow towards rear of trunk.
�
Roll up front end of cloth 8 in the
trunk towards the front and fasten it in
place in front of cloth holder 9.
�
Completely remove luggage cover 7
from the trunk.Installing luggage cover
�
Carefully place luggage cover in trunk.
1Luggage cover
2Hook
3Guide rail
�
Insert luggage cover 1 into guide
rails3 on both sides using hooks 2.
�
Tilt luggage cover forward in direction
of arrow.
Warning!
G
Only open the tensioning clasps when the
luggage cover opened, see “Opening lug-
gage cover” (
�page 206).
You could otherwise be injured.
!
Before installing the luggage cover, make
sure that the cloth end is in front of the cloth
holder. Otherwise, it could be damaged.
��
Page 209 of 473
208 Controls in detailRetractable hardtop�
Fold retainer springs of tensioning
clasps downward and clip them into
holders on both sides (
�page 206).
�
Close tensioning clasps on both sides
by pressing them upward.
�
Pull handle of luggage cover towards
the rear.
�
Clip eyelets onto side trim panels.
�
Close the zipper completely
(�page 206).
�
Fold back the zipper’s cloth cover
across the entire length of the luggage
cover.Sunshade for panorama roof*
The sunshade protects you from excessive
sunlight coming in through the panorama
roof.
1Stop buttons
2HandleOpening
�
Squeeze stop buttons1 and guide the
sunshade towards the rear.
Closing
�
Using handle2, slide the sunshade
towards the front of the vehicle.
Warning!
G
Do not operate the sunshade while driving.
Adjusting the sunshade while driving could
cause the driver to lose control of the vehi-
cle.
��
Page 210 of 473

209 Controls in detail
Driving systems
�Driving systems
The driving systems of your vehicle are de-
scribed on the following pages:�
Cruise control and Distronic*, with
which the vehicle can maintain a preset
speed
�
Distance warning function* (only avail-
able with Distronic*), which warns of
stationary objects or slower moving ve-
hicles that you are closing in on too
quickly
�
ABC with vehicle level control systems,
with which you can change vehicle sus-
pension characteristics
�
Parktronic*, which assists the driver
during parking maneuvers
For information on the BAS, ABS, ESP
®,
and the electro-hydraulic brake system,
see “Driving safety systems” (
�page 87).
Cruise control
The cruise control automatically maintains
the speed you set for your vehicle.
The use of the cruise control is recom-
mended for driving at a constant speed for
extended periods of time.
You can set or resume the cruise control at
any speed above 20 mph (30 km/h).
The cruise control function is operated by
means of the cruise control lever.
The cruise control lever is the uppermost
lever on the left-hand side of the steering
column (
�page 24).
Warning!
G
The cruise control is a convenience system
designed to assist the driver during vehicle
operation. The driver is and must always
remain responsible for the vehicle’s speed
and for safe brake operation.
Only use the cruise control if the road,
traffic, and weather conditions make it ad-
visable to travel at a constant speed.�
The use of the cruise control can be dan-
gerous on winding roads or in heavy traf-
fic because conditions do not allow safe
driving at a constant speed.
�
The use of the cruise control can be dan-
gerous on slippery roads. Rapid changes
in tire traction can result in wheel spin
and loss of control.
�
Deactivate the cruise control when driv-
ing in fog.
The “Resume” function should only be oper-
ated if the driver is fully aware of the previ-
ously set speed and wishes to resume this
particular preset speed.
Page 212 of 473

211 Controls in detail
Driving systems
Canceling the cruise control
There are several ways to cancel the cruise
control:�
Step on the brake pedal.
The cruise control is canceled. The last
set speed is stored for later use.
or
�
Briefly push the cruise control lever in
direction of arrow3.
The cruise control is canceled. The last
set speed is stored for later use.
i
The last stored speed is canceled when you
turn off the engine.
i
The cruise control switches off automatical-
ly when
�
you step on the brake pedal
�
you depress the parking brake pedal
The cruise control also switches off automatical-
ly when
�
the vehicle speed is below
20 mph (30 km/h) (
�page 209)
�
the ESP
® is in operation or switched off with
the ESP® switch (
�page 91)
�
you move the gear selector lever to
positionN while driving
An acoustic warning sounds and the message
CC Off
appears in the multifunction display for
approximately 5 seconds.
!
Moving the gear selector lever to positionN
while driving cancels the cruise control. Howev-
er, the gear selector lever should not be moved
to positionN while driving except to coast when
the vehicle is in danger of skidding (e.g. on icy
roads).
i
Depressing the accelerator pedal does not
deactivate the cruise control. After brief acceler-
ation (e.g. for passing), the cruise control will re-
sume the last speed set.
Page 213 of 473

212 Controls in detailDriving systemsSetting a higher speed�
Lift the cruise control in direction of
arrow1 (
�page 210) and hold it
there until the desired speed is
reached.
�
Release the cruise control lever.
The new speed is set.
Setting a lower speed
�
Depress the cruise control in direction
of arrow2 (
�page 210) and hold it
there until the desired speed is
reached.
�
Release the cruise control lever.
The new speed is set.Fine adjustment in 1 mph
(Canada: 1 km/h) increments
Faster
�
Briefly tip the cruise control lever in
direction of arrow1 (
�page 210).
Slower
�
Briefly tip the cruise control lever in
direction of arrow2 (
�page 210).Setting to last stored speed
(“Resume” function)
�
Briefly pull the cruise control lever in
direction of arrow4 (
�page 210).
The cruise control resumes to the last
set speed or, if no speed is stored, it
will set and store the current speed.
�
Remove your foot from the accelerator
pedal.
The selected speed appears in the mul-
tifunction display.
i
When you use the cruise control lever to de-
celerate, the brake system will automatically
brake the vehicle if the engine’s braking power
does not brake the vehicle sufficiently.
Warning!
G
The set speed stored in memory should only
be set again if prevailing road conditions
permit. Possible acceleration or decelera-
tion differences arising from returning to the
preset speed could cause an accident
and/or serious injury to you and others.
Page 214 of 473

213 Controls in detail
Driving systems
Distronic*
When activated, the Distronic adaptive
cruise control system increases the driving
convenience afforded by the cruise control
while traveling on expressways and other
major roadways.�
If the Distronic distance sensor detects
a slower moving vehicle directly ahead,
your vehicle’s speed will be reduced so
that you follow that vehicle at the pre-
set following distance.
�
If there is no vehicle directly ahead of
you, Distronic will function in the same
way as standard cruise control
(�page 209).
Warning!
G
Distronic adaptive cruise control is not a
substitute for active driving involvement. It
does not react to pedestrians or stationary
objects, recognize or predict the lane curva-
ture nor the movement of preceding
vehicles.
Distronic can only apply a maximum of 20%
of the vehicle’s braking power.
It is the driver’s responsibility at all times to
be attentive to the road, weather and traffic
conditions. In addition, the driver must pro-
vide the steering, braking and other driving
inputs necessary to remain in control of the
vehicle.Warning!
G
Distronic is a convenience system. Its speed
adjustment reduction capability is intended
to make cruise control more effective and
usable when traffic speeds vary. It is not
however, intended to, nor does it, replace
the need for extreme care. The responsibili-
ty for the vehicle’s speed, distance to the
preceding vehicle and, most importantly,
brake operation to assure a safe stopping
distance, always rests with the driver.
Warning!
G
Distronic requires familiarity with its opera-
tional characteristics. We strongly recom-
mend that you review the following
information carefully before operating the
system.Warning!
G
Distronic cannot take street and traffic con-
ditions into account. Only use Distronic if
the road, weather and traffic conditions
make it advisable to travel at a constant
speed.