Page 315 of 595

314 Controls in detail
Loading
Use of the cargo net is a particularly impor-
tant safety factor when the vehicle is load-
ed higher than the top of the seat
backrests with smaller objects. For your
safety, always use the cargo net when
transporting cargo.
The cargo net can be installed in two
locations:
1Holder in B-pillar
2Holder in C-pillar�With the cargo compartment expanded
in part (
�page 307), use holders
above C-pillars2 and the cargo
tie-down rings behind the third-row
seat backrest (
�page 305).
�With the cargo compartment fully ex-
panded (
�page 308), use holders
above B-pillars1 and the cargo
tie-down rings in the second-row foot-
well (
�page 305).
�Open the zipper on the cargo net pack-
age.
�Roll out the cargo net.
�Unfold the cargo net.
The cargo net bars must audibly
engage.Installing the cargo net
Cargo net bar hung up behind the B-pillar
1Holder
2Cargo net bar
�Hang cargo net bar2 on holder1 as
indicated by the arrow.
�Push cargo net bar2 forward into
holder1 in direction of arrow.
Page 316 of 595
315 Controls in detail
Loading
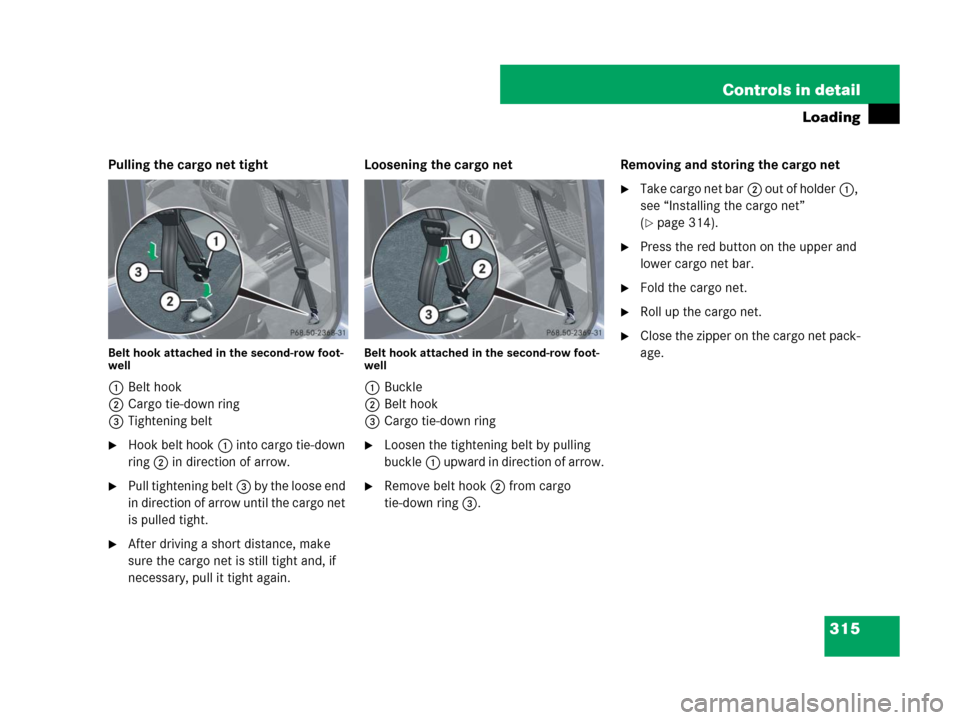
Pulling the cargo net tight
Belt hook attached in the second-row foot-
well
1Belt hook
2Cargo tie-down ring
3Tightening belt
�Hook belt hook1 into cargo tie-down
ring2 in direction of arrow.
�Pull tightening belt3 by the loose end
in direction of arrow until the cargo net
is pulled tight.
�After driving a short distance, make
sure the cargo net is still tight and, if
necessary, pull it tight again.Loosening the cargo net
Belt hook attached in the second-row foot-
well
1Buckle
2Belt hook
3Cargo tie-down ring
�Loosen the tightening belt by pulling
buckle1 upward in direction of arrow.
�Remove belt hook2 from cargo
tie-down ring3.Removing and storing the cargo net
�Take cargo net bar2 out of holder1,
see “Installing the cargo net”
(
�page 314).
�Press the red button on the upper and
lower cargo net bar.
�Fold the cargo net.
�Roll up the cargo net.
�Close the zipper on the cargo net pack-
age.
Page 317 of 595

316 Controls in detail
Useful features
Storage compartments Glove box/CD changer
1Glove box lid release
2Glove box lid
Opening the glove box
�Pull lid release1 in direction of arrow.
Glove box lid2 opens downward.
Closing the glove box
�Push glove box lid2 up to close.Releasing CD changer
1Release button
2AUX-socket (Vehicles without Rear
Seat Entertainment System*)
3CD changer
�Open the glove box (�page 316).
�Press release button1.
CD changer3 is released and swings
down automatically.
For information on CD changer operation,
see separate COMAND system operating
instructions.
Warning!G
To help avoid personal injury during a colli-
sion or sudden maneuver, exercise care
when storing objects in the vehicle. Put lug-
gage or cargo in the cargo compartment if
possible. Do not pile luggage or cargo higher
than the seat backs.
If so equipped, always use the cargo net*
when transporting cargo. The cargo net*
cannot secure hard or heavy objects.
Parcel nets cannot secure hard or heavy ob-
jects.
Keep compartment lids closed. This will help
to prevent stored objects from being thrown
about and injuring vehicle occupants during
�braking
�vehicle maneuvers
�an accident
Page 322 of 595

321 Controls in detail
Useful features
Cup holders
Cup holder in front of armrest
A cup holder and a card/ticket holder are
located in the front center console.
1Cup holderCup holder in rear armrest (second-row
seats)
1Cup holder
�Pull the armrest down by its top.
Warning!G
In order to help prevent spilling liquids on
vehicle occupants and/or vehicle equip-
ment, only use containers that fit into the
cup holder. Use lids on open containers and
do not fill containers to a height where the
contents, especially hot liquids, could spill
during braking, vehicle maneuvers, or an
accident. Liquids spilled on vehicle occu-
pants may cause serious personal injury.
Liquids spilled on vehicle equipment may
cause damage not covered by the
Mercedes-Benz Limited Warranty.
When not in use, keep rear cup holder
closed. An open cup holder may cause injury
to you or others when contacted during
braking, vehicle maneuvers, or in an acci-
dent.
Keep in mind that objects placed in a cup
holder may come loose during braking,
vehicle maneuvers, or an accident and be
thrown around in the vehicle interior.
Objects thrown around in the vehicle interi-
or may cause an accident and/or serious
personal injury.
iThe front cup holder can be removed for
cleaning purposes (
�page 322).
!Close the cup holder before folding the arm-
rest upwards.
Page 328 of 595
327 Controls in detail
Useful features
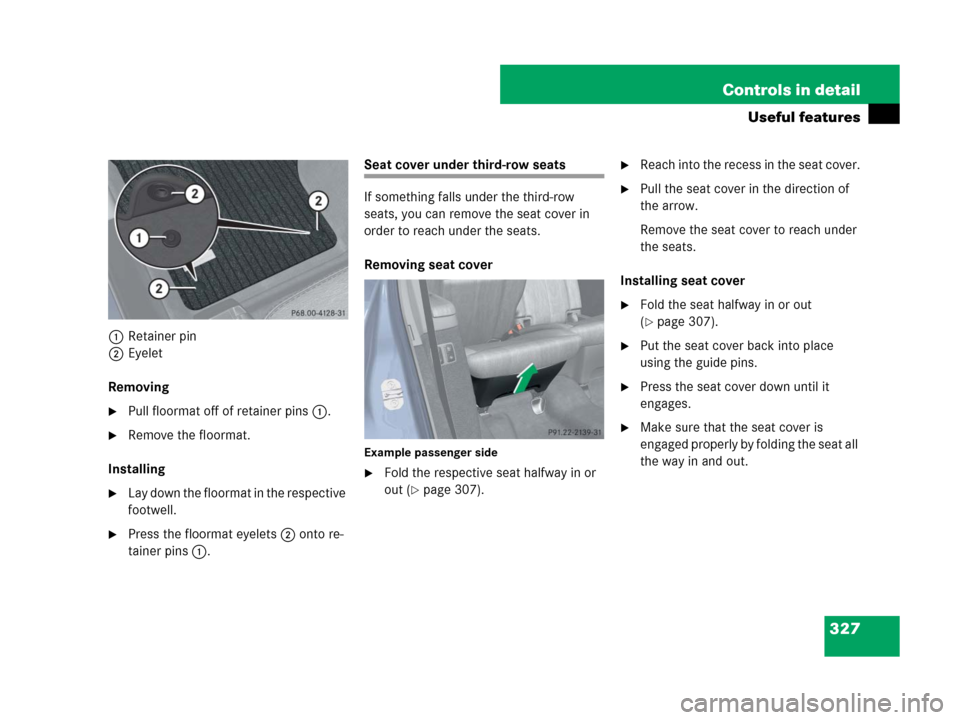
1Retainer pin
2Eyelet
Removing
�Pull floormat off of retainer pins1.
�Remove the floormat.
Installing
�Lay down the floormat in the respective
footwell.
�Press the floormat eyelets2 onto re-
tainer pins1.
Seat cover under third-row seats
If something falls under the third-row
seats, you can remove the seat cover in
order to reach under the seats.
Removing seat cover
Example passenger side
�Fold the respective seat halfway in or
out (
�page 307).
�Reach into the recess in the seat cover.
�Pull the seat cover in the direction of
the arrow.
Remove the seat cover to reach under
the seats.
Installing seat cover
�Fold the seat halfway in or out
(
�page 307).
�Put the seat cover back into place
using the guide pins.
�Press the seat cover down until it
engages.
�Make sure that the seat cover is
engaged properly by folding the seat all
the way in and out.
Page 341 of 595
")
340 Controls in detail
Useful features
Interior rear view mirror with integrated
remote control
1Indicator lamp
2 3 4Signal transmitter button
Needed for programming (not part of vehi-
cle equipment):
5Hand-held remote control of ga-
rage door opener, gate operator
or other device
6Hand-held remote control but-
tonProgramming the integrated remote
control
Step 1:
�Switch on the ignition (�page 42).
Warning!G
Before programming the integrated remote
control to a garage door opener or gate
operator, make sure people and objects are
out of the way of the device to prevent po-
tential harm or damage. When programming
a garage door opener, the door moves up or
down. When programming a gate operator,
the gate opens or closes.
Do not use the integrated remote control
with any garage door opener that lacks
safety stop and reverse features as required
by U.S. federal safety standards (this
includes any garage door opener model
manufactured before April 1, 1982).
A garage door that cannot detect an object
– signaling the door to stop and reverse –
does not meet current U.S. federal safety
standards.
When programming a garage door opener,
park the vehicle outside the garage.
Do not run the engine while programming
the integrated remote control. Inhalation of
exhaust gas is hazardous to your health.
All exhaust gas contains carbon monoxide
(CO), and inhaling it can cause unconscious-
ness and possible death.
Page 344 of 595
. Do not release
this button until it has been successful-
ly trained.
�While still holding dow")
343 Controls in detail
Useful features
Step 4:
�Press and hold the signal transmitter
button (2, 3 or4). Do not release
this button until it has been successful-
ly trained.
�While still holding down the signal
transmitter button (2, 3 or4),
“cycle” your hand-held remote control
button6 as follows: Press and hold
button6 for 2 seconds, then release
it for 2 seconds, and again press and
hold it for 2 seconds. Repeat this se-
quence on the hand-held remote con-
trol until the frequency signal has been
learned. Upon successful training,
indicator lamp1 will flash slowly and
then rapidly after several seconds.
�Proceed with programming step 5 and
step 6 to complete.Reprogramming a single signal trans-
mitter button
To program a device using a signal trans-
mitter button previously trained, follow
these steps:
�Switch on the ignition (�page 42).
�Press and hold the desired signal
transmitter button (2, 3 or4).
Do not release the button.
�Indicator lamp1 will begin to flash af-
ter 20 seconds. Without releasing the
signal transmitter button, proceed with
programming starting with step 3.Operation of integrated remote control
�Switch on the ignition (�page 42).
�Select and press the appropriate inte-
grated signal transmitter button (2,
3 or4) to activate the remote con-
trolled device.
The integrated remote control trans-
mitter continues to send the signal as
long as the button is pressed – up to
20 seconds.
Erasing the integrated remote control
memory
�Switch on the ignition (�page 42).
�Simultaneously press and hold outer
signal transmitter buttons2 and4,
for approximately 20 seconds, until
indicator lamp1 flashes rapidly. Do
not hold for longer than 30 seconds.
The codes of all three channels are
erased.
iUpon completion of programming the inte-
grated remote control, make sure you retain the
hand-held remote control that came with the ga-
rage door opener, gate operator or other device.
You may need it for use in other vehicles, for fu-
ture programming of an integrated remote con-
trol, or simply for continued use as a hand-held
remote control to operate the respective device
in other situations.
iIf you sell your vehicle, erase the codes of all
three channels.
Page 349 of 595

The more cautiously you treat y")
348 Operation
In the “Operation” section you will find
detailed information on operating, main-
taining and caring for your vehicle.
The first 1000 miles (1500 km)
The more cautiously you treat your vehicle
during the break-in period, the more satis-
fied you will be with its performance later
on.
�Drive your vehicle during the first
1000 miles (1500 km) at varying but
moderate vehicle and engine speeds.
�During this period, avoid heavy loads
(full throttle driving) and excessive
engine speeds (no more than
2/3 of
maximum rpm in each gear).
�Shift gears in a timely manner.
�Avoid accelerating by kick-down.
�Do not attempt to slow the vehicle
down by shifting to a lower gear using
the gear selector lever.
�Select gear ranges3, 2 or1
(
�page 200) only when driving at
moderate speeds (for hill driving).After 1000 miles (1500 km) you may
gradually increase vehicle and engine
speeds to the permissible maximum.
All of the above instructions, as may apply
to your vehicle type, also apply when driv-
ing the first 1000 miles (1500 km) after
the engine, the transfer case, the center
differential or the rear differential has been
replaced.
iAlways obey applicable speed limits.