Page 475 of 595
.
Display symbolDisplay messagesPossi")
474 Practical hints
What to do if …
During severe operation conditions and
stop-and-go city traffic, the coolant tem-
perature may rise close to 248°F (120°C).
Display symbolDisplay messagesPossible cause/consequencePossible solution
�Observe the coolant temperature in the
multifunction display (
�page 164).
If the temperature raises again:
�Contact an authorized Mercedes-Benz
Light Truck Center immediately.
Warning!G
Driving when your engine is overheated can
cause some fluids which may have leaked
into the engine compartment to catch fire.
You could be seriously burned.
Steam from an overheated engine can cause
serious burns which can occur just by open-
ing the engine hood. Stay away from the en-
gine if you see or hear steam coming from it.
Turn off the engine, get out of the vehicle
and do not stand near the vehicle until the
engine has cooled down.!The engine should not be operated with the
coolant temperature above 248°F (120°C).
Doing so may cause serious damage which is not
covered by the Mercedes-Benz Limited
Warranty.
Page 492 of 595
491 Practical hints
What to do if …
Display symbolDisplay messagesPossible cause/consequencePossible solution
Visit workshopThe air suspension is malfunctioning.�Do not drive faster than 50 mph
(80 km/h) depending on the set vehi-
cle level.
�Have the vehicle checked at an autho-
rized Mercedes-Benz Light Truck
Center.
Compressor
cooling downYou have selected a higher vehicle level.
Due to frequent level changes within a
short period, the compressor must first
cool down.�Let the compressor cool until the
message disappears.
The selected level will be set once the
compressor has cooled.
!When the message Compressor cooling
down
appears in the multifunction display,
driving is still possible. Keep in mind that the ride
height of the vehicle is not yet reached, so you
can damage the underbody of the vehicle. The
selected level will be set once the compressor
has cooled.
Page 494 of 595

493 Practical hints
What to do if …
Display symbolDisplay messagesPossible cause/consequencePossible solution
kDiff. lock system malfunct.
Visit workshopThe differential locks* are
malfunctioning.�Do not drive faster than 50 mph
(80 km/h).
�Have the vehicle checked at an autho-
rized Mercedes-Benz Light Truck
Center.
Diff. Lock System
overheated. Wait briefly.The differential locks* are too hot
and have been deactivated as a re-
sult.�Continue driving with added caution.
The lock function is unavailable.
�Wait for the lock system to cool down.
The differential locks will be reactivat-
ed as soon as they have cooled off.
mStop vehicle
Engage parking brakeA shifting procedure could not be
completed. LOW RANGE* is in neu-
tral position. There is no connection
between the engine and the drive
wheels.�Do not attempt to continue driving.
You could otherwise damage the
vehicle’s drivetrain.
�Let the vehicle coast to a halt.
� Engage the parking brake.
�Perform the shifting procedure again
(
�page 204).
Page 496 of 595
495 Practical hints
Where will I find ...?
�Where will I find ...?
First aid kit
The first aid kit is located on the driver’s
side in the cargo compartment behind the
cover.
1Lock
2Cover in left side trim panel
�Turn lock1 90° in direction of arrow.
�Fold down cover2.
The first aid kit can be removed.
Vehicle tool kit
The vehicle tool kit is stored under the
cargo compartment floor.
The vehicle tool kit includes:
�Towing eye bolt
�Wheel wrench
�Alignment bolt
�Vehicle jack
�Fuse chart
�Spare fuses
�Fuse extractor
�Collapsible wheel chock
�Wheel bolts for spare wheel1Cargo compartment floor, lowered
2Handle cover
�Open the tailgate (�page 124).
�Push in handle cover2 as indicated
by arrow and pull handle.
�Lift cargo compartment floor1.
iCheck expiration dates and contents for
completeness at least once a year and replace
missing/expired items.
��
Page 502 of 595

501 Practical hints
Unlocking/locking in an emergency
Locking the vehicle
If you cannot lock the vehicle with the
SmartKey or KEYLESS-GO*, lock the vehi-
cle carrying out the following steps.
�Close the front passenger door, the
rear right door and the tailgate.
�Open the driver’s door and the rear left
door.
�Press the central locking switch on the
driver’s door (
�page 130).
The locking knobs of the front passen-
ger door and the rear doors move
down.
If the vehicle battery is disconnected or
drained:
�Press down the locking knobs of
the front passenger door and the
rear doors manually.
�Exit the vehicle.
�Close the driver’s door.
�Enter the vehicle through the rear left
door.
�Press down the locking knob of the
driver’s door.
�Exit the vehicle.
�Close the rear left door.
The vehicle is locked.
Fuel filler flap
�Open the tailgate (�page 124).
The fuel filler flap release is located behind
a cover in the right side trim panel of the
cargo compartment.
1Lock
2Cover
!To prevent inadvertent lockout, make sure
to have the SmartKey or SmartKey with
KEYLESS-GO* with you before proceeding with
the next step. The next step will lock the vehicle.
iThis procedure does not arm the anti-theft
alarm system, nor does it lock the fuel filler flap.
��
Page 506 of 595
505 Practical hints
Resetting activated head restraints
�Guide reset tool1 into rectangular
opening3 of active head restraint2.
�Press reset tool1 downward in
direction of arrow until you hear the
head restraint release mechanism
audibly disengage.
�Pull out reset tool1.
�Firmly press the active head restraint
cushion backward towards the head
restraint cover in direction of arrow
until it engages.
�Repeat this procedure on the active
head restraint for the second front
seat.
�After resetting the active head
restraints store reset tool1 in the
Mercedes-Benz vehicle literature
pouch.
For information on active head restraints,
see “Active head restraint” (
�page 92).
For information on head restraint adjust-
ment, see “Seats” (
�page 45).
Page 511 of 595

510 Practical hints
Replacing bulbs
Notes on bulb replacement
�Only use 12-volt bulbs of the same type
and with the specified watt rating.
�Switch lights off before changing a bulb
to prevent short circuits.
�Always use a clean lint-free cloth when
handling bulbs.
�Your hands should be dry and free of oil
and grease.
�If the newly installed bulb does not
come on, visit an authorized
Mercedes-Benz Light Truck Center.Have the LEDs and bulbs for the following
lamps replaced by an authorized
Mercedes-Benz Light Truck Center:
�the additional turn signal lamps in the
exterior rear view mirrors
�the high mounted brake lamp
�the Bi-Xenon* low beam lamps
�the Bi-Xenon high beam flasher spot-
light*
Warning!G
Bulbs and bulb sockets can be very hot.
Allow the lamp to cool down before chang-
ing a bulb.
Keep bulbs out of reach of children.
Halogen lamps contain pressurized gas.
A bulb can explode if you:
�touch or move it when hot
�drop the bulb
�scratch the bulb
Wear eye and hand protection.
Because of high voltage in Xenon lamps, it is
dangerous to replace the bulb or repair the
lamp and its components. We recommend
that you have such work done by a qualified
technician.
!Do not replace the LEDs yourself. You could
otherwise damage the LEDs or parts of the vehi-
cle. Only have the LEDs replaced by a an autho-
rized Mercedes-Benz Light Truck Center.
iReplacing the bulbs for the front lamps is a
technically complex process. For your conve-
nience, we recommend that you have this work
carried out by an authorized Mercedes-Benz
Light Truck Center.
Have the headlamp adjustment checked
regularly.
Page 517 of 595
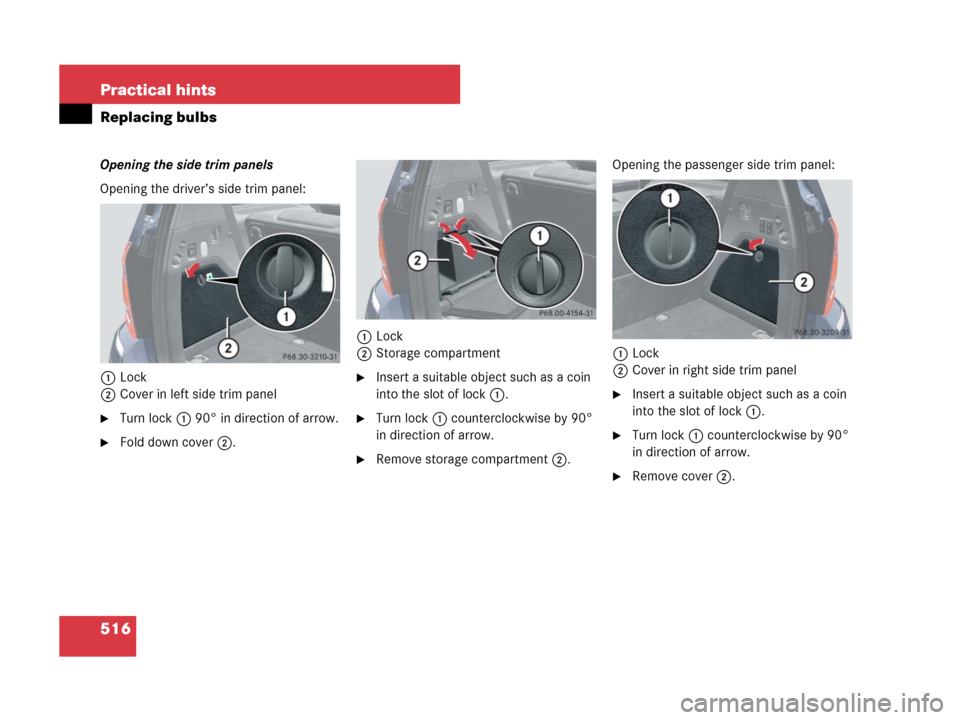
516 Practical hints
Replacing bulbs
Opening the side trim panels
Opening the driver’s side trim panel:
1Lock
2Cover in left side trim panel
�Turn lock1 90° in direction of arrow.
�Fold down cover2.1Lock
2Storage compartment
�Insert a suitable object such as a coin
into the slot of lock1.
�Turn lock1 counterclockwise by 90°
in direction of arrow.
�Remove storage compartment2.Opening the passenger side trim panel:
1Lock
2Cover in right side trim panel
�Insert a suitable object such as a coin
into the slot of lock1.
�Turn lock1 counterclockwise by 90°
in direction of arrow.
�Remove cover2.