Page 31 of 187
30 At a glance
Quick reference COMAND
Setting the volume
�Turn the rotary control* located on
the COMAND control unit,
or
�Pressæ or ç on the multifunc-
tion steering wheel
The volume changes up or down, de-
pending on the direction of rotation or
which button was pressed.
The system stores the volume settings
when the device is switched OFF.
After switching the system back on again,
the volume may be lower than at the time
when the system was switched OFF.
This could be the case if:
�the system was switched OFF for more
than 15 minutes, and
�the volume had been set t o a value in a
certain range at the time the device
was switched OFF.
Automatic volume control
The automatic volume control adjusts the
volume depending on
�the vehicle’s speed (only in vehicles
without Sound-system*),
or on
the interior ambient noises of the vehi-
cle (only in vehicles with Sound-sys-
tem*)
�other parameters (e.g. windows open
or closed)A common balance and fader setting ap-
plies to the following operating modes:
�Radio
�Single CD
�MP3
�CD changer*
�AUX
�Satellite radio*
When adjusting the balance or the fader,
the system automatically stores the set-
ting for the currently active operating
mode.
Balance and fader
i
For Navigation* a different balance/
fader setting is possible. You find the
description under “Adjusting the
acoustics for navigation announce-
ments” (
�page 109).
Page 106 of 187
105 Navigation*
Important notes
COMAND calculates the route with the
help of data that is stored on the naviga-
tion DVD.
Only use Mercedes-Benz navigation DVDs
designed for the E-Class (211) COMAND
system. No other CDs or DVDs will work.
Using other navigation CDs or DVDs might
lead to malfunctions.
Because of changes in local traffic patterns
(e.g. road works) and/or incomplete data,
errors in calculation may occur.
As a result, the recommended route may
deviate from the ideal route. The data
stored on the DVD only reflects local con-
ditions at the time of DVD production. DVD
maps do not cover all areas nor all routes
within an area.The DVD is loaded into (and ejected from)
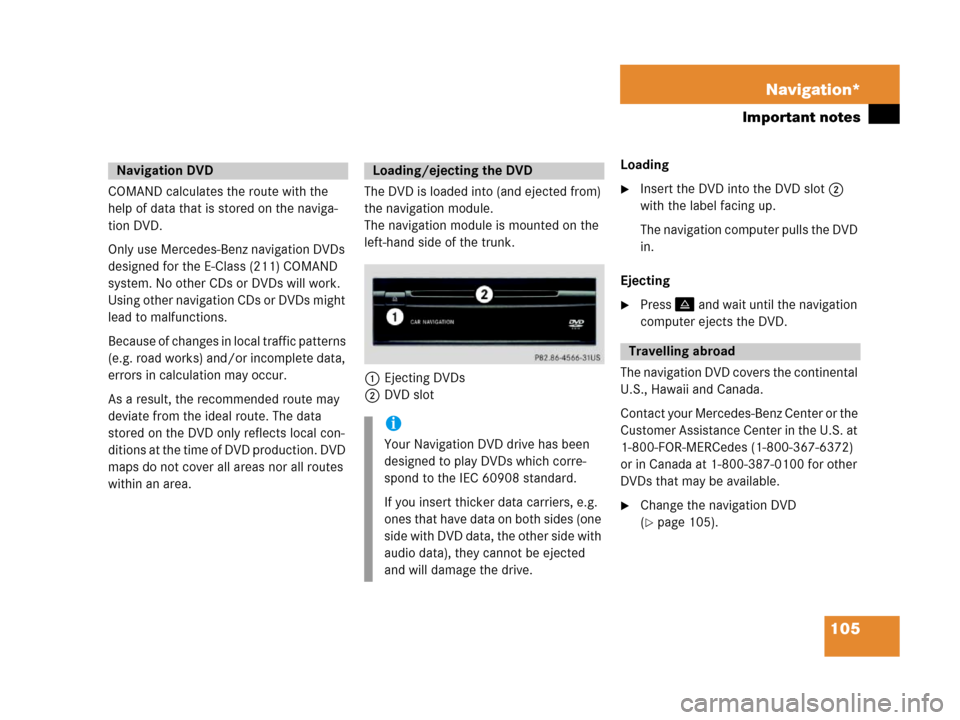
the navigation module.
The navigation module is mounted on the
left-hand side of the trunk.
1Ejecting DVDs
2DVD slotLoading �Insert the DVD into the DVD slot 2
with the label facing up.
Th e n a v i g a t i o n c o m p u t e r p u l l s t h e D V D
in.
Ejecting
�Press: and wait until the navigation
computer ejects the DVD.
The navigation DVD covers the continental
U.S., Hawaii and Canada.
Contact your Mercedes-Benz Center or the
Customer Assistance Center in the U.S. at
1-800-FOR-MERCedes (1-800-367-6372)
or in Canada at 1-800-387-0100 for other
DVDs that may be available.
�Change the navigation DVD
(
�page 105).
Navigation DVDLoading/ejecting the DVD
i
Your Navigation DVD drive has been
designed to play DVDs which corre-
spond to the IEC 60908 standard.
If you insert thicker data carriers, e.g.
ones that have data on both sides (one
side with DVD data, the other side with
audio data), they cannot be ejected
and will damage the drive.
Travelling abroad
Page 107 of 187
106 Navigation*
Important notes
T
If your vehicle has been transported by a
car, train or ferry, COMAND may require
some time to find its exact position.COMAND may issue navigation announce-
ments not suited to your actual position.
Moving the vehicle a few yards is typically
enough to remedy the situation.
While determining the exact position ,
route guidance is subject to the following
restrictions:
�COMAND does not output navigation
announcements.
�The display OFF ROAD and an arrow indi-
cating the direction of the destination
appear instead of the detailed naviga-
tion displays.
Once the system is correctly repositioned,
route guidance continues with navigation
announcements and detailed navigation
displays. The following instructions have to be fol-
lowed when interrupting a trip during route
guidance, and later continuation:
�Continuation of the trip within 2 hours
after interruption:
The system automatically resumes
route guidance.
�Continuation of the trip between
2 and 12 hours after interruption:
�Continue route guidance manually
in the Navigation main menu
(
�page 108).
Route guidance with GPS
i
GPS (Global Positioning System) sig-
nals received make it possible to deter-
mine the current vehicle position.
i
Deviations from the actual position
may occur
�if the reception of GPS signals is
disturbed e. g. in parking garages
and tunnels
�if road conditions are bad
�depending on the vehicle’s condi-
tion
Route guidance after vehicle trans-
port
i
The navigation DVD must be loaded in
the navigation computer (
�page 105).
Trip interruption during route guid-
ance
i
Trip interruption means parking the ve-
hicle and switching COMAND OFF.
Trip continuation means trip continua-
tion with COMAND switched ON.
Page 109 of 187
108 Navigation*
Navigation main menu
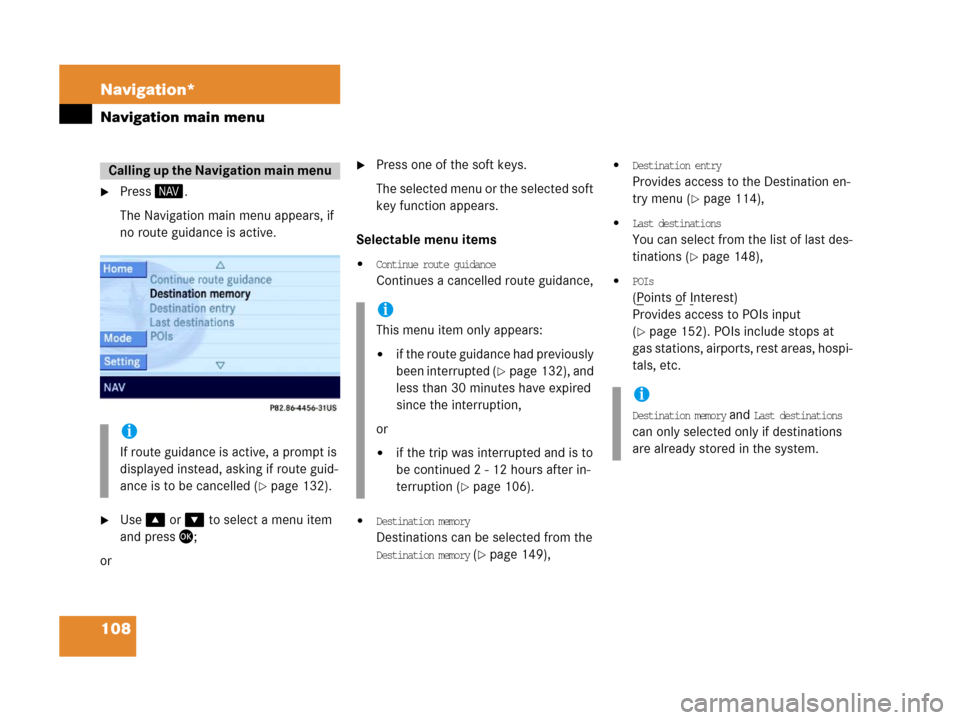
�Press 5.
The Navigation main menu appears, if
no route guidance is active.
�Use% or & to select a menu item
and press';
or
�Press one of the soft keys.
The selected menu or the selected soft
key function appears.
Selectable menu items
�Continue route guidance
Continues a cancelled route guidance,
�Destination memory
Destinations can be selected from the
Destination memory (�page 149),
�Destination entry
Provides access to the Destination en-
try menu (
�page 114),
�Last destinations
You can select from the list of last des-
tinations (
�page 148),
�POIs
(Points of Interest)
Provides access to POIs input
(
�page 152). POIs include stops at
gas stations, airports, rest areas, hospi-
tals, etc.
Calling up the Navigation main menu
i
If route guidance is active, a prompt is
displayed instead, asking if route guid-
ance is to be cancelled (
�page 132).
i
This menu item only appears:
�if the route guidance had previously
been interrupted (
�page 132), and
less than 30 minutes have expired
since the interruption,
or
�if the trip was interrupted and is to
be continued 2 - 12 hours after in-
terruption (
�page 106).
i
Destination memory and Last destinations
can only selected only if destinations
are already stored in the system.
Page 110 of 187
109 Navigation*
Navigation main menu
Selectable soft keys
�Home soft key
Provides access to the input of a home
address (
�page 113).
�Mode soft key
Provides access to the route mode set-
ting for certain road types to be avoid-
ed (
�page 109).
�Setting soft key
Provides access to settings adjusting
the acoustics of navigation announce-
ments (treble, bass, volume, balance
and fader)
(
�page 109).
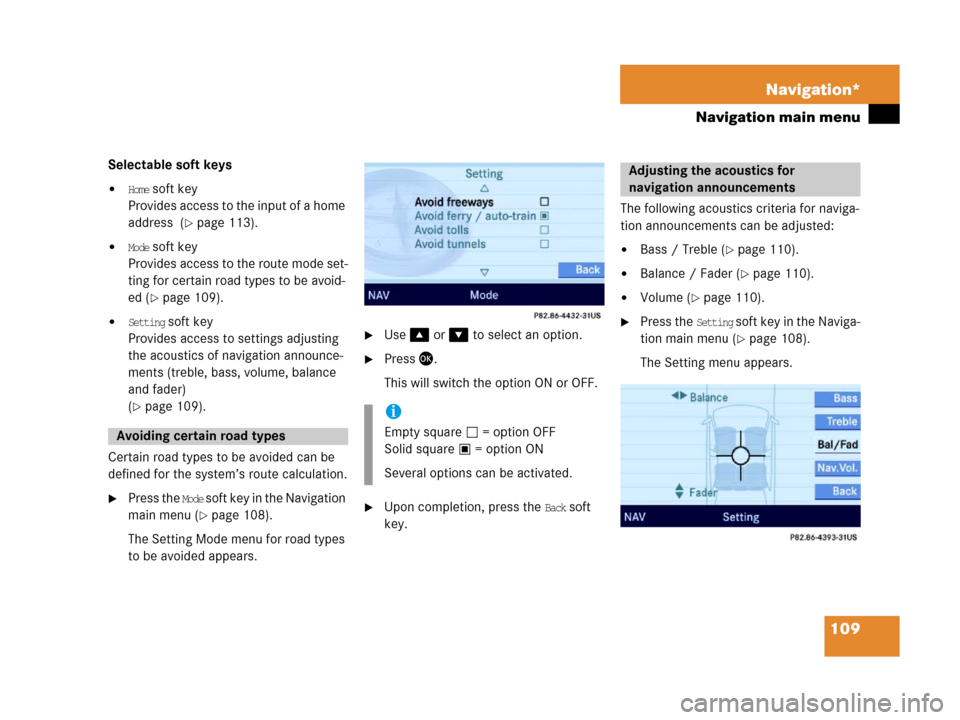
Certain road types to be avoided can be
defined for the system’s route calculation.
�Press the Mode s o f t k e y i n t h e N a v i g a t i o n
main menu (
�page 108).
The Setting Mode menu for road types
to be avoided appears.
�Use% or & to select an option.
�Press '.
This will switch the option ON or OFF.
�Upon completion, press the Back soft
key.The following acoustics criteria for naviga-
tion announcements can be adjusted:
�Bass / Treble (�page 110).
�Balance / Fader (�page 110).
�Volume (�page 110).
�Press the Setting soft key in the Naviga-
tion main menu (
�page 108).
The Setting menu appears.
Avoiding certain road types
i
Empty square = option OFF
Solid square = option ON
Several options can be activated.
Adjusting the acoustics for
navigation announcements
Page 113 of 187
112 Navigation*
Destination entry
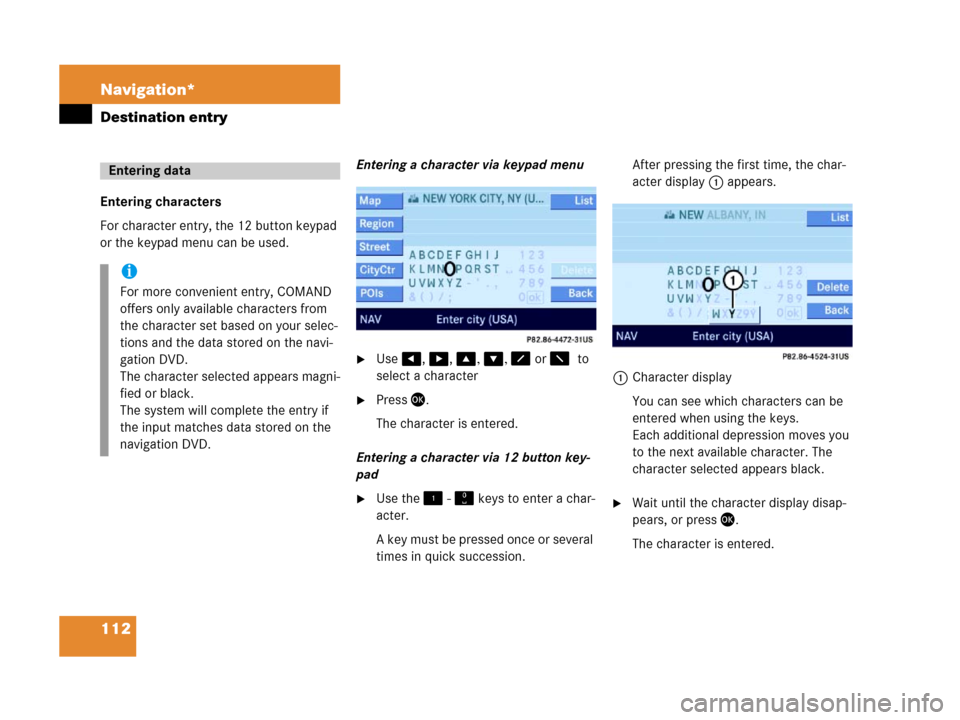
Entering characters
For character entry, the 12 button keypad
or the keypad menu can be used.Entering a character via keypad menu
�Use#, $, %, &, 8 or 70to
select a character
�Press'.
The character is entered.
Entering a character via 12 button key-
pad
�Use the! - " keys to enter a char-
acter.
A key must be pressed once or several
times in quick succession.After pressing the first time, the char-
acter display 1 appears.
1Character display
You can see which characters can be
entered when using the keys.
Each additional depression moves you
to the next available character. The
character selected appears black.�Wait until the character display disap-
pears, or press'.
The character is entered.
Entering data
i
For more convenient entry, COMAND
offers only available characters from
the character set based on your selec-
tions and the data stored on the navi-
gation DVD.
The character selected appears magni-
fied or black.
The system will complete the entry if
the input matches data stored on the
navigation DVD.
Page 114 of 187
113 Navigation*
Destination entry
Deleting a character
�Press the Delete soft key, if necessary.
The character last accepted by the sys-
tem is deleted.
Confirming the data entry
After entering all the characters data entry
must be confirmed.
�Press and hold ' for approx. 2 sec-
onds to confirm the entry;
or
�Use$ or & to select the sym-
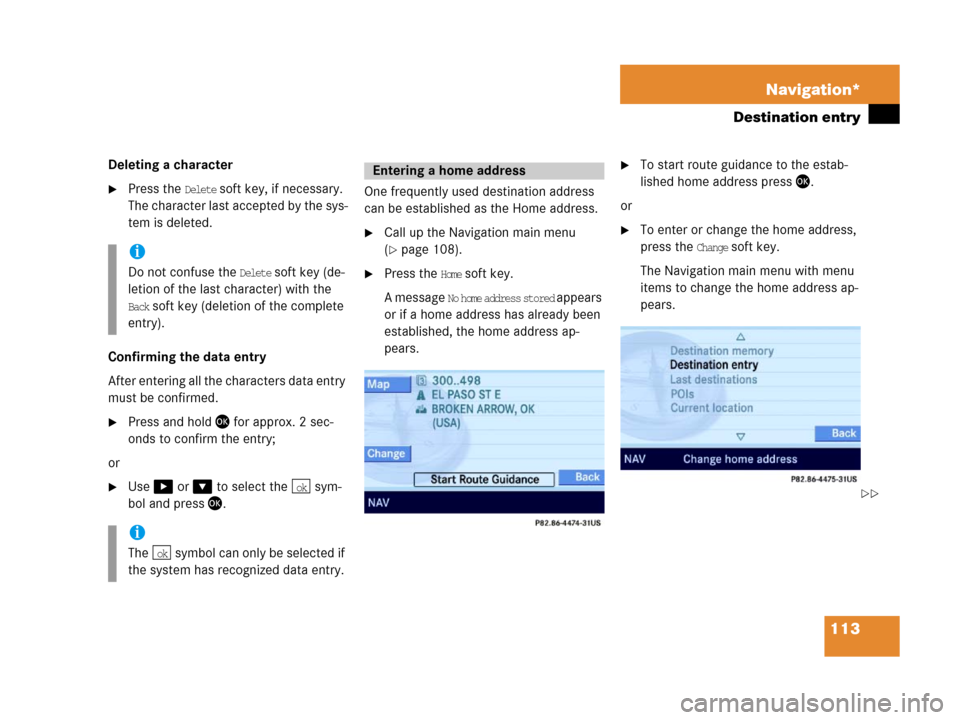
bol and press'.One frequently used destination address
can be established as the Home address.
�Call up the Navigation main menu
(
�page 108).
�Press the Home soft key.
A message
No home address stored a p p e a r s
or if a home address has already been
established, the home address ap-
pears.
�To start route guidance to the estab-
lished home address press'.
or
�To enter or change the home address,
press the
Change soft key.
The Navigation main menu with menu
items to change the home address ap-
pears.i
Do not confuse the Delete soft key (de-
letion of the last character) with the
Back soft key (deletion of the complete
entry).
i
The symbol can only be selected if
the system has recognized data entry.
ok
ok
Entering a home address
��
Page 120 of 187
119 Navigation*
Destination entry
�Press '.
The Start Route Guidance menu
(
�page 128) appears.
The system accesses one of the following
menus after entering of a destination city
(
�page 116):
�For larger cities with more than 15
streets:
Enter Street menu.
�For smaller cities with up to 15 streets:
Select Street menu (
�page 119).
�If no streets are registered for the se-
lected city, or if a street extends
through several city centers:
Select City Center menu (
�page 118).
The appropriate menu can be identified
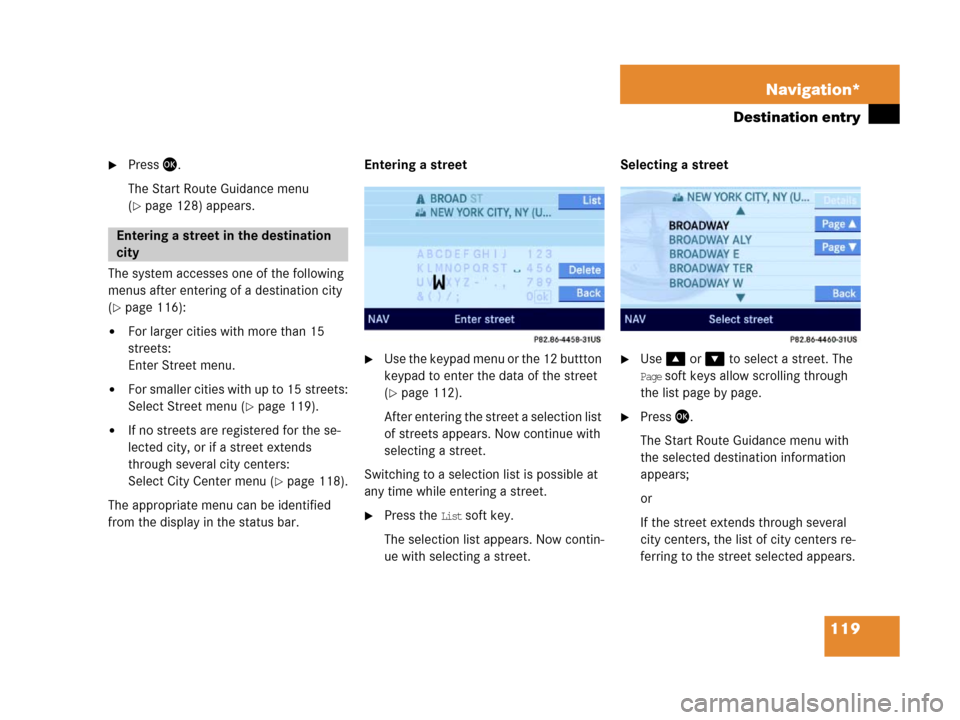
from the display in the status bar.Entering a street
�Use the keypad menu or the 12 buttton
keypad to enter the data of the street
(
�page 112).
After entering the street a selection list
of streets appears. Now continue with
selecting a street.
Switching to a selection list is possible at
any time while entering a street.
�Press the List soft key.
The selection list appears. Now contin-
ue with selecting a street.Selecting a street
�Use % or & to select a street. The
Page soft keys allow scrolling through
the list page by page.
�Press '.
The Start Route Guidance menu with
the selected destination information
appears;
or
If the street extends through several
city centers, the list of city centers re-
ferring to the street selected appears.
Entering a street in the destination
city