Page 229 of 723
:
Slideomp.
�Setting value: Rotate ymz or
slideqmr.
�Saving setting: Press n.Setting the time zone and switching be-
tween Dayl")
228 Control systems
COMAND system settings
�Selecting hour or minute(s):
Slideomp.
�Setting value: Rotate ymz or
slideqmr.
�Saving setting: Press n.Setting the time zone and switching be-
tween Daylight Saving Time and stan-
dard time
�Setting time zone: Select “Vehicle” �
“System Settings” � “Time” � “Time
Zone”.
The country list appears. The dot R in
front of a list entry indicates the cur-
rent setting.
�Select the country in which you are cur-
rently driving.
A time zone list may also be displayed,
depending on the country selected.
�Select desired time zone.Subsequent operation depends on:
�whether your navigation system has
GPS reception
�which country you have previously set
You may either:
�manually switch between “Daylight
Savings Time (Summer)” and “Standard
time (Winter)” in a list
or
�switch automatic Daylight Saving Time
to standard time changeover (and vice
versa) on or off
�Switching manually: Select “Daylight
Savings Time (Summer)” or “Standard
time (Winter)”.
The dot R in front of a list entry indi-
cates the current setting.
iThe increment value for setting the minutes
depends on the situation. If GPS reception is
available, it is 30 minutes. If GPS reception is not
available, it is one minute.
iThe correct time zone and Daylight Saving
Time/standard time must be set for the follow-
ing navigation system functions to operate cor-
rectly:
�Route guidance on routes with time-depen-
dent traffic guidance
�Calculation of estimated arrival time
��
Page 231 of 723

230 Control systems
COMAND system settings
Starting new individualization
�Select “Vehicle” � “System Settings”
� “Voice Control” � “Start new indi-
vidualization”.
A prompt appears asking whether you
would like further information.
�Select “Yes” or “No”.
If you select “No”, the first part of indi-
vidualization begins.
If you select “Yes”, an information dis-
play will be shown with audio instruc-
tion.
�Closing display: Select “OK”.
The first part of individualization be-
gins.
At the end of the first part, you will see
a prompt asking whether you want to
begin the second part.
�Select “Yes” or “No”.
If you select “No”, individualization will
be canceled. The data from the first
part is saved automatically.
If you select “Yes”, the second part be-
gins.
Individualization is completed at the end of
the second part. You will see a message to
this effect. The data from the second part
is saved automatically.
Canceling during the first or second part
of individualization
�Select “Cancel”.
A prompt appears asking whether you
really do want to cancel.
�Select “Yes” or “No”.
If you select “Yes”, individualization will
be canceled. The data from the part at
which you exited is not saved.
If you select “No”, the part at which you
stopped begins again.Deleting existing individualization data
�Select “Vehicle” � “System Settings”
� “Voice Control” � “Delete individu-
alization”.
A prompt appears asking whether you
really do want to delete.
�Select “Yes” or “No”.
The individualization data will either be
deleted or not, depending on your se-
lection.
iIt is only possible to start individualization
with the vehicle stationary. After starting the
session, the system will guide you through the in-
dividualization by means of acoustic instruc-
tions.
Page 232 of 723

231 Control systems
COMAND system settings
Setting the system language
�Select “Vehicle” � “System Settings”
� “Language”.
The language list appears. A dot R in-
dicates the current setting.
�Changing setting: Select desired lan-
guage.
The language is set.
Assigning the favorite button
1Favorite button
You can assign the following predefined
functions to the favorite buttonP:
�“Rear Window Sunshade” (�page 242)
You can use the favorite button to ex-
tend or retract the rear window sun-
shade. This is the default setting.
�“Display OFF” (�page 227)
You can use the favorite button to
switch the COMAND display on or off.
�“Tow-away Alarm” (�page 78)You can use the favorite button to acti-
vate or deactivate the tow-away alarm
(Depending on production date, your
vehicle may not be equipped with the
tow-away alarm).
�“Repeat Navigation Command”
(
�page 202)
You can use the favorite button to re-
call the last announcement issued by
the navigation system.
�Select “Vehicle” � “System Settings”
� “Favorite”.
The list of predefined functions appears.
The dot R in front of the list entry indi-
cates the current setting.
�Changing setting: Rotate ymz and
select desired function.
�Saving setting and exit the menu:
Press n.
Page 233 of 723

232 Control systems
COMAND system settings
Bluetooth® settings
General information about Bluetooth
®
Bluetooth® technology is the standard for
short-range wireless technologies, suitable
for transmitting voice and data. It is possi-
ble to connect Bluetooth
® devices wire-
lessly. Bluetooth® can be used to
exchange vCards or make calls using a
headset.
Bluetooth
® technology uses the freely
available ISM (Industrial Scientific Medi-
cal) wireless network that works at
2.45 GHz. Ranges of up to ten meters are
possible with Bluetooth
®.
Activate or deactivate Bluetooth
®
�Select “Vehicle” � “System Settings”
� “Services” � “Deactivate Blue-
tooth”.
You have activated or deactivated
Bluetooth
®. A checkmark appears
when Bluetooth® is deactivated.Connecting Bluetooth
® devices
It is possible to establish a Bluetooth
® con-
nection between COMAND and the follow-
ing types of device:
�Mobile phone (only for transferring
business cards)
�Headset
�Laptop/PDA
You can connect up to twelve devices to
COMAND but only one device can be ac-
tive at a time.
The connection process includes search-
ing for the device and its subsequent au-
thorization.Calling up the Bluetooth
® device list
and searching for devices
�Calling up the list: Select “Vehicle” �
“System Settings” � “Services” �
“Search for Bluetooth devices”.
When you call up the list for the first
time after switching on COMAND, the
search for devices in the reception
range starts automatically. You will see
a display to this effect.
The device list appears after a short
while.
�Canceling search:
Select “Cancel”.
The second time you call up the list, and
each time thereafter, the device list ap-
pears immediately if COMAND has not
been switched off and on again in the
meantime.
�Starting search manually:
select “Update”.
iTo connect a Bluetooth® device, the
Bluetooth® function must be activated in
COMAND and in the device concerned. The
Bluetooth
® device must also be set to “visible”
or “findable” in order for COMAND to find and
display it. For the setting procedures, please see
the operating instructions for the Bluetooth
®
device.
Page 234 of 723

233 Control systems
COMAND system settings
The device list can contain the following
devices:
�All detected devices, whether autho-
rized or not.
�All authorized devices, whether detect-
ed or not.
1Authorized and detected device – de-
vice and padlock symbol are the same
color
2Device which was not detected, but
which has been authorized in the past
– device and padlock symbol are differ-
ent colors (the device may be switched
off or not in the vehicle, for example)
3Newly detected device - not yet autho-
rized (no symbol)Displaying details of a Bluetooth
® de-
vice
�Call up Bluetooth® device list
(
�page 232).
�Select desired device.
�Select “Details”.
The detailed display for this device ap-
pears.
�Closing detailed display: Slide qmr
or press n.Authorizing a Bluetooth
® device
�Call up Bluetooth® device list
(
�page 232).
�Select unauthorized device.
�Select “Authorize”.
The input menu for the passkey ap-
pears.
iIf the device list already contains twelve au-
thorized devices, you must revoke authorization
for one of the authorized devices. Then you must
switch this device off and then restart the
search. Any new devices for which you would like
to search will otherwise not appear in the list.
iThe passkey is any one to sixteen-digit num-
ber which you can set yourself. You must enter
t he s ame n umb er in C OM AND an d als o in th e de-
vice to be authorized.
iOn devices which do not have an input key-
pad (e.g. headsets), the passkey is predeter-
mined. In this case, it is not necessary to enter
the number on the device itself. You will usually
find the passkey in the operating instructions for
the device.
��
Page 252 of 723
251 Control systems
COMAND seats
Exiting menu
There are several ways to exit the seat
menu.
�Press O again.
or
�Press any shortcut button.
or
�Select another main function from the
main menu line.
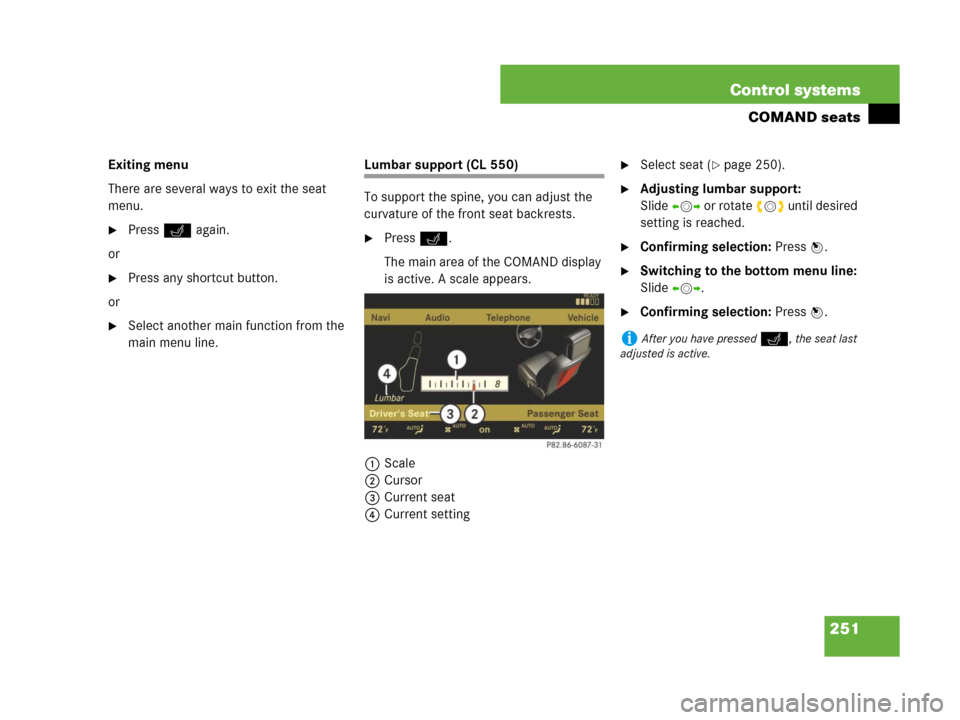
Lumbar support (CL 550)
To support the spine, you can adjust the
curvature of the front seat backrests.
�Press O.
The main area of the COMAND display
is active. A scale appears.
1Scale
2Cursor
3Current seat
4Current setting
�Select seat (�page 250).
�Adjusting lumbar support:
Slideomp or rotate ymz until desired
setting is reached.
�Confirming selection: Press n.
�Switching to the bottom menu line:
Slide omp.
�Confirming selection: Press n.
iAfter you have pressedO, the seat last
adjusted is active.
Page 253 of 723

252 Control systems
COMAND seats
Drive-dynamic multicontour seats*
Drive-dynamic multicontour seats allow
several individual support adjustments and
can automatically adjust lateral support to
your driving style (
�page 255).Multicontour adjustments
To support the spine, you can individually
adjust the backrest contour of the front
seats by regulating the air pressure in the
air chambers.
The settings are made on the COMAND
display.
You can adjust the following air chambers:�sides of seat cushion
�sides of backrest
�backrest curvature in lumbar area
�backrest curvature in shoulder areaAdjusting sides of seat cushion
This function is used to adjust the air
chambers in the sides of the seat cushion.
�Select seat (�page 250).
�Selecting “Seat sides”: Slide omp or
rotate ymz.
�Confirming selection: Press n.
A scale appears.
iIf PRE-SAFE® has been activated, the air
pressure in the air chambers (on the sides of the
seat cushion and backrest) of the drive-dynamic
multicontour seats is increased.
iWhether adjustments are being made manu-
ally or automatically, noises may be heard from
air pumping into or releasing from the air
chambers.
Page 257 of 723

256 Control systems
Instrument cluster control system
The control system is activated as soon as
the SmartKey in the starter switch is
turned to position2 or as soon as the
KEYLESS-GO* start/stop button
(
�page 337) is in position2. The control
system enables you to:
�call up information about your vehicle
�change vehicle settings
For example, you can use the control sys-
tem to find out when your vehicle is next
due for service, to call up statistical data
on your vehicle, and much more.
The control system relays information to
the multifunction display.
Multifunction display
1Line for main menus
2Text field in multifunction display
Settings, functions, submenus as well as
any malfunctions are shown to you in the
text field.
Warning!G
A driver’s attention to the road and traffic
conditions must always be his/her primary
focus when driving.
For your safety and the safety of others, se-
lecting features through the multifunction
steering wheel should only be done by the
driver when traffic and road conditions per-
mit it to be done safely.
Bear in mind that at a speed of just 30 mph
(approximately 50 km/h), your vehicle is
covering a distance of 44 feet (approximate-
ly 14 m) every second.