Page 121 of 344
Features of your vehicle112
3The trip computer is a microcomputer-
controlled driver information system that
displays information related to driving,
including compass, distance to empty,
driving time, average fuel consumption
and outside temperature on the display
when the ignition switch is in ON posi-
tion. All stored driving information is reset
if the battery is disconnected.
Mode selectionThe compass is always displayed until
the display is turned off.
Push the MODE button to select distance
to empty, driving time, average fuel con-
sumption and outside temperature func-
tions.
CompassThe vehicle compass displays the direc-
tion the vehicle is heading.
Heading display
- E : East
- W : West
- S : South
- N : North
ex) NE : North East✽ ✽
NOTICEIf new vehicle is first driven, perform
calibration procedure as follows.
TRIP COMPUTER (IF EQUIPPED)
1VQA2315
Driving time (ET)
Average fuel consumption
(AVG)
Outside temperature
OFF
Distance to empty (RANGE)
1VQA2211
Page 122 of 344

3 113
Features of your vehicle
Calibration procedureThe compass may not indicate the cor-
rect compass direction when you are dri-
ving in certain areas (tunnel, parking
garage, underground parking lot, near
transformer substation, etc.), and the fol-
lowing may occur:
The compass headings become inac-curate.
The compass heading doesn't change when the vehicle changes direction.
Some compass headings are not dis- played.
The compass headings are inaccurate in long distance driving.
If the vehicle's compass headings
become inaccurate continuously, the
compass should be manually calibrated
as follows: 1. Move the vehicle away from any large
steel structures or power generating
cables or equipment.
2. Check the terrestrial deviation angle value by pressing and holding the
MODE button for 4.5 seconds until the
current terrestrial deviation angle
value appears in the display.
3. If the terrestrial deviation angle value is different for your country, set the cor-
rect angle referring to “Setting the
compass zone” and perform the
“Calibration procedure” again.
4. Make sure the vehicle windshield wipers are turned off. 5. Press and hold the MODE button
again for 2~4.5 seconds until the “turn”
appears and “DIR” blinks in the display
and release the button.
6. Drive your vehicle in at least 1 com- plete (either clockwise or counter-
clockwise) circle at less than 5 km/h (3
mph) within 10 minutes until the com-
pass heading appears.
7. If the vehicle’s compass headings become inaccurate again, repeat
steps 1 through 6 above.
✽ ✽NOTICEIf you press the MODE button before
the calibration is completed or the vehi-
cle is not rotated within 10 minutes after
“turn” appears and “DIR” blinks, the
correction will be cancelled.
1VQA2316
Page 123 of 344

Features of your vehicle114
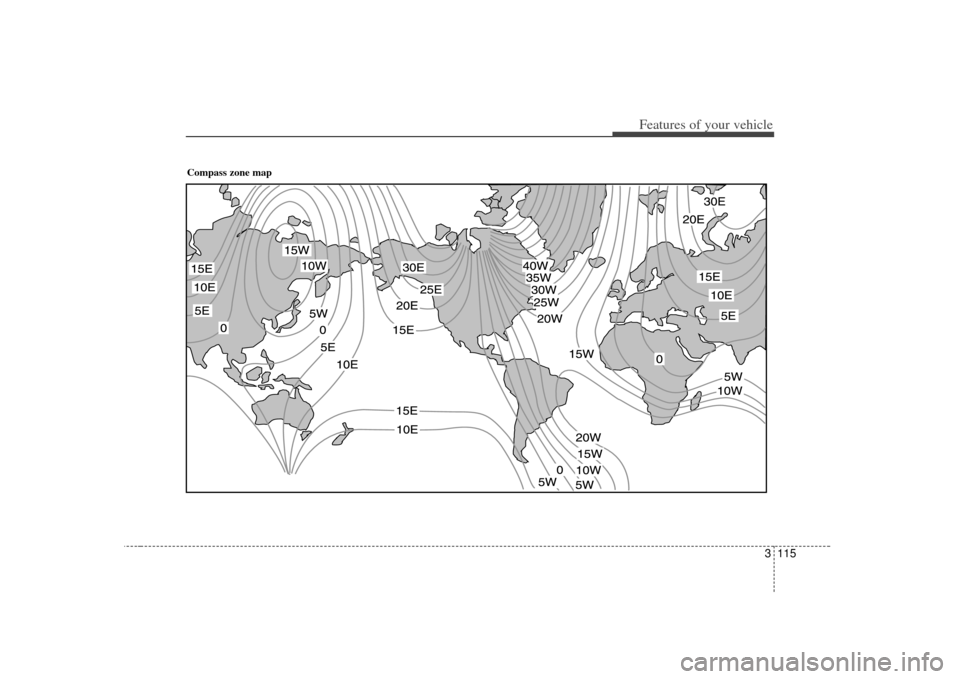
3Setting the compass zoneThis compass must be set to compen-
sate for the variation between true north
and magnetic north. To set variation:
1. Find your current location and terres-
trial deviation angle value on the zone
map.
2. Press and hold the MODE button for 4.5 seconds. The current terrestrial
deviation angle value will appear in the
display. 3. Release the MODE button and press
the RESET button repeatedly until the
correct terrestrial deviation angle value
for your location appears in the display.
4. Press and hold the MODE button for more than 1 second, and then the dis-
play will show a compass direction.
✽ ✽NOTICEIf you press the MODE button for less
than 1 second before new compass zone
is set, the correction is cancelled.
Also, if the correction is not completed
within 30 seconds, the current terrestri-
al deviation angle value will blink for 2
seconds and the correction is cancelled.
✽ ✽NOTICE1. Do not install a ski rack, antenna, etc.
that is attached to the vehicle using a
magnet as anything attached to the
roof of the vehicle with a magnet will
effect compass operation.
2. If the compass deviates from the cor- rect indication after repeated adjust-
ment, have the compass checked at an
authorized dealer.
3. The compass may not indicate the correct compass point in tunnels or
while driving up or down a steep hill.
(The compass returns to the correct
compass point when the vehicle moves
to an area where the geomagnetism is
stabilized.)
1VQA2317
Page 124 of 344
3 115
Features of your vehicle
Compass zone map
Page 125 of 344

Features of your vehicle116
3Distance to empty (“RANGE”
shown on display)This mode indicates the estimated dis-
tance to empty based on the current fuel
in the fuel tank and the amount of fuel
delivered to the engine. When the
remaining distance is below 50 km (30
miles), a blinking “----” symbol will be dis-
played.
The meter’s working range is from 50 to
1500 km (30 to 1500 miles).
✽ ✽
NOTICE• If the vehicle is not on level ground or
the battery power has been interrupt-
ed, the “Distance to empty” function
may not operate correctly.
The trip computer may not register
additional fuel if less than 6 liters (1.6
gallons) of fuel are added to the vehi-
cle.
• The fuel consumption and distance to empty values may vary significantly
based on driving conditions, driving
habits, and condition of the vehicle.
• The distance to empty value is an esti- mate of the available driving distance.
This value may differ from the actual
driving distance available.
Driving time (“ET” shown on dis-
play)This mode indicates the total time trav-
eled since the last driving time reset.
Even if the vehicle is not in motion, the
driving time keeps going while the engine
is running.
The meter’s working range is from
0:00~99:59.
Pressing the RESET button for less than
4 seconds, when the driving time is being
displayed, clears the driving time to zero.
1VQA2319
1VQA2318
Page 126 of 344

3 117
Features of your vehicle
Average fuel consumption (“AVG”
shown on display)This mode calculates the average fuel
consumption from the total fuel used and
the distance since the last average con-
sumption reset. The total fuel used is cal-
culated from the fuel consumption input.
For an accurate calculation, drive more
than 500 m (0.3 miles).
The meter's working range is from 0.0 to
99.9 l/100 km (0.0 to 99.9 miles per gal-
lon).
Pressing the RESET button for less than
4 seconds, when the average fuel con-
sumption is being displayed, clears the
average fuel consumption to “- -” until the
vehicle is moved to 500 m (0.3 miles).
Outside temperatureThis mode indicates the outside temper-
ature around the vehicle.
The meter’s working range is from
-40°C to 60°C (-40°F~140°F).
Unit conversionThe unit on each mode can be changed
by pushing the RESET button for more
than 4 seconds as follows:
Distance to empty: km ↔ MI
Average fuel consumption: l/100km ↔
MPG
Outside temperature: °C ↔ °F
The units on the mode of distance to
empty and average fuel consumption are
changed together. However, the outside
temperature mode display units are
changed separately.
1VQA2322
1VQA2320
OVQ036040N
Page 127 of 344

Features of your vehicle118
3Checking operation All warning lights are checked by turning
the ignition switch ON (do not start the
engine). Any light that does not illuminate
should be checked by an Authorized Kia
Dealer.
After starting the engine, check to make
sure that all warning lights are off. If any
are still on, this indicates a situation that
needs attention. When releasing the
parking brake, the brake system warning
light should go off. The fuel warning light
will stay on if the fuel level is low.
Air bag warning lightThis warning light will illuminate for
approximately 6 seconds each time you
turn the ignition switch to the ON posi-
tion.
If this indicator does not go out, or if it illu-
minates while the vehicle is being driven,
see an authorized Kia Dealer for immedi-
ate service.Anti-lock brake system
(ABS) warning light This light illuminates if the key is turned
to ON and goes off in approximately 3
seconds if the system is operating nor-
mally.
If the light stays on, you may have a
problem with your ABS system. Contact
an authorized Kia dealer as soon as pos-
sible.
Electronic brake force
distribution (EBD) sys-
tem warning lightIf two warning lights illumi-
nate at the same time while
driving, your vehicle has a
problem with ABS and EBD
system.
In this case, your ABS system and regu-
lar brake system may not work normally.
Have the vehicle checked by an
Authorized Kia Dealer as soon as possi-
ble.
WARNINGS AND INDICATORS
WARNING
If the both ABS and Brake warning
lights are ON and stay ON, your
vehicle’s brake system will not work
normally. So you may experience an
unexpected and dangerous situa-
tion during sudden braking. In this
case, avoid high speed driving and
abrupt braking. Have your vehicle
checked by Authorized Kia Dealer
as soon as possible.
AIR
BAG
Page 128 of 344

3 119
Features of your vehicle
Safety belt warning light If the driver's safety belt is not fastened
when the key is turned ON or if it is
unfastened after the key is turned ON,
the safety belt warning light blinks until
the belt fastened.Safety belt warning chime
(if equipped)If the driver's safety belt is not fastened
when the ignition key is turned ON or if it
is unfastened after the key is ON, the
safety belt warning chime will sound for
approximately 6 seconds. At this time, if
the safety belt is fastened, the chime will
stop at once.High beam indicator This indicator illuminates when the head-
lights are on and in the high beam posi-
tion or when the turn signal lever is pulled
into the Flash-to-Pass position.
Engine oil pressure
warning This warning light indicates the engine oil
pressure is low.
If the warning light illuminates while dri-
ving:
1. Drive safely to the side of the road andstop.
2. With the engine off, check the engine oil level. If the level is low, add oil as
required.
If the warning light remains on after
adding oil or if oil is not available, call an
Authorized Kia Dealer.
Parking brake & brake
fluid warning Parking brake warning This light is illuminated when the parking
brake is applied with the ignition switch in
the START or ON position. The warning
light should go off when the parking
brake is released while engine is run-
ning.Low brake fluid level warningIf the warning light remains on, it may
indicate that the brake fluid level in the
reservoir is low.
If the warning light remains on:
1. Drive carefully to the nearest safe location and stop your vehicle.
2. With the engine stopped, check the brake fluid level immediately and add
fluid as required. Then check all brake
components for fluid leaks.
3. Do not drive the vehicle if leaks are found, the warning light remains on or
the brakes do not operate properly.
Have it towed to any Authorized Kia
Dealer for a brake system inspection
and necessary repairs.
CAUTION
If the engine is not stopped imme-diately after the engine oil pressurewarning light is illuminated, severedamage could result.