2007 KIA CARNIVAL battery location
[x] Cancel search: battery locationPage 1259 of 1575
2007 > 2.7L V6 GASOLINE >
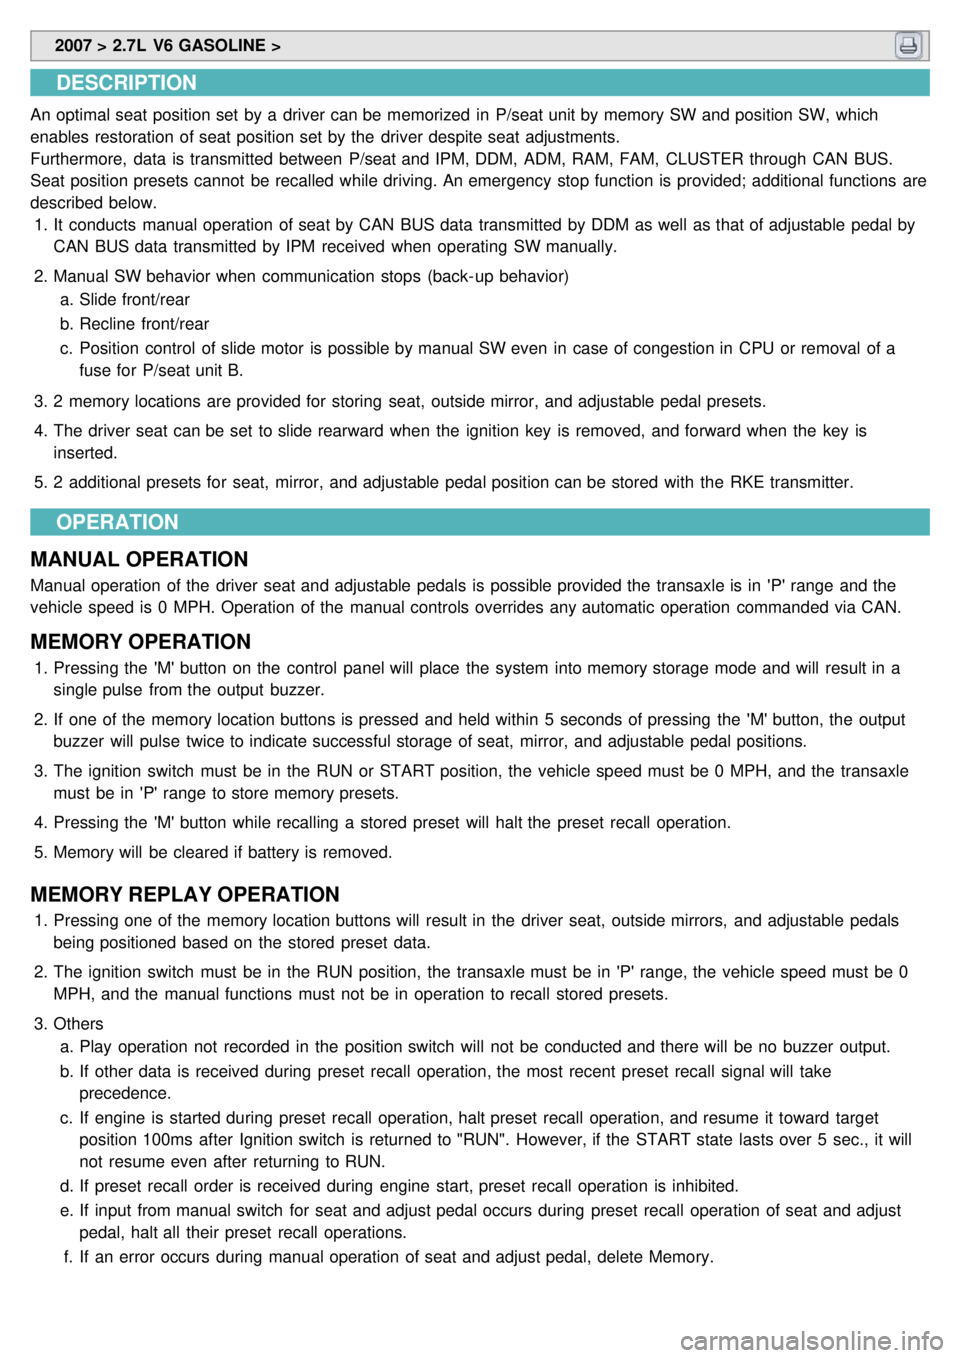
DESCRIPTION
An optimal seat position set by a driver can be memorized in P/seat unit by memory SW and position SW, which
enables restoration of seat position set by the driver despite seat adjustments.
Furthermore, data is transmitted between P/seat and IPM, DDM, ADM, RAM, FAM, CLUSTER through CAN BUS.
Seat position presets cannot be recalled while driving. An emergency stop function is provided; additional functions are
described below.
1. It conducts manual operation of seat by CAN BUS data transmitted by DDM as well as that of adjustable pedal by
CAN BUS data transmitted by IPM received when operating SW manually.
2. Manual SW behavior when communication stops (back- up behavior)
a. Slide front/rear
b. Recline front/rear
c. Position control of slide motor is possible by manual SW even in case of congestion in CPU or removal of a
fuse for P/seat unit B.
3. 2 memory locations are provided for storing seat, outside mirror, and adjustable pedal presets.
4. The driver seat can be set to slide rearward when the ignition key is removed, and forward when the key is
inserted.
5. 2 additional presets for seat, mirror, and adjustable pedal position can be stored with the RKE transmitter.
OPERATION
MANUAL OPERATION
Manual operation of the driver seat and adjustable pedals is possible provided the transaxle is in 'P' range and the
vehicle speed is 0 MPH. Operation of the manual controls overrides any automatic operation commanded via CAN.
MEMORY OPERATION
1. Pressing the 'M' button on the control panel will place the system into memory storage mode and will result in a
single pulse from the output buzzer.
2. If one of the memory location buttons is pressed and held within 5 seconds of pressing the 'M' button, the output
buzzer will pulse twice to indicate successful storage of seat, mirror, and adjustable pedal positions.
3. The ignition switch must be in the RUN or START position, the vehicle speed must be 0 MPH, and the transaxle
must be in 'P' range to store memory presets.
4. Pressing the 'M' button while recalling a stored preset will halt the preset recall operation.
5. Memory will be cleared if battery is removed.
MEMORY REPLAY OPERATION
1.Pressing one of the memory location buttons will result in the driver seat, outside mirrors, and adjustable pedals
being positioned based on the stored preset data.
2. The ignition switch must be in the RUN position, the transaxle must be in 'P' range, the vehicle speed must be 0
MPH, and the manual functions must not be in operation to recall stored presets.
3. Others
a. Play operation not recorded in the position switch will not be conducted and there will be no buzzer output.
b. If other data is received during preset recall operation, the most recent preset recall signal will take
precedence.
c. If engine is started during preset recall operation, halt preset recall operation, and resume it toward target
position 100ms after Ignition switch is returned to "RUN". However, if the START state lasts over 5 sec., it will
not resume even after returning to RUN.
d. If preset recall order is received during engine start, preset recall operation is inhibited.
e. If input from manual switch for seat and adjust pedal occurs during preset recall operation of seat and adjust
pedal, halt all their preset recall operations.
f. If an error occurs during manual operation of seat and adjust pedal, delete Memory.
Page 1332 of 1575
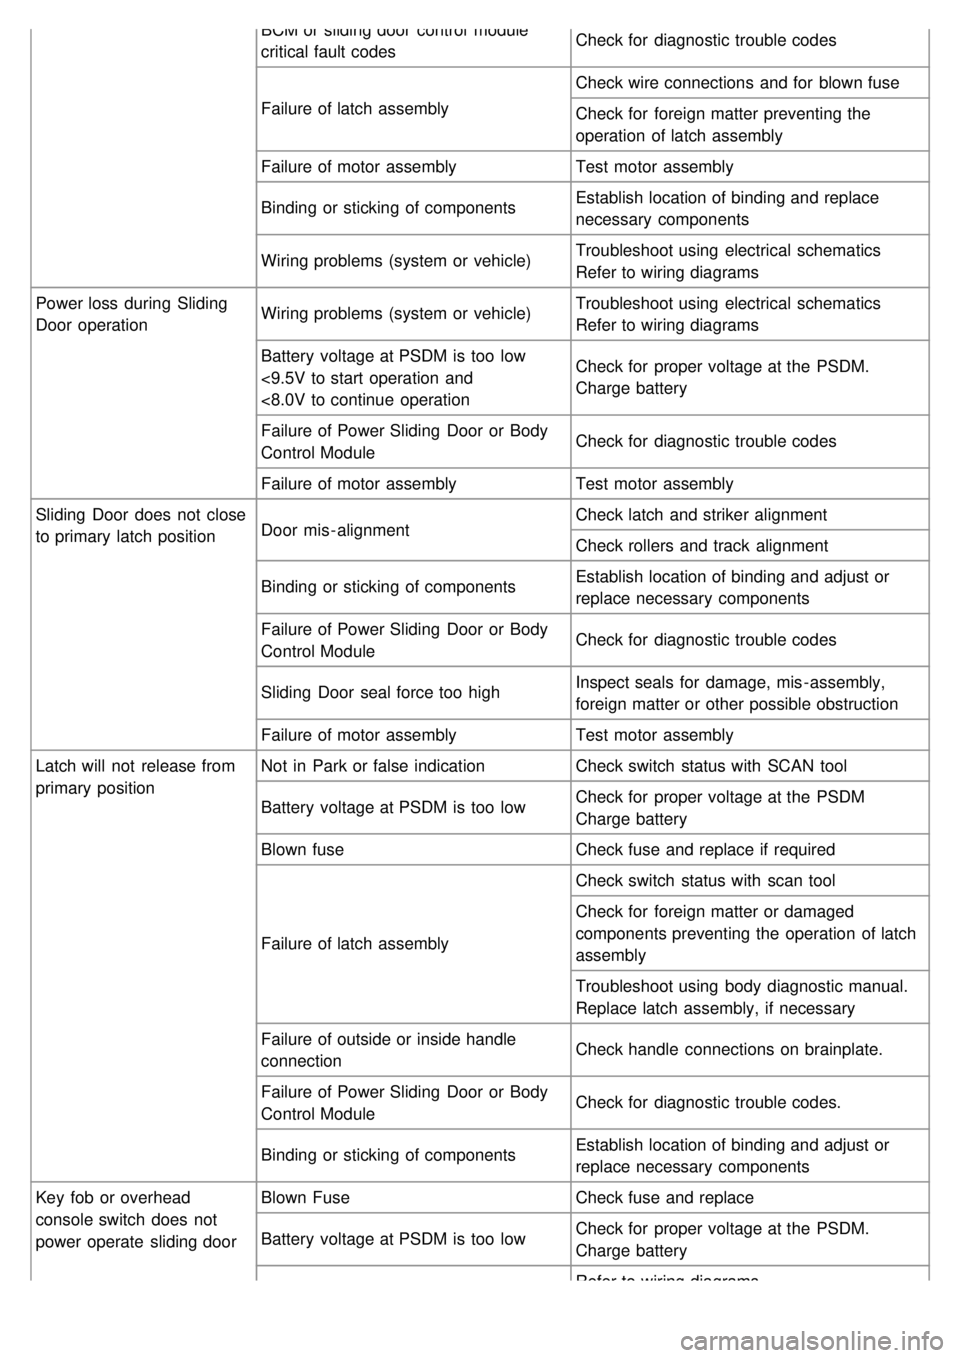
BCM or sliding door control module
critical fault codesCheck for diagnostic trouble codes
Failure of latch assembly Check wire connections and for blown fuse
Check for foreign matter preventing the
operation of latch assembly
Failure of motor assembly Test motor assembly
Binding or sticking of components Establish location of binding and replace
necessary components
Wiring problems (system or vehicle) Troubleshoot using electrical schematics
Refer to wiring diagrams
Power loss during Sliding
Door operation Wiring problems (system or vehicle)
Troubleshoot using electrical schematics
Refer to wiring diagrams
Battery voltage at PSDM is too low
<9.5V to start operation and
<8.0V to continue operation Check for proper voltage at the PSDM.
Charge battery
Failure of Power Sliding Door or Body
Control Module Check for diagnostic trouble codes
Failure of motor assembly Test motor assembly
Sliding Door does not close
to primary latch position Door mis - alignment Check latch and striker alignment
Check rollers and track alignment
Binding or sticking of components Establish location of binding and adjust or
replace necessary components
Failure of Power Sliding Door or Body
Control Module Check for diagnostic trouble codes
Sliding Door seal force too high Inspect seals for damage, mis - assembly,
foreign matter or other possible obstruction
Failure of motor assembly Test motor assembly
Latch will not release from
primary position Not in Park or false indication
Check switch status with SCAN tool
Battery voltage at PSDM is too low Check for proper voltage at the PSDM
Charge battery
Blown fuse Check fuse and replace if required
Failure of latch assembly Check switch status with scan tool
Check for foreign matter or damaged
components preventing the operation of latch
assembly
Troubleshoot using body diagnostic manual.
Replace latch assembly, if necessary
Failure of outside or inside handle
connection Check handle connections on brainplate.
Failure of Power Sliding Door or Body
Control Module Check for diagnostic trouble codes.
Binding or sticking of components Establish location of binding and adjust or
replace necessary components
Key fob or overhead
console switch does not
power operate sliding door Blown Fuse
Check fuse and replace
Battery voltage at PSDM is too low Check for proper voltage at the PSDM.
Charge battery
Refer to wiring diagrams
Page 1333 of 1575
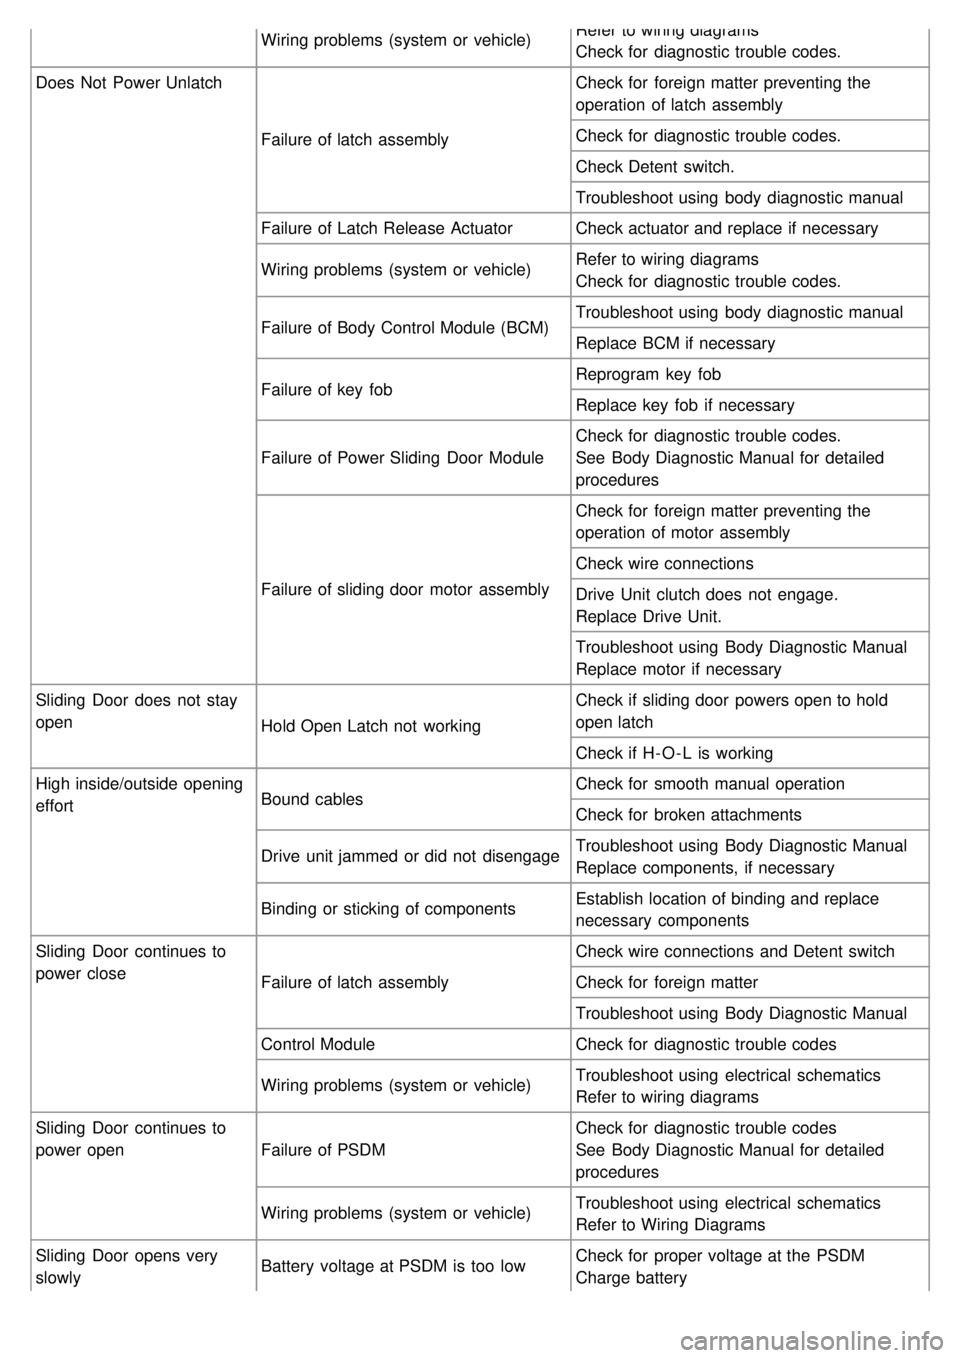
Wiring problems (system or vehicle)Refer to wiring diagrams
Check for diagnostic trouble codes.
Does Not Power Unlatch
Failure of latch assembly Check for foreign matter preventing the
operation of latch assembly
Check for diagnostic trouble codes.
Check Detent switch.
Troubleshoot using body diagnostic manual
Failure of Latch Release Actuator Check actuator and replace if necessary
Wiring problems (system or vehicle) Refer to wiring diagrams
Check for diagnostic trouble codes.
Failure of Body Control Module (BCM) Troubleshoot using body diagnostic manual
Replace BCM if necessary
Failure of key fob Reprogram key fob
Replace key fob if necessary
Failure of Power Sliding Door Module Check for diagnostic trouble codes.
See Body Diagnostic Manual for detailed
procedures
Failure of sliding door motor assembly Check for foreign matter preventing the
operation of motor assembly
Check wire connections
Drive Unit clutch does not engage.
Replace Drive Unit.
Troubleshoot using Body Diagnostic Manual
Replace motor if necessary
Sliding Door does not stay
open Hold Open Latch not working Check if sliding door powers open to hold
open latch
Check if H- O - L is working
High inside/outside opening
effort Bound cables Check for smooth manual operation
Check for broken attachments
Drive unit jammed or did not disengage Troubleshoot using Body Diagnostic Manual
Replace components, if necessary
Binding or sticking of components Establish location of binding and replace
necessary components
Sliding Door continues to
power close Failure of latch assembly Check wire connections and Detent switch
Check for foreign matter
Troubleshoot using Body Diagnostic Manual
Control Module Check for diagnostic trouble codes
Wiring problems (system or vehicle) Troubleshoot using electrical schematics
Refer to wiring diagrams
Sliding Door continues to
power open Failure of PSDM Check for diagnostic trouble codes
See Body Diagnostic Manual for detailed
procedures
Wiring problems (system or vehicle) Troubleshoot using electrical schematics
Refer to Wiring Diagrams
Sliding Door opens very
slowly Battery voltage at PSDM is too low
Check for proper voltage at the PSDM
Charge battery
Page 1334 of 1575
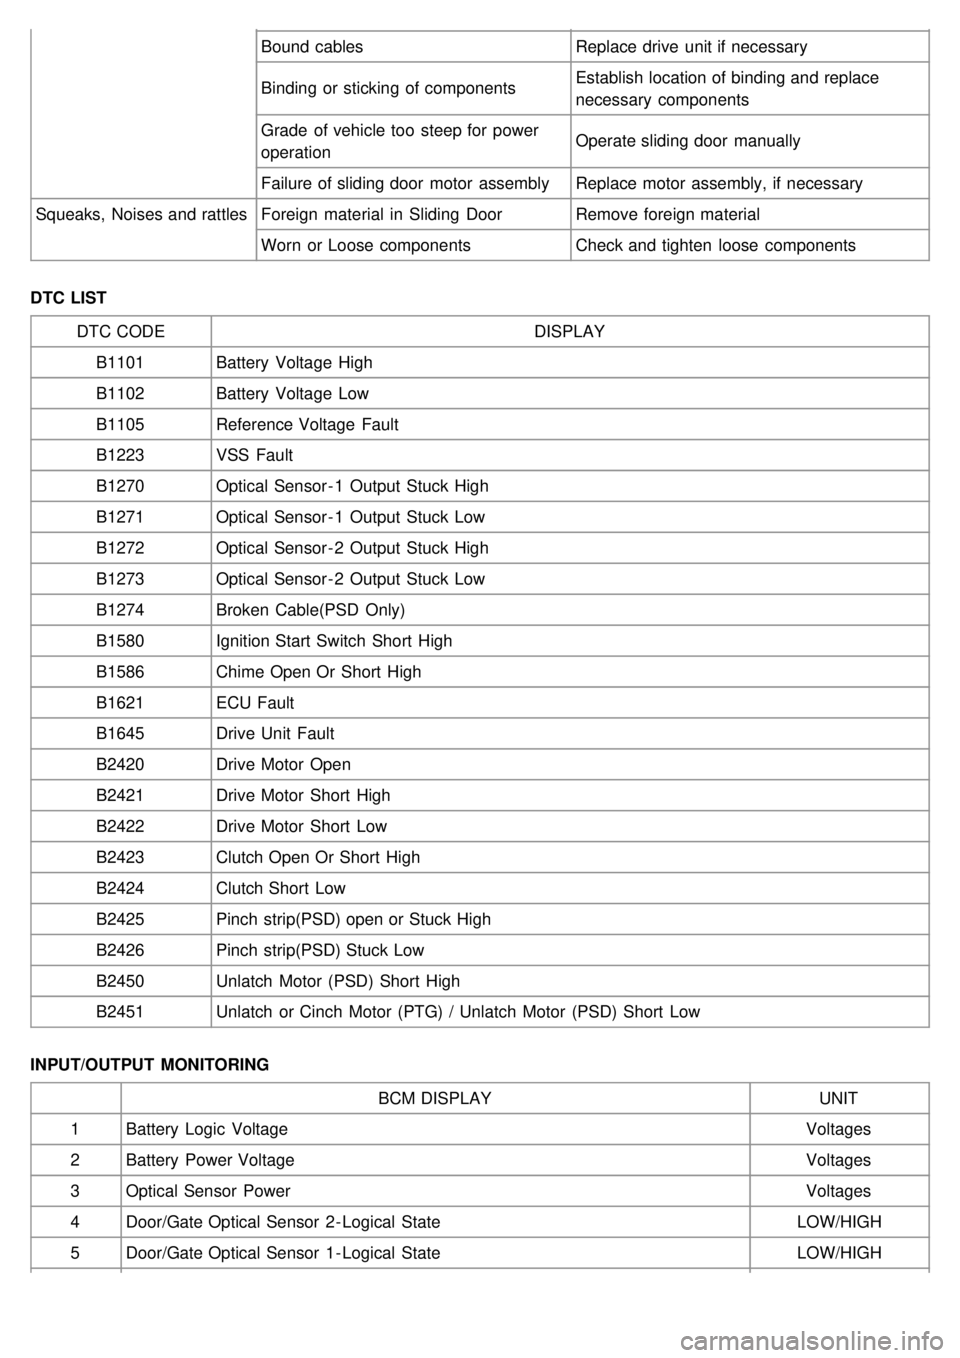
Bound cablesReplace drive unit if necessary
Binding or sticking of components Establish location of binding and replace
necessary components
Grade of vehicle too steep for power
operation Operate sliding door manually
Failure of sliding door motor assembly Replace motor assembly, if necessary
Squeaks, Noises and rattles Foreign material in Sliding Door Remove foreign material
Worn or Loose components Check and tighten loose components
DTC LIST DTC CODE DISPLAY
B1101 Battery Voltage High
B1102 Battery Voltage Low
B1105 Reference Voltage Fault
B1223 VSS Fault
B1270 Optical Sensor - 1 Output Stuck High
B1271 Optical Sensor - 1 Output Stuck Low
B1272 Optical Sensor - 2 Output Stuck High
B1273 Optical Sensor - 2 Output Stuck Low
B1274 Broken Cable(PSD Only)
B1580 Ignition Start Switch Short High
B1586 Chime Open Or Short High
B1621 ECU Fault
B1645 Drive Unit Fault
B2420 Drive Motor Open
B2421 Drive Motor Short High
B2422 Drive Motor Short Low
B2423 Clutch Open Or Short High
B2424 Clutch Short Low
B2425 Pinch strip(PSD) open or Stuck High
B2426 Pinch strip(PSD) Stuck Low
B2450 Unlatch Motor (PSD) Short High
B2451 Unlatch or Cinch Motor (PTG) / Unlatch Motor (PSD) Short Low
INPUT/OUTPUT MONITORING BCM DISPLAY UNIT
1 Battery Logic Voltage Voltages
2 Battery Power Voltage Voltages
3 Optical Sensor Power Voltages
4 Door/Gate Optical Sensor 2 - Logical State LOW/HIGH
5 Door/Gate Optical Sensor 1 - Logical State LOW/HIGH
Page 1372 of 1575
2007 > 2.7L V6 GASOLINE >
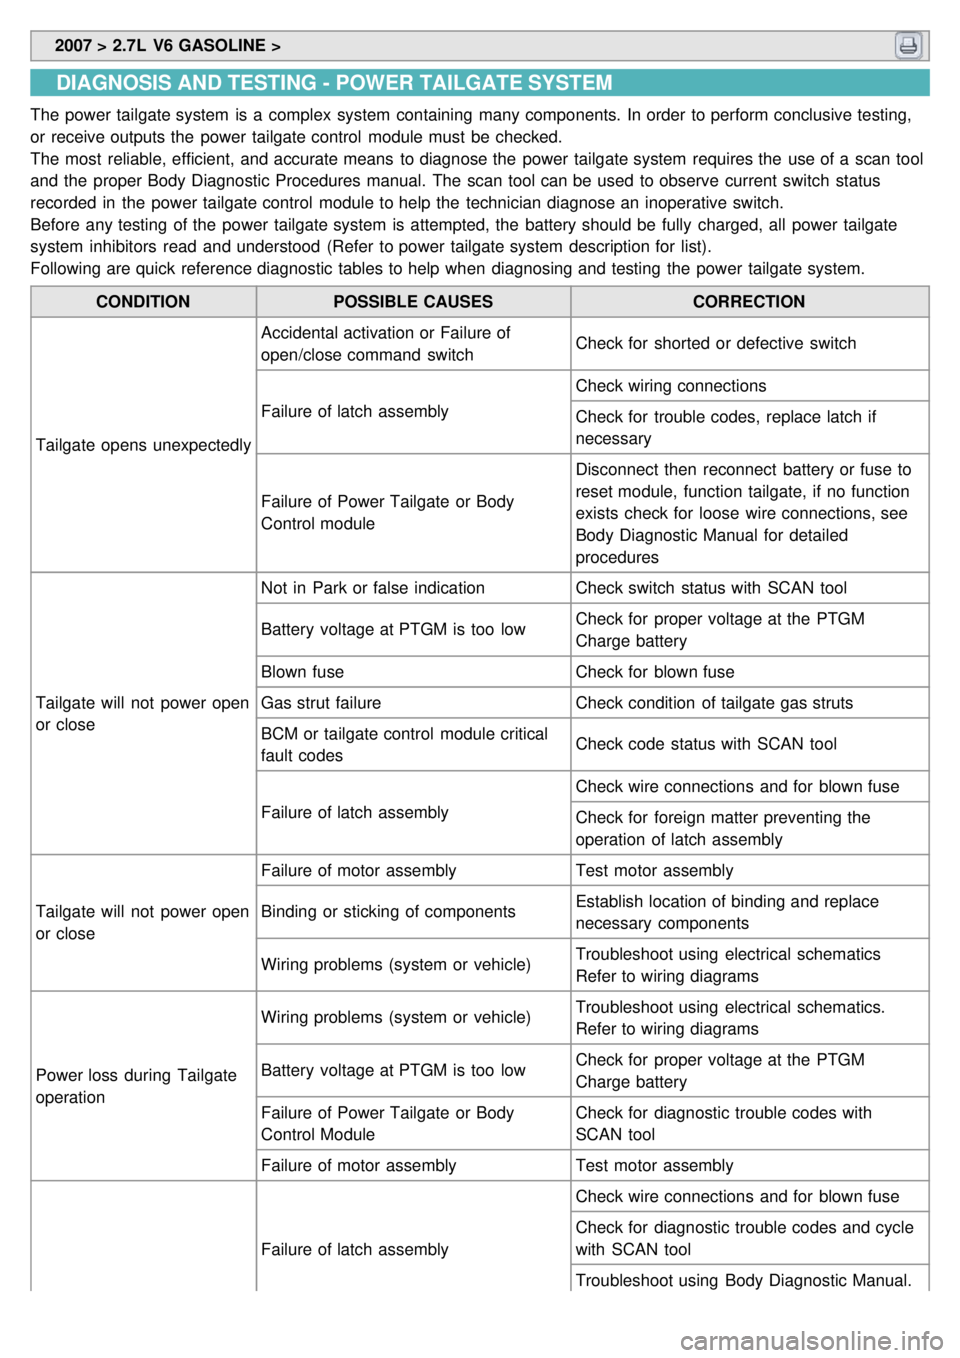
DIAGNOSIS AND TESTING - POWER TAILGATE SYSTEM
The power tailgate system is a complex system containing many components. In order to perform conclusive testing,
or receive outputs the power tailgate control module must be checked.
The most reliable, efficient, and accurate means to diagnose the power tailgate system requires the use of a scan tool
and the proper Body Diagnostic Procedures manual. The scan tool can be used to observe current switch status
recorded in the power tailgate control module to help the technician diagnose an inoperative switch.
Before any testing of the power tailgate system is attempted, the battery should be fully charged, all power tailgate
system inhibitors read and understood (Refer to power tailgate system description for list).
Following are quick reference diagnostic tables to help when diagnosing and testing the power tailgate system.
CONDITION POSSIBLE CAUSES CORRECTION
Tailgate opens unexpectedly Accidental activation or Failure of
open/close command switch
Check for shorted or defective switch
Failure of latch assembly Check wiring connections
Check for trouble codes, replace latch if
necessary
Failure of Power Tailgate or Body
Control module Disconnect then reconnect battery or fuse to
reset module, function tailgate, if no function
exists check for loose wire connections, see
Body Diagnostic Manual for detailed
procedures
Tailgate will not power open
or close Not in Park or false indication
Check switch status with SCAN tool
Battery voltage at PTGM is too low Check for proper voltage at the PTGM
Charge battery
Blown fuse Check for blown fuse
Gas strut failure Check condition of tailgate gas struts
BCM or tailgate control module critical
fault codes Check code status with SCAN tool
Failure of latch assembly Check wire connections and for blown fuse
Check for foreign matter preventing the
operation of latch assembly
Tailgate will not power open
or close Failure of motor assembly
Test motor assembly
Binding or sticking of components Establish location of binding and replace
necessary components
Wiring problems (system or vehicle) Troubleshoot using electrical schematics
Refer to wiring diagrams
Power loss during Tailgate
operation Wiring problems (system or vehicle)
Troubleshoot using electrical schematics.
Refer to wiring diagrams
Battery voltage at PTGM is too low Check for proper voltage at the PTGM
Charge battery
Failure of Power Tailgate or Body
Control Module Check for diagnostic trouble codes with
SCAN tool
Failure of motor assembly Test motor assembly
Failure of latch assembly Check wire connections and for blown fuse
Check for diagnostic trouble codes and cycle
with SCAN tool
Troubleshoot using Body Diagnostic Manual.
Replace latch assembly, if necessary
Page 1373 of 1575
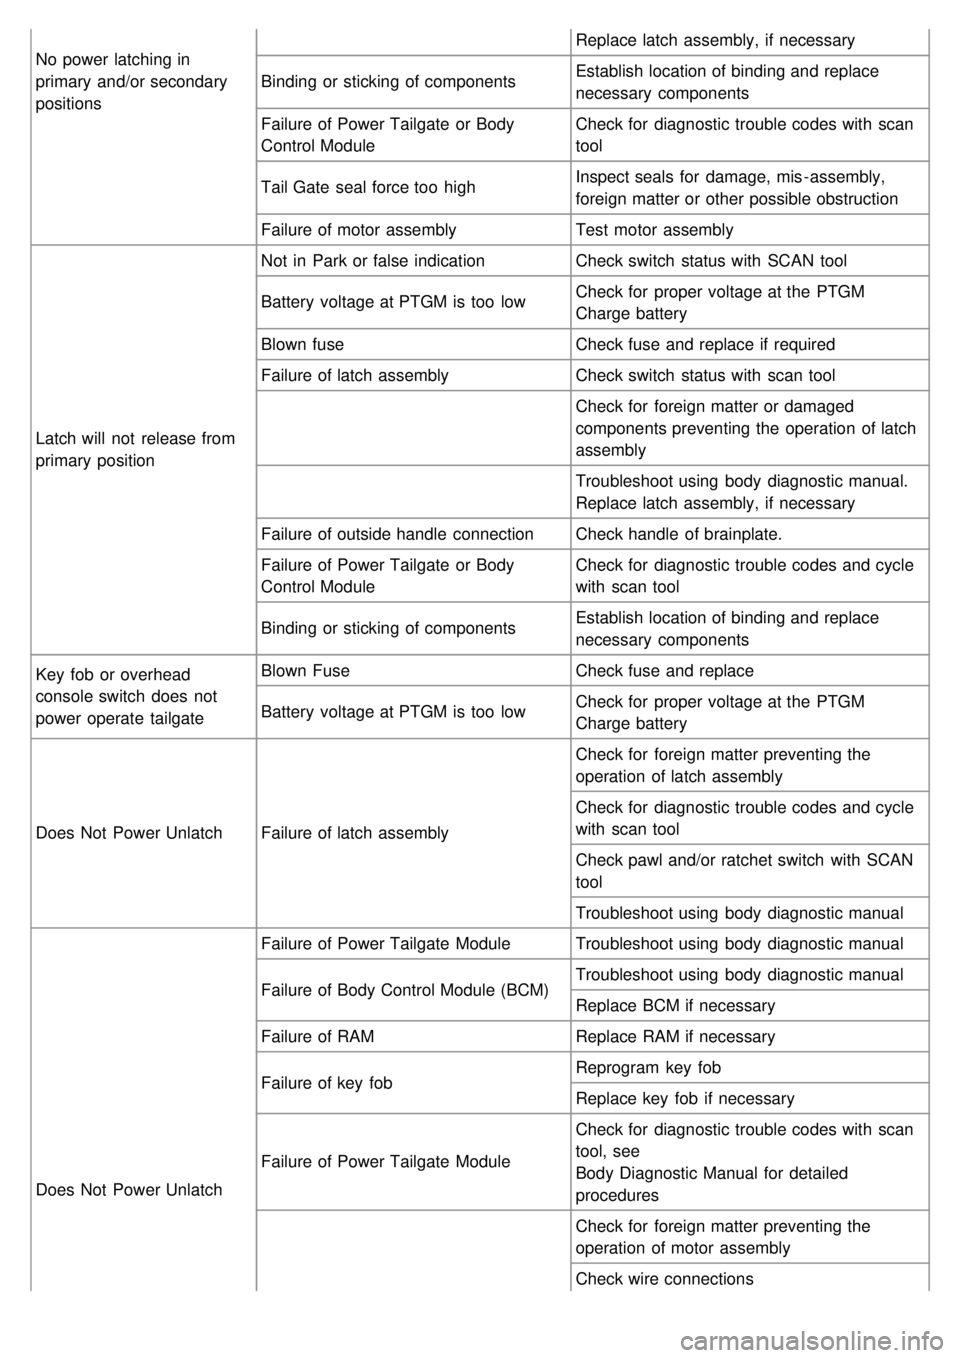
No power latching in
primary and/or secondary
positionsReplace latch assembly, if necessary
Binding or sticking of components Establish location of binding and replace
necessary components
Failure of Power Tailgate or Body
Control Module Check for diagnostic trouble codes with scan
tool
Tail Gate seal force too high Inspect seals for damage, mis - assembly,
foreign matter or other possible obstruction
Failure of motor assembly Test motor assembly
Latch will not release from
primary position Not in Park or false indication
Check switch status with SCAN tool
Battery voltage at PTGM is too low Check for proper voltage at the PTGM
Charge battery
Blown fuse Check fuse and replace if required
Failure of latch assembly Check switch status with scan tool
Check for foreign matter or damaged
components preventing the operation of latch
assembly
Troubleshoot using body diagnostic manual.
Replace latch assembly, if necessary
Failure of outside handle connection Check handle of brainplate.
Failure of Power Tailgate or Body
Control Module Check for diagnostic trouble codes and cycle
with scan tool
Binding or sticking of components Establish location of binding and replace
necessary components
Key fob or overhead
console switch does not
power operate tailgate Blown Fuse
Check fuse and replace
Battery voltage at PTGM is too low Check for proper voltage at the PTGM
Charge battery
Does Not Power Unlatch Failure of latch assembly Check for foreign matter preventing the
operation of latch assembly
Check for diagnostic trouble codes and cycle
with scan tool
Check pawl and/or ratchet switch with SCAN
tool
Troubleshoot using body diagnostic manual
Does Not Power Unlatch Failure of Power Tailgate Module
Troubleshoot using body diagnostic manual
Failure of Body Control Module (BCM) Troubleshoot using body diagnostic manual
Replace BCM if necessary
Failure of RAM Replace RAM if necessary
Failure of key fob Reprogram key fob
Replace key fob if necessary
Failure of Power Tailgate Module Check for diagnostic trouble codes with scan
tool, see
Body Diagnostic Manual for detailed
procedures
Check for foreign matter preventing the
operation of motor assembly
Check wire connections
Page 1374 of 1575
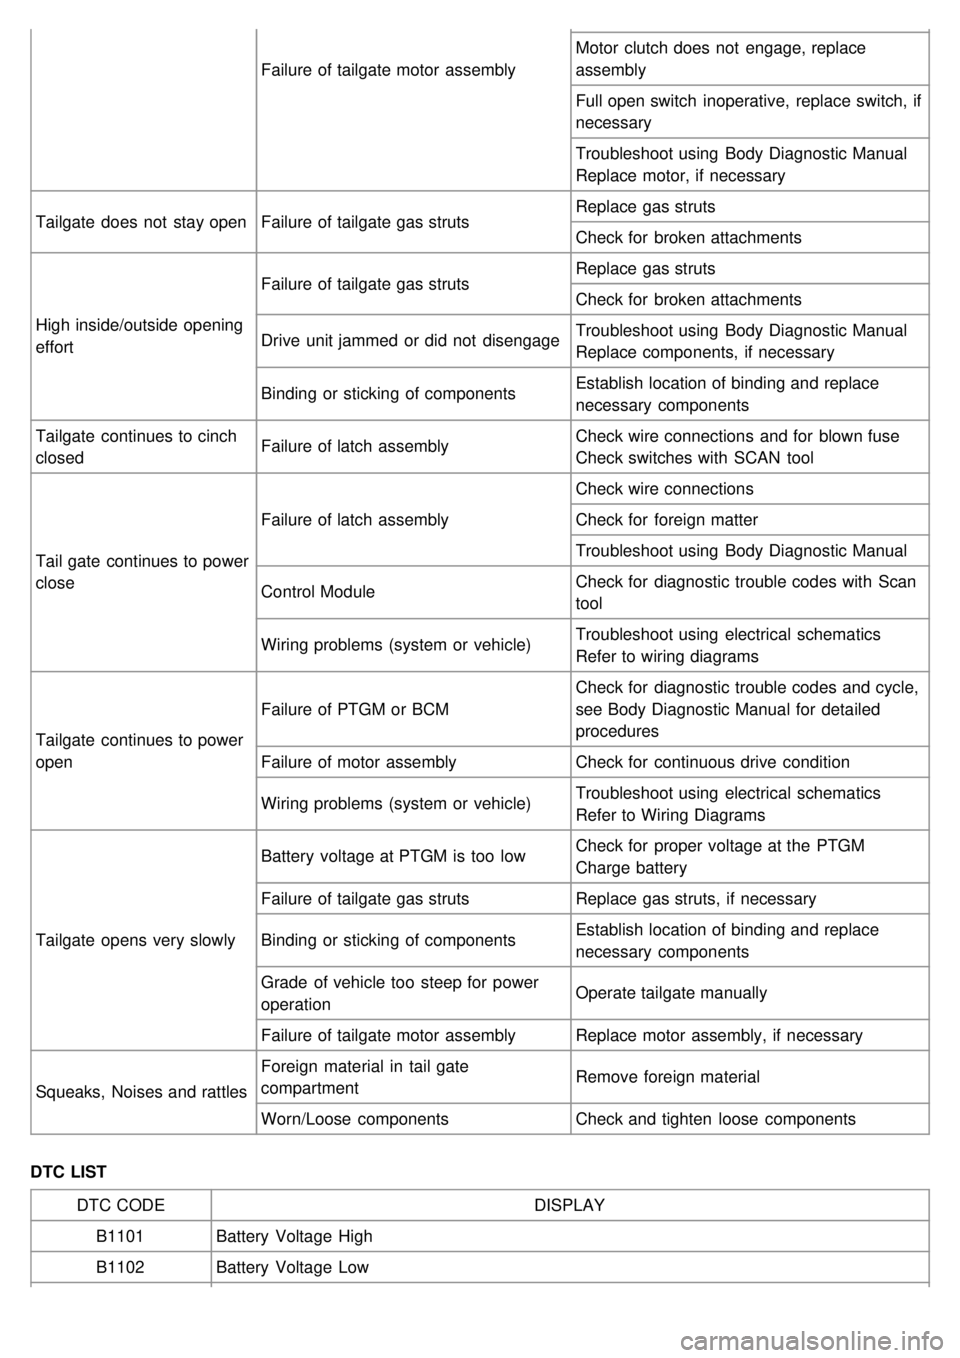
Failure of tailgate motor assemblyMotor clutch does not engage, replace
assembly
Full open switch inoperative, replace switch, if
necessary
Troubleshoot using Body Diagnostic Manual
Replace motor, if necessary
Tailgate does not stay open Failure of tailgate gas struts Replace gas struts
Check for broken attachments
High inside/outside opening
effort Failure of tailgate gas struts
Replace gas struts
Check for broken attachments
Drive unit jammed or did not disengage Troubleshoot using Body Diagnostic Manual
Replace components, if necessary
Binding or sticking of components Establish location of binding and replace
necessary components
Tailgate continues to cinch
closed Failure of latch assembly
Check wire connections and for blown fuse
Check switches with SCAN tool
Tail gate continues to power
close Failure of latch assembly
Check wire connections
Check for foreign matter
Troubleshoot using Body Diagnostic Manual
Control Module Check for diagnostic trouble codes with Scan
tool
Wiring problems (system or vehicle) Troubleshoot using electrical schematics
Refer to wiring diagrams
Tailgate continues to power
open Failure of PTGM or BCM
Check for diagnostic trouble codes and cycle,
see Body Diagnostic Manual for detailed
procedures
Failure of motor assembly Check for continuous drive condition
Wiring problems (system or vehicle) Troubleshoot using electrical schematics
Refer to Wiring Diagrams
Tailgate opens very slowly Battery voltage at PTGM is too low
Check for proper voltage at the PTGM
Charge battery
Failure of tailgate gas struts Replace gas struts, if necessary
Binding or sticking of components Establish location of binding and replace
necessary components
Grade of vehicle too steep for power
operation Operate tailgate manually
Failure of tailgate motor assembly Replace motor assembly, if necessary
Squeaks, Noises and rattles Foreign material in tail gate
compartment
Remove foreign material
Worn/Loose components Check and tighten loose components
DTC LIST DTC CODE DISPLAY
B1101 Battery Voltage High
B1102 Battery Voltage Low