Page 1069 of 1575
4.Installation is the reverse of removal.
a.Make sure the connector are plugged in properly.
AUDIO ASSEMBLY REPLACEMENT
1.Remove the center facia panel.
2. Loosen the screws.
3.Disconnect the connector (A), then remove the audio assembly (B).
4.Installation is the reverse of removal.
a.Make sure the connector are plugged in properly.
Page 1075 of 1575
9.Installation is the reverse of removal.
CRASH PAD REPLACEMENT
a.When prying with a flat- tipped screwdriver, wrap itwith protective tape, and apply protective tapearound the
related parts, to prevent damage.
b. Put on gloves to protect your hands.
1. Remove the following items.
a. Front seat.
b. Cluster facia panel, cluster.
c. Audio assembly.
d. Glove box.
e. Side cover, center under cover.
f. Front pillar trim.
2. Remove the photo sensor (C), speaker connector (B).
3. Disconnect the passenger`s air bag connector (A).
Loosen the bolt and nut, then remove the crash pad (D).
4. Installation is the reverse of removal.
a.Make sure the crash pad fits onto the guide pins correctly.
b. Before tightening the bolts, make sure the crash pad wire harnesses are not pinched.
c. Make sure the connectors are plugged in properly, and the antenna lead is connected properly.
d. Enter the anti- theft code for the radio, then enter.
[LHD]
Page 1157 of 1575
Page 1170 of 1575

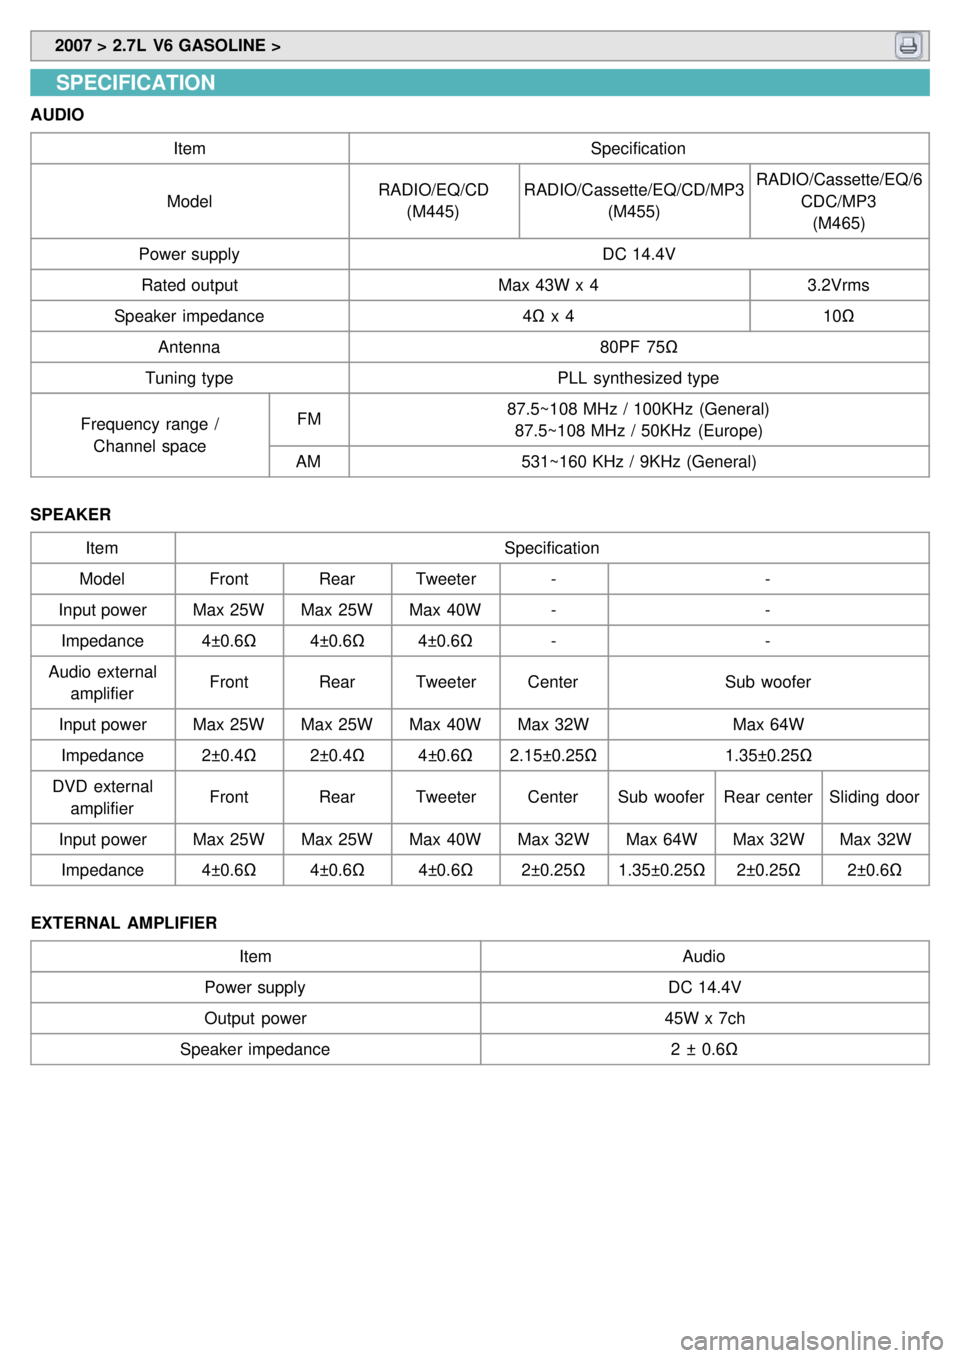
2007 > 2.7L V6 GASOLINE >
SPECIFICATION
AUDIO
Item Specification
Model RADIO/EQ/CD
(M445) RADIO/Cassette/EQ/CD/MP3
(M455) RADIO/Cassette/EQ/6
CDC/MP3(M465)
Power supply DC 14.4V
Rated output Max 43W x 43.2Vrms
Speaker impedance 4Ω x 4 10Ω
Antenna 80PF 75Ω
Tuning type PLL synthesized type
Frequency range / Channel space FM
87.5~108 MHz / 100KHz (General)
87.5~108 MHz / 50KHz (Europe)
AM 531~160 KHz / 9KHz (General)
SPEAKER Item Specification
Model FrontRearTweeter - -
Input power Max 25WMax 25WMax 40W - -
Impedance 4±0.6Ω4±0.6Ω4±0.6Ω - -
Audio external amplifier Front
RearTweeter Center Sub woofer
Input power Max 25WMax 25WMax 40WMax 32W Max 64W
Impedance 2±0.4Ω2±0.4Ω4±0.6Ω2.15±0.25Ω 1.35±0.25Ω
DVD external amplifier Front
RearTweeter CenterSub woofer Rear centerSliding door
Input power Max 25WMax 25WMax 40WMax 32WMax 64WMax 32WMax 32W
Impedance 4±0.6Ω4±0.6Ω4±0.6Ω2±0.25Ω1.35±0.25Ω 2±0.25Ω2±0.6Ω
EXTERNAL AMPLIFIER Item Audio
Power supply DC 14.4V
Output power 45W x 7ch
Speaker impedance 2 ± 0.6Ω
Page 1171 of 1575
Page 1175 of 1575
2007 > 2.7L V6 GASOLINE >
INSPECTION
TAPE HEAD AND CAPSTAN CLEANING
1. To obtain optimum performance, clean the head, and capstan as often as necessary, depending on frequency of
use and tape cleanness.
2. To clean the tape head and capstan, use a cotton swab dipped in ordinary rubbing alcohol. Wipe the head and
capstan.
REPLACEMENT
1.Disconnect the negative ( - ) battery terminal.
2. Remove the center facia panel, console lower cover, center air vent, switches, tray and heater control panel (A).
(Refer to the Body group - Crash pad)
3.Remove the mounting 4 screws then remove the audio unit (A).
4.Installation is the reverse of removal.
VIDEO JACK (DVD ONLY)
1.Disconnect the negative ( - ) battery terminal.
Page 1185 of 1575
7.Check for continuity between terminals of harness side connector and antenna grid terminals (AM, FM).
8. Check the grid lines for continuity.
9. When a poor radio reception is not repaired through the above inspection methods, replace the amp.
If the radio reception is still poor, check the radio cable for short and radio head unit for failure.
ANTENNA CABLE
1.Remove the antenna jack from the audio unit and antenna.
2. Check for continuity between the center poles of antenna cable.
3.Check for continuity between the outer poles of antenna cable. There should be continuity.
4.If there is no continuity, replace the antenna cable.
5. Check for continuity between the center pole of antenna cable and terminal of glass antenna. There should be
continuity.
6.If there is no continuity, replace the antenna amplifier.
7. Check for continuity between the center pole (A) and outer pole (B) of antenna cable. There should be no
continuity.
Page 1187 of 1575