Page 82 of 1575
2c51.012 ~ 51.018mm
(2.0083 ~ 2.0086in.)
CRANKSHAFT PIN MARK LOCATION
DISCRIMINATION OF CRANKSHAFT
DISCRIMINATION OF CRANKSHAFT
CLASS MARKOUTSIDE DIAMETER OF PIN
I 1 or A 47.994 ~ 48.000mm
(1.8895 ~ 1.8898in.)
II 2 or B 47.988 ~ 47.994mm
(1.8893 ~ 1.8895in.)
III 3 or C 47.982 ~ 47.988mm
(1.8891 ~ 1.8893in.)
PLACE OF IDENTIFICATION MARK (CONNECTING ROD BEARING)
DISCRIMINATION OF CONNECTING ROD BEARING
CLASS MARKTHICKNESS OF BEARING
A BLUE 1.5000 ~ 1.503mm
(0.0591 ~ 0.0592in.)
B BLACK 1.497 ~ 1.500mm
(0.0589 ~ 0.0591in.)
C -1.494 ~ 1.497mm
(0.0588 ~ 0.0589in.)
Page 83 of 1575

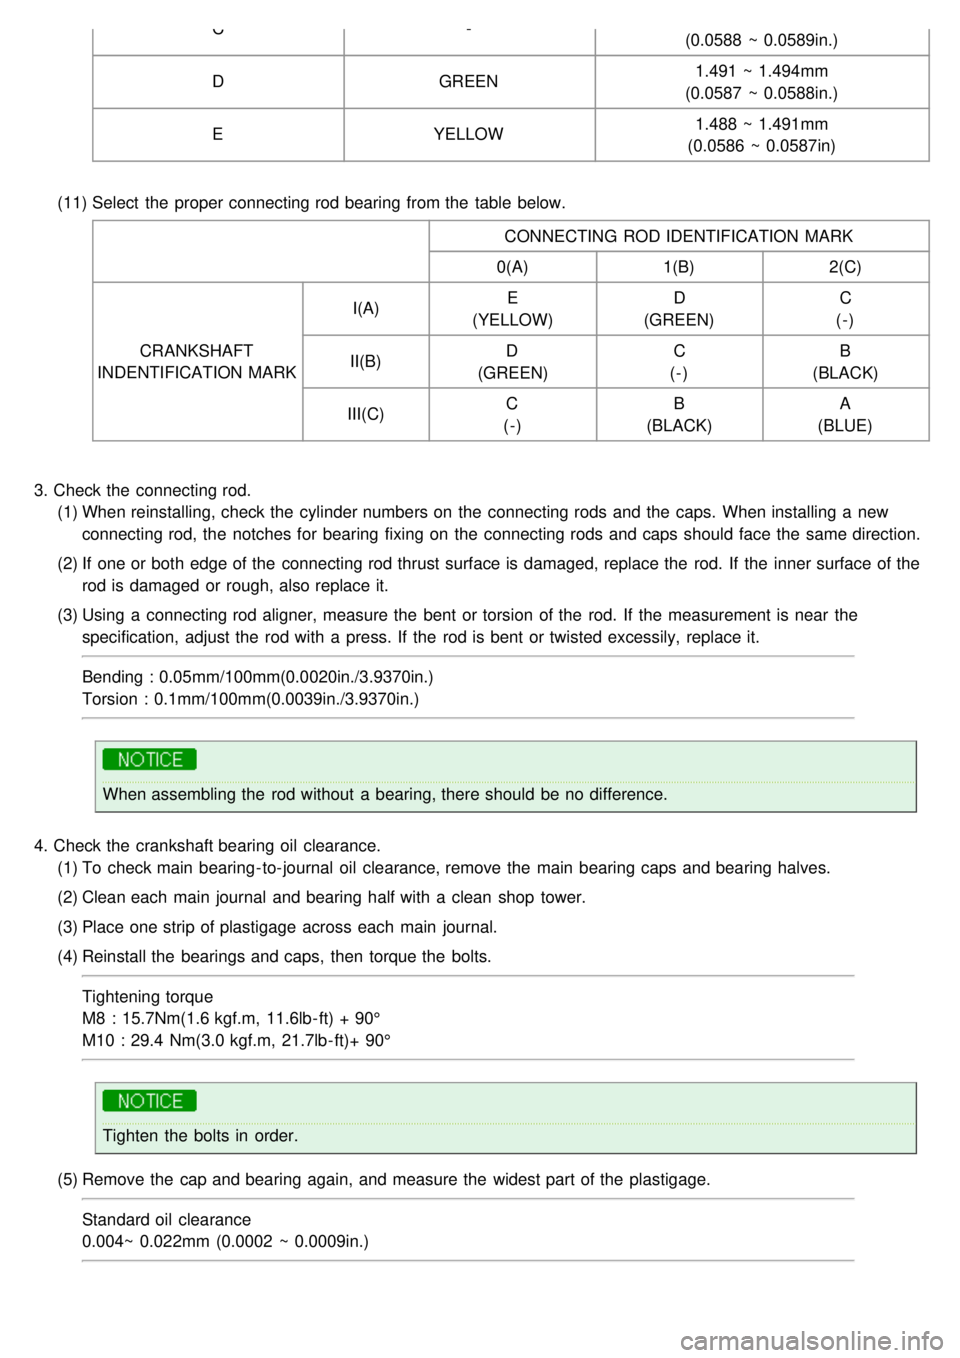
C-
(0.0588 ~ 0.0589in.)
D GREEN 1.491 ~ 1.494mm
(0.0587 ~ 0.0588in.)
E YELLOW 1.488 ~ 1.491mm
(0.0586 ~ 0.0587in)
(11) Select the proper connecting rod bearing from the table below.
CONNECTING ROD IDENTIFICATION MARK
0(A) 1(B)2(C)
CRANKSHAFT
INDENTIFICATION MARK I(A)
E
(YELLOW) D
(GREEN) C
(-)
II(B) D
(GREEN) C
(-) B
(BLACK)
III(C) C
(-) B
(BLACK) A
(BLUE)
3. Check the connecting rod.
(1) When reinstalling, check the cylinder numbers on the connecting rods and the caps. When installing a new
connecting rod, the notches for bearing fixing on the connecting rods and caps should face the same direction.
(2) If one or both edge of the connecting rod thrust surface is damaged, replace the rod. If the inner surface of the
rod is damaged or rough, also replace it.
(3) Using a connecting rod aligner, measure the bent or torsion of the rod. If the measurement is near the
specification, adjust the rod with a press. If the rod is bent or twisted excessily, replace it.
Bending : 0.05mm/100mm(0.0020in./3.9370in.)
Torsion : 0.1mm/100mm(0.0039in./3.9370in.)
When assembling the rod without a bearing, there should be no difference.
4. Check the crankshaft bearing oil clearance.
(1) To check main bearing- to- journal oil clearance, remove the main bearing caps and bearing halves.
(2) Clean each main journal and bearing half with a clean shop tower.
(3) Place one strip of plastigage across each main journal.
(4) Reinstall the bearings and caps, then torque the bolts.
Tightening torque
M8 : 15.7Nm(1.6 kgf.m, 11.6lb- ft) + 90°
M10 : 29.4 Nm(3.0 kgf.m, 21.7lb- ft)+ 90°
Tighten the bolts in order.
(5) Remove the cap and bearing again, and measure the widest part of the plastigage.
Standard oil clearance
0.004~ 0.022mm (0.0002 ~ 0.0009in.)
Page 86 of 1575

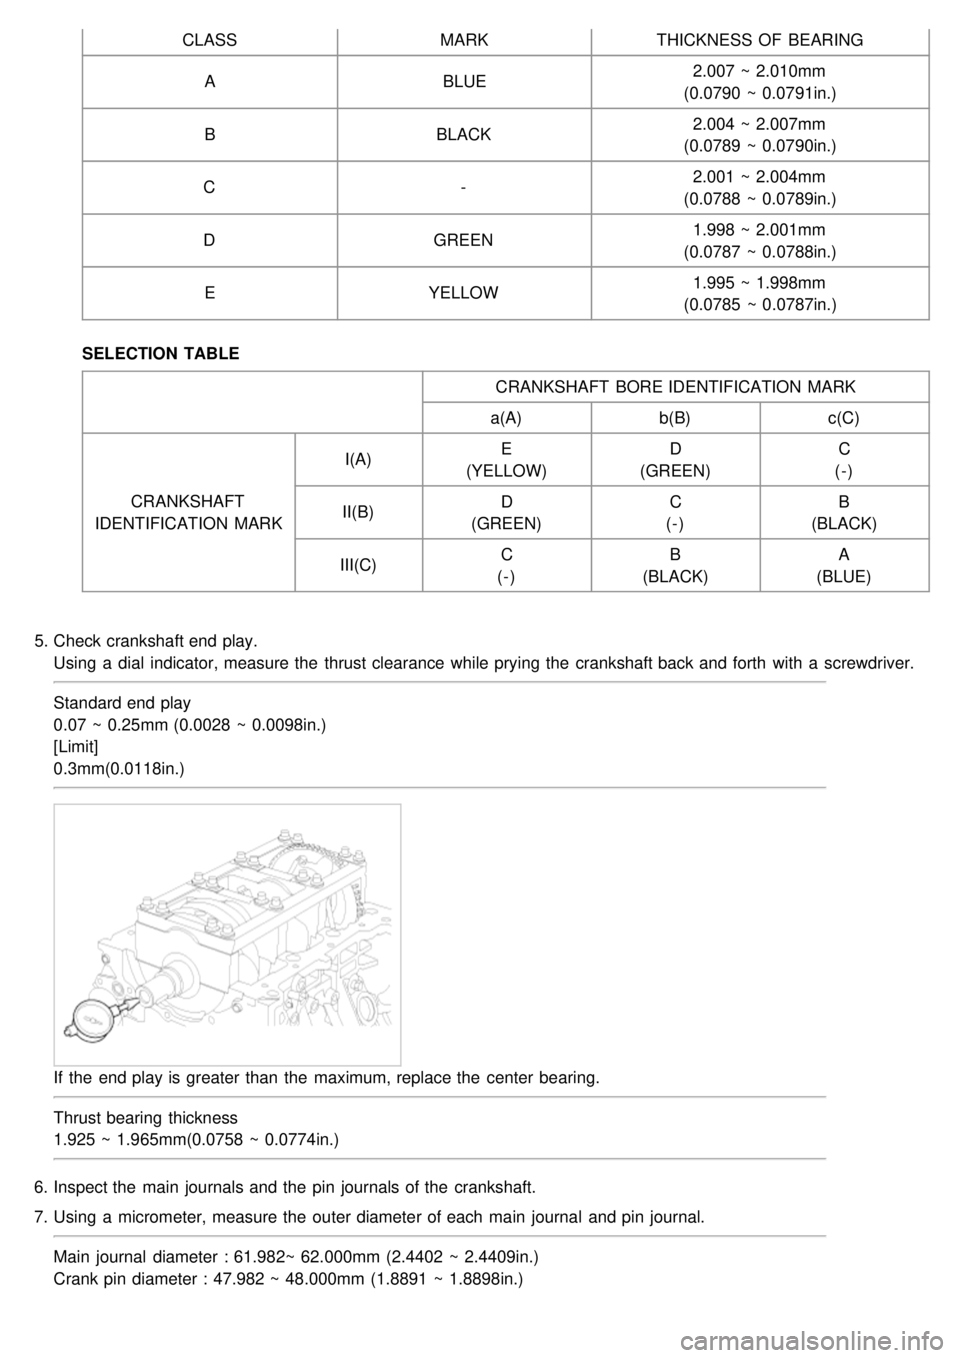
CLASSMARKTHICKNESS OF BEARING
A BLUE 2.007 ~ 2.010mm
(0.0790 ~ 0.0791in.)
B BLACK 2.004 ~ 2.007mm
(0.0789 ~ 0.0790in.)
C -2.001 ~ 2.004mm
(0.0788 ~ 0.0789in.)
D GREEN 1.998 ~ 2.001mm
(0.0787 ~ 0.0788in.)
E YELLOW 1.995 ~ 1.998mm
(0.0785 ~ 0.0787in.)
SELECTION TABLE CRANKSHAFT BORE IDENTIFICATION MARK
a(A) b(B)c(C)
CRANKSHAFT
IDENTIFICATION MARK I(A)
E
(YELLOW) D
(GREEN) C
(-)
II(B) D
(GREEN) C
(-) B
(BLACK)
III(C) C
(-) B
(BLACK) A
(BLUE)
5. Check crankshaft end play.
Using a dial indicator, measure the thrust clearance while prying the crankshaft back and forth with a screwdriver.
Standard end play
0.07 ~ 0.25mm (0.0028 ~ 0.0098in.)
[Limit]
0.3mm(0.0118in.)
If the end play is greater than the maximum, replace the center bearing.
Thrust bearing thickness
1.925 ~ 1.965mm(0.0758 ~ 0.0774in.)
6. Inspect the main journals and the pin journals of the crankshaft.
7. Using a micrometer, measure the outer diameter of each main journal and pin journal.
Main journal diameter : 61.982~ 62.000mm (2.4402 ~ 2.4409in.)
Crank pin diameter : 47.982 ~ 48.000mm (1.8891 ~ 1.8898in.)
Page 353 of 1575

BRAKES
The gear changing mechanism utilizes two multi- disc brakes.
LOW&REVERSE BRAKE AND SECOND BRAKE
The low&reverse brake(A) operates in 1st and reverse gears, when the vehicle is parked, and during manual
operation. It locks the low&reverse annulus gear and overdrive planetary carrier to the case.
The second(C) brake(B) operates in 2nd and 4th gears and locks the reverse sun gear(D) to the case.
The components comprising the low&reverse brake and second brake are as illustrated below.
As shown, the discs and plates of the two brakes are arranged on either side of the rear cushion plate(E), which is
itself secured to the case(F) by a snap ring.
OWC
To improve the shift feeling from 1st to 2nd gear, OWC was adopted on the low&reverse brake annulus gear. Instead
of hydraulic fixing by Low&reverse brake at the 1st gear, this mechanical fixing device was used. This structure is not
a new concept, because this OWC already has been installed on the previous models.
ACCUMULATORS
NumberFunction Name Color
1 Low&Reverse Brake None
2 Underdrive Clutch Yellow
3 Second Brake Blue
4 Overdrive Clutch None
Page 445 of 1575

2007 > 2.7L V6 GASOLINE >
TROUBLESHOOTING
Symptom Possible cause Remedy
Vehicle pulls to one side Scoring of driveshaft ball joint
Wear, rattle or scoring of wheel bearing
Defective front suspension and steering Replace
Replace
Adjust or replace
Vibration Wear, damage or bending of driveshaft
Driveshaft rattle and worn hub splines
Wear, rattle or scratching of wheel bearing Replace
Replace
Replace
Shimmy Improper wheel balance
Bent wheel
Defective front suspension and steering Adjust or replace
Replace
Adjust or replace
Excessive noise Wear, damage or bending of driveshaft
Driveshaft rattle and worn hub splines
Driveshaft rattle and worn side gear splines
Wear, rattle or galling of wheel bearing
Loose hub nut
Defective front suspension and steering Replace
Replace
Replace
Replace
Adjust or replace
Adjust or replace
Bent cage Cage damaged by improper handling or tool usage Replace bearing
Galling Metal smears on roller end due to overheating,
incorrect lubricant or overloading Replace bearing
Check seals, check for
proper lubrication
Cracked inner race Race cracked due to improper fit, cocking or poor bearing
seats Replace bearing
Etching Bearing surfaces appear gray or grayish black
in color accompanied by material etched
away usually at roller spacing Replace bearing
Check seals, check for
proper lubrication
Brinelling Surface indentations on race surface caused by rollers
being under impact loading or vibration while the bearing
is not rotating Replace bearing
Heat discoloration Heat discoloration is dark blue resulting
from overload or no lubricant (Yellow or brown color is
normal) Replace bearing
Check seals and other parts
Fatigue spalling Flaking of surface metal resulting from fatigue Replace bearing
Clean all related parts