Page 3638 of 6020
Starting System – V6 Page 6D1-2–30
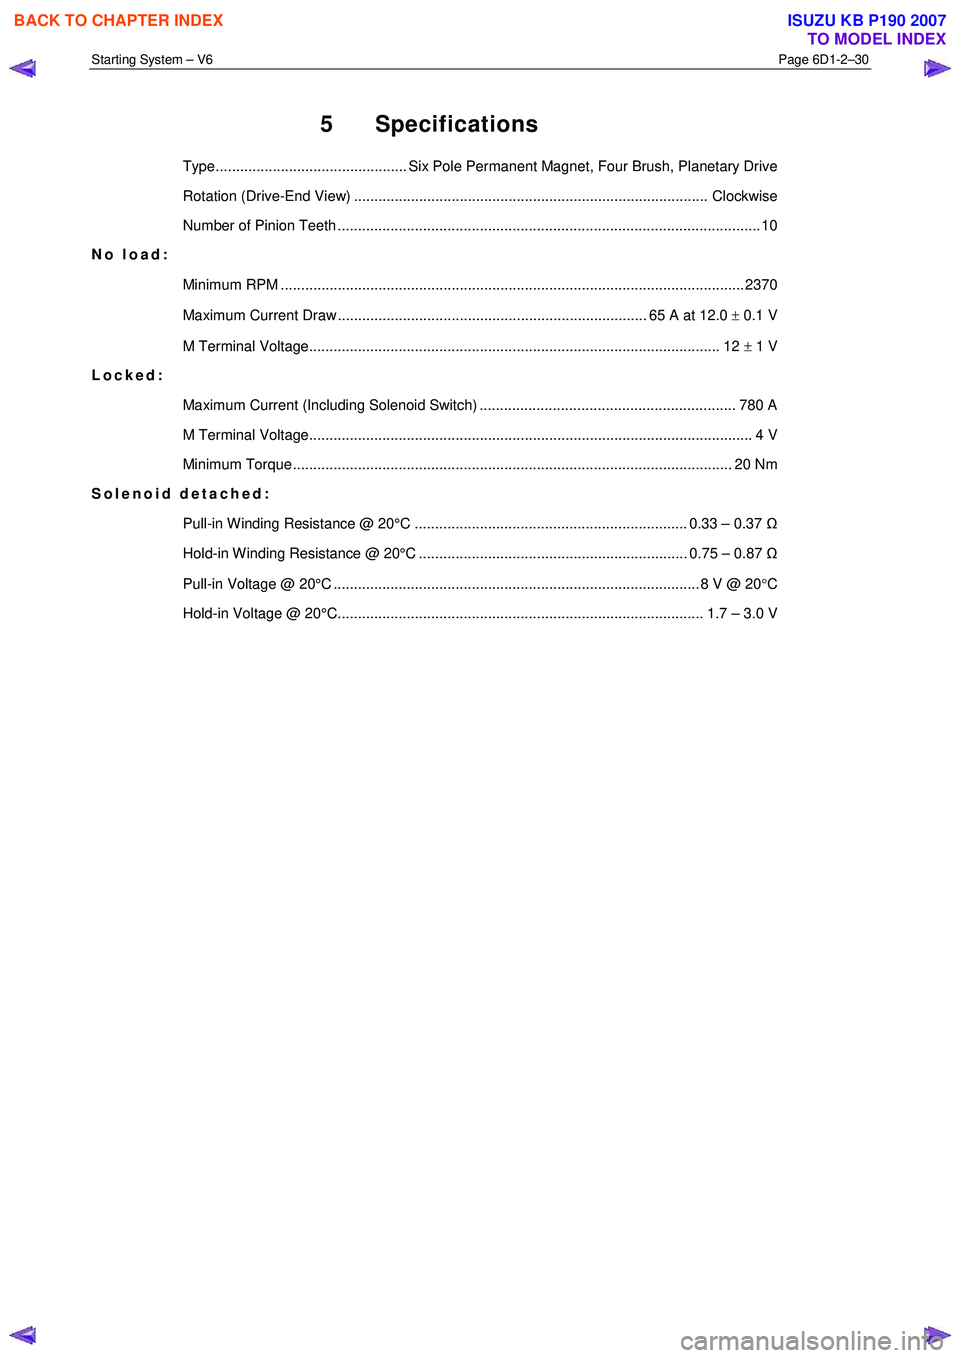
5 Specifications
Type............................................... Six Pole Permanent Magnet, Four Brush, Planetary Drive
Rotation (Drive-End View) ....................................................................................... Clockwise
Number of Pinion Teeth ........................................................................................................ 1 0
No load:
Minimum RPM .................................................................................................................. 23 70
Maximum Current Draw ............................................................................ 65 A at 12.0 ± 0.1 V
M Terminal Voltage..................................................................................................... 12 ± 1 V
Locked:
Maximum Current (Including Solenoid Switch) ............................................................... 780 A
M Terminal Voltage............................................................................................................. 4 V
Minimum Torque ............................................................................................................ 20 Nm
Solenoid detached:
Pull-in Winding Resistance @ 20°C ................................................................... 0.33 – 0.37 Ω
Hold-in Winding Resistance @ 20°C .................................................................. 0.75 – 0.87 Ω
Pull-in Voltage @ 20°C .......................................................................................... 8 V @ 20 °C
Hold-in Voltage @ 20°C.......................................................................................... 1.7 – 3.0 V
BACK TO CHAPTER INDEX
TO MODEL INDEX
ISUZU KB P190 2007
Page 3639 of 6020
Starting System – V6 Page 6D1-2–31
6 Torque Wrench Specifications
..................................................................................................................... Nm
Solenoid Switch Mounting Screw ........................................................ 4.1 – 7.6
Solenoid Switch Terminal M Nut ................................................................ 10.0
Solenoid Switch Terminal P – 3 Nut ........................................................... 10.0
Starter Motor Mounting Bolt........................................................................ 45.0
Knock Sensor Bolt ................................................................................ 23.0 Nm
Starter Motor Heat Shield Lower Bolt ................................................... 23.0 Nm
Starter Motor Heat Shield Upper Screw ........................................ 3.0 – 5.0 Nm
BACK TO CHAPTER INDEX
TO MODEL INDEX
ISUZU KB P190 2007
Page 3642 of 6020
Battery Page 6D1-3–2
6 Torque Wrench Specifications............................................................................................................20
7 Special Tools ........................................................................................................................................21
BACK TO CHAPTER INDEX
TO MODEL INDEX
ISUZU KB P190 2007
Page 3649 of 6020
Battery Page 6D1-3–9
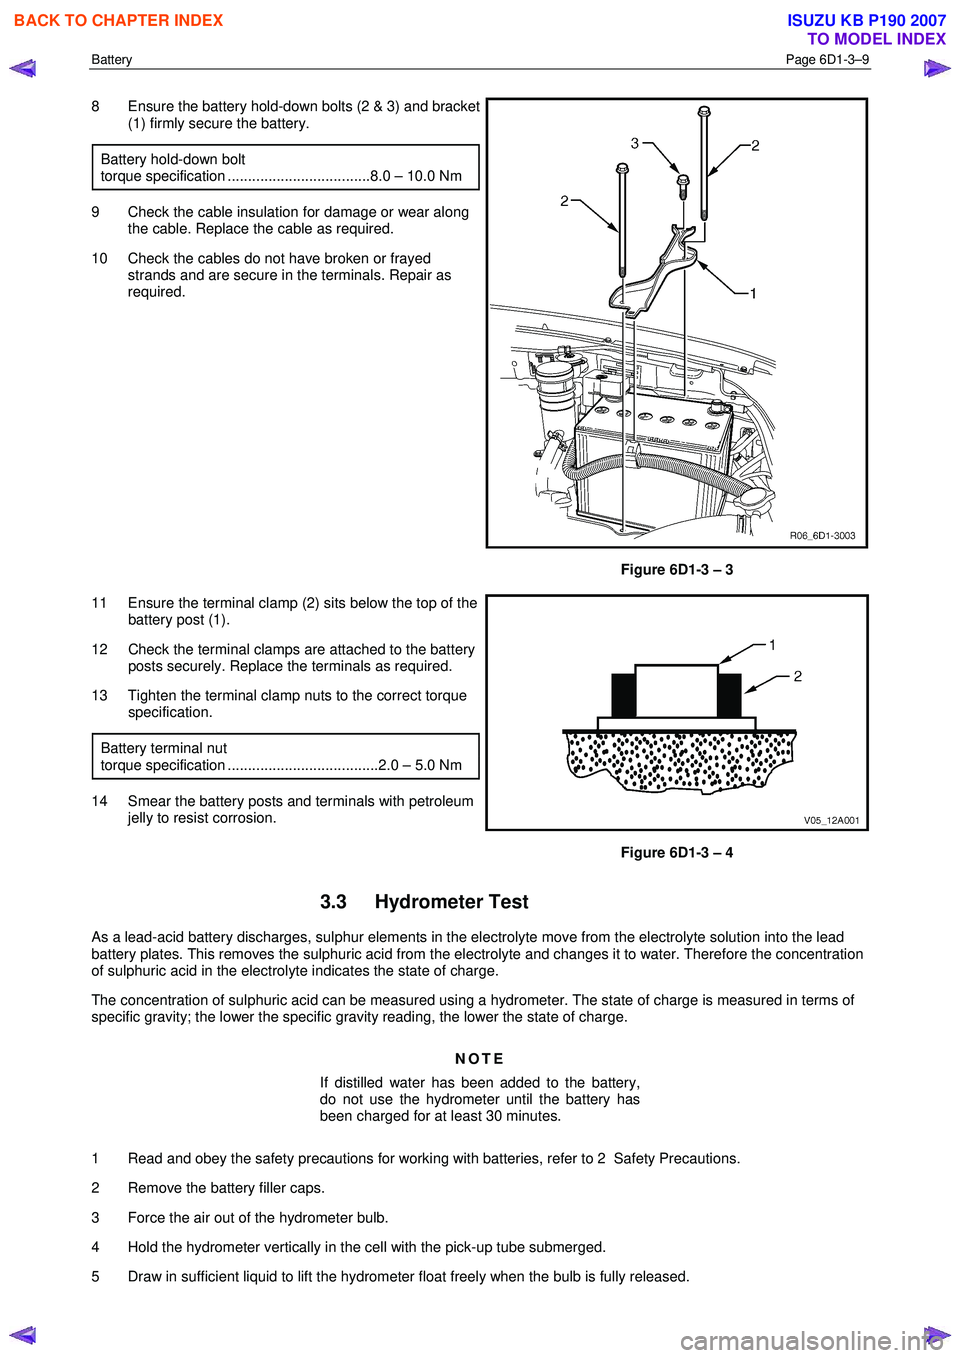
8 Ensure the battery hold-down bolts (2 & 3) and bracket
(1) firmly secure the battery.
Battery hold-down bolt
torque specification ...................................8.0 – 10.0 Nm
9 Check the cable insulation for damage or wear along the cable. Replace the cable as required.
10 Check the cables do not have broken or frayed strands and are secure in the terminals. Repair as
required.
Figure 6D1-3 – 3
11 Ensure the terminal clamp (2) sits below the top of the battery post (1).
12 Check the terminal clamps are attached to the battery posts securely. Replace the terminals as required.
13 Tighten the terminal clamp nuts to the correct torque specification.
Battery terminal nut
torque specification .....................................2.0 – 5.0 Nm
14 Smear the battery posts and terminals with petroleum jelly to resist corrosion.
Figure 6D1-3 – 4
3.3 Hydrometer Test
As a lead-acid battery discharges, sulphur elements in the electrolyte move from the electrolyte solution into the lead
battery plates. This removes the sulphuric acid from the electrolyte and changes it to water. Therefore the concentration
of sulphuric acid in the electrolyte indicates the state of charge.
The concentration of sulphuric acid can be measured using a hydrometer. The state of charge is measured in terms of
specific gravity; the lower the specific gravity reading, the lower the state of charge.
NOTE
If distilled water has been added to the battery,
do not use the hydrometer until the battery has
been charged for at least 30 minutes.
1 Read and obey the safety precautions for working with batteries, refer to 2 Safety Precautions.
2 Remove the battery filler caps.
3 Force the air out of the hydrometer bulb.
4 Hold the hydrometer vertically in the cell with the pick-up tube submerged.
5 Draw in sufficient liquid to lift the hydrometer float freely when the bulb is fully released.
BACK TO CHAPTER INDEX
TO MODEL INDEX
ISUZU KB P190 2007
Page 3653 of 6020
Battery Page 6D1-3–13
3 W hen the circuit group is determined, install the fuse / circuit breaker and identify the specific circuit within this
group that is drawing the excess current. Disconnect the wiring harness connectors in this circuit group one at a
time. Refer to 8A Electrical Body & Chassis.
4 W hen the cause is disconnected, the multimeter reading should drop to the correct reading as outlined in Step 9 of the Test Procedure in this Section.
5 If required, remove the components in this circuit one at a time to determine the cause of the excessive standing current. Refer to 8A Electrical Body & Chassis.
6 Repair the fault, refer to 8A Electrical Body & Chassis.
7 Ensure any fuses, circuit breakers and connectors that have been removed are secure.
Restore
1 Reconnect the electrical earth cable to the battery terminal and tighten the nut to the correct torque specification.
Battery terminal nut
torque specification .....................................2.0 – 5.0 Nm
2 Disconnect the multimeter connections.
BACK TO CHAPTER INDEX
TO MODEL INDEX
ISUZU KB P190 2007
Page 3654 of 6020
Battery Page 6D1-3–14
4 Service Operations
4.1 Battery
Remove
Disconnection of the battery affects certain
vehicle electronic systems. Refer to 1.1
WARNING, CAUTION and NOTES before
disconnecting the battery.
1 Read and obey the safety precautions for working with batteries, refer to 2 Safety Precautions.
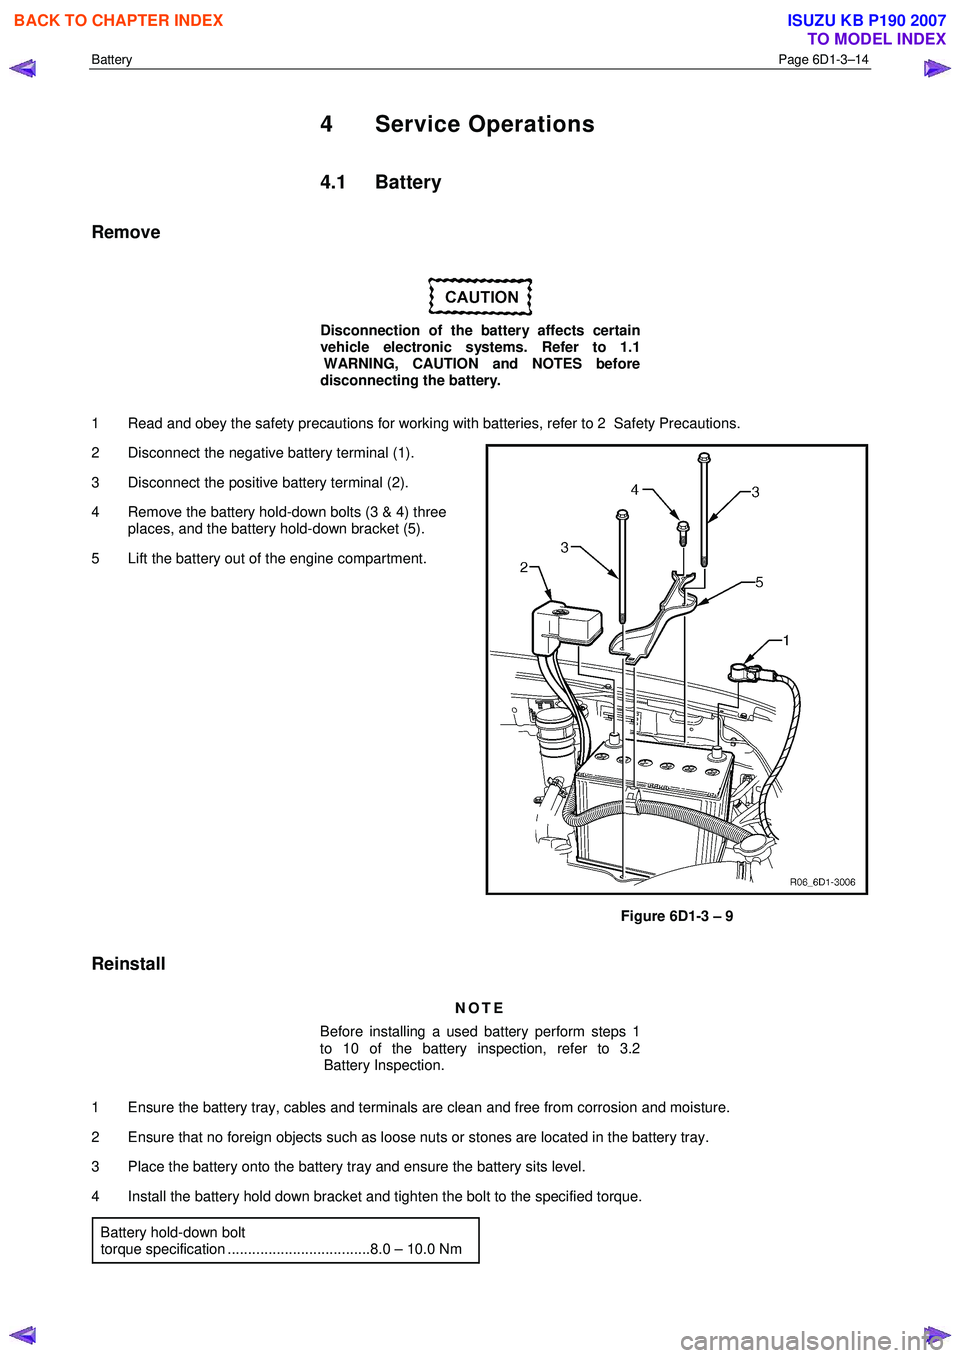
2 Disconnect the negative battery terminal (1).
3 Disconnect the positive battery terminal (2).
4 Remove the battery hold-down bolts (3 & 4) three places, and the battery hold-down bracket (5).
5 Lift the battery out of the engine compartment.
Figure 6D1-3 – 9
Reinstall
NOTE
Before installing a used battery perform steps 1
to 10 of the battery inspection, refer to 3.2
Battery Inspection.
1 Ensure the battery tray, cables and terminals are clean and free from corrosion and moisture.
2 Ensure that no foreign objects such as loose nuts or stones are located in the battery tray.
3 Place the battery onto the battery tray and ensure the battery sits level.
4 Install the battery hold down bracket and tighten the bolt to the specified torque. Battery hold-down bolt
torque specification ...................................8.0 – 10.0 Nm
BACK TO CHAPTER INDEX
TO MODEL INDEX
ISUZU KB P190 2007
Page 3655 of 6020
Battery Page 6D1-3–15
5 Install the positive terminal onto the positive battery post. Ensure the terminal sits below the top of the post and
tighten the terminal nut to the correct specification.
Battery terminal nut
torque specification .....................................2.0 – 5.0 Nm
6 Install the negative terminal onto the negative battery post. Ensure the terminal sits below the top of the post and tighten the terminal nut to the correct specification.
Battery terminal nut
torque specification .....................................2.0 – 5.0 Nm
7 Smear the battery posts and cable terminals with petroleum jelly to inhibit corrosion.
4.2 Battery Charge
Safety Precautions
Read and obey the general safety precautions for working with batteries, refer to 2 Safety Precautions.
The battery releases an explosive hydrogen and oxygen gas mixture during charging. Ensure there are no naked flames
or sparks near the battery.
Flat batteries can be safely boost-charged, however avoid excessive charging current if the battery is more than half
charged. Slow charging is best.
Fast charging can substantially boost a battery, but slow charging is required to fully charge the battery.
Do not use a fast charger:
• for starting the vehicle,
• if the specific gravity readings are not uniform between battery cells, refer to 3.3 Hydrometer Test,
• if the specific gravity readings are above 1.20, refer to 3.3Hydrometer Test,
• if the electrolyte is discoloured with brown sediment, and
• if any of the above three conditions develop after beginning a fast charge.
Battery Charge Procedure
Disconnection of the battery affects certain
vehicle electronic systems. Refer to Warning,
Caution and Notes in this section before
disconnecting the battery.
1 Perform steps 1 to 10 of the battery inspection, refer to 3.2 Battery Inspection.
2 Remove the battery from the vehicle. Refer to 4.1 Battery.
3 If required remove the battery filler caps. Let the caps rest loosely on top of the filler tubes.
Always ensure the connections are to the
correct polarity and follow the manufacturer’s
recommendations for battery charging.
4 Connect the battery to the battery charger.
5 Set the charging current using the following table as a guide.
BACK TO CHAPTER INDEX
TO MODEL INDEX
ISUZU KB P190 2007
Page 3660 of 6020
Battery Page 6D1-3–20
6 Torque Wrench Specifications
Battery Hold-Down Bolts ............................................................. 8.0 – 10.0 Nm
Battery Terminal Nut...................................................................... 2.0 – 5.0 Nm
BACK TO CHAPTER INDEX
TO MODEL INDEX
ISUZU KB P190 2007