Page 2884 of 6020

Engine Mechanical – V6 Page 6A1–107
Page 6A1–107
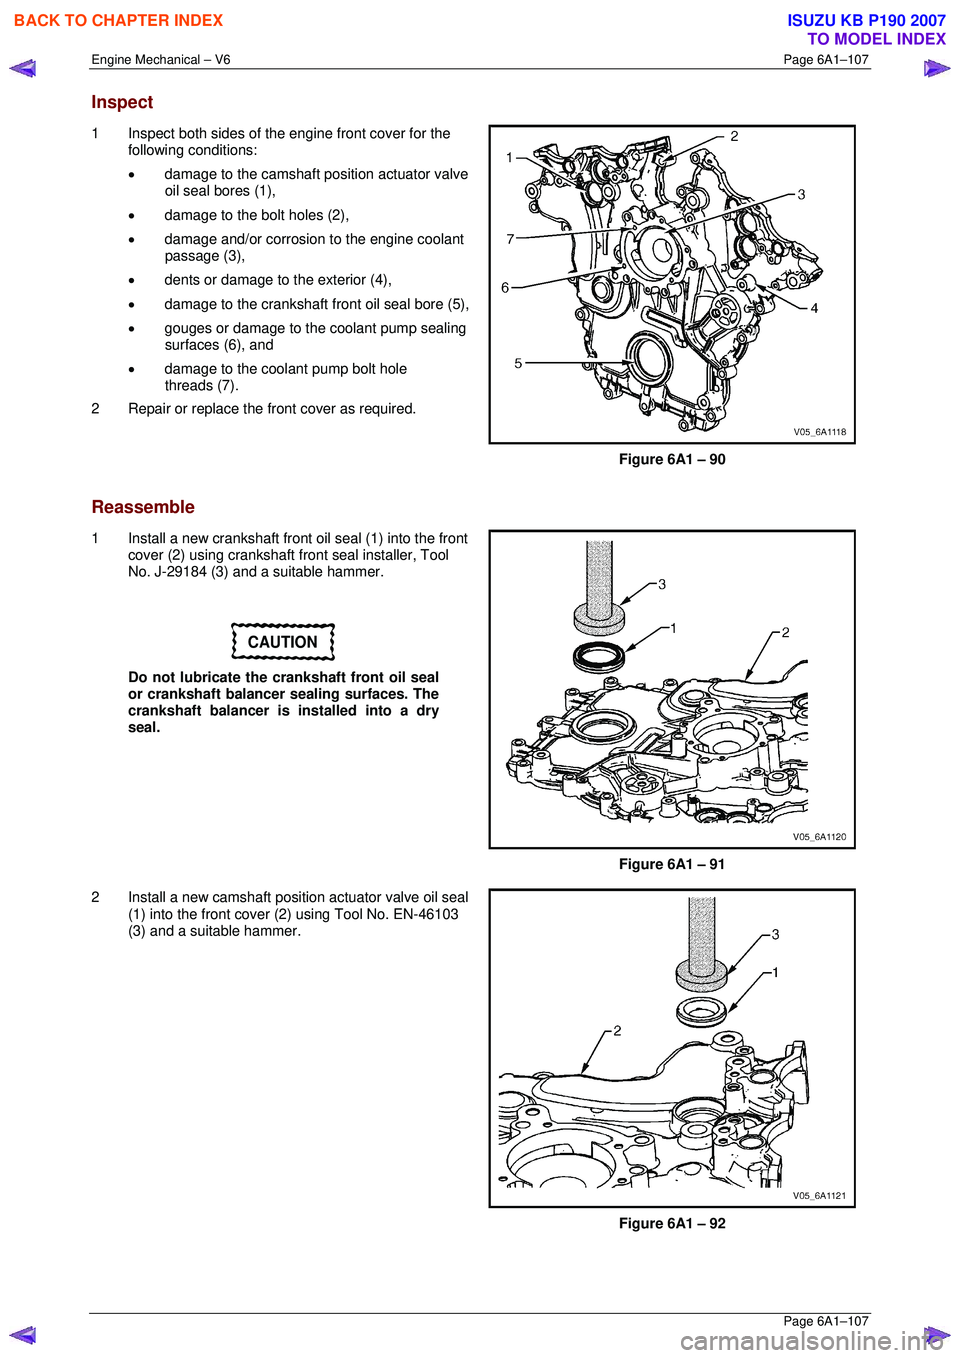
Inspect
1 Inspect both sides of the engine front cover for the
following conditions:
• damage to the camshaft position actuator valve
oil seal bores (1),
• damage to the bolt holes (2),
• damage and/or corrosion to the engine coolant
passage (3),
• dents or damage to the exterior (4),
• damage to the crankshaft front oil seal bore (5),
• gouges or damage to the coolant pump sealing
surfaces (6), and
• damage to the coolant pump bolt hole
threads (7).
2 Repair or replace the fr ont cover as required.
Figure 6A1 – 90
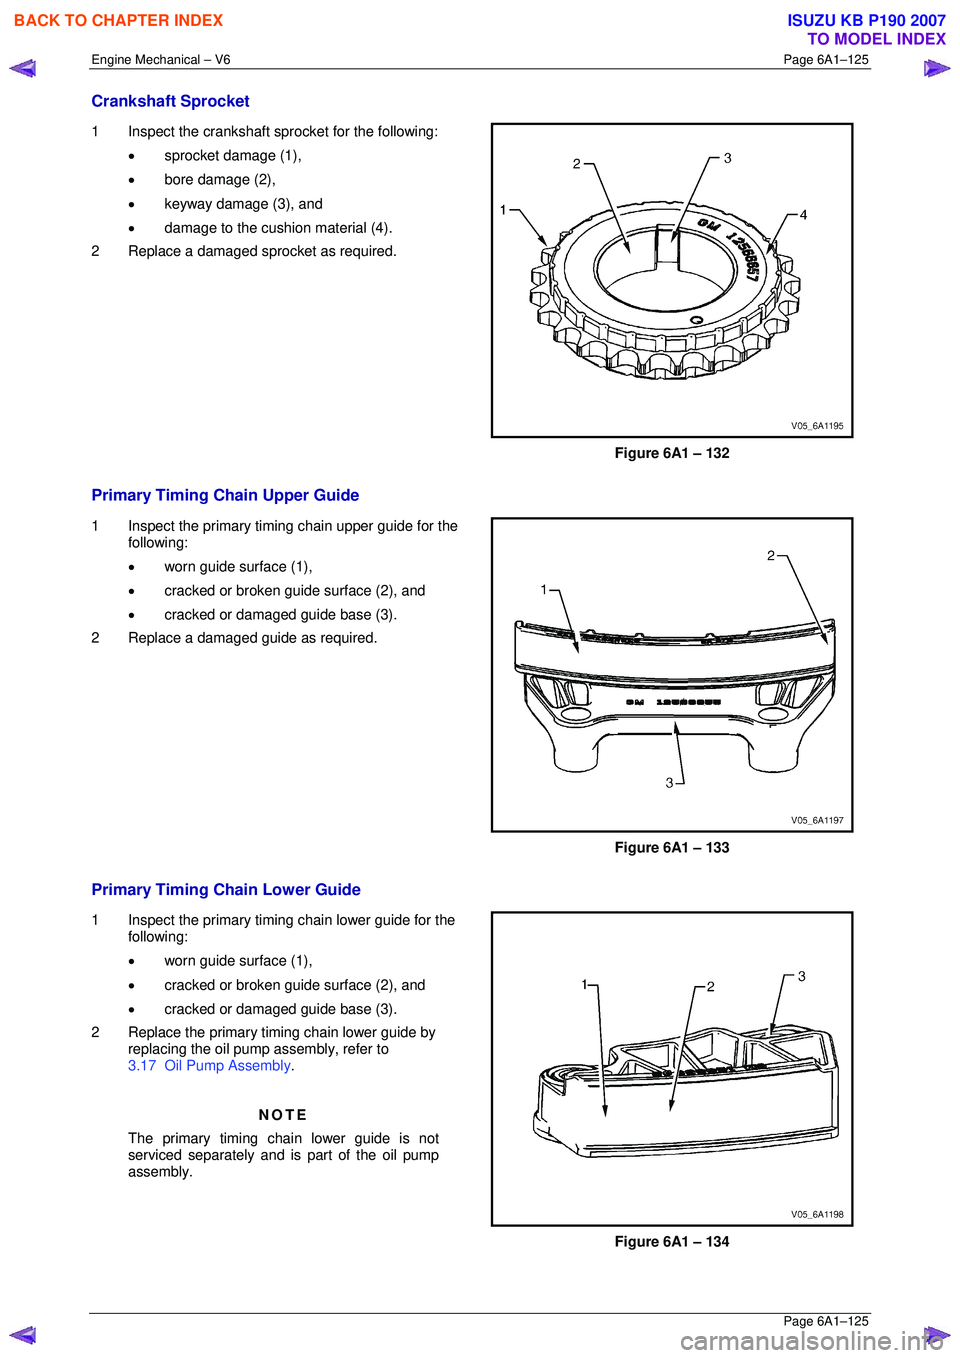
Reassemble
1 Install a new crankshaft front oil seal (1) into the front cover (2) using crankshaft front seal installer, Tool
No. J-29184 (3) and a suitable hammer.
CAUTION
Do not lubricate the crankshaft front oil seal
or crankshaft balancer sealing surfaces. The
crankshaft balancer is installed into a dry
seal.
Figure 6A1 – 91
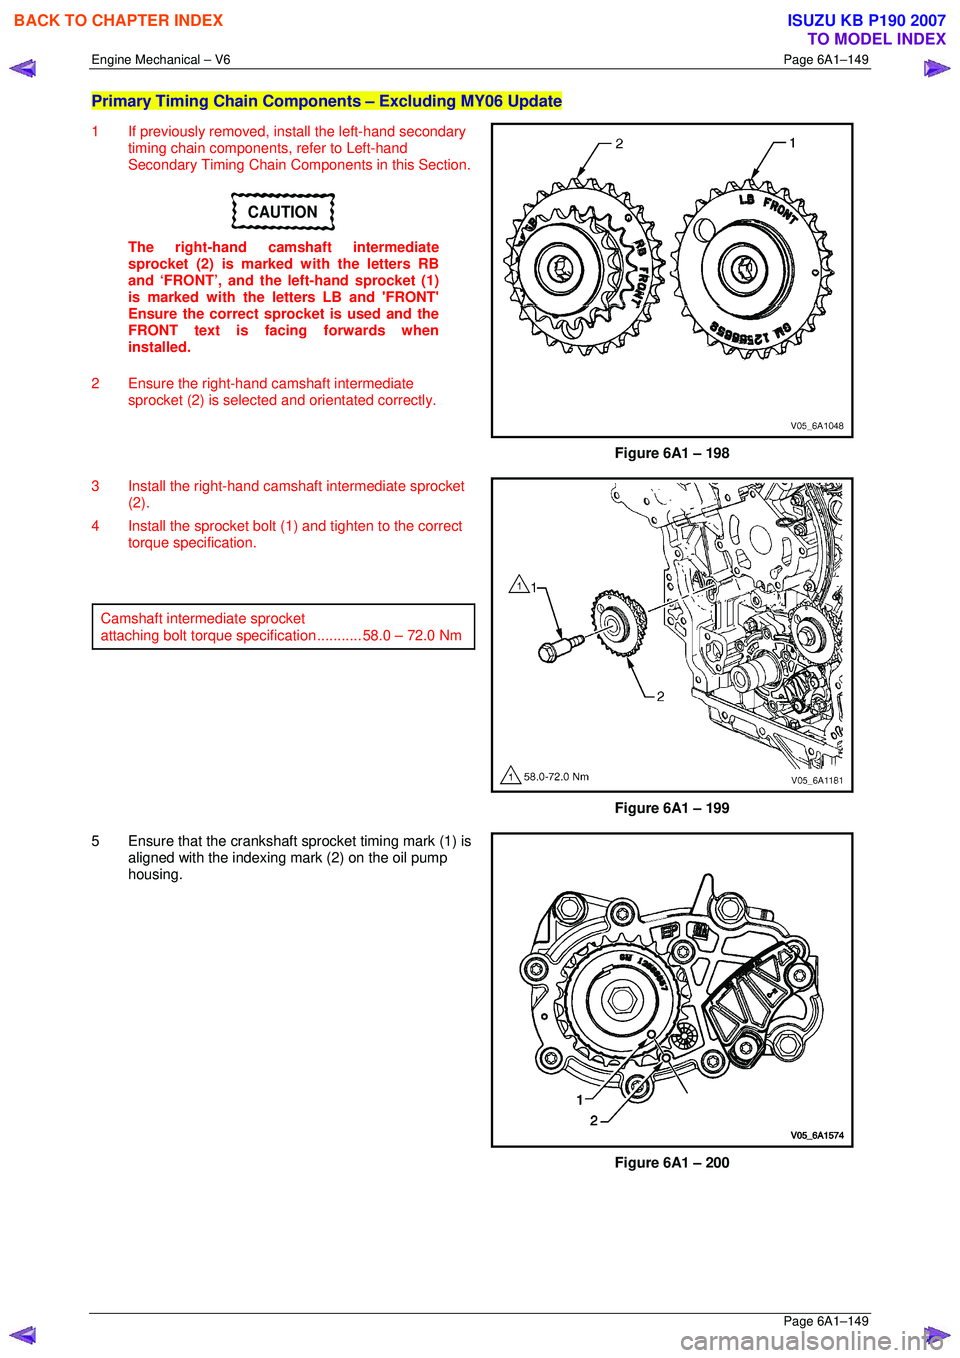
2 Install a new camshaft positi on actuator valve oil seal
(1) into the front cover (2) using Tool No. EN-46103
(3) and a suitable hammer.
Figure 6A1 – 92
BACK TO CHAPTER INDEX
TO MODEL INDEX
ISUZU KB P190 2007
Page 2886 of 6020
Engine Mechanical – V6 Page 6A1–109
Page 6A1–109
4 Place the front cover onto the special tools and slide
into position.
5 Remove the special tools from the cylinder block.
Figure 6A1 – 96
6 Hand start the front cover bolts (1).
Figure 6A1 – 97
7 Tighten the engine front cover bolts to the correct torque specification, in the sequence shown.
Engine front cover assembly attaching
bolt torque specificat ion .......................... 20.0 – 26.0 Nm
8 Fill the cooling system, refer to Section 6B1 Engine
Cooling – V6 .
9 Change the engine oil, refer to 3.1 Engine Oil.
Figure 6A1 – 98
BACK TO CHAPTER INDEX
TO MODEL INDEX
ISUZU KB P190 2007
Page 2891 of 6020
Engine Mechanical – V6 Page 6A1–114
Page 6A1–114
Remove
Right-hand Secondary Timing Chain
CAUTION
After removing the upper intake manifold, and
spark plugs, plug any openings to prevent dirt
and other contaminants from entering.
1 Remove the engine front cover assembly, refer to 3.15 Front Cover Assembly.
2 Remove the spark plugs to aid crankshaft/engine rotation, refer to Section 6C1-3 Engine Management – V6 –
Service Operations .
3 Install Tool No. EN46111 (1) onto the crankshaft (2).
Figure 6A1 – 103
4 Using Tool No. EN46111 (1), rotate the crankshaft in a clockwise direction until the crankshaft sprocket
timing mark (2) is aligned with the indexing mark (3)
on the oil pump housing.
NOTE
Graphic shows 'Early Type' crankshaft sprocket,
'Late Type' similar.
Figure 6A1 – 104
BACK TO CHAPTER INDEX
TO MODEL INDEX
ISUZU KB P190 2007
Page 2896 of 6020
Engine Mechanical – V6 Page 6A1–119
Page 6A1–119
NOTE
Do not remove the primary timing chain lower
guide (1). The primary timing chain lower guide
is not serviced separately. If the primary timing
chain lower guide requires replacement, the oil
pump assembly (2) must be replaced.
Figure 6A1 – 117
6 Remove the primary timing chain (1). NOTE
For ease of removal, remove the chain from the
crankshaft sprocket, bef ore attempting to
remove from the camshaft intermediate
sprockets.
Figure 6A1 – 118
7 If required, remove the right-hand camshaft intermediate sprocket bolt (1) and remove the
sprocket (2).
Figure 6A1 – 119
BACK TO CHAPTER INDEX
TO MODEL INDEX
ISUZU KB P190 2007
Page 2902 of 6020

Engine Mechanical – V6 Page 6A1–125
Page 6A1–125
Crankshaft Sprocket
1 Inspect the crankshaft sprocket for the following:
• sprocket damage (1),
• bore damage (2),
• keyway damage (3), and
• damage to the cushion material (4).
2 Replace a damaged sprocket as required.
Figure 6A1 – 132
Primary Timing Chain Upper Guide
1 Inspect the primary timing chain upper guide for the following:
• worn guide surface (1),
• cracked or broken guide surface (2), and
• cracked or damaged guide base (3).
2 Replace a damaged guide as required.
Figure 6A1 – 133
Primary Timing Chain Lower Guide
1 Inspect the primary timing chain lower guide for the following:
• worn guide surface (1),
• cracked or broken guide surface (2), and
• cracked or damaged guide base (3).
2 Replace the primary timing chain lower guide by replacing the oil pump assembly, refer to
3.17 Oil Pump Assembly .
NOTE
The primary timing chain lower guide is not
serviced separately and is part of the oil pump
assembly.
Figure 6A1 – 134
BACK TO CHAPTER INDEX
TO MODEL INDEX
ISUZU KB P190 2007
Page 2908 of 6020
Engine Mechanical – V6 Page 6A1–131
Page 6A1–131
3 Install Tool No. EN 46105-1 (1) onto the rear of the
left-hand cylinder head camshafts (2), and Tool No.
EN 46105-2 onto the rear of the right-hand cylinder
head camshafts.
4 Ensure that Tool No. EN 46105 is fully seated onto the camshafts.
CAUTION
All camshafts must be locked in place before
installation of any timing chains.
Figure 6A1 – 147
5 Using Tool No. EN46111 (1), rotate the crankshaft in a clockwise direction until the crankshaft sprocket
timing mark (2) is aligned with the indexing mark (3)
on the oil pump housing.
Figure 6A1 – 148
6 Install the left-hand secondary timing chain (1) aligning the chain in the following manner:
Figure 6A1 – 149
BACK TO CHAPTER INDEX
TO MODEL INDEX
ISUZU KB P190 2007
Page 2917 of 6020
Engine Mechanical – V6 Page 6A1–140
Page 6A1–140
CAUTION
In order to install Tool No. EN 46105 onto the
camshafts, rotate the camshafts in an anti-
clockwise direction. There should be no
need to rotate the camshaft more than 45
degrees.
Figure 6A1 – 173
3 Install Tool No. EN 46105-1 (1) onto the rear of the
left-hand cylinder head camshafts (2).
CAUTION
All camshafts must be locked in place before
installation of any timing chains.
4 Ensure that Tool No. EN 46105 is fully seated onto the camshafts.
Figure 6A1 – 174
5 Using Tool No. EN46111 (1), rotate the crankshaft in a clockwise direction until the crankshaft sprocket
timing mark (2) is aligned with the indexing mark (3)
on the oil pump housing.
Figure 6A1 – 175
BACK TO CHAPTER INDEX
TO MODEL INDEX
ISUZU KB P190 2007
Page 2926 of 6020

Engine Mechanical – V6 Page 6A1–149
Page 6A1–149
Primary Timing Chain Components – Excluding MY06 Update
1 If previously removed, install the left-hand secondary
timing chain components, refer to Left-hand
Secondary Timing Chain Components in this Section.
CAUTION
The right-hand camshaft intermediate
sprocket (2) is marked with the letters RB
and ‘FRONT’, and the left-hand sprocket (1)
is marked with the le tters LB and 'FRONT'
Ensure the correct sprocket is used and the
FRONT text is facing forwards when
installed.
2 Ensure the right-hand camshaft intermediate sprocket (2) is selected and orientated correctly.
Figure 6A1 – 198
3 Install the right-hand camshaft intermediate sprocket (2).
4 Install the sprocket bolt (1) and tighten to the correct torque specification.
Camshaft intermediate sprocket
attaching bolt torque spec ification ........... 58.0 – 72.0 Nm
Figure 6A1 – 199
5 Ensure that the crankshaft sprocket timing mark (1) is aligned with the indexing mark (2) on the oil pump
housing.
Figure 6A1 – 200
BACK TO CHAPTER INDEX
TO MODEL INDEX
ISUZU KB P190 2007