2007 ISUZU KB P190 oil temperature
[x] Cancel search: oil temperaturePage 4086 of 6020
ON-VEHICLE SERVICE (AW30–40LE) 7A3-1
SECTION 7A3
ON-VEHICLE SERVICE (AW30–40LE)
TABLE OF CONTENTS
Service Precaution .................................................. 7A3-2
Diagnosis ................................................................. 7A3-3
Basic Troubleshooting ........................................ 7A3-3
Manual Shifting Test ........................................... 7A3-9
Stall Test ............................................................... 7A3-9
Time Lag Test ...................................................... 7A3-10
Hydraulic Test ...................................................... 7A3-11
Road Test ............................................................. 7A3-12
Shift Point Chart and Lock-Up Point Chart ..........7A3-16
Shift Point Chart ................................................... 7A3-16
Lock-Up Point Chart ............................................ 7A3-17
Transmission Fluid Level and Condition ..............7A3-18
Inspection ............................................................. 7A3-18
ATF Replacement ................................................... 7A3-19
Inspection ............................................................. 7A3-19
Neutral Start Switch (Mode Switch) ......................7A3-20
Inspection ............................................................. 7A3-20
Removal ................................................................ 7A3-20
Installation ............................................................. 7A3-20
Brake Signal ............................................................ 7A3-21
Inspection ............................................................. 7A3-21
Input and Output Revolution Sensor ....................7A3-22
Inspection ............................................................. 7A3-22
Power and 3rd Start switch ....................................7A3-22
Inspection ............................................................. 7A3-22
Solenoid .................................................................... 7A3-23
Inspection ............................................................. 7A3-23
ATF Temperature Sensor ......................................7A3-24
Inspection ............................................................. 7A3-24
Select Lever ....................................................... 7A3-25 Remove or Disconnect .......................................7A3-26
Install or Connect ................................................ 7A3-26
Shift Cable .......................................................... 7A3-28 Remove or Disconnect .......................................7A3-28
Install or Connect ................................................ 7A3-29
Torque Specifications ......................................... 7A3-30
Transmission Control Module (TCM) ...................7A3-31
Removal ............................................................... 7A3-31
Installation ............................................................ 7A3-31
Shift Solenoid and Lock-Up Solenoid ..................7A3-32
Removal ............................................................... 7A3-32
Installation ............................................................ 7A3-33
Valve Body Assembly and Pressure Control Solenoid ................................................. 7A3-34
Removal ............................................................... 7A3-34
Installation ............................................................ 7A3-36
Rear Oil Seal (Adapter Housing, 4 ×4) ................. 7A3-37
Removal ............................................................... 7A3-37
Installation ............................................................ 7A3-37
Rear Oil Seal (Extension Housing, 4 ×2) .............. 7A3-38
Removal ............................................................... 7A3-38
Installation ............................................................ 7A3-38
Transmission Assembly .........................................7A3-39
Transmission and Associated Parts .................7A3-39
Removal ............................................................... 7A3-40
Installation ............................................................ 7A3-44
Major Components .............................................. 7A3-49
BACK TO CHAPTER INDEX
TO MODEL INDEX
ISUZU KB P190 2007
Page 4096 of 6020
ON-VEHICLE SERVICE (AW30–40LE) 7A3-11
Measure Time Lag
1. Fully apply the parking brake.
2. Start the engine. Check idling speed (A/C OFF).
3. Operate the select lever from “N" to “D" position.
Using a stopwatch, measure the time it takes from
shifting the lever until the shock is felt.
Time lag: Less than 0.7 seconds
4. In same manner, measure the time lag for “N" →
“R".
Time lag: Less than 1.2 seconds
Evaluation
1. If “N" → “D" time lag is longer than specified:
• Line pressure too low
• Forward clutch malfunction
• No.2 one-way clutch not operating properly
2. If “N" → “R" time lag is longer than specified:
• Line pressure too low
• Direct clutch malfunction
• First and Reverse brake malfunction
3. If both time lag is longer than specified:
• Line pressure too low
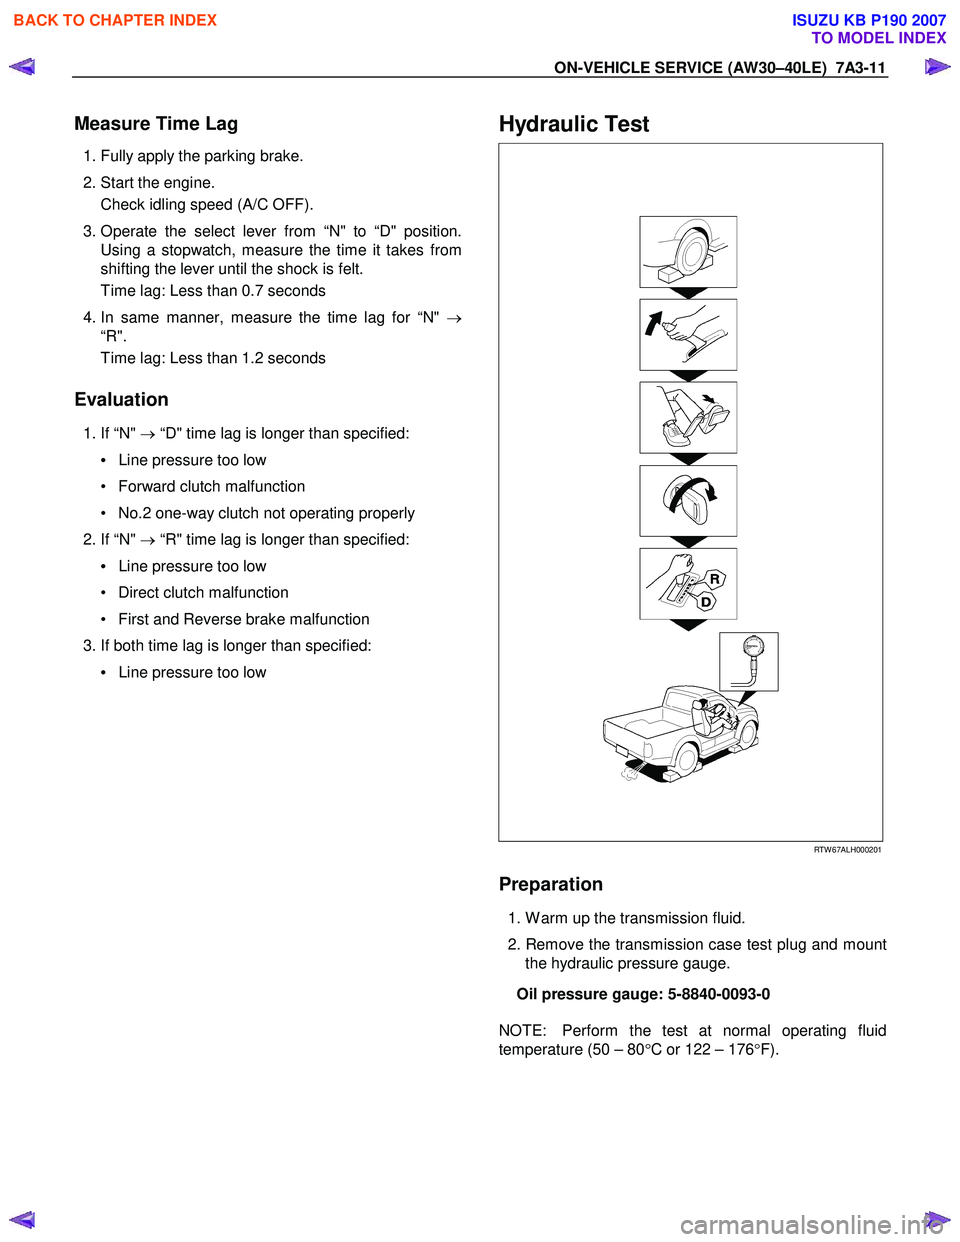
Hydraulic Test
RTW 67ALH000201
Preparation
1. W arm up the transmission fluid.
2. Remove the transmission case test plug and mount the hydraulic pressure gauge.
Oil pressure gauge: 5-8840-0093-0
NOTE: Perform the test at normal operating fluid
temperature (50 – 80 °C or 122 – 176 °F).
BACK TO CHAPTER INDEX
TO MODEL INDEX
ISUZU KB P190 2007
Page 4097 of 6020
7A3-12 ON-VEHICLE SERVICE (AW30–40LE)
Measure Line Pressure
1. Fully apply the parking brake and chock the four
wheels.
2. Start the engine and check idling rpm.
3. Select into “D" position, step down strongly on the brake pedal with your left foot and while
manipulating the accelerator pedal with the right
foot, measure the line pressures at the engine
speeds specified in the table.
4. In the same manner, perform the test in “R" position.
Line pressure kPa (kg/cm
2/psi) Engine
speed “D" position “R" position
Idling 349 – 408
(3.6 – 4.2 /51 – 59) 577 – 675
(5.9 – 6.9/84 – 98)
Stall 1,206 – 1,353
(12.3–13.8/175–196) 1,646 – 1,979
(16.8–20.2/239–287)
Evaluation
1. If the measured values at all positions are higher
than specified:
• Pressure control solenoid defective
• Primary regulator valve defective
2. If the measured values at all positions are lowe
r
than specified:
• Primary regulator valve defective
• Oil pump defective
• Pressure control solenoid defective
3. If pressure is low in “D" position only:
• “D" position circuit fluid leakage
4. If pressure is low in “R" position only:
• “R" position circuit fluid leakage
Road Test
NOTE: Perform the test at normal operating fluid
temperature (50 – 80 °C or 122 – 176 °F).
“D" Position Test in “NORMAL", and
“POWER" Pattern
Select into the “D" position and hold the accelerator
pedal constant at the 50% and 100% throttle valve
opening positions.
Push in one of the pattern selector buttons and check
the following:
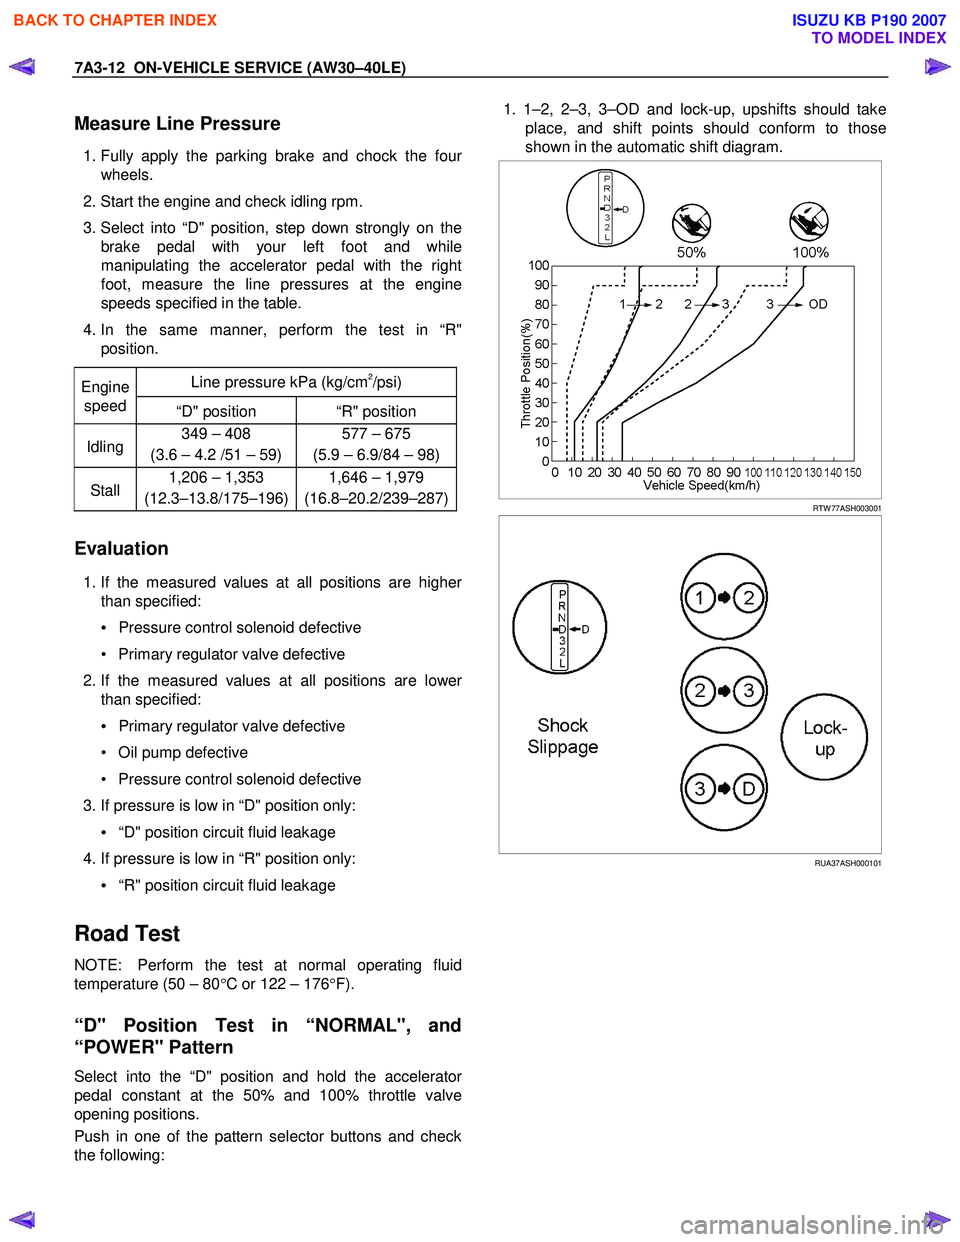
1. 1–2, 2–3, 3–OD and lock-up, upshifts should take
place, and shift points should conform to those
shown in the automatic shift diagram.
RTW 77ASH003001
RUA37ASH000101
BACK TO CHAPTER INDEX
TO MODEL INDEX
ISUZU KB P190 2007
Page 4137 of 6020
7A4–2 UNIT REPAIR (AW30–40LE)
Major Components (1)
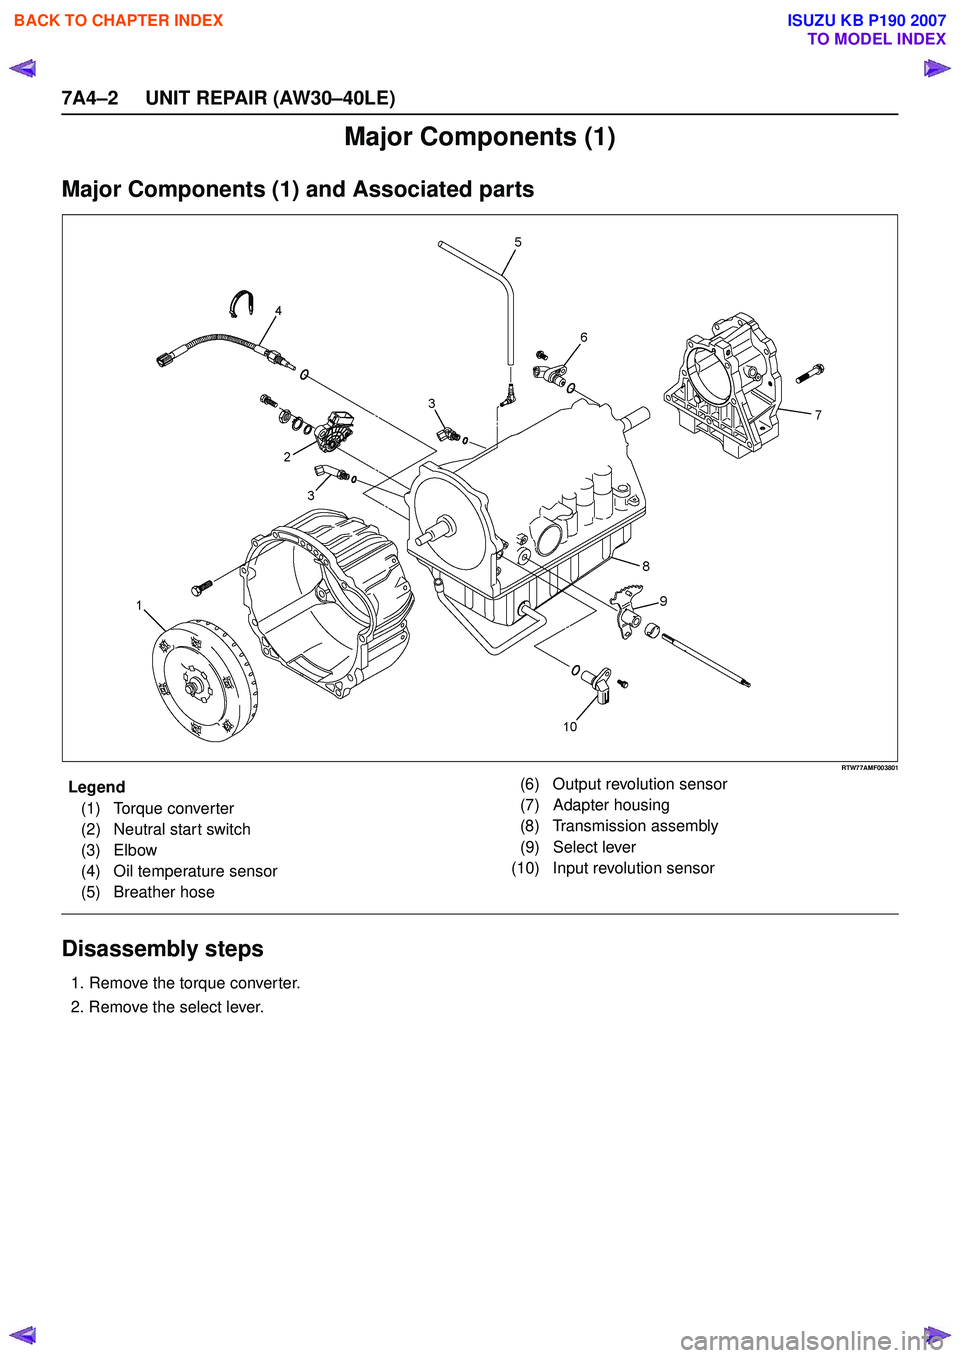
Major Components (1) and Associated parts
RTW77AMF003801
EndOFCallout
Disassembly steps
1. Remove the torque converter.
2. Remove the select lever.
Legend (1) Torque converter
(2) Neutral start switch
(3) Elbow
(4) Oil temperature sensor
(5) Breather hose (6) Output revolution sensor
(7) Adapter housing
(8) Transmission assembly
(9) Select lever
(10) Input revolution sensor
BACK TO CHAPTER INDEX
TO MODEL INDEX
ISUZU KB P190 2007
Page 4138 of 6020
UNIT REPAIR (AW30–40LE) 7A4–3
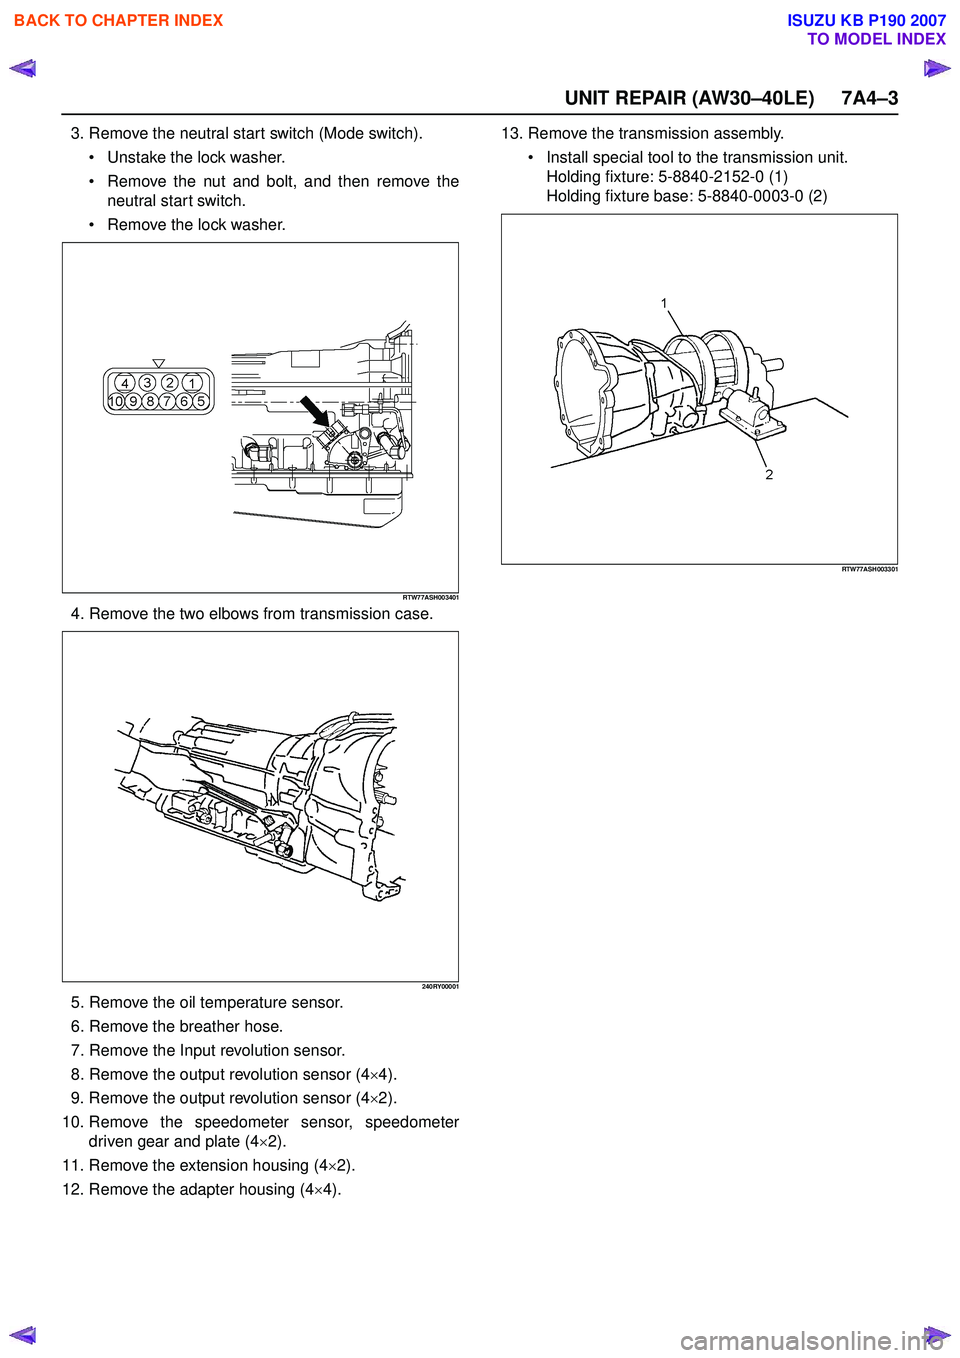
3. Remove the neutral start switch (Mode switch). Unstake the lock washer.
Remove the nut and bolt, and then remove the
neutral start switch.
Remove the lock washer.
RTW77ASH003401
4. Remove the two elbows from transmission case.
240RY00001
5. Remove the oil temperature sensor.
6. Remove the breather hose.
7. Remove the Input revolution sensor.
8. Remove the output revolution sensor (4 ×4).
9. Remove the output revolution sensor (4 ×2).
10. Remove the speedometer sensor, speedometer driven gear and plate (4 ×2).
11. Remove the extension housing (4 ×2).
12. Remove the adapter housing (4 ×4). 13. Remove the transmission assembly.
Install special tool to the transmission unit.
Holding fixture: 5-8840-2152-0 (1)
Holding fixture base: 5-8840-0003-0 (2)
RTW77ASH003301
BACK TO CHAPTER INDEX
TO MODEL INDEX
ISUZU KB P190 2007
Page 4139 of 6020
7A4–4 UNIT REPAIR (AW30–40LE)
Components (1)
Reassembly
1. Install a new gasket and the extension housing(4×2) to the transmission case.
Torque: 36 N·m (3.7 kgf·m/27 Ib ·ft)
2. Install the speedometer driven gear, plate, and speedometer sensor (4 ×2).
Torque:
Plate bolt – 15 N·m (1.5 kgf·m/11 Ib ·ft)
Speedometer sensor – 25 N·m (2.5 kgf·m/18 Ib ·ft)
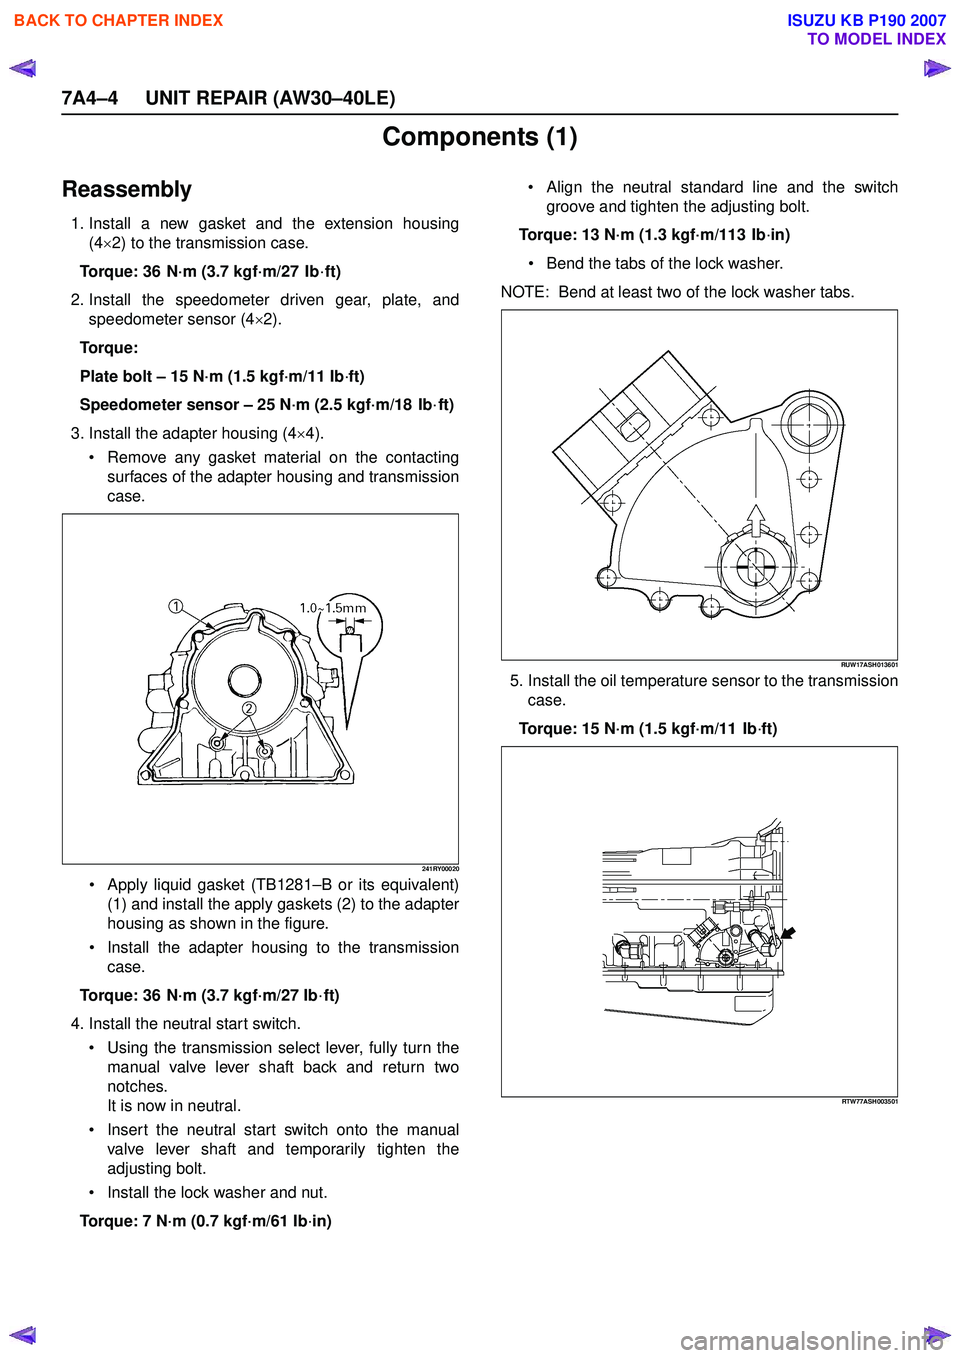
3. Install the adapter housing (4 ×4).
Remove any gasket material on the contacting
surfaces of the adapter housing and transmission
case.
241RY00020
Apply liquid gasket (TB1281 –B or its equivalent)
(1) and install the apply gaskets (2) to the adapter
housing as shown in the figure.
Install the adapter housing to the transmission
case.
Torque: 36 N·m (3.7 kgf·m/27 Ib ·ft)
4. Install the neutral start switch. Using the transmission select lever, fully turn the
manual valve lever shaft back and return two
notches.
It is now in neutral.
Insert the neutral start switch onto the manual
valve lever shaft and temporarily tighten the
adjusting bolt.
Install the lock washer and nut.
Torque: 7 N·m (0.7 kgf·m/61 Ib ·in)
Align the neutral standard line and the switch
groove and tighten the adjusting bolt.
Torque: 13 N·m (1.3 kgf·m/113 Ib ·in)
Bend the tabs of the lock washer.
NOTE: Bend at least two of the lock washer tabs.
RUW17ASH013601
5. Install the oil temperature sensor to the transmission case.
Torque: 15 N·m (1.5 kgf·m/11 Ib ·ft)
RTW77ASH003501
BACK TO CHAPTER INDEX
TO MODEL INDEX
ISUZU KB P190 2007
Page 4256 of 6020
CONSTRUCTION AND FUNCTION 7A1-17
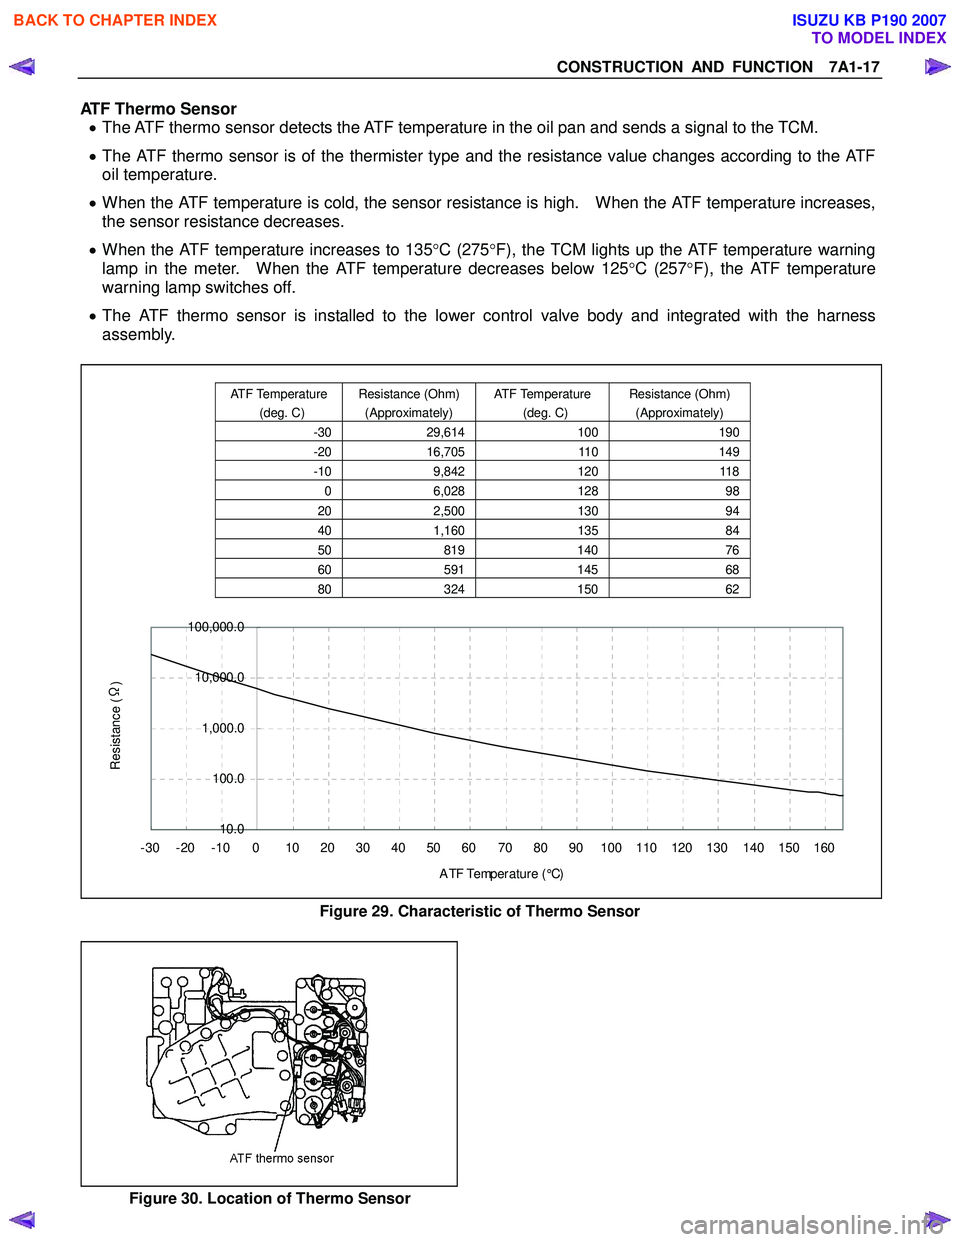
ATF Thermo Sensor • The ATF thermo sensor detects the ATF temperature in the oil pan and sends a signal to the TCM.
• The ATF thermo sensor is of the thermister type and the resistance value changes according to the ATF
oil temperature.
• When the ATF temperature is cold, the sensor resistance is high. When the ATF temperature increases,
the sensor resistance decreases.
• When the ATF temperature increases to 135 °C (275 °F), the TCM lights up the ATF temperature warning
lamp in the meter. When the ATF temperature decreases below 125 °C (257 °F), the ATF temperature
warning lamp switches off.
• The ATF thermo sensor is installed to the lower control valve body and integrated with the harness
assembly.
10.0
100.0
1,000.0
10,000.0
100,000.0
-30 -20 -10 0 10 20 30 40 50 60 70 80 90 100 110 120 130 140 150 160 A TF Temp er a t ur e ( °C)
Resistance (Ω
)
Figure 29. Characteristic of Thermo Sensor
Figure 30. Location of Thermo Sensor
ATF Temperature
(deg. C) Resistance (Ohm)
(Approximately) ATF Temperature
(deg. C) Resistance (Ohm)
(Approximately)
-30 29,614 100190
-20 16,705 110149
-10 9,842 120118
0 6,028 128 98
20 2,500 130 94
40 1,160 135 84
50 819 140 76
60 591 14568
80 324 15062
BACK TO CHAPTER INDEX
TO MODEL INDEX
ISUZU KB P190 2007
Page 4265 of 6020
7A1-26 CONSTRUCTION AND FUNCTION
CONTROL MECHANISM
CONTENT OF FUNCTION AND CONTROL
Item Description
Line pressure control TCM issues a signal according to vehicle travel, engine load and other conditions, which
drives the ON/OFF type line pressure solenoid to switch the line pressure to high or low
pressure.
The line pressure solenoid is switched to the low pressure side when the solenoid is turned
ON (power supplied) and to the high pressure side when turned OFF (no power supplied).
In the forward travel position (D, 3, 2, L position), the line pressure decreases lower than
that in the P, N, and R position through the oil pressure circuit.
Gear shift control The TCM issues a shift solenoid drive signal based on the traveling mode switch, inhibitor
switch, the vehicle speed, the APP opening and other input signals, to control the optimum
gear position automatically.
Shift features have been set up to the TCM; the normal mode is suited to normal travel, and
the power mode is used when the vehicle is loaded or the speed accelerated.
In addition, shift features used only for high oil temperature, hill climbing, and downward
travel have been set up to the TCM. These are automatically switched depending on the
travel conditions.
W hen the oil temperature is low (10°C or less), shifting up from the third speed to the fourth
speed is prohibited by the gear shift control.
Shift pattern selection
control
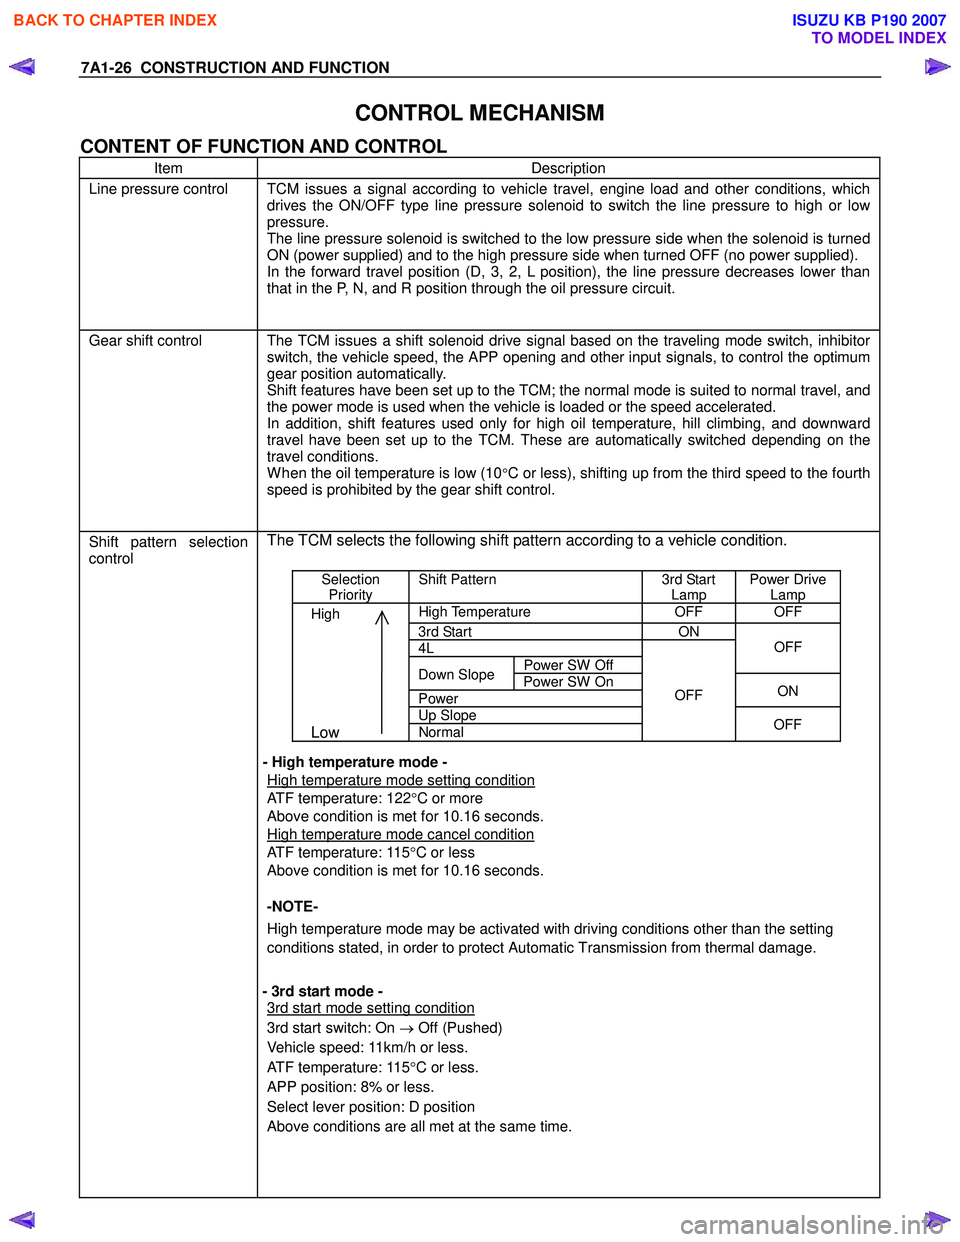
The TCM selects the following shift pattern according to a vehicle condition.
Selection
Priority Shift Pattern 3rd Start
Lamp Power Drive
Lamp
High High Temperature OFF OFF
3rd Start ON
4L
Power SW Off
OFF
Down Slope
Power SW On
Power ON
Up Slope
Low Normal
OFF
OFF
- High temperature mode -
High temperature mode setting condition
ATF temperature: 122 °C or more
Above condition is met for 10.16 seconds.
High temperature mode cancel condition
ATF temperature: 115 °C or less
Above condition is met for 10.16 seconds.
-NOTE-
High temperature mode may be activated with driving conditions other than the setting
conditions stated, in order to protect Automatic Transmission from thermal damage.
- 3rd start mode -
3rd start mode setting condition
3rd start switch: On → Off (Pushed)
Vehicle speed: 11km/h or less.
ATF temperature: 115 °C or less.
APP position: 8% or less.
Select lever position: D position
Above conditions are all met at the same time.
BACK TO CHAPTER INDEX
TO MODEL INDEX
ISUZU KB P190 2007