2007 ISUZU KB P190 low oil pressure
[x] Cancel search: low oil pressurePage 3514 of 6020
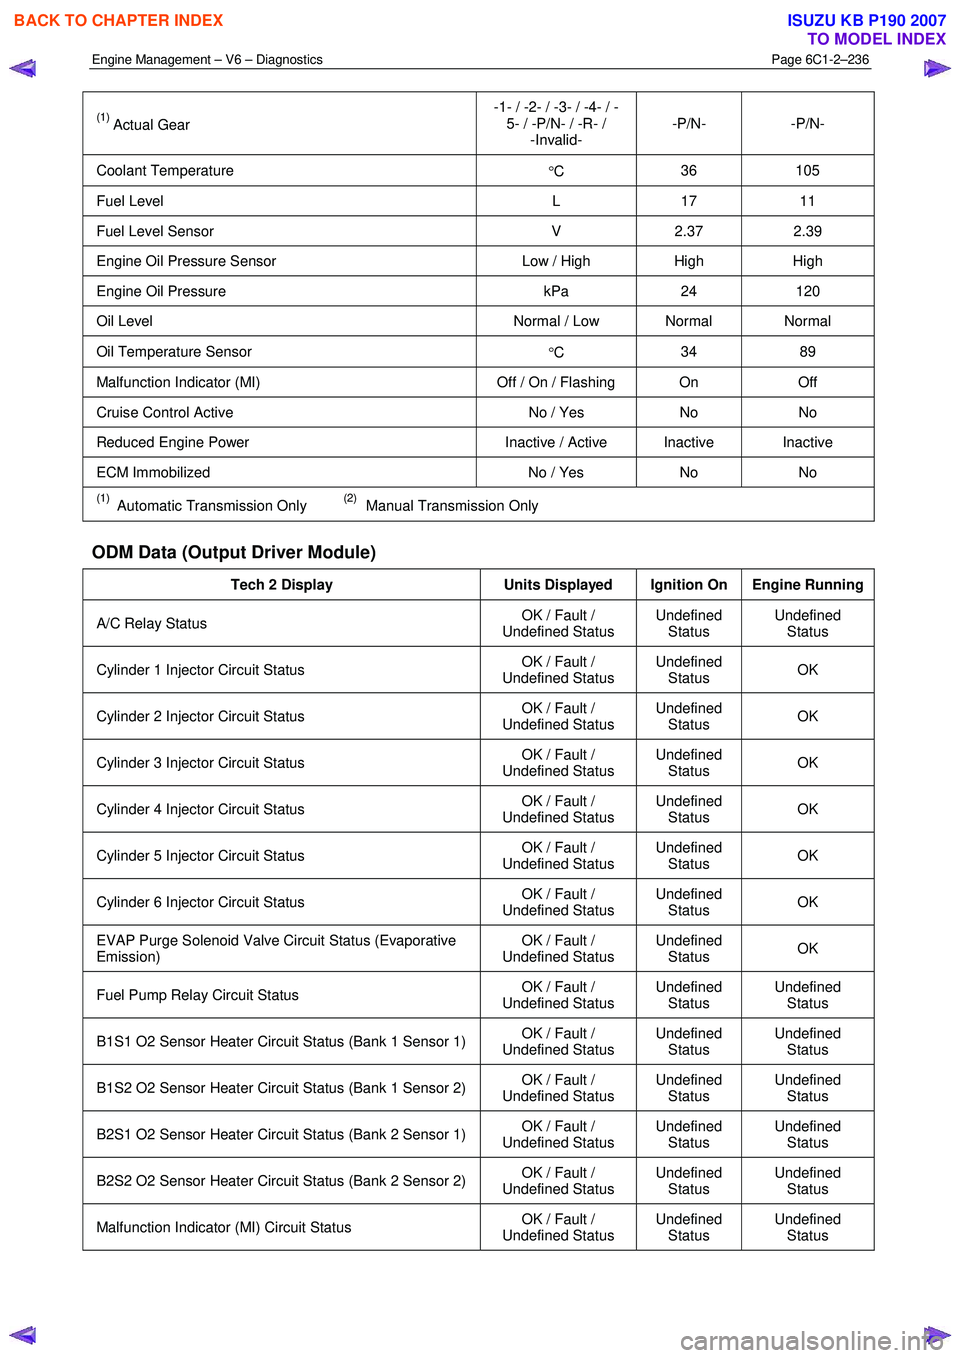
Engine Management – V6 – Diagnostics Page 6C1-2–236
(1) Actual Gear -1- / -2- / -3- / -4- / -
5- / -P/N- / -R- / -Invalid- -P/N- -P/N-
Coolant Temperature
°C 36 105
Fuel Level
L 17 11
Fuel Level Sensor V 2.37 2.39
Engine Oil Pressure Sensor Low / High High High
Engine Oil Pressure kPa 24 120
Oil Level Normal / Low Normal Normal
Oil Temperature Sensor
°C 34 89
Malfunction Indicator (MI)
Off / On / Flashing On Off
Cruise Control Active No / Yes No No
Reduced Engine Power Inactive / Active Inactive Inactive
ECM Immobilized No / Yes No No
(1) Automatic Transmission Only (2) Manual Transmission Only
ODM Data (Output Driver Module)
Tech 2 Display Units Displayed Ignition On Engine Running
A/C Relay Status OK / Fault /
Undefined Status Undefined
Status Undefined
Status
Cylinder 1 Injector Circuit Status OK / Fault /
Undefined Status Undefined
Status OK
Cylinder 2 Injector Circuit Status
OK / Fault /
Undefined Status Undefined
Status OK
Cylinder 3 Injector Circuit Status
OK / Fault /
Undefined Status Undefined
Status OK
Cylinder 4 Injector Circuit Status
OK / Fault /
Undefined Status Undefined
Status OK
Cylinder 5 Injector Circuit Status
OK / Fault /
Undefined Status Undefined
Status OK
Cylinder 6 Injector Circuit Status
OK / Fault /
Undefined Status Undefined
Status OK
EVAP Purge Solenoid Valve Circuit Status (Evaporative
Emission) OK / Fault /
Undefined Status Undefined
Status OK
Fuel Pump Relay Circuit Status
OK / Fault /
Undefined Status Undefined
Status Undefined
Status
B1S1 O2 Sensor Heater Circuit Status (Bank 1 Sensor 1) OK / Fault /
Undefined Status Undefined
Status Undefined
Status
B1S2 O2 Sensor Heater Circuit Status (Bank 1 Sensor 2) OK / Fault /
Undefined Status Undefined
Status Undefined
Status
B2S1 O2 Sensor Heater Circuit Status (Bank 2 Sensor 1) OK / Fault /
Undefined Status Undefined
Status Undefined
Status
B2S2 O2 Sensor Heater Circuit Status (Bank 2 Sensor 2) OK / Fault /
Undefined Status Undefined
Status Undefined
Status
Malfunction Indicator (MI) Circuit Status OK / Fault /
Undefined Status Undefined
Status Undefined
Status
BACK TO CHAPTER INDEX
TO MODEL INDEX
ISUZU KB P190 2007
Page 3518 of 6020

Engine Management – V6 – Diagnostics Page 6C1-2–240
Cruise Control Switch: This parameter displays the state of the cruise control on/off switch input to the control module.
Cruise Control Disengagement Reason: The parameter displays which of a possible 28 causes for the cruise control
to disengage.
CC Disengagement 1 – 8 History (Cruise Control): The parameter displays the last 8 cruise control disengages in
order from 1 to 8, with 8 being the most recent. There are about 28 possible causes for the cruise control to disengage.
Cruise Resume/Acceleration Switch: This parameter displays the state of the cruise control resume/accel switch
position input to the ECM.
Cruise Set / Coast Switch: This parameter displays the state of the cruise controls set/decel. switch position input to
the ECM.
Cycles of Misfire: This parameter displays the number of misfire tests during 200 engine revolutions.
Cylinder 1 – 6 Injector Circuit Status: This parameter displays the state of the fuel injector control circuit. The
parameter displays ‘Fault’ if the fuel injector control circuit is open, shorted to ground, or shorted to voltage. This
parameter displays ‘Undefined Status’ until the control circuit has been commanded ‘On’.
Dec. Fuel Cutoff (Deceleration): This parameter displays the status of the ECM operating mode, used to turn off the
fuel injectors and the evaporative emission (EVAP) canister purge valve during certain deceleration conditions.
Desired Engine Idle Speed: This parameter displays the desired engine idle speed as commanded by the ECM.
Desired Throttle Position: This parameter displays the desired throttle position (TP) angle commanded by the ECM.
Distance Since DTC Cleared: This parameter displays the distance (km) travelled since any diagnostic trouble code
(DTC) has been cleared from the ECM memory.
DTC Set This Ignition: This parameter displays Yes if a DTC set on the current ignition cycle.
ECM Immobilized: This parameter displays ‘Yes’ when an internal control module reset occurs. Tech 2 will display ‘No’
under normal operating conditions.
Electronic Throttle Control Learn Counter: W hen the ECM performs a throttle body relearn procedure, the throttle
plate is commanded to move from the rest position (7% open) to full closed (0%), then to around 10% open.
At the start of this procedure, the Tech 2 ‘TAC Learn Counter’ parameter should display 0, then count up to 11 after the
procedure is completed. If the counter did not start at 0 or if the counter did not end at 11, a fault has occurred and a
DTC should set.
Engine Control Ignition Relay: This parameter displays the state of the control circuit for control module power relay
as commanded by the ECM.
Engine Control Ignition Relay Feedback: This parameter displays the voltage available at the engine control ignition
relay pin of the control module.
Engine Load: This parameter displays the calculated engine load in percent based on inputs to the control module from
various engine sensors.
Engine Oil Life Remaining: This parameter displays the percentage of engine oil life remaining. The controller
calculates the engine oil life by monitoring engine load, collant temperature and engine speed.
Engine Oil Pressure: This parameter displays the oil pressure in kPa from the ECM, developed from the engine oil
pressure (EOP) sensor input.
Engine Oil Pressure Sensor: This parameter displays ‘High’ if the engine oil pressure is within the correct range. If the
ECM detects that the engine oil pressure is not within the correct range, Tech 2 will display ‘Low’.
Engine Runtime: This parameter displays the time elapsed since the engine was started.
Engine Speed: This parameter displays the speed of the engine crankshaft rotation from information received from the
CKP sensor. If there is a CKP sensor DTC, the ECM calculates the engine speed from one of the camshaft position
(CMP) sensors.
EVAP Purge Solenoid (Evaporative Emission): This parameter displays the on-time or duty cycle of the EVAP
canister purge solenoid commanded by the ECM. Zero percent indicates no purge. One hundred percent indicates full
purge.
EVAP Purge Solenoid Valve Circuit Status (Evaporative Emission): This parameter displays the state of the EVAP
purge solenoid control circuit. The parameter displays ‘Fault’ if the EVAP purge solenoid control circuit is open, shorted
to ground, or shorted to voltage. The parameter displays ‘Undefined Status’ until the circuit has been established as
‘OK’.
Cooling Fan Relay: This parameter displays the control module commanded state of the fan relay control circuit.
BACK TO CHAPTER INDEX
TO MODEL INDEX
ISUZU KB P190 2007
Page 3526 of 6020
Engine Management – V6 – Service Operations Page 6C1-3–2
Reinstall ................................................................................................................................................................ 20
ECM Reset ...................................................................................................................... ...................................... 20
2.8 Engine Control Module Bracket Assembly......................................................................................... ............... 21
Remove ................................................................................................................................................................. 21
Reinstall ................................................................................................................................................................ 21
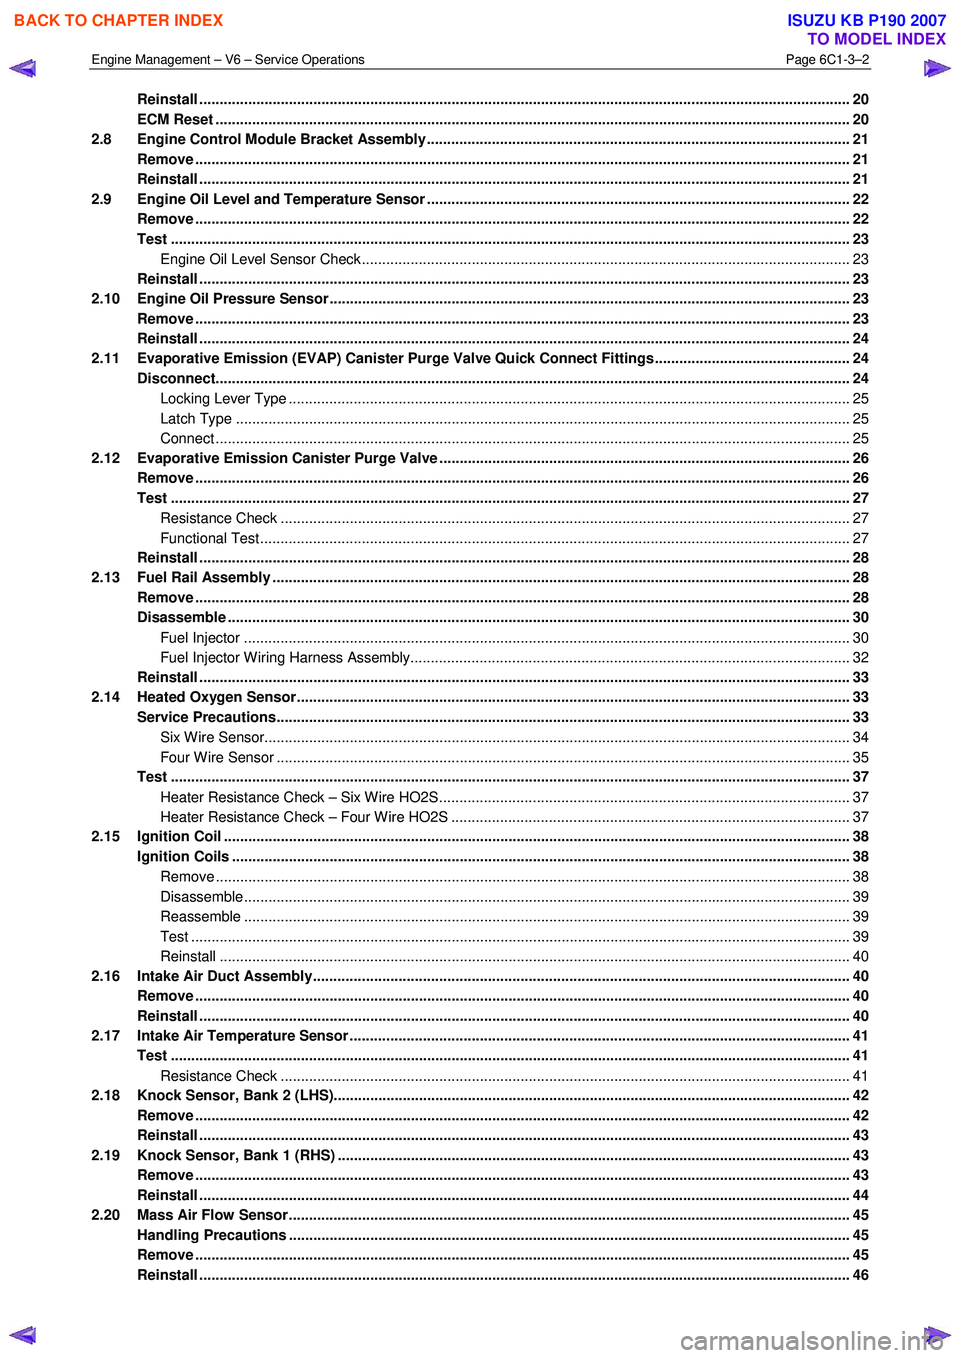
2.9 Engine Oil Level and Temperature Sensor ........................................................................................ ................ 22
Remove ................................................................................................................................................................. 22
Test ....................................................................................................................................................................... 23
Engine Oil Level Sensor Check .................................................................................................. ...................... 23
Reinstall ................................................................................................................................................................ 23
2.10 Engine Oil Pressure Sensor..................................................................................................... ........................... 23
Remove ................................................................................................................................................................. 23
Reinstall ................................................................................................................................................................ 24
2.11 Evaporative Emission (EVAP) Canister Purge Valve Quick Connect Fittings ................................................ 24
Disconnect..................................................................................................................... ....................................... 24
Locking Lever Type ............................................................................................................. ............................. 25
Latch Type ....................................................................................................................................................... 25
Connect ............................................................................................................................................................ 25
2.12 Evaporative Emission Canister Purge Valve ...................................................................................... ............... 26
Remove ................................................................................................................................................................. 26
Test ....................................................................................................................................................................... 27
Resistance Check ............................................................................................................... ............................. 27
Functional Test................................................................................................................................................. 27
Reinstall ................................................................................................................................................................ 28
2.13 Fuel Rail Assembly ............................................................................................................. ................................. 28
Remove ................................................................................................................................................................. 28
Disassemble ......................................................................................................................................................... 30
Fuel Injector ..................................................................................................................................................... 30
Fuel Injector Wiring Harness Assembly.......................................................................................... .................. 32
Reinstall ................................................................................................................................................................ 33
2.14 Heated Oxygen Sensor........................................................................................................... ............................. 33
Service Precautions............................................................................................................................................. 33
Six Wire Sensor................................................................................................................................................ 34
Four Wire Sensor ............................................................................................................... .............................. 35
Test ....................................................................................................................................................................... 37
Heater Resistance Check – Six Wire HO2S........................................................................................ ............. 37
Heater Resistance Check – Four Wire HO2S ....................................................................................... ........... 37
2.15 Ignition Coil .......................................................................................................................................................... 38
Ignition Coils ................................................................................................................. ....................................... 38
Remove ............................................................................................................................................................ 38
Disassemble..................................................................................................................................................... 39
Reassemble ..................................................................................................................................................... 39
Test .................................................................................................................................................................. 39
Reinstall ........................................................................................................................................................... 40
2.16 Intake Air Duct Assembly....................................................................................................... ............................. 40
Remove ................................................................................................................................................................. 40
Reinstall ................................................................................................................................................................ 40
2.17 Intake Air Temperature Sensor .................................................................................................. ......................... 41
Test ....................................................................................................................................................................... 41
Resistance Check ............................................................................................................... ............................. 41
2.18 Knock Sensor, Bank 2 (LHS)..................................................................................................... .......................... 42
Remove ................................................................................................................................................................. 42
Reinstall ................................................................................................................................................................ 43
2.19 Knock Sensor, Bank 1 (RHS) ..................................................................................................... ......................... 43
Remove ................................................................................................................................................................. 43
Reinstall ................................................................................................................................................................ 44
2.20 Mass Air Flow Sensor........................................................................................................... ............................... 45
Handling Precautions .......................................................................................................................................... 45
Remove ................................................................................................................................................................. 45
Reinstall ................................................................................................................................................................ 46
BACK TO CHAPTER INDEX
TO MODEL INDEX
ISUZU KB P190 2007
Page 3547 of 6020
Engine Management – V6 – Service Operations Page 6C1-3–23
Test
Engine Oil Level Sensor Check
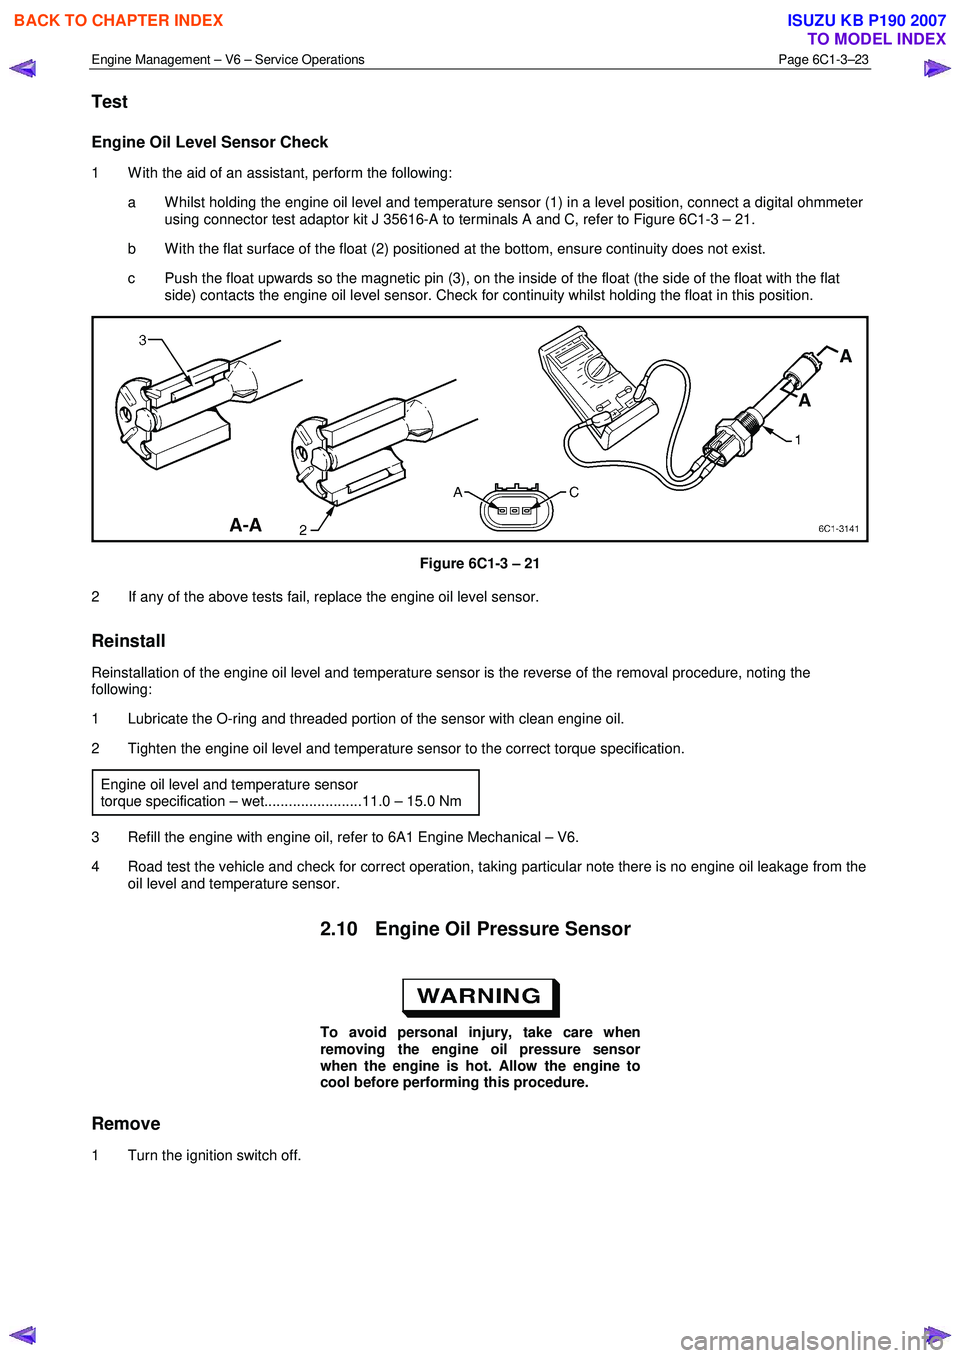
1 W ith the aid of an assistant, perform the following:
a W hilst holding the engine oil level and temperature sensor (1) in a level position, connect a digital ohmmeter using connector test adaptor kit J 35616-A to terminals A and C, refer to Figure 6C1-3 – 21.
b W ith the flat surface of the float (2) positioned at the bottom, ensure continuity does not exist.
c Push the float upwards so the magnetic pin (3), on the inside of the float (the side of the float with the flat side) contacts the engine oil level sensor. Check for continuity whilst holding the float in this position.
Figure 6C1-3 – 21
2 If any of the above tests fail, replace the engine oil level sensor.
Reinstall
Reinstallation of the engine oil level and temperature sensor is the reverse of the removal procedure, noting the
following:
1 Lubricate the O-ring and threaded portion of the sensor with clean engine oil.
2 Tighten the engine oil level and temperature sensor to the correct torque specification.
Engine oil level and temperature sensor
torque specification – wet........................11.0 – 15.0 Nm
3 Refill the engine with engine oil, refer to 6A1 Engine Mechanical – V6.
4 Road test the vehicle and check for correct operation, taking particular note there is no engine oil leakage from the oil level and temperature sensor.
2.10 Engine Oil Pressure Sensor
To avoid personal injury, take care when
removing the engine oil pressure sensor
when the engine is hot. Allow the engine to
cool before performing this procedure.
Remove
1 Turn the ignition switch off.
BACK TO CHAPTER INDEX
TO MODEL INDEX
ISUZU KB P190 2007
Page 3548 of 6020
Engine Management – V6 – Service Operations Page 6C1-3–24
Clean the area around the engine oil pressure
sensor before removal to avoid debris from
entering the engine.
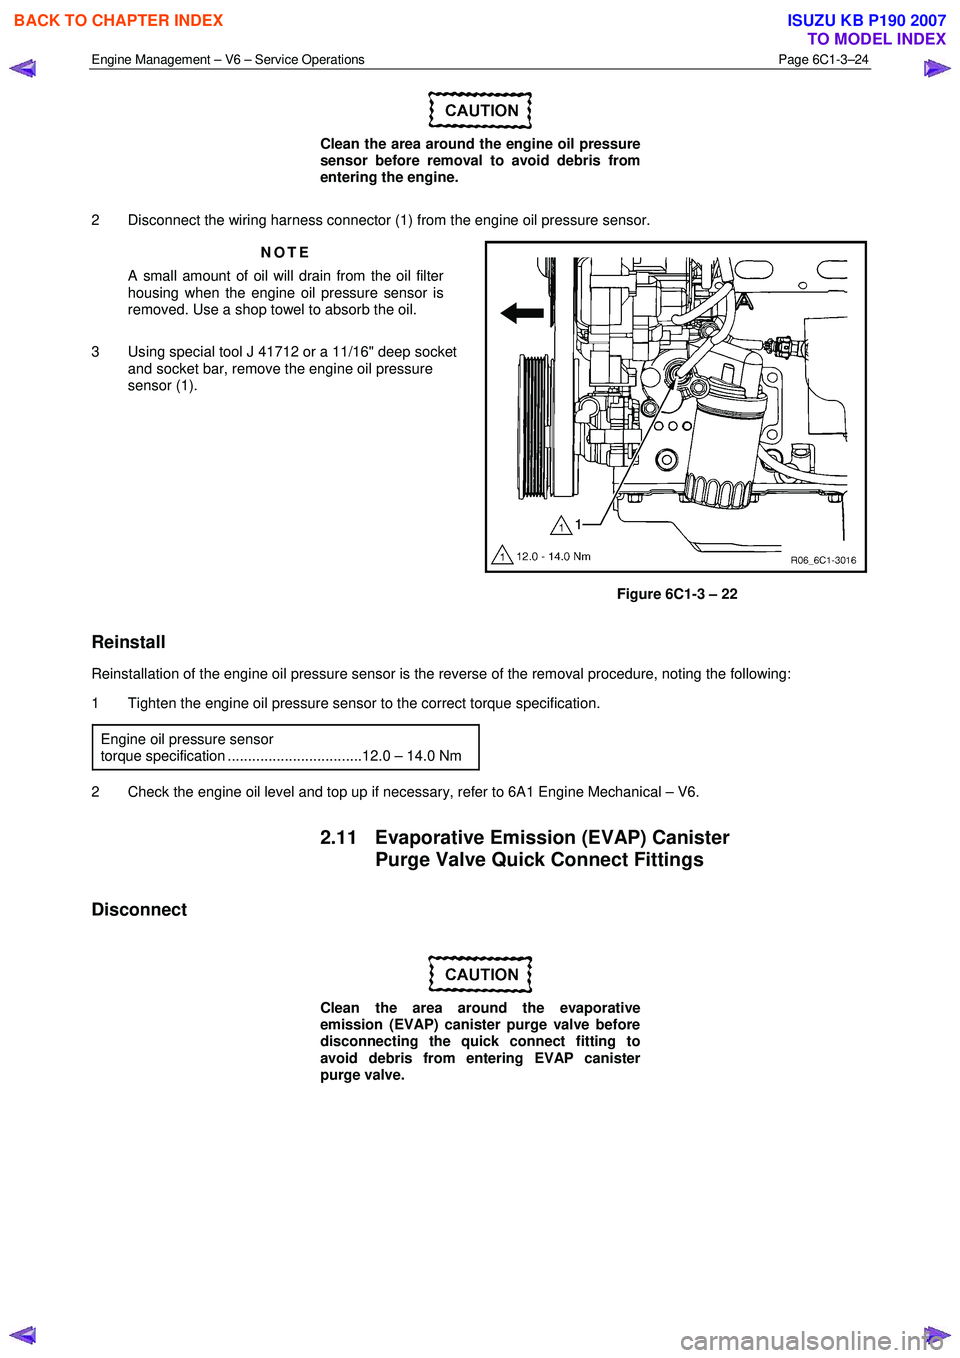
2 Disconnect the wiring harness connector (1) from the engine oil pressure sensor. NOTE
A small amount of oil will drain from the oil filter
housing when the engine oil pressure sensor is
removed. Use a shop towel to absorb the oil.
3 Using special tool J 41712 or a 11/16" deep socket and socket bar, remove the engine oil pressure
sensor (1).
Figure 6C1-3 – 22
Reinstall
Reinstallation of the engine oil pressure sensor is the reverse of the removal procedure, noting the following:
1 Tighten the engine oil pressure sensor to the correct torque specification.
Engine oil pressure sensor
torque specification .................................12.0 – 14.0 Nm
2 Check the engine oil level and top up if necessary, refer to 6A1 Engine Mechanical – V6.
2.11 Evaporative Emission (EVAP) Canister Purge Valve Quick Connect Fittings
Disconnect
Clean the area around the evaporative
emission (EVAP) canister purge valve before
disconnecting the quick connect fitting to
avoid debris from entering EVAP canister
purge valve.
BACK TO CHAPTER INDEX
TO MODEL INDEX
ISUZU KB P190 2007
Page 3585 of 6020
Engine Management – V6 – Service Operations Page 6C1-3–61
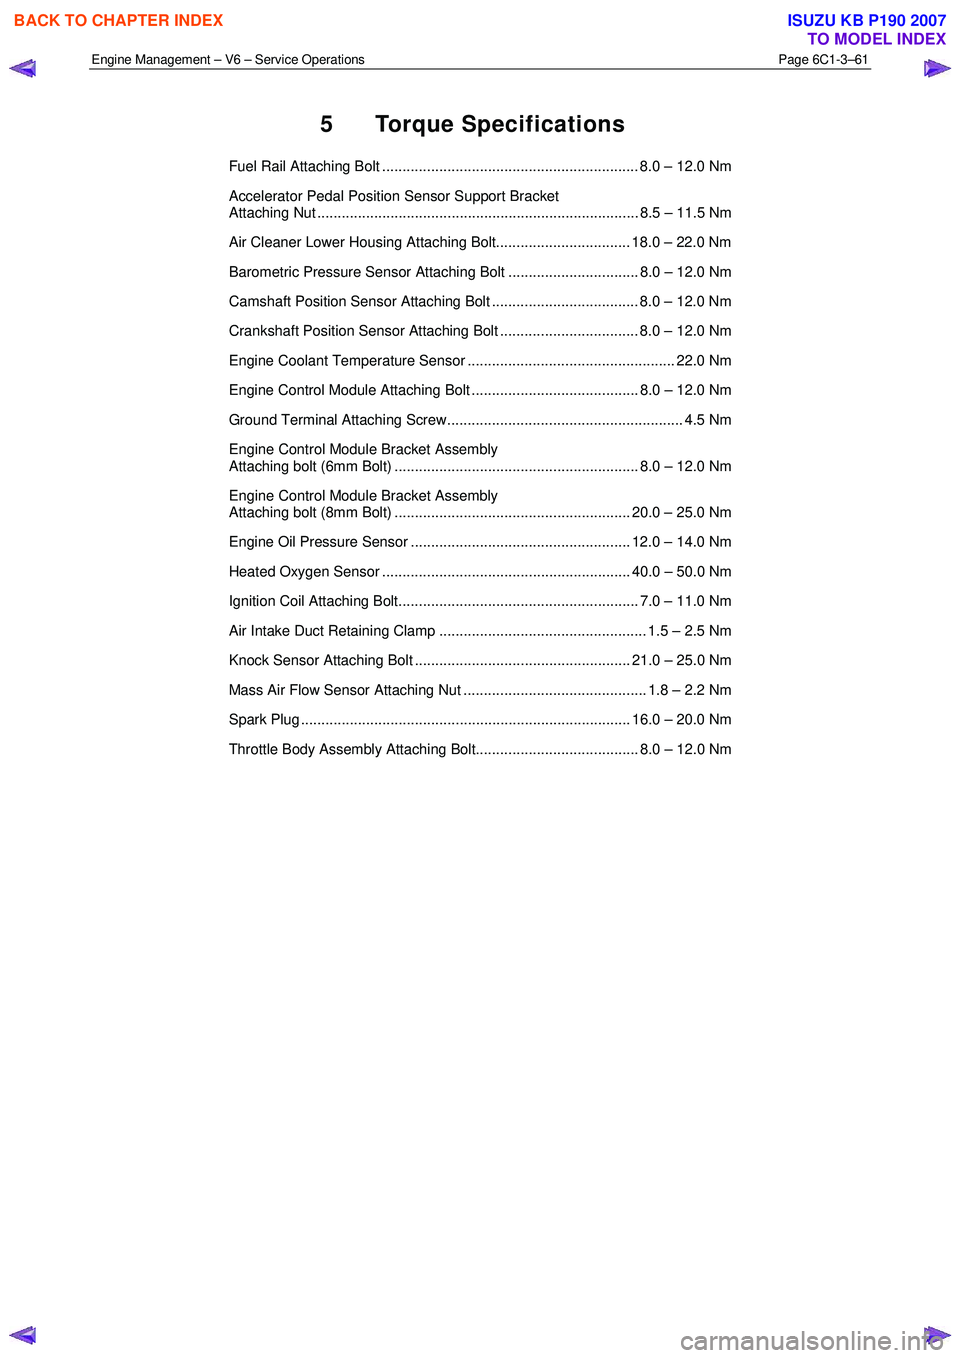
5 Torque Specifications
Fuel Rail Attaching Bolt ............................................................... 8.0 – 12.0 Nm
Accelerator Pedal Position Sensor Support Bracket
Attaching Nut ............................................................................... 8.5 – 11.5 Nm
Air Cleaner Lower Housing Attaching Bolt................................. 18.0 – 22.0 Nm
Barometric Pressure Sensor Attaching Bolt ................................ 8.0 – 12.0 Nm
Camshaft Position Sensor Attaching Bolt .................................... 8.0 – 12.0 Nm
Crankshaft Position Sensor Attaching Bolt .................................. 8.0 – 12.0 Nm
Engine Coolant Temperature Sensor ................................................... 22.0 Nm
Engine Control Module Attaching Bolt ......................................... 8.0 – 12.0 Nm
Ground Terminal Attaching Screw.......................................................... 4.5 Nm
Engine Control Module Bracket Assembly
Attaching bolt (6mm Bolt) ............................................................ 8.0 – 12.0 Nm
Engine Control Module Bracket Assembly
Attaching bolt (8mm Bolt) .......................................................... 20.0 – 25.0 Nm
Engine Oil Pressure Sensor ...................................................... 12.0 – 14.0 Nm
Heated Oxygen Sensor ............................................................. 40.0 – 50.0 Nm
Ignition Coil Attaching Bolt........................................................... 7.0 – 11.0 Nm
Air Intake Duct Retaining Clamp ................................................... 1.5 – 2.5 Nm
Knock Sensor Attaching Bolt ..................................................... 21.0 – 25.0 Nm
Mass Air Flow Sensor Attaching Nut ............................................. 1.8 – 2.2 Nm
Spark Plug ................................................................................. 16.0 – 20.0 Nm
Throttle Body Assembly Attaching Bolt........................................ 8.0 – 12.0 Nm
BACK TO CHAPTER INDEX
TO MODEL INDEX
ISUZU KB P190 2007
Page 3673 of 6020
Powertrain Interface Module – V6 Page 6E1–12
3 Component Description and
Operation
3.1 Powertrain Interface Module
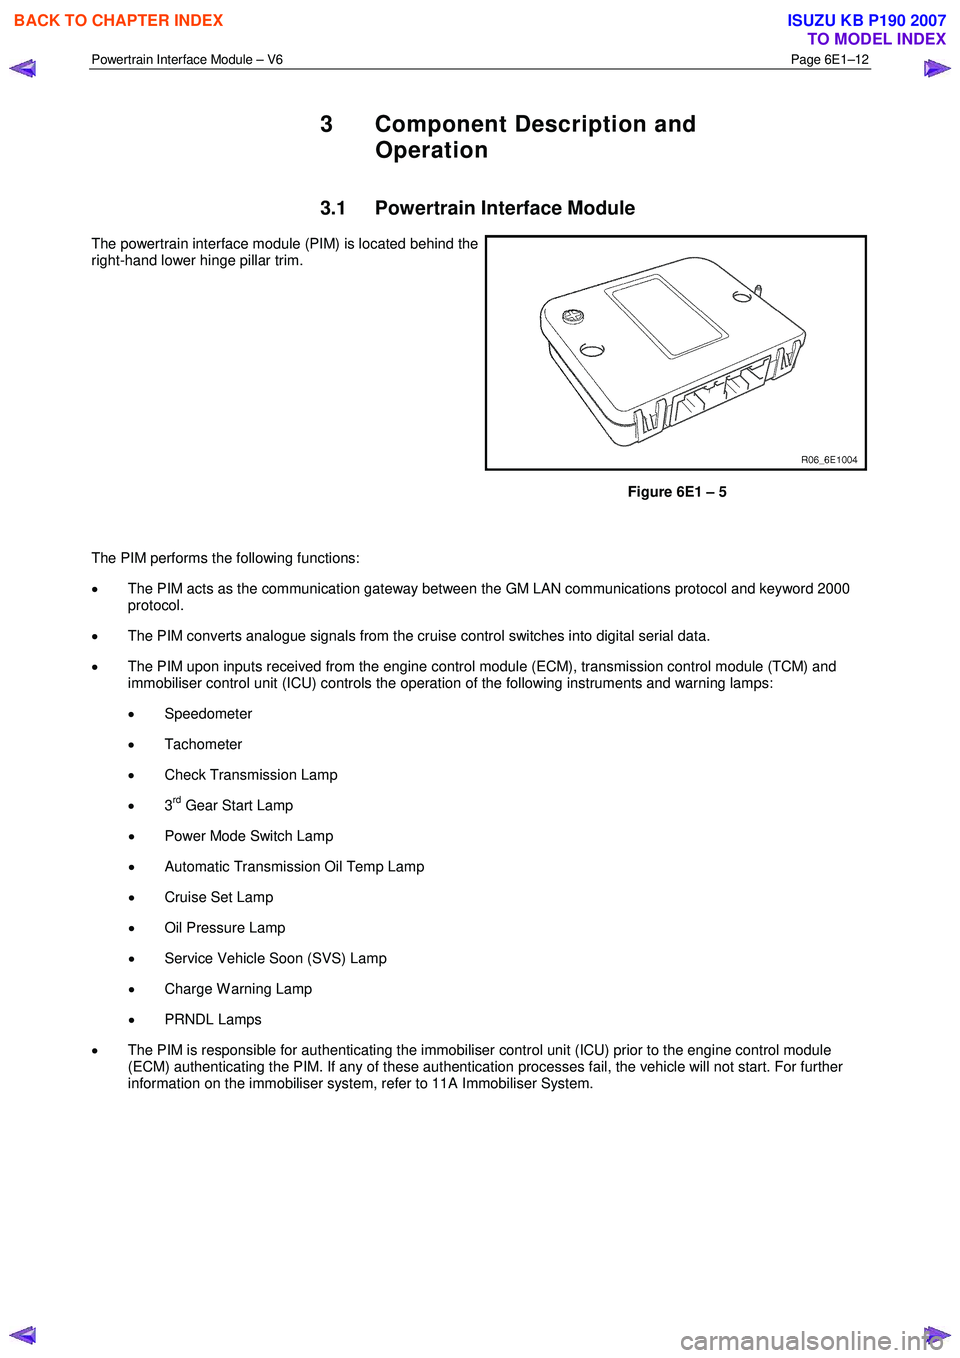
The powertrain interface module (PIM) is located behind the
right-hand lower hinge pillar trim.
Figure 6E1 – 5
The PIM performs the following functions:
• The PIM acts as the communication gateway between the GM LAN communications protocol and keyword 2000
protocol.
• The PIM converts analogue signals from the cruise control switches into digital serial data.
• The PIM upon inputs received from the engine control module (ECM), transmission control module (TCM) and
immobiliser control unit (ICU) controls the operation of the following instruments and warning lamps:
• Speedometer
• Tachometer
• Check Transmission Lamp
• 3
rd Gear Start Lamp
• Power Mode Switch Lamp
• Automatic Transmission Oil Temp Lamp
• Cruise Set Lamp
• Oil Pressure Lamp
• Service Vehicle Soon (SVS) Lamp
• Charge W arning Lamp
• PRNDL Lamps
• The PIM is responsible for authenticating the immobiliser control unit (ICU) prior to the engine control module
(ECM) authenticating the PIM. If any of these authentication processes fail, the vehicle will not start. For further
information on the immobiliser system, refer to 11A Immobiliser System.
BACK TO CHAPTER INDEX
TO MODEL INDEX
ISUZU KB P190 2007
Page 3742 of 6020
Powertrain Interface Module – V6 Page 6E1–81
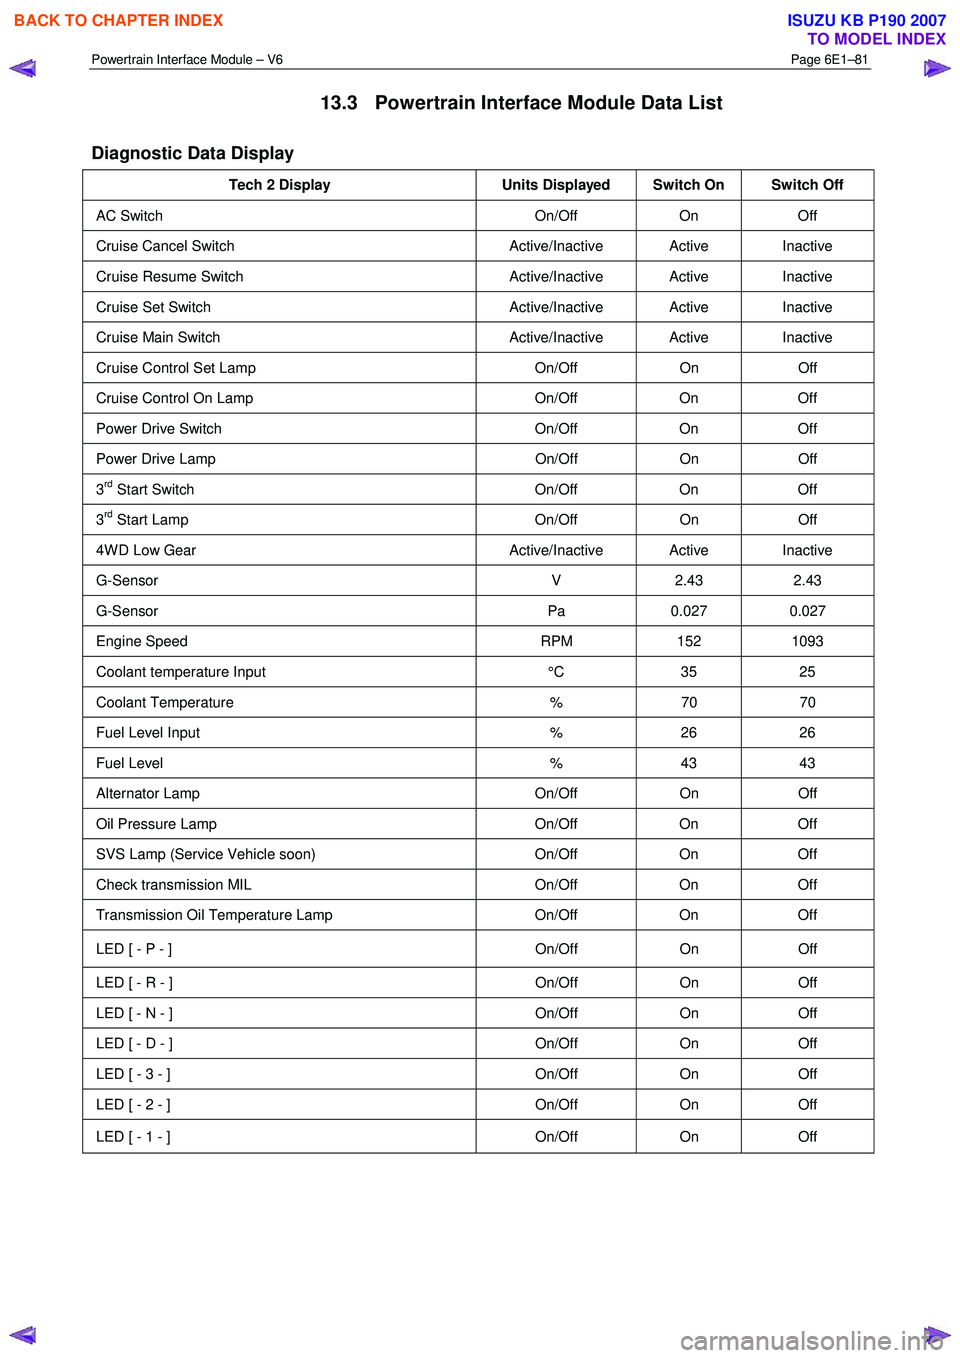
13.3 Powertrain Interface Module Data List
Diagnostic Data Display
Tech 2 Display Units Displayed Switch On Switch Off
AC Switch On/Off On Off
Cruise Cancel Switch Active/Inactive Active Inactive
Cruise Resume Switch Active/Inactive Active Inactive
Cruise Set Switch Active/Inactive Active Inactive
Cruise Main Switch Active/Inactive Active Inactive
Cruise Control Set Lamp On/Off On Off
Cruise Control On Lamp On/Off On Off
Power Drive Switch On/Off On Off
Power Drive Lamp On/Off On Off
3rd Start Switch On/Off On Off
3rd Start Lamp On/Off On Off
4W D Low Gear Active/Inactive Active Inactive
G-Sensor V 2.43 2.43
G-Sensor Pa 0.027 0.027
Engine Speed RPM 152 1093
Coolant temperature Input °C 35 25
Coolant Temperature % 70 70
Fuel Level Input % 26 26
Fuel Level % 43 43
Alternator Lamp On/Off On Off
Oil Pressure Lamp On/Off On Off
SVS Lamp (Service Vehicle soon) On/Off On Off
Check transmission MIL On/Off On Off
Transmission Oil Temperature Lamp On/Off On Off
LED [ - P - ] On/Off On Off
LED [ - R - ] On/Off On Off
LED [ - N - ] On/Off On Off
LED [ - D - ] On/Off On Off
LED [ - 3 - ] On/Off On Off
LED [ - 2 - ] On/Off On Off
LED [ - 1 - ] On/Off On Off
BACK TO CHAPTER INDEX
TO MODEL INDEX
ISUZU KB P190 2007