Page 5745 of 6020
RESTRAINT CONTROL SYSTEM 9A1-63
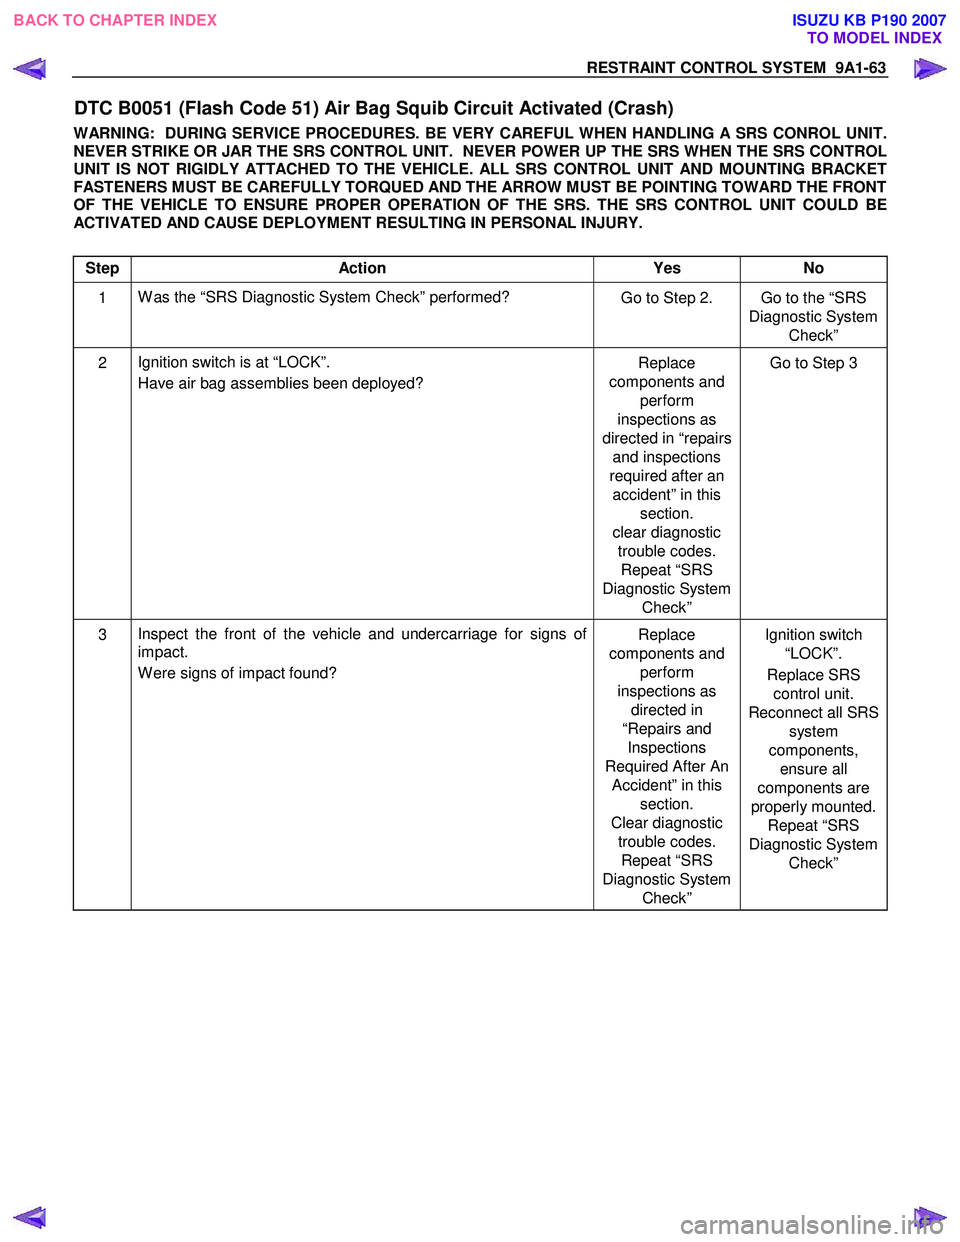
DTC B0051 (Flash Code 51) Air Bag Squib Circuit Activated (Crash)
WARNING: DURING SERVICE PROCEDURES. BE VERY CAREFUL WHEN HANDLING A SRS CONROL UNIT.
NEVER STRIKE OR JAR THE SRS CONTROL UNIT. NEVER POWER UP THE SRS WHEN THE SRS CONTROL
UNIT IS NOT RIGIDLY ATTACHED TO THE VEHICLE. ALL SRS CONTROL UNIT AND MOUNTING BRACKET
FASTENERS MUST BE CAREFULLY TORQUED AND THE ARROW MUST BE POINTING TOWARD THE FRONT
OF THE VEHICLE TO ENSURE PROPER OPERATION OF THE SRS. THE SRS CONTROL UNIT COULD BE
ACTIVATED AND CAUSE DEPLOYMENT RESULTING IN PERSONAL INJURY.
Step Action Yes No
1 W as the “SRS Diagnostic System Check” performed?
Go to Step 2. Go to the “SRS
Diagnostic System Check”
2 Ignition switch is at “LOCK”.
Have air bag assemblies been deployed? Replace
components and perform
inspections as
directed in “repairs and inspections
required after an accident” in this section.
clear diagnostic trouble codes. Repeat “SRS
Diagnostic System Check” Go to Step 3
3
Inspect the front of the vehicle and undercarriage for signs of
impact.
W ere signs of impact found? Replace
components and perform
inspections as directed in
“Repairs and Inspections
Required After An Accident” in this section.
Clear diagnostic trouble codes. Repeat “SRS
Diagnostic System Check” Ignition switch
“LOCK”.
Replace SRS control unit.
Reconnect all SRS system
components, ensure all
components are
properly mounted. Repeat “SRS
Diagnostic System Check”
BACK TO CHAPTER INDEX TO MODEL INDEX
ISUZU KB P190 2007
Page 5746 of 6020
9A1-64 RESTRAINT CONTROL SYSTEM
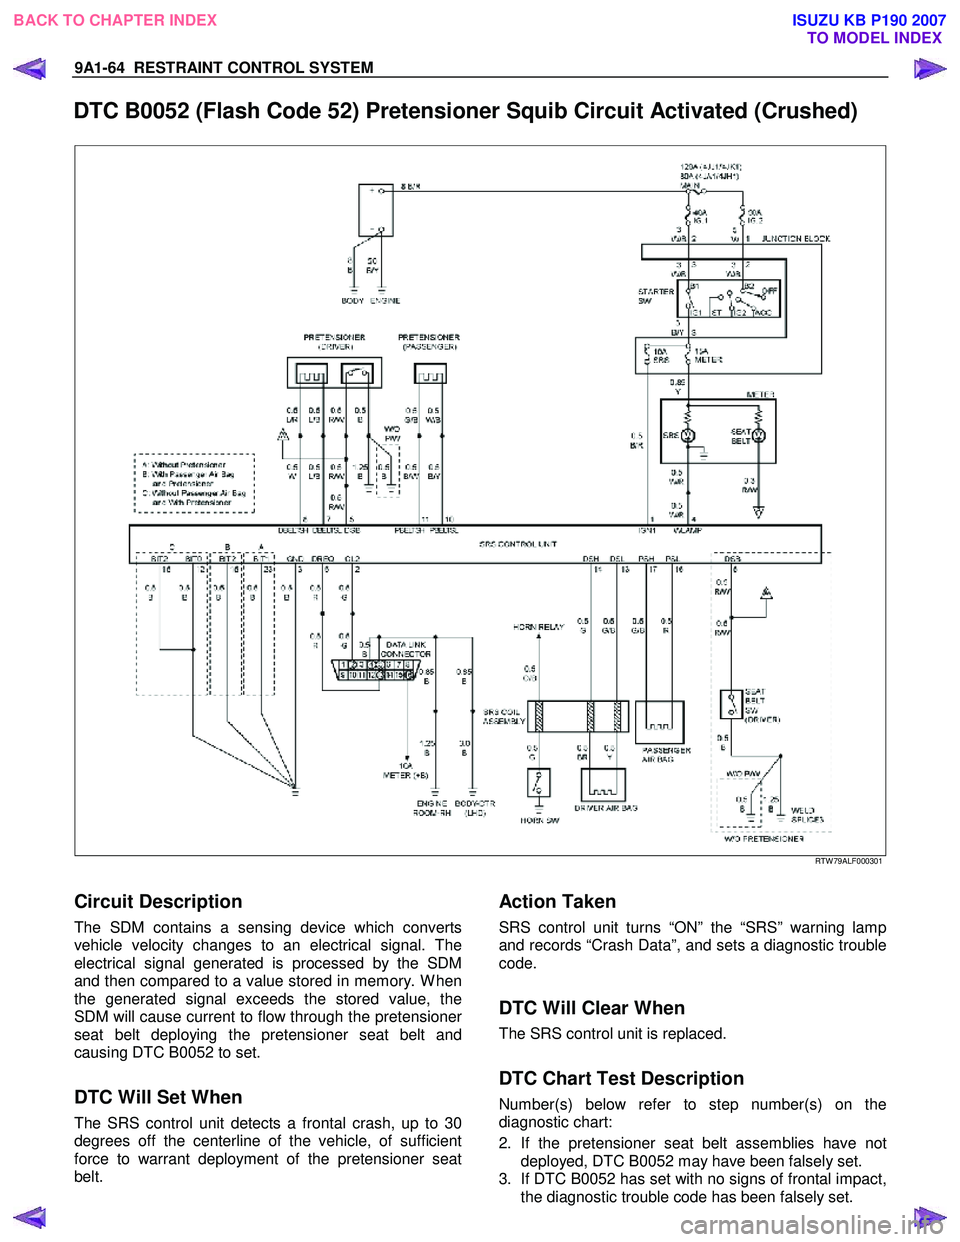
DTC B0052 (Flash Code 52) Pretensioner Squib Circuit Activated (Crushed)
RTW 79ALF000301
Circuit Description
The SDM contains a sensing device which converts
vehicle velocity changes to an electrical signal. The
electrical signal generated is processed by the SDM
and then compared to a value stored in memory. W hen
the generated signal exceeds the stored value, the
SDM will cause current to flow through the pretensione
r
seat belt deploying the pretensioner seat belt and
causing DTC B0052 to set.
DTC Will Set When
The SRS control unit detects a frontal crash, up to 30
degrees off the centerline of the vehicle, of sufficient
force to warrant deployment of the pretensioner seat
belt.
Action Taken
SRS control unit turns “ON” the “SRS” warning lamp
and records “Crash Data”, and sets a diagnostic trouble
code.
DTC Will Clear When
The SRS control unit is replaced.
DTC Chart Test Description
Number(s) below refer to step number(s) on the
diagnostic chart:
2. If the pretensioner seat belt assemblies have not deployed, DTC B0052 may have been falsely set.
3. If DTC B0052 has set with no signs of frontal impact, the diagnostic trouble code has been falsely set.
BACK TO CHAPTER INDEX TO MODEL INDEX
ISUZU KB P190 2007
Page 5747 of 6020
RESTRAINT CONTROL SYSTEM 9A1-65
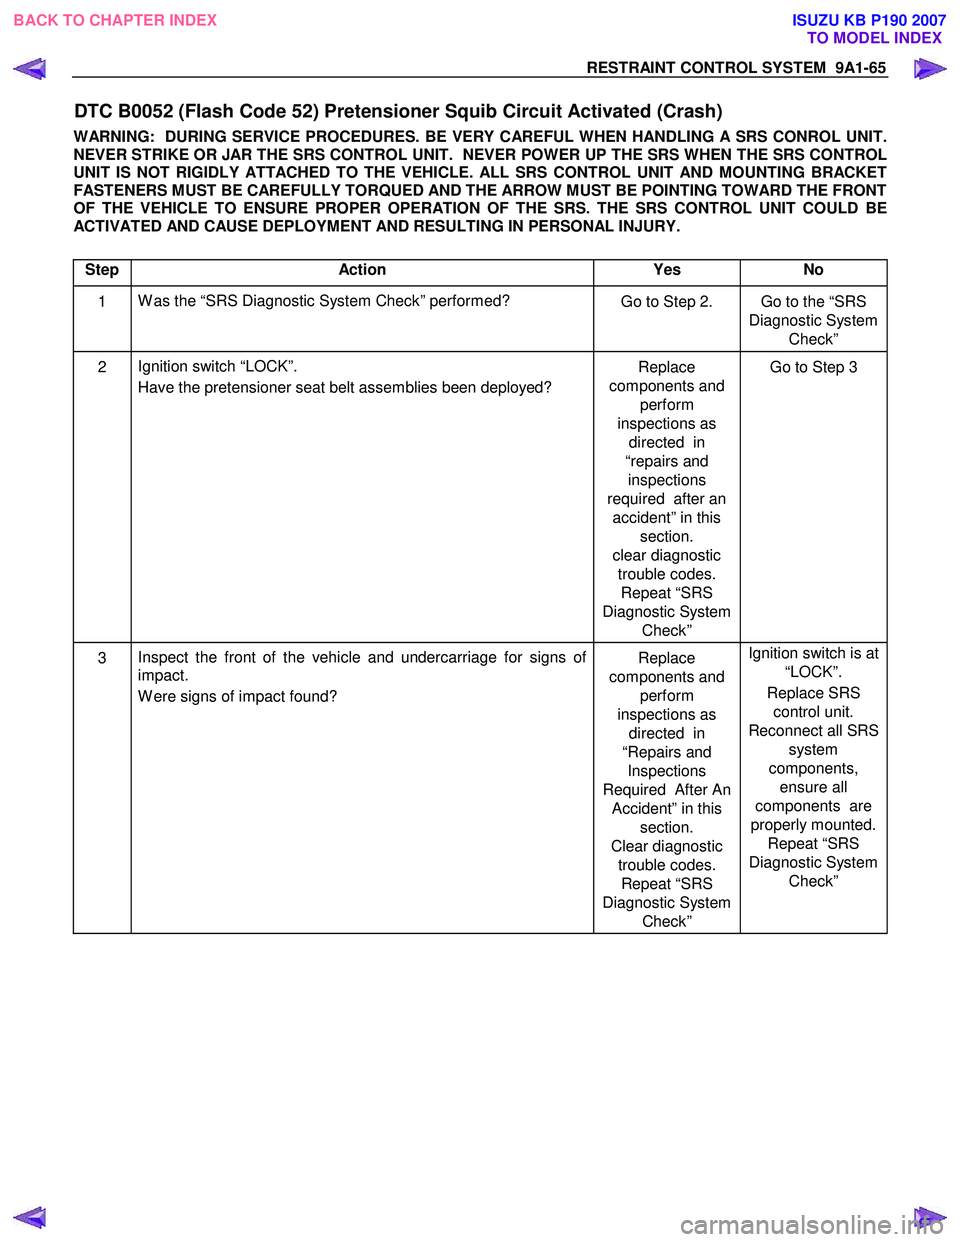
DTC B0052 (Flash Code 52) Pretensioner Squib Circuit Activated (Crash)
WARNING: DURING SERVICE PROCEDURES. BE VERY CAREFUL WHEN HANDLING A SRS CONROL UNIT.
NEVER STRIKE OR JAR THE SRS CONTROL UNIT. NEVER POWER UP THE SRS WHEN THE SRS CONTROL
UNIT IS NOT RIGIDLY ATTACHED TO THE VEHICLE. ALL SRS CONTROL UNIT AND MOUNTING BRACKET
FASTENERS MUST BE CAREFULLY TORQUED AND THE ARROW MUST BE POINTING TOWARD THE FRONT
OF THE VEHICLE TO ENSURE PROPER OPERATION OF THE SRS. THE SRS CONTROL UNIT COULD BE
ACTIVATED AND CAUSE DEPLOYMENT AND RESULTING IN PERSONAL INJURY.
Step Action Yes No
1 W as the “SRS Diagnostic System Check” performed?
Go to Step 2. Go to the “SRS
Diagnostic System Check”
2 Ignition switch “LOCK”.
Have the pretensioner seat belt assemblies been deployed? Replace
components and perform
inspections as directed in
“repairs and inspections
required after an accident” in this section.
clear diagnostic trouble codes. Repeat “SRS
Diagnostic System Check” Go to Step 3
3
Inspect the front of the vehicle and undercarriage for signs of
impact.
W ere signs of impact found? Replace
components and perform
inspections as directed in
“Repairs and Inspections
Required After An Accident” in this section.
Clear diagnostic trouble codes. Repeat “SRS
Diagnostic System Check” Ignition switch is at
“LOCK”.
Replace SRS control unit.
Reconnect all SRS system
components, ensure all
components are
properly mounted. Repeat “SRS
Diagnostic System Check”
BACK TO CHAPTER INDEX TO MODEL INDEX
ISUZU KB P190 2007
Page 5749 of 6020
RESTRAINT CONTROL SYSTEM 9A1-67
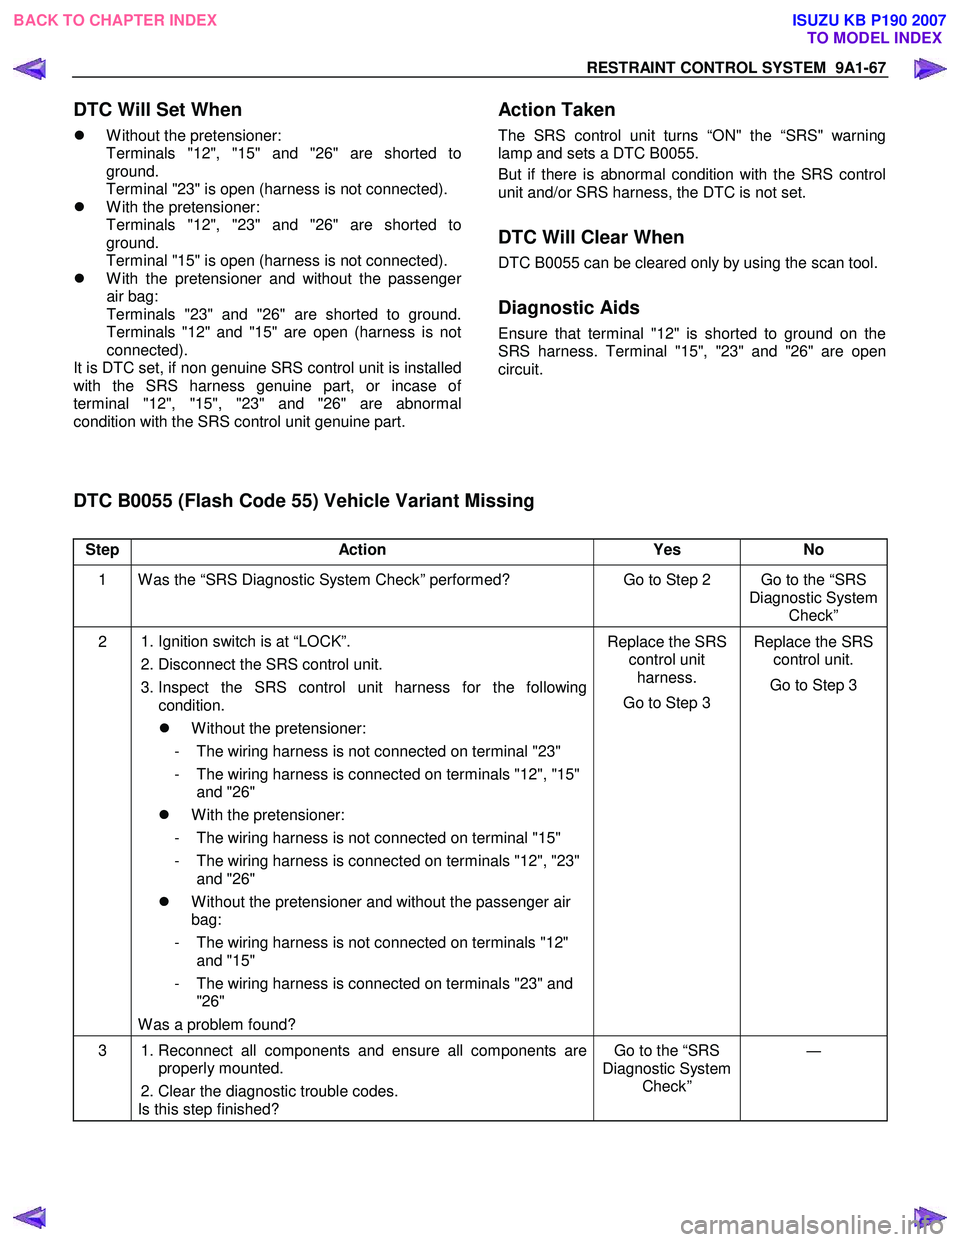
Step Action Yes No
1 W as the “SRS Diagnostic System Check” performed? Go to Step 2 Go to the “SRS
Diagnostic System Check”
2 1. Ignition switch is at “LOCK”.
2. Disconnect the SRS control unit.
3. Inspect the SRS control unit harness for the following condition.
�z W ithout the pretensioner:
- The wiring harness is not connected on terminal "23"
- The wiring harness is connected on terminals "12", "15" and "26"
�z W ith the pretensioner:
- The wiring harness is not connected on terminal "15"
- The wiring harness is connected on terminals "12", "23" and "26"
�z W ithout the pretensioner and without the passenger air
bag:
- The wiring harness is not connected on terminals "12" and "15"
- The wiring harness is connected on terminals "23" and "26"
W as a problem found? Replace the SRS
control unit harness.
Go to Step 3 Replace the SRS
control unit.
Go to Step 3
3 1. Reconnect all components and ensure all components are
properly mounted.
2. Clear the diagnostic trouble codes.
Is this step finished? Go to the “SRS
Diagnostic System Check” ―
DTC Will Set When
�z W ithout the pretensioner:
Terminals "12", "15" and "26" are shorted to
ground.
Terminal "23" is open (harness is not connected).
�z W ith the pretensioner:
Terminals "12", "23" and "26" are shorted to
ground.
Terminal "15" is open (harness is not connected).
�z W ith the pretensioner and without the passenge
r
air bag:
Terminals "23" and "26" are shorted to ground.
Terminals "12" and "15" are open (harness is not
connected).
It is DTC set, if non genuine SRS control unit is installed
with the SRS harness genuine part, or incase o
f
terminal "12", "15", "23" and "26" are abnormal
condition with the SRS control unit genuine part.
Action Taken
The SRS control unit turns “ON" the “SRS" warning
lamp and sets a DTC B0055.
But if there is abnormal condition with the SRS control
unit and/or SRS harness, the DTC is not set.
DTC Will Clear When
DTC B0055 can be cleared only by using the scan tool.
Diagnostic Aids
Ensure that terminal "12" is shorted to ground on the
SRS harness. Terminal "15", "23" and "26" are open
circuit.
DTC B0055 (Flash Code 55) Vehicle Variant Missing
BACK TO CHAPTER INDEX TO MODEL INDEX
ISUZU KB P190 2007
Page 5752 of 6020

9A1-70 RESTRAINT CONTROL SYSTEM
Step Action Yes No
8 1. Ignition switch is at “LOCK”.
2. Measure the resistance from the instrument meter cluster harness connector "SRS" warning lamp circuit terminal to the
SRS control unit harness connector terminal “4”.
Is the resistance 5.0 ohms or less? Go to Step 9 Replace the SRS
harness.
Go to Step 10
9 1. Disconnect the instrument meter cluster harness connector.
2. Measure the resistance from the "METER" fuse to the instrument meter cluster harness connector "SRS" warning
lamp power supply circuit terminal.
Is the resistance 5.0 ohms or less? Service instrument
meter cluster.
Install instrument meter cluster.
Go to Step 10 Replace the "SRS"
warning lamp power supply
circuit harness.
Go to Step 10
10 1. Reconnect all components and ensure all components are
properly mounted.
2. Clear the diagnostic trouble codes.
Is this step finished? Go to the “SRS
Diagnostic System Check” ―
BACK TO CHAPTER INDEX
TO MODEL INDEX
ISUZU KB P190 2007
Page 5754 of 6020
9A1-72 RESTRAINT CONTROL SYSTEM
DTC B0062 (Flash Code 62) Battery Voltage Too High
Step Action Yes No
1 W as the “SRS Diagnostic System Check” performed? Go to Step 2 Go to the “SRS
Diagnostic System Check”
2 1. Ignition switch is at “LOCK”.
2. Disconnect the SRS control unit.
3. Ignition switch “ON”.
4. Measure voltage on SRS control unit harness connector from terminal “1” to terminal “3” (ground).
Is voltage on terminal “1” below 16.5V? Ignition switch is at
“LOCK”.
Replace the SRS control unit.
Go to Step 3 Inspect the
Charging System. Refer to the
"Engine Electrical" section.
Go to Step 3
3 1. Reconnect all the components and ensure all components
are properly mounted.
2. Clear diagnostic trouble codes.
Is this step finished? Go to the “SRS
Diagnostic system Check” ―
BACK TO CHAPTER INDEX
TO MODEL INDEX
ISUZU KB P190 2007
Page 5756 of 6020
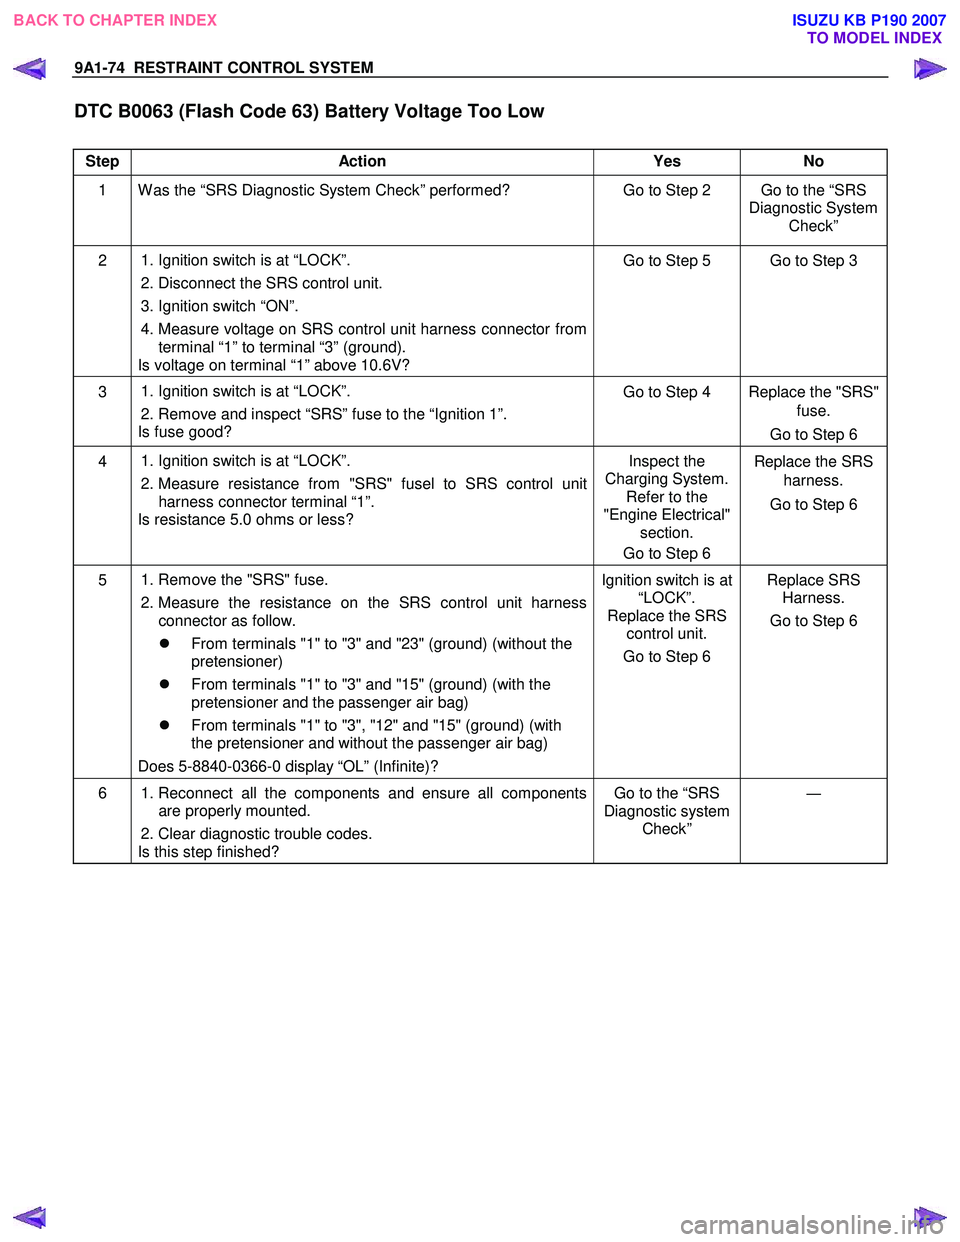
9A1-74 RESTRAINT CONTROL SYSTEM
DTC B0063 (Flash Code 63) Battery Voltage Too Low
Step Action Yes No
1 W as the “SRS Diagnostic System Check” performed? Go to Step 2 Go to the “SRS
Diagnostic System Check”
2 1. Ignition switch is at “LOCK”.
2. Disconnect the SRS control unit.
3. Ignition switch “ON”.
4. Measure voltage on SRS control unit harness connector from terminal “1” to terminal “3” (ground).
Is voltage on terminal “1” above 10.6V? Go to Step 5 Go to Step 3
3
1. Ignition switch is at “LOCK”.
2. Remove and inspect “SRS” fuse to the “Ignition 1”.
Is fuse good? Go to Step 4 Replace the "SRS"
fuse.
Go to Step 6
4
1. Ignition switch is at “LOCK”.
2. Measure resistance from "SRS" fusel to SRS control unit
harness connector terminal “1”.
Is resistance 5.0 ohms or less? Inspect the
Charging System. Refer to the
"Engine Electrical" section.
Go to Step 6 Replace the SRS
harness.
Go to Step 6
5
1. Remove the "SRS" fuse.
2. Measure the resistance on the SRS control unit harness connector as follow.
�z From terminals "1" to "3" and "23" (ground) (without the
pretensioner)
�z From terminals "1" to "3" and "15" (ground) (with the
pretensioner and the passenger air bag)
�z From terminals "1" to "3", "12" and "15" (ground) (with
the pretensioner and without the passenger air bag)
Does 5-8840-0366-0 display “OL” (Infinite)? Ignition switch is at
“LOCK”.
Replace the SRS control unit.
Go to Step 6 Replace SRS
Harness.
Go to Step 6
6 1. Reconnect all the components and ensure all components
are properly mounted.
2. Clear diagnostic trouble codes.
Is this step finished? Go to the “SRS
Diagnostic system Check” ―
BACK TO CHAPTER INDEX
TO MODEL INDEX
ISUZU KB P190 2007
Page 5776 of 6020
10-18 CAB
ADJUSTMENT (FRONT)
Door Hinge
Door alignment can be obtained by moving the door hinges.
Prior to adjustment, remove the fender and set the door
temporarily.
Loosen the hinge to door bolts when adjusting steps between
the door and body.
Loosen the hinge to body bolts to adjust the clearance between
the door and body.
RUW 5A0SH003201
Door Striker
Loosen the striker screws and adjust the position of the striker
by holding a piece of wood against the striker and tapping it
with a hammer.
To obtain correct adjustment, move the position of the striker
vertically so that the lower face of the dovetail becomes parallel
to the striker.
BACK TO CHAPTER INDEX TO MODEL INDEX
ISUZU KB P190 2007