2007 ISUZU KB P190 display
[x] Cancel search: displayPage 3374 of 6020
Engine Management – V6 – Diagnostics Page 6C1-2–96
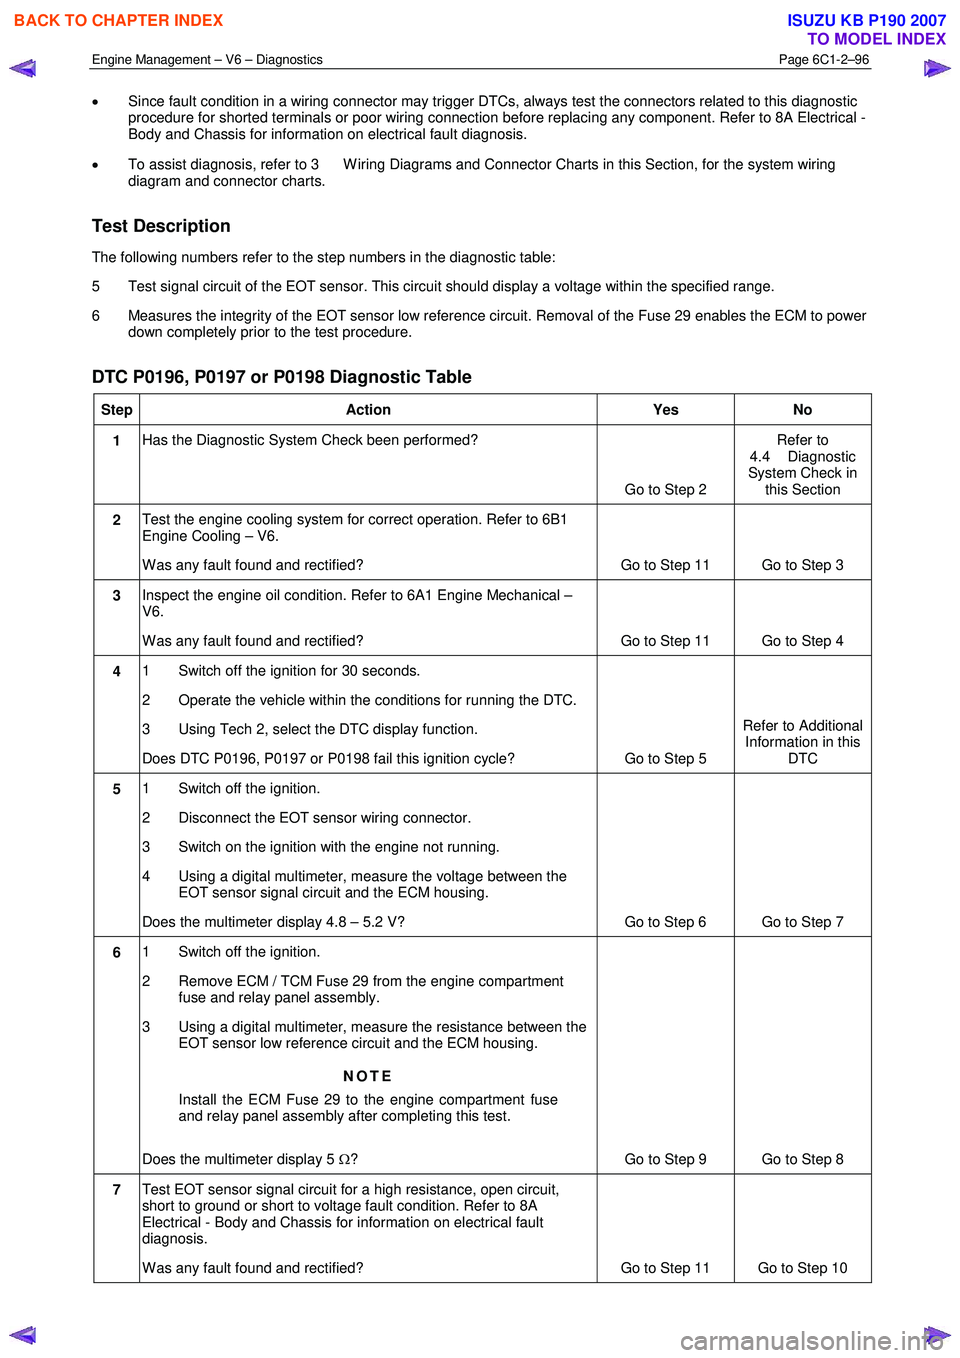
• Since fault condition in a wiring connector may trigger DTCs, always test the connectors related to this diagnostic
procedure for shorted terminals or poor wiring connection before replacing any component. Refer to 8A Electrical -
Body and Chassis for information on electrical fault diagnosis.
• To assist diagnosis, refer to 3 W iring Diagrams and Connector Charts in this Section, for the system wiring
diagram and connector charts.
Test Description
The following numbers refer to the step numbers in the diagnostic table:
5 Test signal circuit of the EOT sensor. This circuit should display a voltage within the specified range.
6 Measures the integrity of the EOT sensor low reference circuit. Removal of the Fuse 29 enables the ECM to power down completely prior to the test procedure.
DTC P0196, P0197 or P0198 Diagnostic Table
Step Action Yes No
1 Has the Diagnostic System Check been performed?
Go to Step 2 Refer to
4.4 Diagnostic
System Check in this Section
2 Test the engine cooling system for correct operation. Refer to 6B1
Engine Cooling – V6.
W as any fault found and rectified? Go to Step 11 Go to Step 3
3 Inspect the engine oil condition. Refer to 6A1 Engine Mechanical –
V6.
W as any fault found and rectified? Go to Step 11 Go to Step 4
4 1 Switch off the ignition for 30 seconds.
2 Operate the vehicle within the conditions for running the DTC.
3 Using Tech 2, select the DTC display function.
Does DTC P0196, P0197 or P0198 fail this ignition cycle? Go to Step 5 Refer to Additional
Information in this DTC
5 1 Switch off the ignition.
2 Disconnect the EOT sensor wiring connector.
3 Switch on the ignition with the engine not running.
4 Using a digital multimeter, measure the voltage between the EOT sensor signal circuit and the ECM housing.
Does the multimeter display 4.8 – 5.2 V? Go to Step 6 Go to Step 7
6 1 Switch off the ignition.
2 Remove ECM / TCM Fuse 29 from the engine compartment fuse and relay panel assembly.
3 Using a digital multimeter, measure the resistance between the EOT sensor low reference circuit and the ECM housing.
NOTE
Install the ECM Fuse 29 to the engine compartment fuse
and relay panel assembly after completing this test.
Does the multimeter display 5 Ω? Go to Step 9 Go to Step 8
7 Test EOT sensor signal circuit for a high resistance, open circuit,
short to ground or short to voltage fault condition. Refer to 8A
Electrical - Body and Chassis for information on electrical fault
diagnosis.
W as any fault found and rectified? Go to Step 11 Go to Step 10
BACK TO CHAPTER INDEX
TO MODEL INDEX
ISUZU KB P190 2007
Page 3375 of 6020
Engine Management – V6 – Diagnostics Page 6C1-2–97
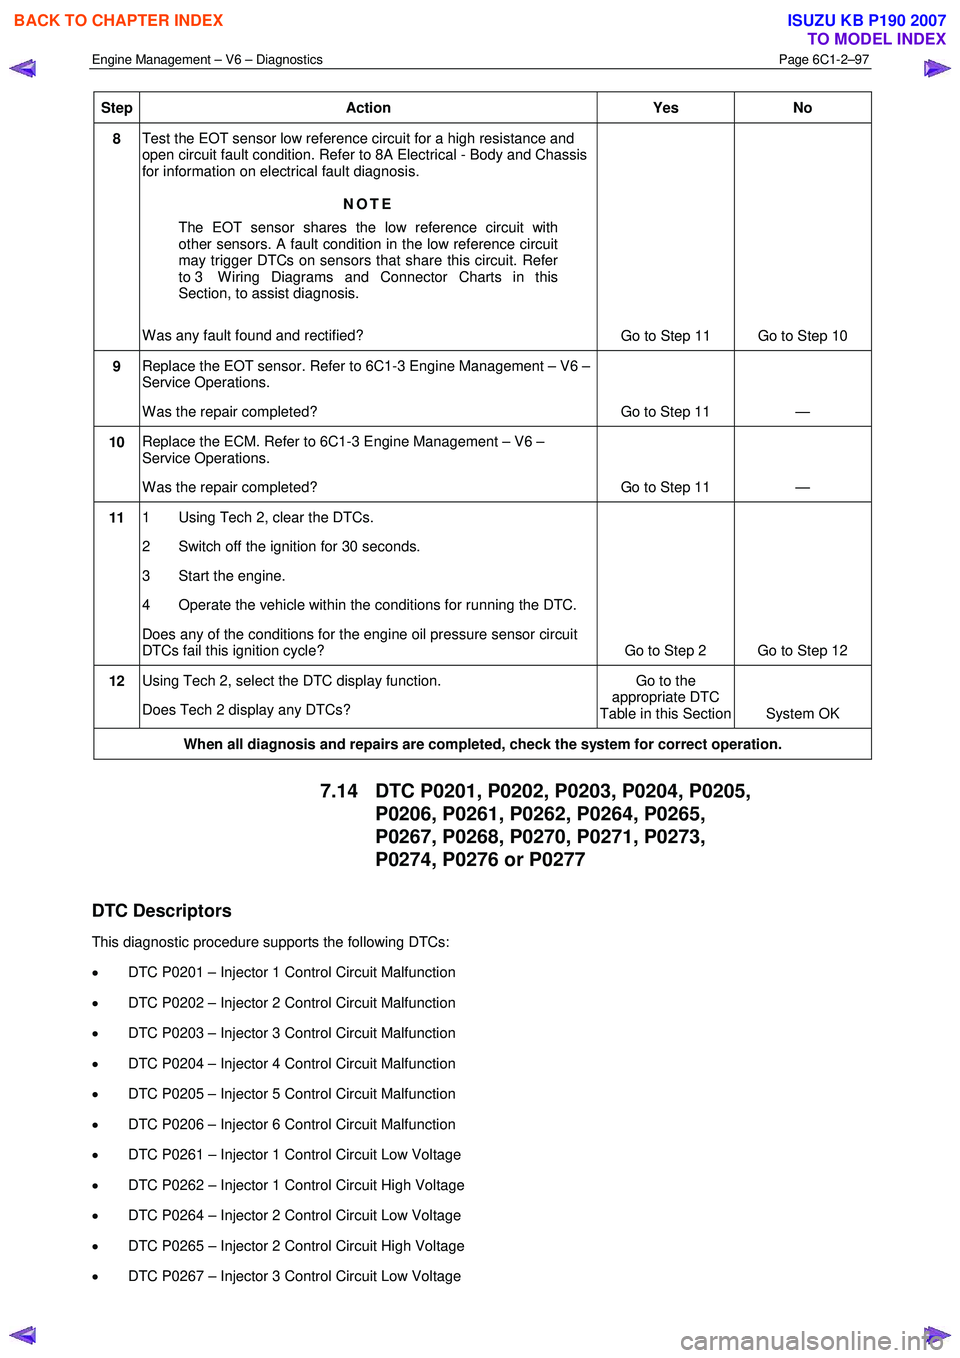
Step Action Yes
No
8 Test the EOT sensor low reference circuit for a high resistance and
open circuit fault condition. Refer to 8A Electrical - Body and Chassis
for information on electrical fault diagnosis.
NOTE
The EOT sensor shares the low reference circuit with
other sensors. A fault condition in the low reference circuit
may trigger DTCs on sensors that share this circuit. Refer
to 3 W iring Diagrams and Connector Charts in this
Section, to assist diagnosis.
W as any fault found and rectified? Go to Step 11 Go to Step 10
9 Replace the EOT sensor. Refer to 6C1-3 Engine Management – V6 –
Service Operations.
W as the repair completed? Go to Step 11 —
10 Replace the ECM. Refer to 6C1-3 Engine Management – V6 –
Service Operations.
W as the repair completed? Go to Step 11 —
11 1 Using Tech 2, clear the DTCs.
2 Switch off the ignition for 30 seconds.
3 Start the engine.
4 Operate the vehicle within the conditions for running the DTC.
Does any of the conditions for the engine oil pressure sensor circuit
DTCs fail this ignition cycle? Go to Step 2 Go to Step 12
12 Using Tech 2, select the DTC display function.
Does Tech 2 display any DTCs? Go to the
appropriate DTC
Table in this Section System OK
When all diagnosis and repairs are completed, check the system for correct operation.
7.14 DTC P0201, P0202, P0203, P0204, P0205,
P0206, P0261, P0262, P0264, P0265,
P0267, P0268, P0270, P0271, P0273,
P0274, P0276 or P0277
DTC Descriptors
This diagnostic procedure supports the following DTCs:
• DTC P0201 – Injector 1 Control Circuit Malfunction
• DTC P0202 – Injector 2 Control Circuit Malfunction
• DTC P0203 – Injector 3 Control Circuit Malfunction
• DTC P0204 – Injector 4 Control Circuit Malfunction
• DTC P0205 – Injector 5 Control Circuit Malfunction
• DTC P0206 – Injector 6 Control Circuit Malfunction
• DTC P0261 – Injector 1 Control Circuit Low Voltage
• DTC P0262 – Injector 1 Control Circuit High Voltage
• DTC P0264 – Injector 2 Control Circuit Low Voltage
• DTC P0265 – Injector 2 Control Circuit High Voltage
• DTC P0267 – Injector 3 Control Circuit Low Voltage
BACK TO CHAPTER INDEX
TO MODEL INDEX
ISUZU KB P190 2007
Page 3377 of 6020
Engine Management – V6 – Diagnostics Page 6C1-2–99
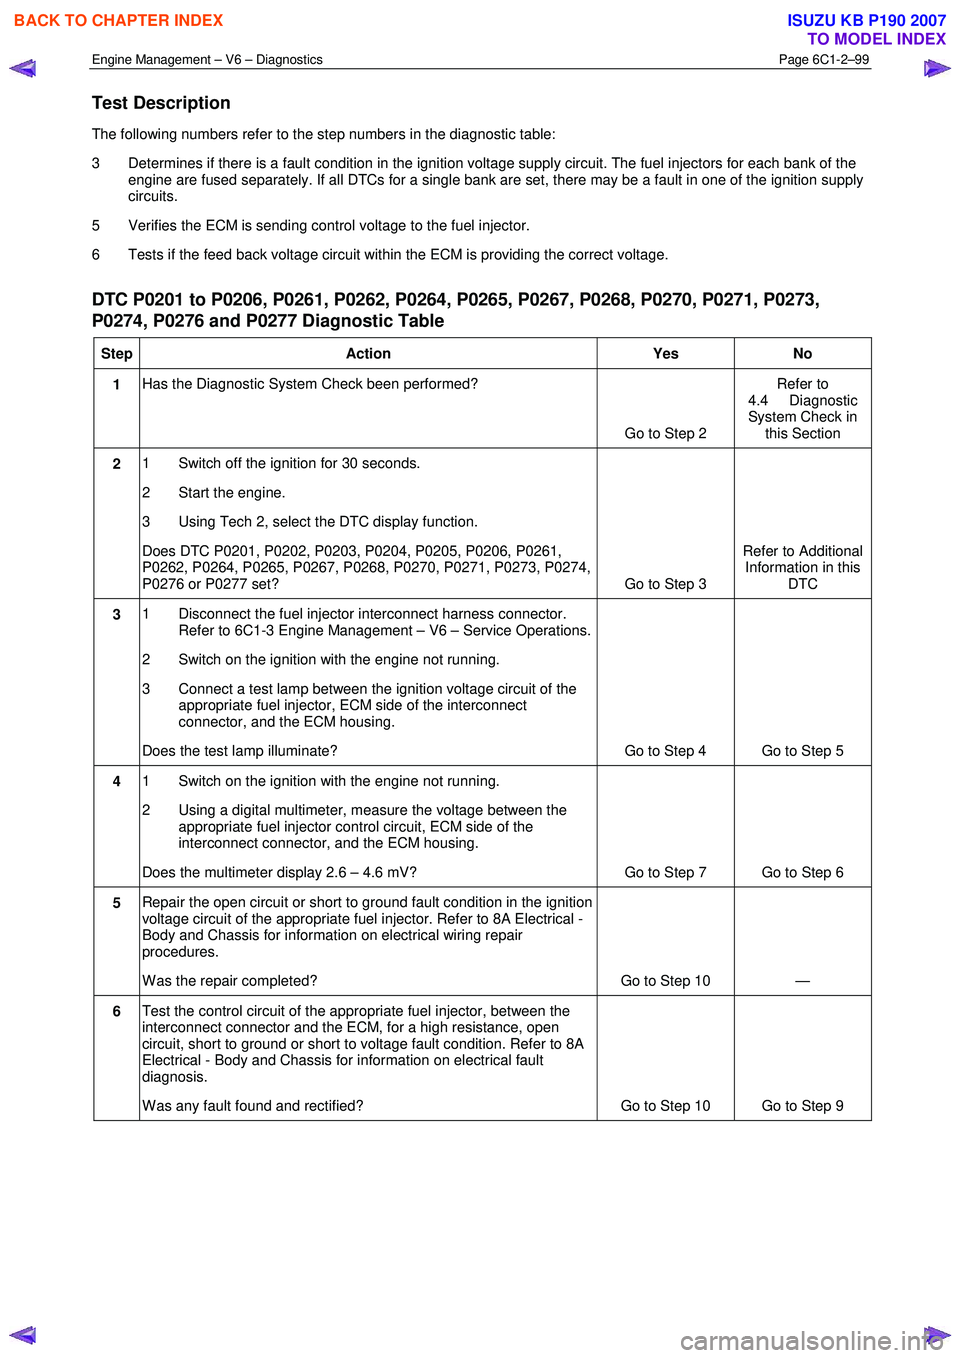
Test Description
The following numbers refer to the step numbers in the diagnostic table:
3 Determines if there is a fault condition in the ignition voltage supply circuit. The fuel injectors for each bank of the engine are fused separately. If all DTCs for a single bank are set, there may be a fault in one of the ignition supply
circuits.
5 Verifies the ECM is sending control voltage to the fuel injector.
6 Tests if the feed back voltage circuit within the ECM is providing the correct voltage.
DTC P0201 to P0206, P0261, P0262, P0264, P0265, P0267, P0268, P0270, P0271, P0273,
P0274, P0276 and P0277 Diagnostic Table
Step Action Yes No
1 Has the Diagnostic System Check been performed?
Go to Step 2 Refer to
4.4 Diagnostic
System Check in this Section
2 1 Switch off the ignition for 30 seconds.
2 Start the engine.
3 Using Tech 2, select the DTC display function.
Does DTC P0201, P0202, P0203, P0204, P0205, P0206, P0261,
P0262, P0264, P0265, P0267, P0268, P0270, P0271, P0273, P0274,
P0276 or P0277 set? Go to Step 3 Refer to Additional
Information in this DTC
3 1 Disconnect the fuel injector interconnect harness connector.
Refer to 6C1-3 Engine Management – V6 – Service Operations.
2 Switch on the ignition with the engine not running.
3 Connect a test lamp between the ignition voltage circuit of the appropriate fuel injector, ECM side of the interconnect
connector, and the ECM housing.
Does the test lamp illuminate? Go to Step 4 Go to Step 5
4 1 Switch on the ignition with the engine not running.
2 Using a digital multimeter, measure the voltage between the appropriate fuel injector control circuit, ECM side of the
interconnect connector, and the ECM housing.
Does the multimeter display 2.6 – 4.6 mV? Go to Step 7 Go to Step 6
5 Repair the open circuit or short to ground fault condition in the ignition
voltage circuit of the appropriate fuel injector. Refer to 8A Electrical -
Body and Chassis for information on electrical wiring repair
procedures.
W as the repair completed? Go to Step 10 —
6 Test the control circuit of the appropriate fuel injector, between the
interconnect connector and the ECM, for a high resistance, open
circuit, short to ground or short to voltage fault condition. Refer to 8A
Electrical - Body and Chassis for information on electrical fault
diagnosis.
W as any fault found and rectified? Go to Step 10 Go to Step 9
BACK TO CHAPTER INDEX
TO MODEL INDEX
ISUZU KB P190 2007
Page 3378 of 6020
Engine Management – V6 – Diagnostics Page 6C1-2–100
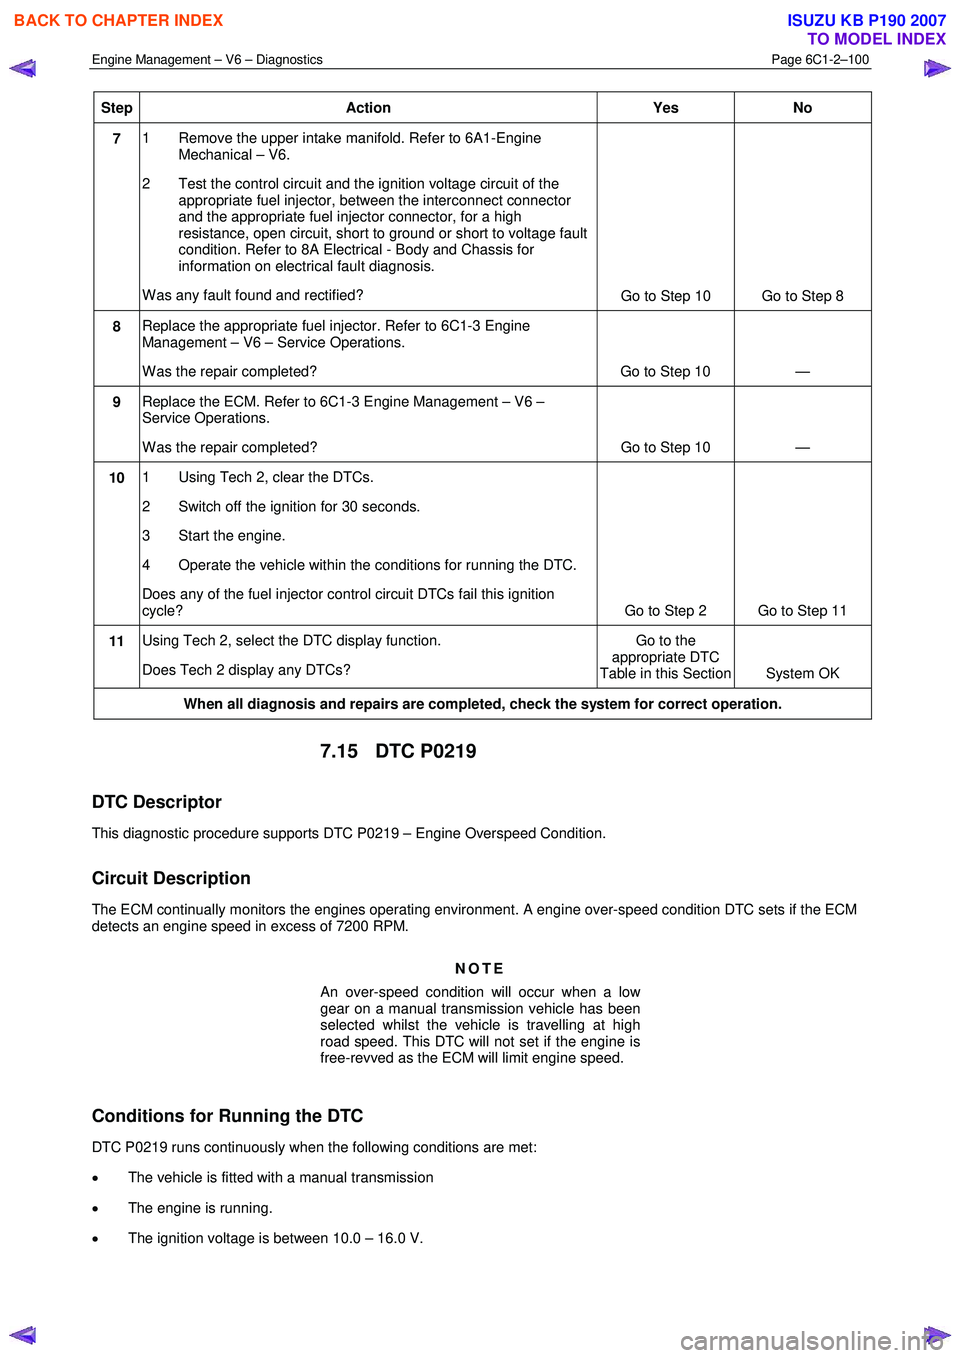
Step Action Yes No
7 1 Remove the upper intake manifold. Refer to 6A1-Engine
Mechanical – V6.
2 Test the control circuit and the ignition voltage circuit of the appropriate fuel injector, between the interconnect connector
and the appropriate fuel injector connector, for a high
resistance, open circuit, short to ground or short to voltage fault
condition. Refer to 8A Electrical - Body and Chassis for
information on electrical fault diagnosis.
W as any fault found and rectified? Go to Step 10 Go to Step 8
8 Replace the appropriate fuel injector. Refer to 6C1-3 Engine
Management – V6 – Service Operations.
W as the repair completed? Go to Step 10 —
9 Replace the ECM. Refer to 6C1-3 Engine Management – V6 –
Service Operations.
W as the repair completed? Go to Step 10 —
10 1 Using Tech 2, clear the DTCs.
2 Switch off the ignition for 30 seconds.
3 Start the engine.
4 Operate the vehicle within the conditions for running the DTC.
Does any of the fuel injector control circuit DTCs fail this ignition
cycle? Go to Step 2 Go to Step 11
11 Using Tech 2, select the DTC display function.
Does Tech 2 display any DTCs? Go to the
appropriate DTC
Table in this Section System OK
When all diagnosis and repairs are completed, check the system for correct operation.
7.15 DTC P0219
DTC Descriptor
This diagnostic procedure supports DTC P0219 – Engine Overspeed Condition.
Circuit Description
The ECM continually monitors the engines operating environment. A engine over-speed condition DTC sets if the ECM
detects an engine speed in excess of 7200 RPM.
NOTE
An over-speed condition will occur when a low
gear on a manual transmission vehicle has been
selected whilst the vehicle is travelling at high
road speed. This DTC will not set if the engine is
free-revved as the ECM will limit engine speed.
Conditions for Running the DTC
DTC P0219 runs continuously when the following conditions are met:
• The vehicle is fitted with a manual transmission
• The engine is running.
• The ignition voltage is between 10.0 – 16.0 V.
BACK TO CHAPTER INDEX
TO MODEL INDEX
ISUZU KB P190 2007
Page 3379 of 6020
Engine Management – V6 – Diagnostics Page 6C1-2–101
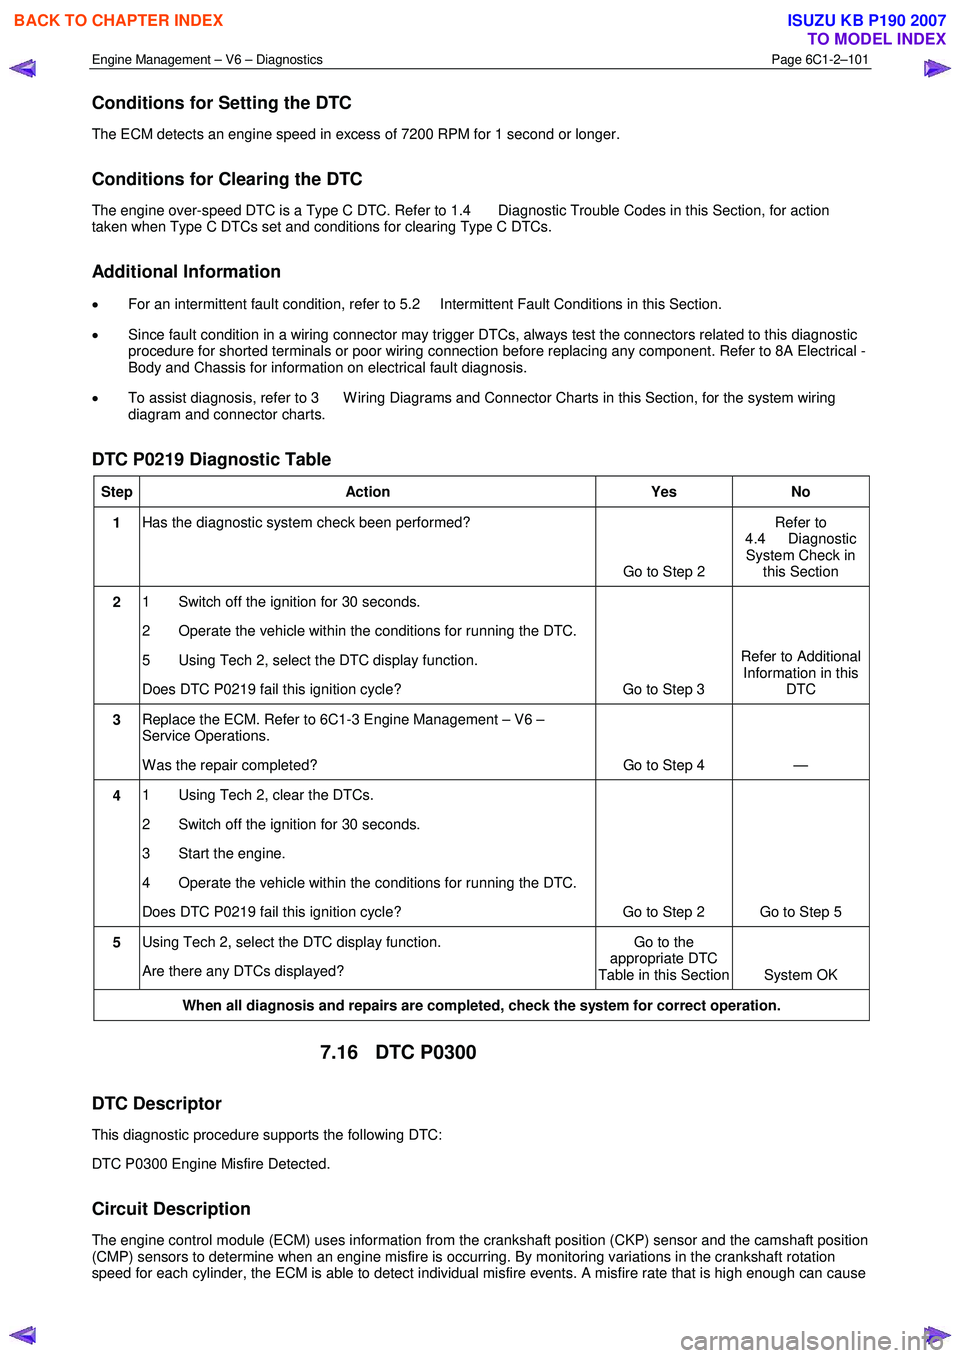
Conditions for Setting the DTC
The ECM detects an engine speed in excess of 7200 RPM for 1 second or longer.
Conditions for Clearing the DTC
The engine over-speed DTC is a Type C DTC. Refer to 1.4 Diagnostic Trouble Codes in this Section, for action
taken when Type C DTCs set and conditions for clearing Type C DTCs.
Additional Information
• For an intermittent fault condition, refer to 5.2 Intermittent Fault Conditions in this Section.
• Since fault condition in a wiring connector may trigger DTCs, always test the connectors related to this diagnostic
procedure for shorted terminals or poor wiring connection before replacing any component. Refer to 8A Electrical -
Body and Chassis for information on electrical fault diagnosis.
• To assist diagnosis, refer to 3 W iring Diagrams and Connector Charts in this Section, for the system wiring
diagram and connector charts.
DTC P0219 Diagnostic Table
Step Action Yes No
1 Has the diagnostic system check been performed?
Go to Step 2 Refer to
4.4 Diagnostic System Check in this Section
2 1 Switch off the ignition for 30 seconds.
2 Operate the vehicle within the conditions for running the DTC.
5 Using Tech 2, select the DTC display function.
Does DTC P0219 fail this ignition cycle? Go to Step 3 Refer to Additional
Information in this DTC
3 Replace the ECM. Refer to 6C1-3 Engine Management – V6 –
Service Operations.
W as the repair completed? Go to Step 4 —
4 1 Using Tech 2, clear the DTCs.
2 Switch off the ignition for 30 seconds.
3 Start the engine.
4 Operate the vehicle within the conditions for running the DTC.
Does DTC P0219 fail this ignition cycle? Go to Step 2 Go to Step 5
5 Using Tech 2, select the DTC display function.
Are there any DTCs displayed? Go to the
appropriate DTC
Table in this Section System OK
When all diagnosis and repairs are completed, check the system for correct operation.
7.16 DTC P0300
DTC Descriptor
This diagnostic procedure supports the following DTC:
DTC P0300 Engine Misfire Detected.
Circuit Description
The engine control module (ECM) uses information from the crankshaft position (CKP) sensor and the camshaft position
(CMP) sensors to determine when an engine misfire is occurring. By monitoring variations in the crankshaft rotation
speed for each cylinder, the ECM is able to detect individual misfire events. A misfire rate that is high enough can cause
BACK TO CHAPTER INDEX
TO MODEL INDEX
ISUZU KB P190 2007
Page 3381 of 6020
Engine Management – V6 – Diagnostics Page 6C1-2–103
Test Description
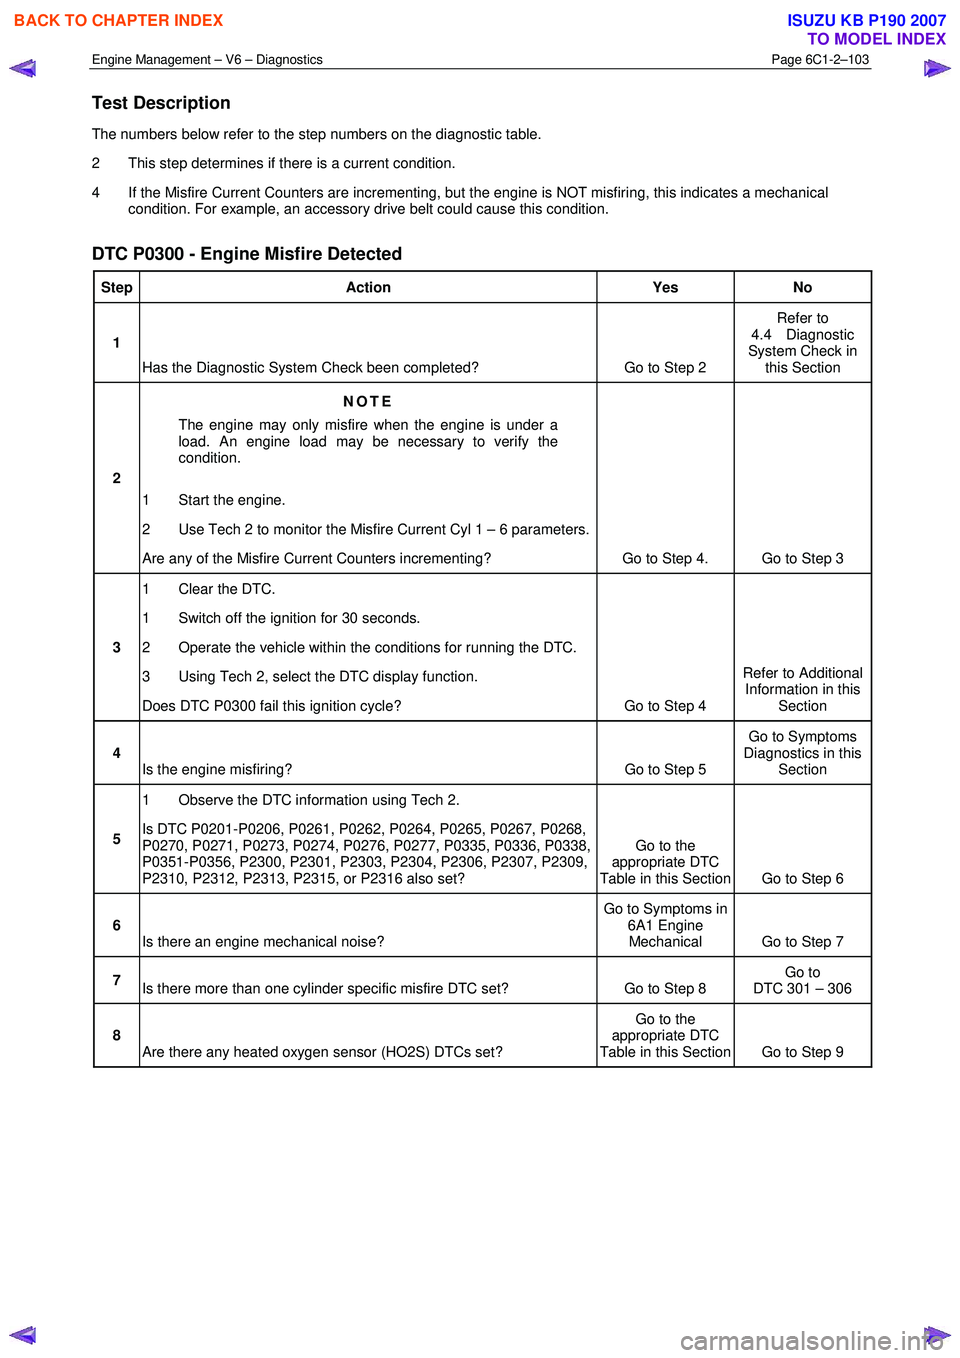
The numbers below refer to the step numbers on the diagnostic table.
2 This step determines if there is a current condition.
4 If the Misfire Current Counters are incrementing, but the engine is NOT misfiring, this indicates a mechanical condition. For example, an accessory drive belt could cause this condition.
DTC P0300 - Engine Misfire Detected
Step Action Yes No
1
Has the Diagnostic System Check been completed? Go to Step 2 Refer to
4.4 Diagnostic
System Check in this Section
2 NOTE
The engine may only misfire when the engine is under a
load. An engine load may be necessary to verify the
condition.
1 Start the engine.
2 Use Tech 2 to monitor the Misfire Current Cyl 1 – 6 parameters.
Are any of the Misfire Current Counters incrementing? Go to Step 4. Go to Step 3
3 1 Clear the DTC.
1 Switch off the ignition for 30 seconds.
2 Operate the vehicle within the conditions for running the DTC.
3 Using Tech 2, select the DTC display function.
Does DTC P0300 fail this ignition cycle? Go to Step 4 Refer to Additional
Information in this Section
4 Is the engine misfiring? Go to Step 5 Go to Symptoms
Diagnostics in this Section
5 1 Observe the DTC information using Tech 2.
Is DTC P0201-P0206, P0261, P0262, P0264, P0265, P0267, P0268,
P0270, P0271, P0273, P0274, P0276, P0277, P0335, P0336, P0338,
P0351-P0356, P2300, P2301, P2303, P2304, P2306, P2307, P2309,
P2310, P2312, P2313, P2315, or P2316 also set? Go to the
appropriate DTC
Table in this Section Go to Step 6
6 Is there an engine mechanical noise? Go to Symptoms in
6A1 Engine Mechanical Go to Step 7
7 Is there more than one cylinder specific misfire DTC set? Go to Step 8 Go to
DTC 301 – 306
8 Are there any heated oxygen sensor (HO2S) DTCs set? Go to the
appropriate DTC
Table in this Section Go to Step 9
BACK TO CHAPTER INDEX
TO MODEL INDEX
ISUZU KB P190 2007
Page 3382 of 6020

Engine Management – V6 – Diagnostics Page 6C1-2–104
Step Action Yes No
9 1 Inspect or test for the following conditions:
• Inspect the vacuum hoses for splits, kinks, and proper
connections.
• Inspect the throttle body and the intake manifold for
vacuum leaks.
• Inspect the crankcase ventilation valve and / or system for
any vacuum leaks.
• Test for the correct fuel pressure. Refer to 6C Fuel System
– V6.
• Inspect the fuel system for any restrictions, leaks or fuel
contamination. Refer to 6C Fuel System – V6.
• Inspect for fouled or damaged spark plugs. Determine
what caused the spark plugs to foul. Refer to 6C1-3
Engine Management – Service Operations.
• Inspect the exhaust system for restrictions. Refer to 6F
Exhaust System – V6.
• Inspect the engine control grounds for being clean, tight,
and in the correct location.
• Inspect for a camshaft actuator stuck in the full advance or
retard position.
2 Repair as required.
Did you find and correct the condition? Go to Step 10 Go to Symptoms in
6A1 Engine
Mechanical – V6
10 1 Use Tech 2 to clear the DTCs.
2 Switch off the ignition for 30 seconds.
3 Start the engine.
4 Operate the vehicle within the Conditions for Running DTC 300.
Did the DTC fail this ignition? Go to Step 2 Go to Step 11
11 1 Using Tech 2, select the DTC display function.
Does Tech display any DTCs? Go to the
appropriate DTC
Table in this Section System OK
When all diagnosis and repairs are completed, clear all DTCs and verify correct operation
7.17 DTC P0301, P0302, P0303, P0304, P0305
or P0306
DTC Descriptor
This diagnostic procedure supports the following DTCs:
• DTC P0301 – Cylinder 1 Misfire Detected
• DTC P0302 – Cylinder 2 Misfire Detected
• DTC P0303 – Cylinder 3 Misfire Detected
• DTC P0304 – Cylinder 4 Misfire Detected
• DTC P0305 – Cylinder 5 Misfire Detected
• DTC P0306 – Cylinder 6 Misfire Detected
BACK TO CHAPTER INDEX
TO MODEL INDEX
ISUZU KB P190 2007
Page 3385 of 6020
Engine Management – V6 – Diagnostics Page 6C1-2–107
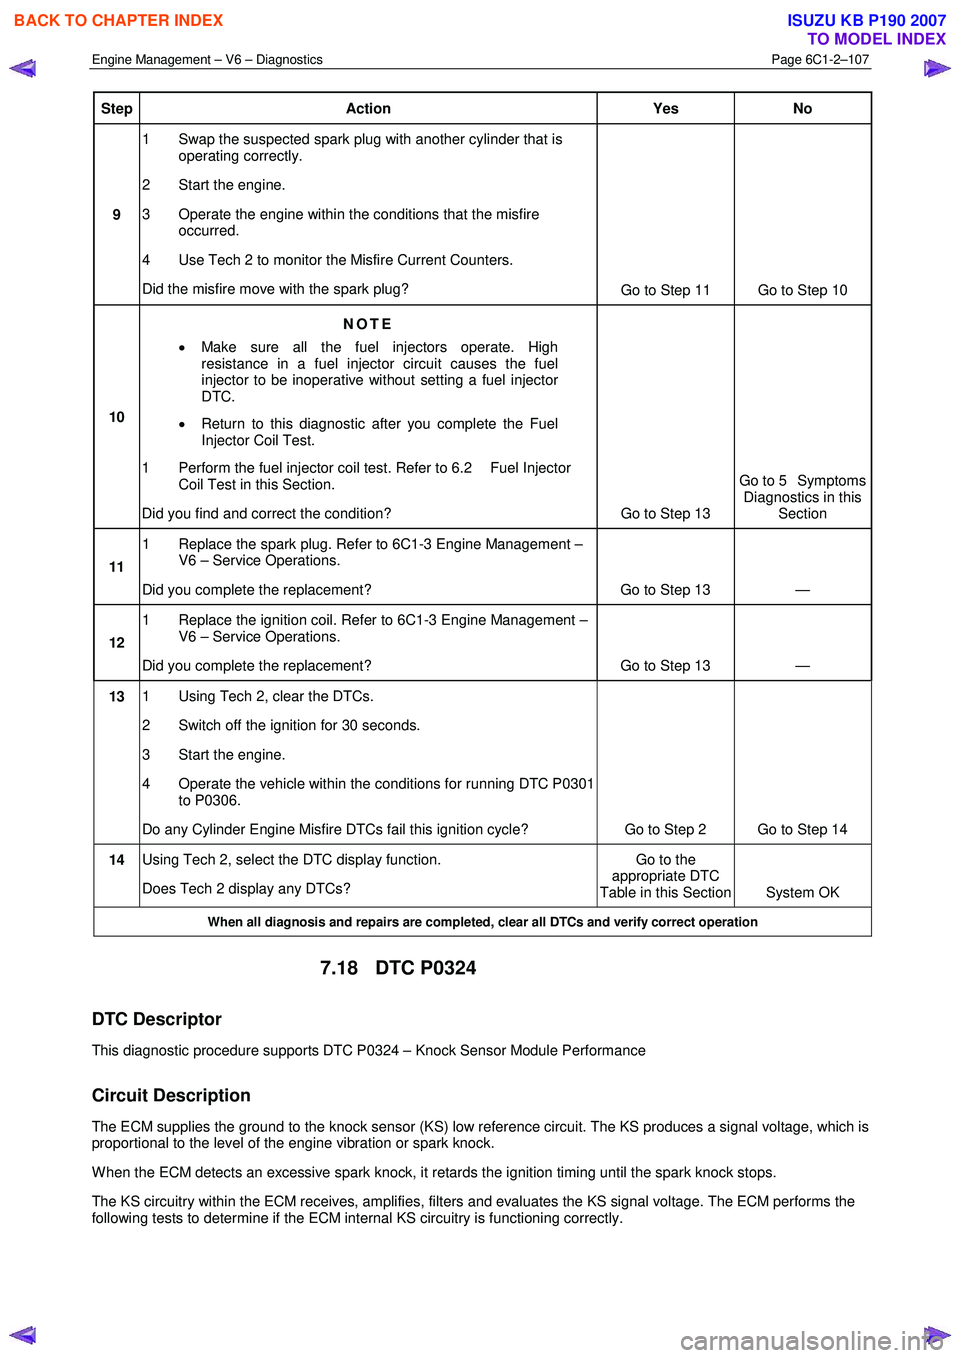
Step Action Yes No
9 1 Swap the suspected spark plug with another cylinder that is
operating correctly.
2 Start the engine.
3 Operate the engine within the conditions that the misfire occurred.
4 Use Tech 2 to monitor the Misfire Current Counters.
Did the misfire move with the spark plug? Go to Step 11 Go to Step 10
10 NOTE
• Make sure all the fuel injectors operate. High
resistance in a fuel injector circuit causes the fuel
injector to be inoperative without setting a fuel injector
DTC.
• Return to this diagnostic after you complete the Fuel
Injector Coil Test.
1 Perform the fuel injector coil test. Refer to 6.2 Fuel Injector Coil Test in this Section.
Did you find and correct the condition? Go to Step 13 Go to 5 Symptoms
Diagnostics in this Section
11 1 Replace the spark plug. Refer to 6C1-3 Engine Management –
V6 – Service Operations.
Did you complete the replacement? Go to Step 13 —
12 1 Replace the ignition coil. Refer to 6C1-3 Engine Management –
V6 – Service Operations.
Did you complete the replacement? Go to Step 13 —
13 1 Using Tech 2, clear the DTCs.
2 Switch off the ignition for 30 seconds.
3 Start the engine.
4 Operate the vehicle within the conditions for running DTC P0301 to P0306.
Do any Cylinder Engine Misfire DTCs fail this ignition cycle? Go to Step 2 Go to Step 14
14 Using Tech 2, select the DTC display function.
Does Tech 2 display any DTCs? Go to the
appropriate DTC
Table in this Section System OK
When all diagnosis and repairs are completed, clear all DTCs and verify correct operation
7.18 DTC P0324
DTC Descriptor
This diagnostic procedure supports DTC P0324 – Knock Sensor Module Performance
Circuit Description
The ECM supplies the ground to the knock sensor (KS) low reference circuit. The KS produces a signal voltage, which is
proportional to the level of the engine vibration or spark knock.
W hen the ECM detects an excessive spark knock, it retards the ignition timing until the spark knock stops.
The KS circuitry within the ECM receives, amplifies, filters and evaluates the KS signal voltage. The ECM performs the
following tests to determine if the ECM internal KS circuitry is functioning correctly.
BACK TO CHAPTER INDEX
TO MODEL INDEX
ISUZU KB P190 2007