2007 ISUZU KB P190 Circuit
[x] Cancel search: CircuitPage 3801 of 6020
Automatic Transmission – 4L60E – Electrical Diagnosis Page 7C2–15
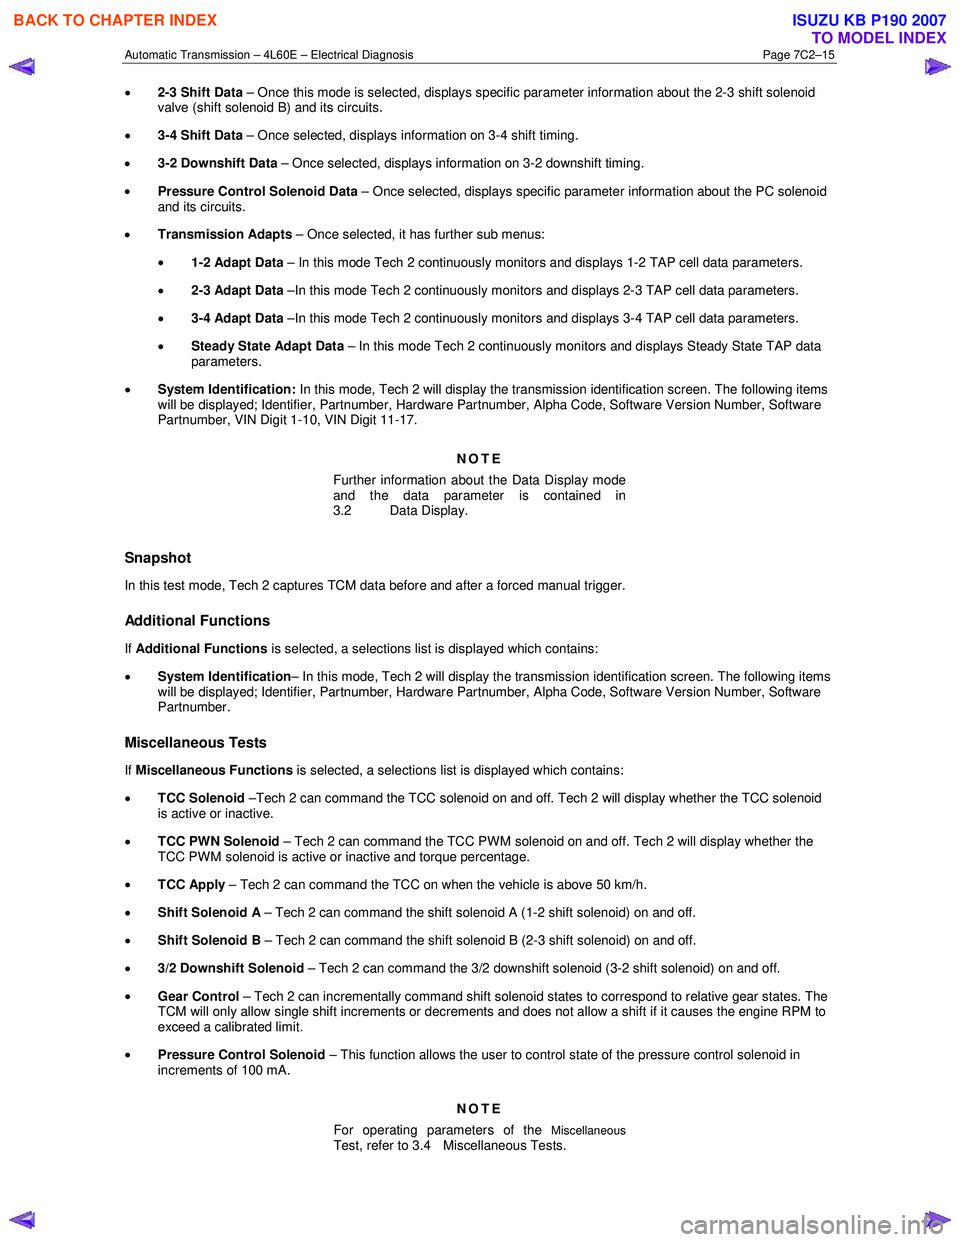
• 2-3 Shift Data – Once this mode is selected, displays specific parameter information about the 2-3 shift solenoid
valve (shift solenoid B) and its circuits.
• 3-4 Shift Data – Once selected, displays information on 3-4 shift timing.
• 3-2 Downshift Data – Once selected, displays information on 3-2 downshift timing.
• Pressure Control Solenoid Data – Once selected, displays specific parameter information about the PC solenoid
and its circuits.
• Transmission Adapts – Once selected, it has further sub menus:
• 1-2 Adapt Data – In this mode Tech 2 continuously monitors and displays 1-2 TAP cell data parameters.
• 2-3 Adapt Data –In this mode Tech 2 continuously monitors and displays 2-3 TAP cell data parameters.
• 3-4 Adapt Data –In this mode Tech 2 continuously monitors and displays 3-4 TAP cell data parameters.
• Steady State Adapt Data – In this mode Tech 2 continuously monitors and displays Steady State TAP data
parameters.
• System Identification: In this mode, Tech 2 will display the transmission identification screen. The following items
will be displayed; Identifier, Partnumber, Hardware Partnumber, Alpha Code, Software Version Number, Software
Partnumber, VIN Digit 1-10, VIN Digit 11-17.
NOTE
Further information about the Data Display mode
and the data parameter is contained in
3.2 Data Display.
Snapshot
In this test mode, Tech 2 captures TCM data before and after a forced manual trigger.
Additional Functions
If Additional Functions is selected, a selections list is displayed which contains:
• System Identification – In this mode, Tech 2 will display the transmission identification screen. The following items
will be displayed; Identifier, Partnumber, Hardware Partnumber, Alpha Code, Software Version Number, Software
Partnumber.
Miscellaneous Tests
If Miscellaneous Functions is selected, a selections list is displayed which contains:
• TCC Solenoid –Tech 2 can command the TCC solenoid on and off. Tech 2 will display whether the TCC solenoid
is active or inactive.
• TCC PWN Solenoid – Tech 2 can command the TCC PWM solenoid on and off. Tech 2 will display whether the
TCC PWM solenoid is active or inactive and torque percentage.
• TCC Apply – Tech 2 can command the TCC on when the vehicle is above 50 km/h.
• Shift Solenoid A – Tech 2 can command the shift solenoid A (1-2 shift solenoid) on and off.
• Shift Solenoid B – Tech 2 can command the shift solenoid B (2-3 shift solenoid) on and off.
• 3/2 Downshift Solenoid – Tech 2 can command the 3/2 downshift solenoid (3-2 shift solenoid) on and off.
• Gear Control – Tech 2 can incrementally command shift solenoid states to correspond to relative gear states. The
TCM will only allow single shift increments or decrements and does not allow a shift if it causes the engine RPM to
exceed a calibrated limit.
• Pressure Control Solenoid – This function allows the user to control state of the pressure control solenoid in
increments of 100 mA.
NOTE
For operating parameters of the
Miscellaneous Test, refer to 3.4 Miscellaneous Tests.
BACK TO CHAPTER INDEX
TO MODEL INDEX
ISUZU KB P190 2007
Page 3803 of 6020
Automatic Transmission – 4L60E – Electrical Diagnosis Page 7C2–17
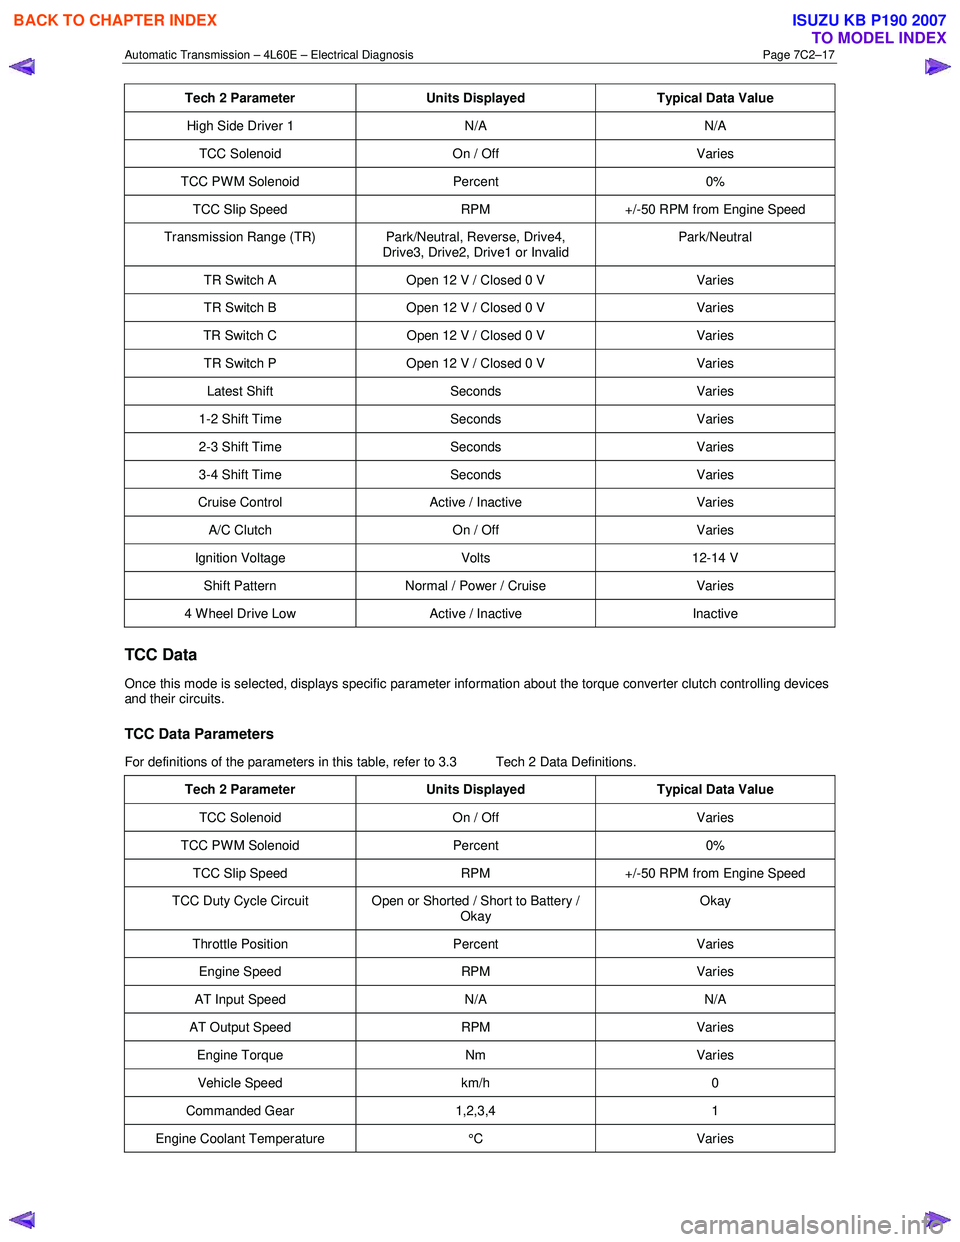
Tech 2 Parameter Units Displayed Typical Data Value
High Side Driver 1 N/A N/A
TCC Solenoid On / Off Varies
TCC PWM Solenoid Percent 0%
TCC Slip Speed RPM +/-50 RPM from Engine Speed
Transmission Range (TR) Park/Neutral, Reverse, Drive4,
Drive3, Drive2, Drive1 or Invalid Park/Neutral
TR Switch A
Open 12 V / Closed 0 V Varies
TR Switch B Open 12 V / Closed 0 V Varies
TR Switch C Open 12 V / Closed 0 V Varies
TR Switch P Open 12 V / Closed 0 V Varies
Latest Shift Seconds Varies
1-2 Shift Time Seconds Varies
2-3 Shift Time Seconds Varies
3-4 Shift Time Seconds Varies
Cruise Control Active / Inactive Varies
A/C Clutch On / Off Varies
Ignition Voltage Volts 12-14 V
Shift Pattern Normal / Power / Cruise Varies
4 Wheel Drive Low Active / Inactive Inactive
TCC Data
Once this mode is selected, displays specific parameter information about the torque converter clutch controlling devices
and their circuits.
TCC Data Parameters
For definitions of the parameters in this table, refer to 3.3 Tech 2 Data Definitions.
Tech 2 Parameter Units Displayed Typical Data Value
TCC Solenoid On / Off Varies
TCC PWM Solenoid Percent 0%
TCC Slip Speed RPM +/-50 RPM from Engine Speed
TCC Duty Cycle Circuit Open or Shorted / Short to Battery /
Okay Okay
Throttle Position
Percent Varies
Engine Speed RPM Varies
AT Input Speed N/A N/A
AT Output Speed RPM Varies
Engine Torque Nm Varies
Vehicle Speed km/h 0
Commanded Gear 1,2,3,4 1
Engine Coolant Temperature °C Varies
BACK TO CHAPTER INDEX
TO MODEL INDEX
ISUZU KB P190 2007
Page 3804 of 6020

Automatic Transmission – 4L60E – Electrical Diagnosis Page 7C2–18
Tech 2 Parameter Units Displayed Typical Data Value
Transmission Fluid Temp °C Varies
Estimated Gear Ratio Ratio 8.00:1
Transmission Hot Mode On / Off Off
1-2 Shift Data
Once this mode is selected, displays specific parameter information about the 1-2 shift solenoid valve and its circuits.
1-2 Shift Data Parameters
For definitions of the parameters in this table, refer to 3.3 Tech 2 Data Definitions.
Tech 2 Parameter Units Displayed Typical Data Value
Shift Solenoid A On / Off Varies
Shift Solenoid B On / Off Varies
Commanded Gear 1,2,3,4 1
1-2 Shift Time Seconds Varies
1-2 Shift Error Seconds Varies
Shift Solenoid A Circuit Open or Shorted / Short to Battery /
Okay Okay
Throttle Position
Percent Varies
Engine Speed RPM Varies
AT Input Speed N/A N/A
AT Output Speed RPM Varies
Vehicle Speed km/h 0
Estimated Gear Ratio Ratio 8.00:1
2-3 Shift Data
Once this mode is selected, displays specific parameter information about the 2-3 shift solenoid valve and its circuits.
2-3 Shift Data Parameters
For definitions of the parameters in this table, refer to 3.3 Tech 2 Data Definitions.
Tech 2 Parameter Units Displayed Typical Data Value
Shift Solenoid A On / Off Varies
Shift Solenoid B On / Off Varies
Commanded Gear 1,2,3,4 1
2-3 Shift Time Seconds Varies
2-3 Shift Error Seconds Varies
Shift Solenoid B Circuit Open or Shorted / Short to Battery /
Okay Okay
Throttle Position
Percent Varies
Engine Speed RPM Varies
AT Input Speed N/A N/A
AT Output Speed RPM Varies
BACK TO CHAPTER INDEX
TO MODEL INDEX
ISUZU KB P190 2007
Page 3805 of 6020
Automatic Transmission – 4L60E – Electrical Diagnosis Page 7C2–19
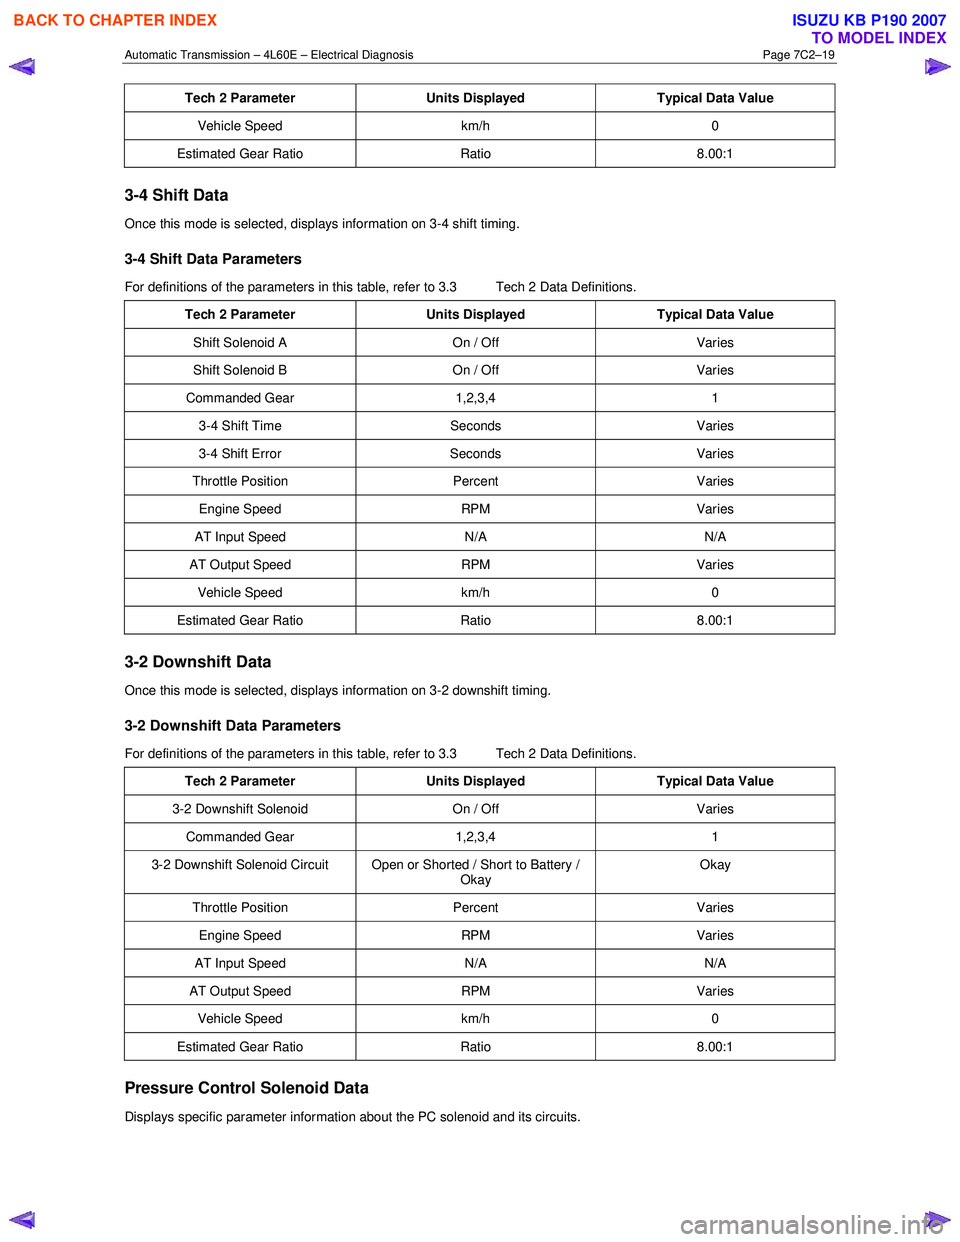
Tech 2 Parameter Units Displayed Typical Data Value
Vehicle Speed km/h 0
Estimated Gear Ratio Ratio 8.00:1
3-4 Shift Data
Once this mode is selected, displays information on 3-4 shift timing.
3-4 Shift Data Parameters
For definitions of the parameters in this table, refer to 3.3 Tech 2 Data Definitions.
Tech 2 Parameter Units Displayed Typical Data Value
Shift Solenoid A On / Off Varies
Shift Solenoid B On / Off Varies
Commanded Gear 1,2,3,4 1
3-4 Shift Time Seconds Varies
3-4 Shift Error Seconds Varies
Throttle Position Percent Varies
Engine Speed RPM Varies
AT Input Speed N/A N/A
AT Output Speed RPM Varies
Vehicle Speed km/h 0
Estimated Gear Ratio Ratio 8.00:1
3-2 Downshift Data
Once this mode is selected, displays information on 3-2 downshift timing.
3-2 Downshift Data Parameters
For definitions of the parameters in this table, refer to 3.3 Tech 2 Data Definitions.
Tech 2 Parameter Units Displayed Typical Data Value
3-2 Downshift Solenoid On / Off Varies
Commanded Gear 1,2,3,4 1
3-2 Downshift Solenoid Circuit Open or Shorted / Short to Battery /
Okay Okay
Throttle Position
Percent Varies
Engine Speed RPM Varies
AT Input Speed N/A N/A
AT Output Speed RPM Varies
Vehicle Speed km/h 0
Estimated Gear Ratio Ratio 8.00:1
Pressure Control Solenoid Data
Displays specific parameter information about the PC solenoid and its circuits.
BACK TO CHAPTER INDEX
TO MODEL INDEX
ISUZU KB P190 2007
Page 3808 of 6020
Automatic Transmission – 4L60E – Electrical Diagnosis Page 7C2–22
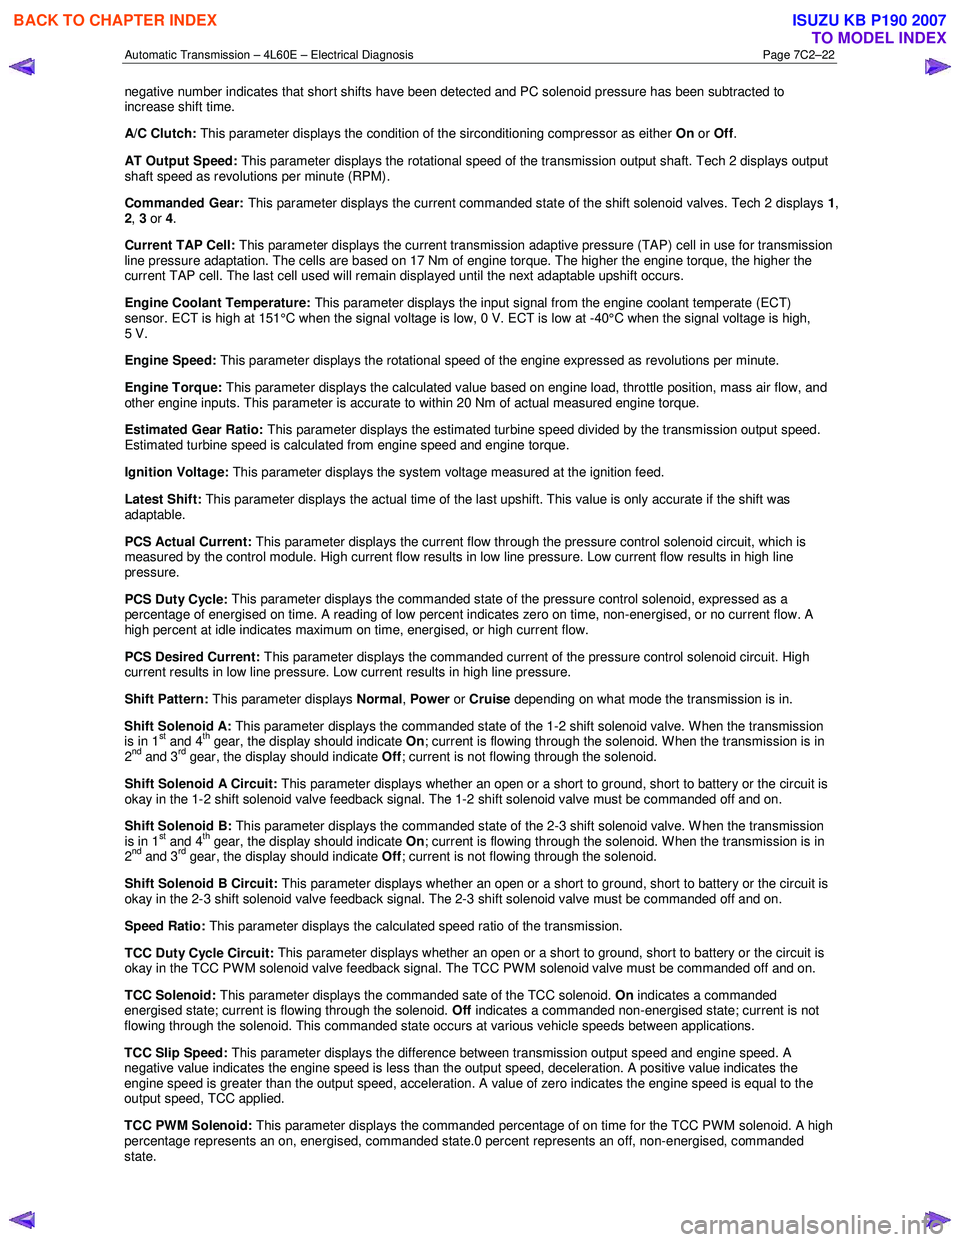
negative number indicates that short shifts have been detected and PC solenoid pressure has been subtracted to
increase shift time.
A/C Clutch: This parameter displays the condition of the sirconditioning compressor as either On or Off .
AT Output Speed: This parameter displays the rotational speed of the transmission output shaft. Tech 2 displays output
shaft speed as revolutions per minute (RPM).
Commanded Gear: This parameter displays the current commanded state of the shift solenoid valves. Tech 2 displays 1,
2 , 3 or 4.
Current TAP Cell: This parameter displays the current transmission adaptive pressure (TAP) cell in use for transmission
line pressure adaptation. The cells are based on 17 Nm of engine torque. The higher the engine torque, the higher the
current TAP cell. The last cell used will remain displayed until the next adaptable upshift occurs.
Engine Coolant Temperature: This parameter displays the input signal from the engine coolant temperate (ECT)
sensor. ECT is high at 151°C when the signal voltage is low, 0 V. ECT is low at -40°C when the signal voltage is high,
5 V.
Engine Speed: This parameter displays the rotational speed of the engine expressed as revolutions per minute.
Engine Torque: This parameter displays the calculated value based on engine load, throttle position, mass air flow, and
other engine inputs. This parameter is accurate to within 20 Nm of actual measured engine torque.
Estimated Gear Ratio: This parameter displays the estimated turbine speed divided by the transmission output speed.
Estimated turbine speed is calculated from engine speed and engine torque.
Ignition Voltage: This parameter displays the
system voltage measured at the ignition feed.
Latest Shift: This parameter displays the actual time of the last upshift. This value is only accurate if the shift was
adaptable.
PCS Actual Current: This parameter displays the current flow through the pressure control solenoid circuit, which is
measured by the control module. High current flow results in low line pressure. Low current flow results in high line
pressure.
PCS Duty Cycle: This parameter displays the commanded state of the pressure control solenoid, expressed as a
percentage of energised on time. A reading of low percent indicates zero on time, non-energised, or no current flow. A
high percent at idle indicates maximum on time, energised, or high current flow.
PCS Desired Current: This parameter displays the commanded current of the pressure control solenoid circuit. High
current results in low line pressure. Low current results in high line pressure.
Shift Pattern: This parameter displays Normal, Power or Cruise depending on what mode the transmission is in.
Shift Solenoid A: This parameter displays the commanded state of the 1-2 shift solenoid valve. W hen the transmission
is in 1
st and 4th gear, the display should indicate On; current is flowing through the solenoid. When the transmission is in
2nd and 3rd gear, the display should indicate Off; current is not flowing through the solenoid.
Shift Solenoid A Circuit: This parameter displays whether an open or a short to ground, short to battery or the circuit is
okay in the 1-2 shift solenoid valve feedback signal. The 1-2 shift solenoid valve must be commanded off and on.
Shift Solenoid B: This parameter displays the commanded state of the 2-3 shift solenoid valve. W hen the transmission
is in 1
st and 4th gear, the display should indicate On; current is flowing through the solenoid. When the transmission is in
2nd and 3rd gear, the display should indicate Off; current is not flowing through the solenoid.
Shift Solenoid B Circuit: This parameter displays whether an open or a short to ground, short to battery or the circuit is
okay in the 2-3 shift solenoid valve feedback signal. The 2-3 shift solenoid valve must be commanded off and on.
Speed Ratio: This parameter displays the calculated speed ratio of the transmission.
TCC Duty Cycle Circuit: This parameter displays whether an open or a short to ground, short to battery or the circuit is
okay in the TCC PW M solenoid valve feedback signal. The TCC PW M solenoid valve must be commanded off and on.
TCC Solenoid: This parameter displays the commanded sate of the TCC solenoid. On indicates a commanded
energised state; current is flowing through the solenoid. Off indicates a commanded non-energised state; current is not
flowing through the solenoid. This commanded state occurs at various vehicle speeds between applications.
TCC Slip Speed: This parameter displays the difference between transmission output speed and engine speed. A
negative value indicates the engine speed is less than the output speed, deceleration. A positive value indicates the
engine speed is greater than the output speed, acceleration. A value of zero indicates the engine speed is equal to the
output speed, TCC applied.
TCC PWM Solenoid: This parameter displays the commanded percentage of on time for the TCC PWM solenoid. A high
percentage represents an on, energised, commanded state.0 percent represents an off, non-energised, commanded
state.
BACK TO CHAPTER INDEX
TO MODEL INDEX
ISUZU KB P190 2007
Page 3813 of 6020
Automatic Transmission – 4L60E – Electrical Diagnosis Page 7C2–27
4 Diagnostics
4.1 Introduction
The transmission diagnostic procedure is organised in a logical structure that begins with the diagnostic system check
and as such must always be used as the starting point. The diagnostic system check directs the technician to the logical
steps necessary to diagnose a transmission driveability fault condition.
4.2 Basic Knowledge Required
A lack of basic understanding regarding
electronics, electrical wiring circuits and use
of electrical circuit testing tools when
performing any diagnostic procedure, could
result in incorrect diagnostic results or
damage to system components.
Understanding of the following is required to perform any of the diagnostic procedures detailed in this Service
Information:
• Basic electronics,
• Electrical wiring circuits,
• Electrical circuits testing, and
• Correct use of basic system diagnostic tools.
4.3 Diagnostic Precautions
When tests are required on connector
terminals, use the adapters in connector
adaptor kit J35616-C to prevent damage to
terminals.
The following precautions must be observed when performing all diagnostic procedures. Otherwise, incorrect diagnostic
results or damage to system components will occur:
1 Disconnection of the battery affects certain vehicle electronic systems.
2 Disconnect the battery negative lead when performing the following procedures:
• Disconnecting the electronic control module wiring harness connector/s or
• Charging the battery.
3 Disconnect the battery terminal ground lead and the electronic control module wiring harness connector before attempting any electric arc welding on the vehicle.
4 Do not start the engine if the battery terminal is not properly secured to the battery.
5 Do not disconnect or reconnect any of the following while the ignition is switched on or when the engine is running:
• Any electronic control module or system component electrical wiring connector, or
• Battery terminal leads.
6 Ensure that the correct procedure for disconnecting and connecting system electrical wiring harness connectors is always followed. For information on the correct procedure for disconnecting and connecting specific wiring
connectors, refer to 8A Electrical-Body and Chassis.
BACK TO CHAPTER INDEX
TO MODEL INDEX
ISUZU KB P190 2007
Page 3814 of 6020
Automatic Transmission – 4L60E – Electrical Diagnosis Page 7C2–28
7 Ensure that all wiring harness connectors are fitted correctly and secure.
8 W hen steam or pressure cleaning vehicle components, such as engines, transmissions, etc., do not direct the cleaning nozzle at any system electrical wiring harness connectors or components.
9 Do not clear any DTCs unless instructed.
10 The fault must be present when using the Diagnostic Trouble Code (DTC) Diagnostic Tables. Otherwise, misdiagnosis or replacement of good parts may occur.
11 Do not touch any electronic control module connector pins or soldered components on the circuit board. This is required to avoid the possibility of electrostatic discharge damage.
12 Use only the test equipment specified in the diagnostic tables, as other test equipment may give incorrect results or damage good components.
13 Electronic control modules are designed to withstand normal current draws associated with vehicle operation. However, the following fault conditions or incorrect test procedure may overload internal control module circuits and
irreparably damage the control module:
• A short to voltage fault condition in any of the control module low reference circuits may cause internal and/or
sensor damage. Therefore, any short to voltage fault condition in the control module low reference circuits
must be rectified before replacing a faulty component.
• A short to ground fault condition in any of the control module 5 volts reference circuits may cause internal
control module and/or sensor damage. Therefore, any short to ground fault condition in the control module 5
volt reference circuits must be rectified before replacing a faulty component.
• W hen using a test light to test an electrical circuit, do not use any of the control module low reference circuits
or 5 volts reference circuits as a reference point. Otherwise, excessive current draw from the test light may
damage the control module.
14 Disregard DTCs that set while performing the following diagnostic Steps:
• Using the Tech 2 output control function, or
• Disconnecting a control module system sensor connector then switching the ignition ON.
15 After completing the required diagnostics and service operations, road test the vehicle to ensure correct system operation.
4.4 Preliminary Checks
The Preliminary Checks is a set of visual and physical checks or inspections that may quickly identify a control module
system fault condition:
1 Refer to relevant Service Techlines for information regarding the fault condition.
2 Ensure that the battery is fully charged.
3 Inspect the battery connections for corrosion or a loose terminal.
4 Ensure that all relevant control module system related fuses are serviceable.
5 Inspect for incorrect aftermarket theft deterrent devices, lights or mobile phone installation.
6 Ensure that there is no speaker magnet positioned too close to any electronic module that contains relays.
7 Inspect the system wiring harness for proper connections, pinches or cuts.
8 Ensure that all control module related electrical wiring connectors are fitted correctly.
9 Inspect the control module ground connections for corrosion, loose terminal or incorrect position.
10 Ensure that the resistance between the control module housing and the battery ground cable is less than 0.5 ohms.
11 Check that the control module and its mounting bracket is secure.
12 Check all control module related components for correct installation.
13 Check the control module and related wiring harness routing to ensure that no rubbing or cutting of the wiring harness by sharp body components can occur.
BACK TO CHAPTER INDEX
TO MODEL INDEX
ISUZU KB P190 2007
Page 3815 of 6020
Automatic Transmission – 4L60E – Electrical Diagnosis Page 7C2–29
4.5 Diagnostic Trouble Code Tables
The diagnostic system check and the DTC list, directs the technician to the appropriate diagnostic trouble code (DTC)
tables if there is a DTC currently stored in the TCM.
The diagnostic tables locate a faulty circuit or component through a logic based on the process of elimination. These
diagnostic tables are developed with the following assumptions:
• the vehicle functioned correctly at the time of assembly,
• there are no multiple faults, and
• the problem currently exists.
Understanding and the correct use of the diagnostic tables are essential to reduce diagnostic time and to prevent
misdiagnosis.
Multiple DTCs Fault Condition
Some fault conditions trigger multiple component DTCs even if the fault condition exists only on a single component. If
there are multiple DTCs stored in the TCM, the service technician must view and record all DTCs logged.
Relationship between the logged DTCs can then be analysed to determine the source of the fault condition. Always
begin the diagnostic process with the DTC table of the fault condition that may trigger other DTCs to set.
The following fault conditions may trigger multiple DTCs:
• a fault in the serial data communication circuit,
• a system voltage that is too low may cause incorrect transmission tem operation or transmission component
malfunction,
• a system voltage that is too high may damage the TCM and/or other components,
• fault condition in the TCM Read Only Memory (ROM) or Random Access Memory (RAM),
• fault condition in the TCM internal circuitry or programming, or
• improperly connected sensor or component wiring connector.
If there are no obvious faults to begin a multiple DTC fault condition diagnostic procedure, refer to the Conditions for
Running the DTC in each diagnostic.
4.6 Diagnostic Trouble Code Definitions
The TCM constantly performs self-diagnostic tests on the transmission and it components. W hen the TCM detects a fault
condition in the transmission operating parameters, the TCM sets a DTC to represents that fault condition. The following
are the types of DTCs programmed in the TCM. In addition, DTCs are classified as either Current or History DTC.
• Type A – Emission Related DTCs,
• Type B – Emission Related DTCs, and
• Type C – Non-emission Related DTCs.
NOTE
Depending on the type of DTC set, the TCM may
command the malfunction indiciator lamp (MIL) to
display on the instrument cluster and warn the
driver there is a fault in the transmission. Refer to
the RA Rodeo Owner Manual for further
information on the MIL.
Type A – Emission Related DTCs
The TCM takes the following action when a Type A DTC runs and fails:
• sets a current Type A DTC that represents the fault condition,
• illuminates the MIL, and
BACK TO CHAPTER INDEX
TO MODEL INDEX
ISUZU KB P190 2007