2007 INFINITI QX56 ignition
[x] Cancel search: ignitionPage 2070 of 3061
POWER WINDOW SYSTEM
GW-51
< SERVICE INFORMATION >
C
D
E
F
G
H
J
K
L
MA
B
GW
N
O
P
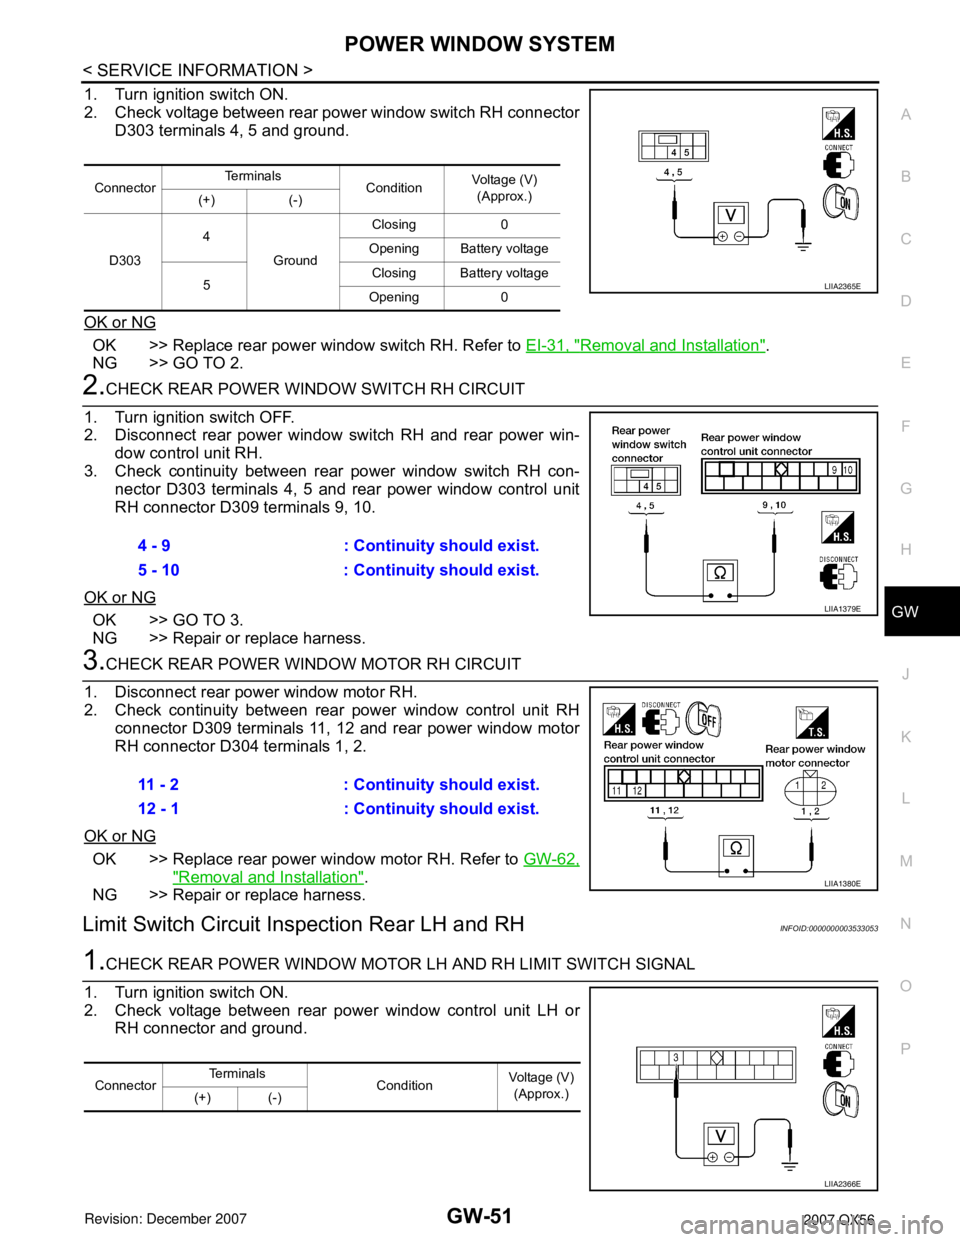
1. Turn ignition switch ON.
2. Check voltage between rear power window switch RH connector
D303 terminals 4, 5 and ground.
OK or NG
OK >> Replace rear power window switch RH. Refer to EI-31, "Removal and Installation".
NG >> GO TO 2.
2.CHECK REAR POWER WINDOW SWITCH RH CIRCUIT
1. Turn ignition switch OFF.
2. Disconnect rear power window switch RH and rear power win-
dow control unit RH.
3. Check continuity between rear power window switch RH con-
nector D303 terminals 4, 5 and rear power window control unit
RH connector D309 terminals 9, 10.
OK or NG
OK >> GO TO 3.
NG >> Repair or replace harness.
3.CHECK REAR POWER WINDOW MOTOR RH CIRCUIT
1. Disconnect rear power window motor RH.
2. Check continuity between rear power window control unit RH
connector D309 terminals 11, 12 and rear power window motor
RH connector D304 terminals 1, 2.
OK or NG
OK >> Replace rear power window motor RH. Refer to GW-62,
"Removal and Installation".
NG >> Repair or replace harness.
Limit Switch Circuit Inspection Rear LH and RHINFOID:0000000003533053
1.CHECK REAR POWER WINDOW MOTOR LH AND RH LIMIT SWITCH SIGNAL
1. Turn ignition switch ON.
2. Check voltage between rear power window control unit LH or
RH connector and ground.
ConnectorTe r m i n a l s
ConditionVoltage (V)
(Approx.)
(+) (-)
D3034
GroundClosing 0
Opening Battery voltage
5Closing Battery voltage
Opening 0
LIIA2365E
4 - 9 : Continuity should exist.
5 - 10 : Continuity should exist.
LIIA1379E
11 - 2 : Continuity should exist.
12 - 1 : Continuity should exist.
LIIA1380E
ConnectorTe r m i n a l s
Condition Voltage (V)
(Approx.)
(+) (-)
LIIA2366E
Page 2071 of 3061
GW-52
< SERVICE INFORMATION >
POWER WINDOW SYSTEM
OK or NG
OK >> Limit switch circuit is OK.
NG >> GO TO 2.
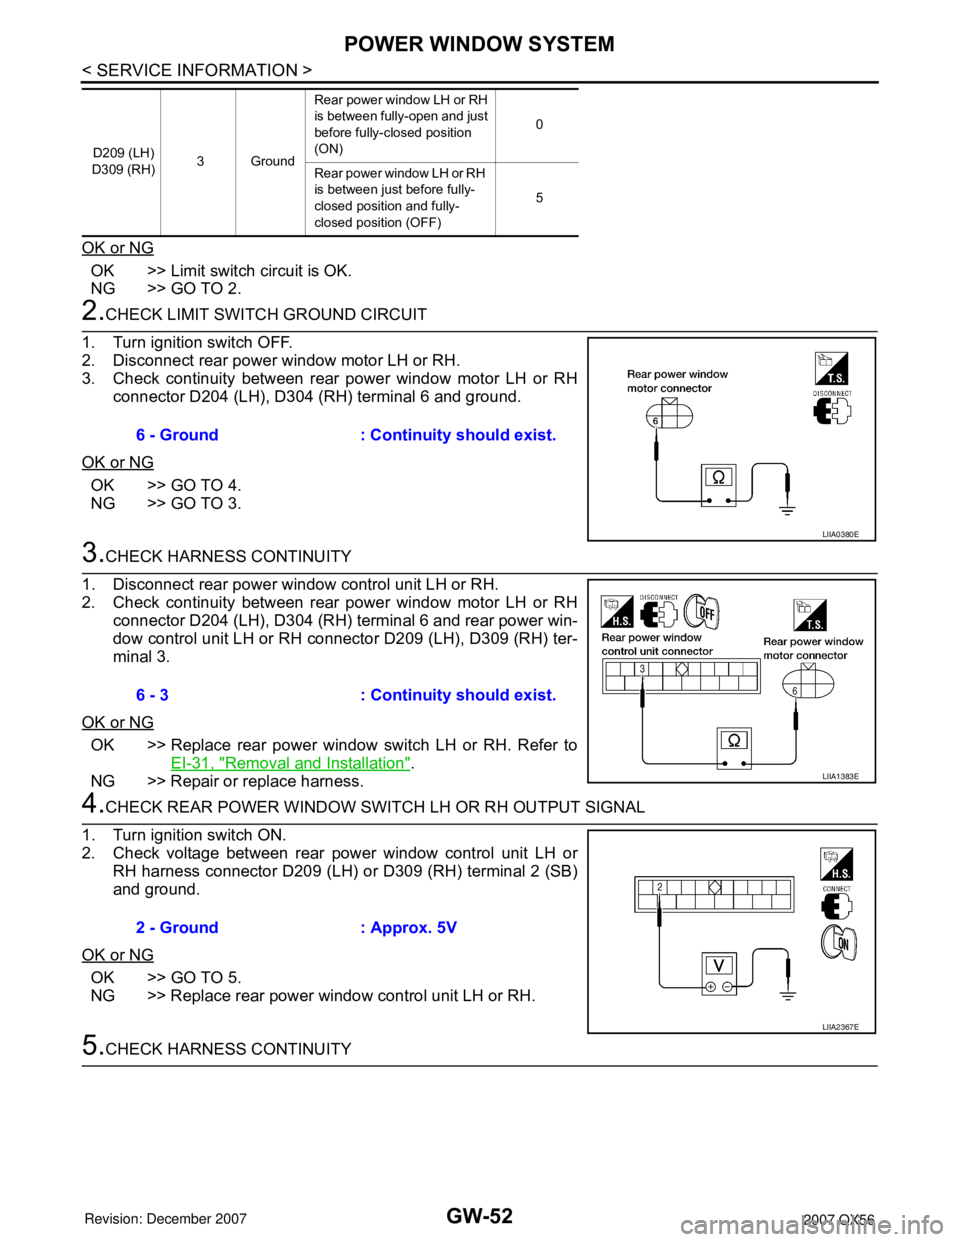
2.CHECK LIMIT SWITCH GROUND CIRCUIT
1. Turn ignition switch OFF.
2. Disconnect rear power window motor LH or RH.
3. Check continuity between rear power window motor LH or RH
connector D204 (LH), D304 (RH) terminal 6 and ground.
OK or NG
OK >> GO TO 4.
NG >> GO TO 3.
3.CHECK HARNESS CONTINUITY
1. Disconnect rear power window control unit LH or RH.
2. Check continuity between rear power window motor LH or RH
connector D204 (LH), D304 (RH) terminal 6 and rear power win-
dow control unit LH or RH connector D209 (LH), D309 (RH) ter-
minal 3.
OK or NG
OK >> Replace rear power window switch LH or RH. Refer to
EI-31, "
Removal and Installation".
NG >> Repair or replace harness.
4.CHECK REAR POWER WINDOW SWITCH LH OR RH OUTPUT SIGNAL
1. Turn ignition switch ON.
2. Check voltage between rear power window control unit LH or
RH harness connector D209 (LH) or D309 (RH) terminal 2 (SB)
and ground.
OK or NG
OK >> GO TO 5.
NG >> Replace rear power window control unit LH or RH.
5.CHECK HARNESS CONTINUITY
D209 (LH)
D309 (RH)3GroundRear power window LH or RH
is between fully-open and just
before fully-closed position
(ON)0
Rear power window LH or RH
is between just before fully-
closed position and fully-
closed position (OFF)5
6 - Ground : Continuity should exist.
LIIA0380E
6 - 3 : Continuity should exist.
LIIA1383E
2 - Ground : Approx. 5V
LIIA2367E
Page 2072 of 3061
POWER WINDOW SYSTEM
GW-53
< SERVICE INFORMATION >
C
D
E
F
G
H
J
K
L
MA
B
GW
N
O
P
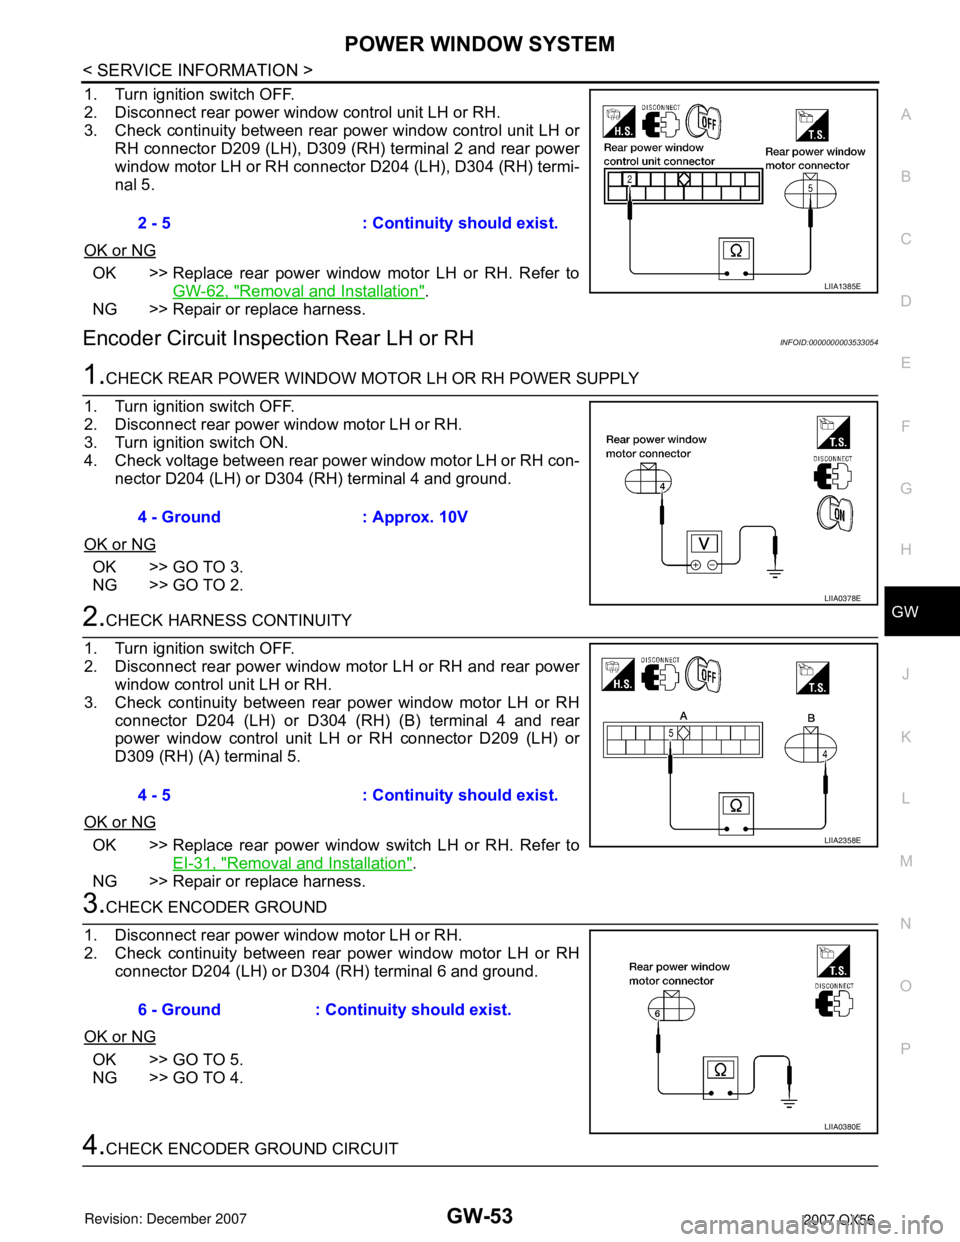
1. Turn ignition switch OFF.
2. Disconnect rear power window control unit LH or RH.
3. Check continuity between rear power window control unit LH or
RH connector D209 (LH), D309 (RH) terminal 2 and rear power
window motor LH or RH connector D204 (LH), D304 (RH) termi-
nal 5.
OK or NG
OK >> Replace rear power window motor LH or RH. Refer to
GW-62, "
Removal and Installation".
NG >> Repair or replace harness.
Encoder Circuit Inspection Rear LH or RHINFOID:0000000003533054
1.CHECK REAR POWER WINDOW MOTOR LH OR RH POWER SUPPLY
1. Turn ignition switch OFF.
2. Disconnect rear power window motor LH or RH.
3. Turn ignition switch ON.
4. Check voltage between rear power window motor LH or RH con-
nector D204 (LH) or D304 (RH) terminal 4 and ground.
OK or NG
OK >> GO TO 3.
NG >> GO TO 2.
2.CHECK HARNESS CONTINUITY
1. Turn ignition switch OFF.
2. Disconnect rear power window motor LH or RH and rear power
window control unit LH or RH.
3. Check continuity between rear power window motor LH or RH
connector D204 (LH) or D304 (RH) (B) terminal 4 and rear
power window control unit LH or RH connector D209 (LH) or
D309 (RH) (A) terminal 5.
OK or NG
OK >> Replace rear power window switch LH or RH. Refer to
EI-31, "
Removal and Installation".
NG >> Repair or replace harness.
3.CHECK ENCODER GROUND
1. Disconnect rear power window motor LH or RH.
2. Check continuity between rear power window motor LH or RH
connector D204 (LH) or D304 (RH) terminal 6 and ground.
OK or NG
OK >> GO TO 5.
NG >> GO TO 4.
4.CHECK ENCODER GROUND CIRCUIT2 - 5 : Continuity should exist.
LIIA1385E
4 - Ground : Approx. 10V
LIIA0378E
4 - 5 : Continuity should exist.
LIIA2358E
6 - Ground : Continuity should exist.
LIIA0380E
Page 2073 of 3061
GW-54
< SERVICE INFORMATION >
POWER WINDOW SYSTEM
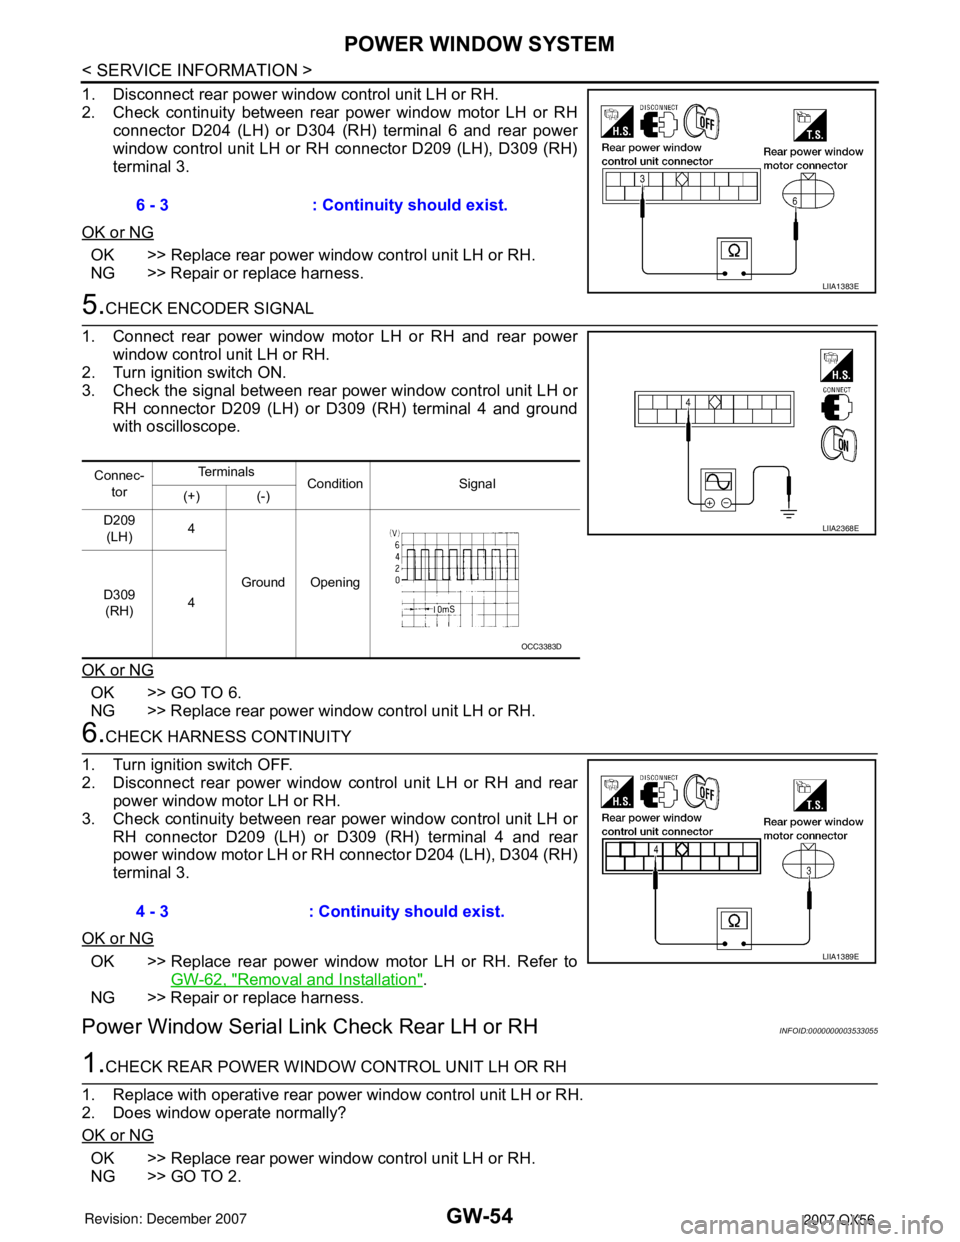
1. Disconnect rear power window control unit LH or RH.
2. Check continuity between rear power window motor LH or RH
connector D204 (LH) or D304 (RH) terminal 6 and rear power
window control unit LH or RH connector D209 (LH), D309 (RH)
terminal 3.
OK or NG
OK >> Replace rear power window control unit LH or RH.
NG >> Repair or replace harness.
5.CHECK ENCODER SIGNAL
1. Connect rear power window motor LH or RH and rear power
window control unit LH or RH.
2. Turn ignition switch ON.
3. Check the signal between rear power window control unit LH or
RH connector D209 (LH) or D309 (RH) terminal 4 and ground
with oscilloscope.
OK or NG
OK >> GO TO 6.
NG >> Replace rear power window control unit LH or RH.
6.CHECK HARNESS CONTINUITY
1. Turn ignition switch OFF.
2. Disconnect rear power window control unit LH or RH and rear
power window motor LH or RH.
3. Check continuity between rear power window control unit LH or
RH connector D209 (LH) or D309 (RH) terminal 4 and rear
power window motor LH or RH connector D204 (LH), D304 (RH)
terminal 3.
OK or NG
OK >> Replace rear power window motor LH or RH. Refer to
GW-62, "
Removal and Installation".
NG >> Repair or replace harness.
Power Window Serial Link Check Rear LH or RHINFOID:0000000003533055
1.CHECK REAR POWER WINDOW CONTROL UNIT LH OR RH
1. Replace with operative rear power window control unit LH or RH.
2. Does window operate normally?
OK or NG
OK >> Replace rear power window control unit LH or RH.
NG >> GO TO 2.6 - 3 : Continuity should exist.
LIIA1383E
Connec-
torTe r m i n a l s
Condition Signal
(+) (-)
D209
(LH)4
Ground Opening
D309
(RH)4
LIIA2368E
OCC3383D
4 - 3 : Continuity should exist.
LIIA1389E
Page 2074 of 3061
POWER WINDOW SYSTEM
GW-55
< SERVICE INFORMATION >
C
D
E
F
G
H
J
K
L
MA
B
GW
N
O
P
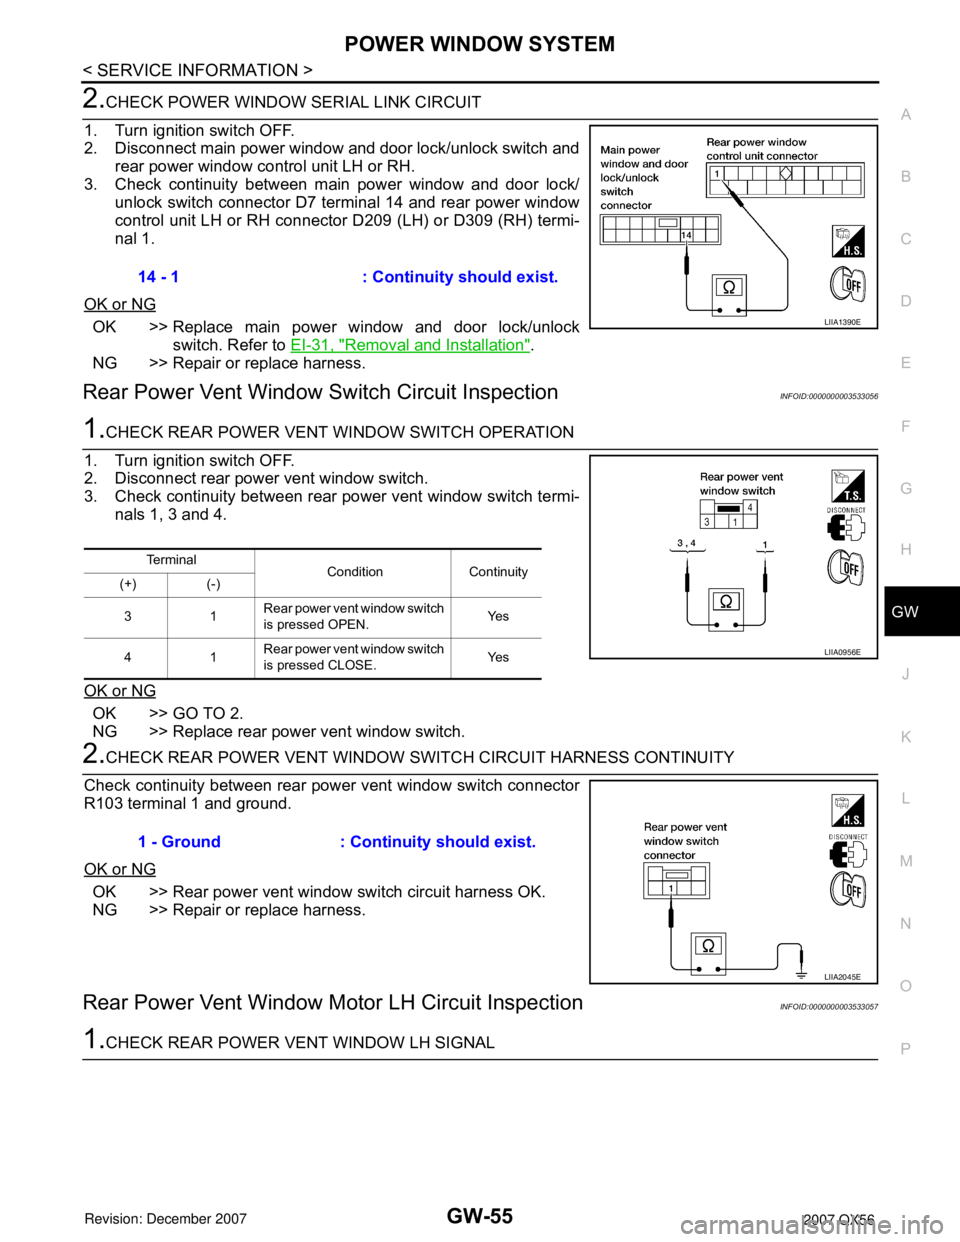
2.CHECK POWER WINDOW SERIAL LINK CIRCUIT
1. Turn ignition switch OFF.
2. Disconnect main power window and door lock/unlock switch and
rear power window control unit LH or RH.
3. Check continuity between main power window and door lock/
unlock switch connector D7 terminal 14 and rear power window
control unit LH or RH connector D209 (LH) or D309 (RH) termi-
nal 1.
OK or NG
OK >> Replace main power window and door lock/unlock
switch. Refer to EI-31, "
Removal and Installation".
NG >> Repair or replace harness.
Rear Power Vent Window Switch Circuit InspectionINFOID:0000000003533056
1.CHECK REAR POWER VENT WINDOW SWITCH OPERATION
1. Turn ignition switch OFF.
2. Disconnect rear power vent window switch.
3. Check continuity between rear power vent window switch termi-
nals 1, 3 and 4.
OK or NG
OK >> GO TO 2.
NG >> Replace rear power vent window switch.
2.CHECK REAR POWER VENT WINDOW SWITCH CIRCUIT HARNESS CONTINUITY
Check continuity between rear power vent window switch connector
R103 terminal 1 and ground.
OK or NG
OK >> Rear power vent window switch circuit harness OK.
NG >> Repair or replace harness.
Rear Power Vent Window Motor LH Circuit InspectionINFOID:0000000003533057
1.CHECK REAR POWER VENT WINDOW LH SIGNAL14 - 1 : Continuity should exist.
LIIA1390E
Te r m i n a l
Condition Continuity
(+) (-)
31Rear power vent window switch
is pressed OPEN.Ye s
41Rear power vent window switch
is pressed CLOSE.Ye s
LIIA0956E
1 - Ground : Continuity should exist.
LIIA2045E
Page 2075 of 3061
GW-56
< SERVICE INFORMATION >
POWER WINDOW SYSTEM
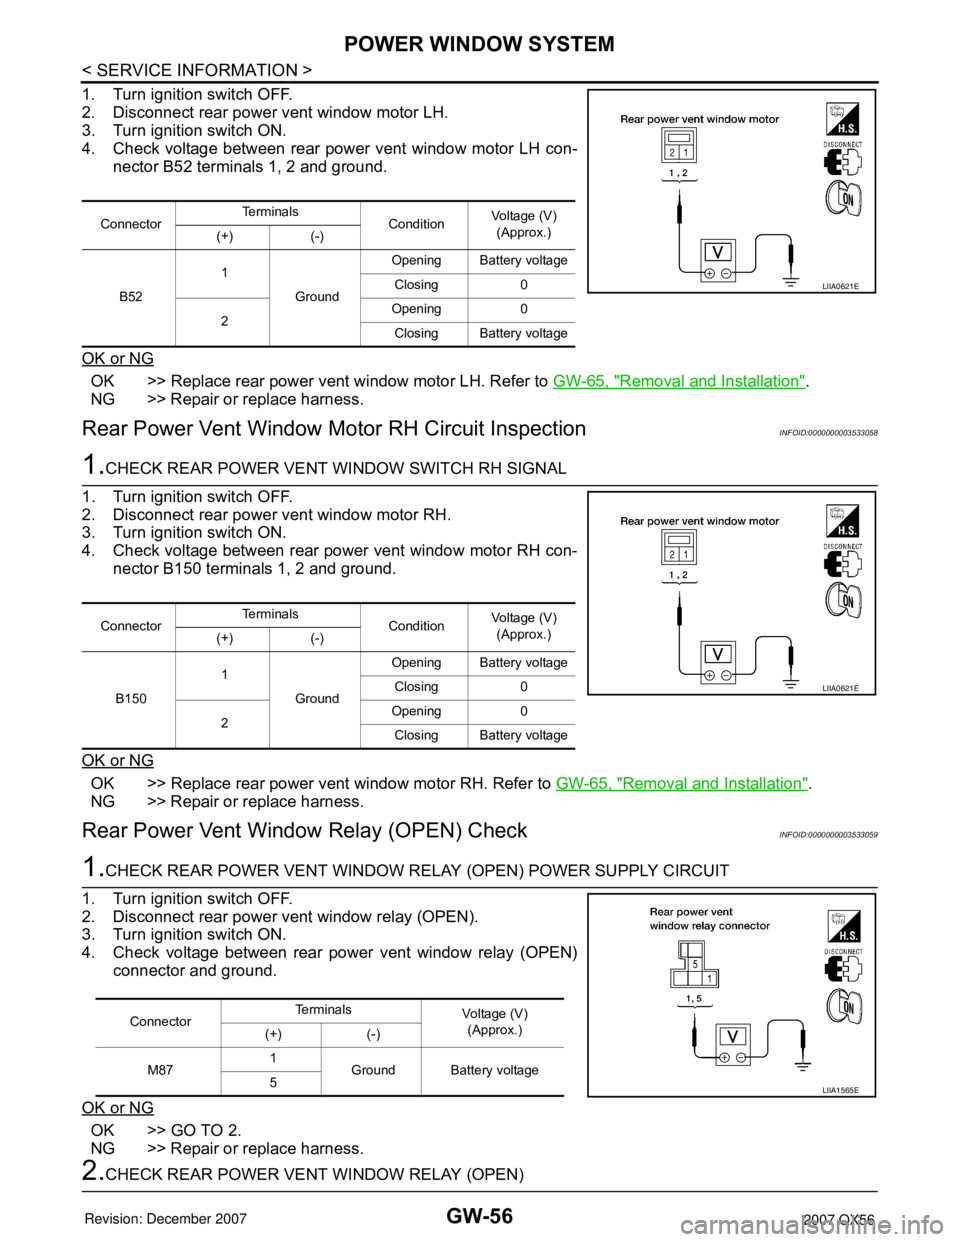
1. Turn ignition switch OFF.
2. Disconnect rear power vent window motor LH.
3. Turn ignition switch ON.
4. Check voltage between rear power vent window motor LH con-
nector B52 terminals 1, 2 and ground.
OK or NG
OK >> Replace rear power vent window motor LH. Refer to GW-65, "Removal and Installation".
NG >> Repair or replace harness.
Rear Power Vent Window Motor RH Circuit InspectionINFOID:0000000003533058
1.CHECK REAR POWER VENT WINDOW SWITCH RH SIGNAL
1. Turn ignition switch OFF.
2. Disconnect rear power vent window motor RH.
3. Turn ignition switch ON.
4. Check voltage between rear power vent window motor RH con-
nector B150 terminals 1, 2 and ground.
OK or NG
OK >> Replace rear power vent window motor RH. Refer to GW-65, "Removal and Installation".
NG >> Repair or replace harness.
Rear Power Vent Window Relay (OPEN) CheckINFOID:0000000003533059
1.CHECK REAR POWER VENT WINDOW RELAY (OPEN) POWER SUPPLY CIRCUIT
1. Turn ignition switch OFF.
2. Disconnect rear power vent window relay (OPEN).
3. Turn ignition switch ON.
4. Check voltage between rear power vent window relay (OPEN)
connector and ground.
OK or NG
OK >> GO TO 2.
NG >> Repair or replace harness.
2.CHECK REAR POWER VENT WINDOW RELAY (OPEN)
ConnectorTe r m i n a l s
ConditionVoltage (V)
(Approx.)
(+) (-)
B521
GroundOpening Battery voltage
Closing 0
2Opening 0
Closing Battery voltage
LIIA0621E
ConnectorTe r m i n a l s
ConditionVoltage (V)
(Approx.)
(+) (-)
B1501
GroundOpening Battery voltage
Closing 0
2Opening 0
Closing Battery voltage
LIIA0621E
ConnectorTe r m i n a l s
Voltage (V)
(Approx.)
(+) (-)
M871
Ground Battery voltage
5
LIIA1565E
Page 2076 of 3061
POWER WINDOW SYSTEM
GW-57
< SERVICE INFORMATION >
C
D
E
F
G
H
J
K
L
MA
B
GW
N
O
P
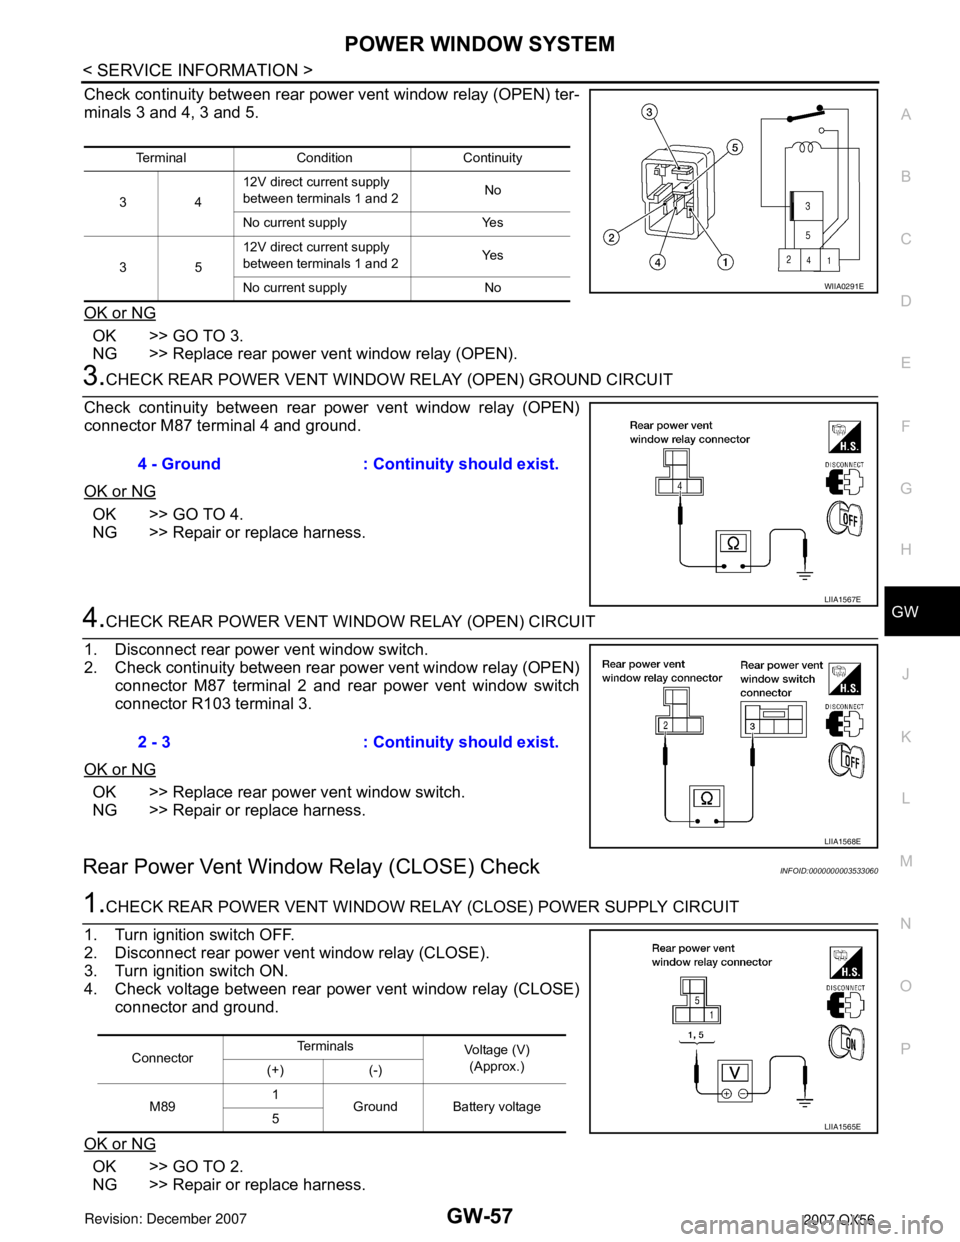
Check continuity between rear power vent window relay (OPEN) ter-
minals 3 and 4, 3 and 5.
OK or NG
OK >> GO TO 3.
NG >> Replace rear power vent window relay (OPEN).
3.CHECK REAR POWER VENT WINDOW RELAY (OPEN) GROUND CIRCUIT
Check continuity between rear power vent window relay (OPEN)
connector M87 terminal 4 and ground.
OK or NG
OK >> GO TO 4.
NG >> Repair or replace harness.
4.CHECK REAR POWER VENT WINDOW RELAY (OPEN) CIRCUIT
1. Disconnect rear power vent window switch.
2. Check continuity between rear power vent window relay (OPEN)
connector M87 terminal 2 and rear power vent window switch
connector R103 terminal 3.
OK or NG
OK >> Replace rear power vent window switch.
NG >> Repair or replace harness.
Rear Power Vent Window Relay (CLOSE) CheckINFOID:0000000003533060
1.CHECK REAR POWER VENT WINDOW RELAY (CLOSE) POWER SUPPLY CIRCUIT
1. Turn ignition switch OFF.
2. Disconnect rear power vent window relay (CLOSE).
3. Turn ignition switch ON.
4. Check voltage between rear power vent window relay (CLOSE)
connector and ground.
OK or NG
OK >> GO TO 2.
NG >> Repair or replace harness.
Terminal Condition Continuity
3412V direct current supply
between terminals 1 and 2No
No current supply Yes
3512V direct current supply
between terminals 1 and 2Ye s
No current supply No
WIIA0291E
4 - Ground : Continuity should exist.
LIIA1567E
2 - 3 : Continuity should exist.
LIIA1568E
ConnectorTe r m i n a l s
Voltage (V)
(Approx.)
(+) (-)
M891
Ground Battery voltage
5
LIIA1565E
Page 2087 of 3061
GW-68
< SERVICE INFORMATION >
REAR WINDOW DEFOGGER
REAR WINDOW DEFOGGER
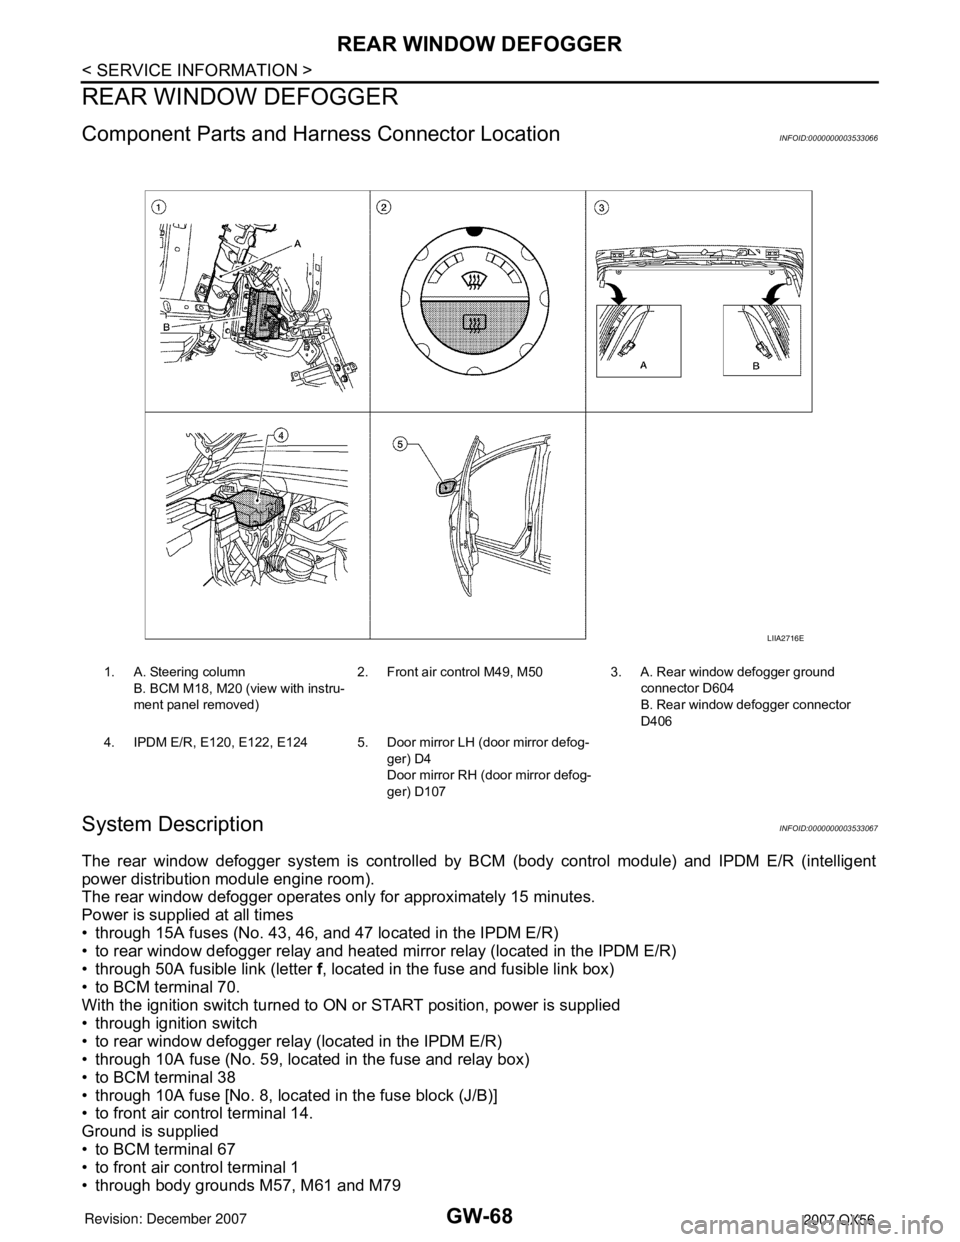
Component Parts and Harness Connector LocationINFOID:0000000003533066
System DescriptionINFOID:0000000003533067
The rear window defogger system is controlled by BCM (body control module) and IPDM E/R (intelligent
power distribution module engine room).
The rear window defogger operates only for approximately 15 minutes.
Power is supplied at all times
• through 15A fuses (No. 43, 46, and 47 located in the IPDM E/R)
• to rear window defogger relay and heated mirror relay (located in the IPDM E/R)
• through 50A fusible link (letter f, located in the fuse and fusible link box)
• to BCM terminal 70.
With the ignition switch turned to ON or START position, power is supplied
• through ignition switch
• to rear window defogger relay (located in the IPDM E/R)
• through 10A fuse (No. 59, located in the fuse and relay box)
• to BCM terminal 38
• through 10A fuse [No. 8, located in the fuse block (J/B)]
• to front air control terminal 14.
Ground is supplied
• to BCM terminal 67
• to front air control terminal 1
• through body grounds M57, M61 and M79
1. A. Steering column
B. BCM M18, M20 (view with instru-
ment panel removed)2. Front air control M49, M50 3. A. Rear window defogger ground
connector D604
B. Rear window defogger connector
D406
4. IPDM E/R, E120, E122, E124 5. Door mirror LH (door mirror defog-
ger) D4
Door mirror RH (door mirror defog-
ger) D107
LIIA2716E