Page 1013 of 3061

DI-2
Terminal and Reference Value for Sonar Control
Unit .........................................................................
50
How to Proceed with Trouble Diagnosis .................51
Pre-diagnosis Inspection ........................................51
Self-Diagnosis Function ..........................................51
Preliminary Check ..................................................53
Symptom Chart .......................................................54
Component Inspection ............................................55
Removal and Installation ........................................55
CLOCK ...............................................................56
Wiring Diagram - CLOCK - .................................. ...56
Removal and Installation of Clock ..........................56
REAR VIEW MONITOR .....................................58
Component Parts and Harness Connector Loca-
tion ....................................................................... ...
58
System Description .............................................. ...58
Schematic ...............................................................60
Wiring Diagram - R/VIEW - .....................................61
Rear View Camera Control Unit Harness Connec-
tor Terminal Layout .............................................. ...
64
Terminal and Reference Value for Rear View
Camera Control Unit ...............................................
64
CONSULT-II Function (REARVIEW CAMERA) ......64
Side Distance Guideline Correction ........................65
Power Supply and Ground Circuit Inspection .........67
Rear View Is Not Displayed with the A/T Selector
Lever in R Position ..................................................
67
Removal and Installation of Rear View Camera
Control Unit .......................................................... ...
71
Removal and Installation of Rear View Camera .....72
Page 1014 of 3061

PRECAUTIONDI-3
< SERVICE INFORMATION >
C
DE
F
G H
I
J
L
M A
B
DI
N
O P
SERVICE INFORMATION
PRECAUTION
Precaution for Supplemental Restraint System (SRS) "AIR BAG" and "SEAT BELT
PRE-TENSIONER"
INFOID:0000000003533477
The Supplemental Restraint System such as “A IR BAG” and “SEAT BELT PRE-TENSIONER”, used along
with a front seat belt, helps to reduce the risk or severi ty of injury to the driver and front passenger for certain
types of collision. This system includes seat belt switch inputs and dual stage front air bag modules. The SRS
system uses the seat belt switches to determine the front air bag deployment, and may only deploy one front
air bag, depending on the severity of a collision and w hether the front occupants are belted or unbelted.
Information necessary to service the system safely is included in the SRS and SB section of this Service Man-
ual.
WARNING:
• To avoid rendering the SRS inoper ative, which could increase the risk of personal injury or death in
the event of a collision which would result in air bag inflation, all maintenance must be performed by
an authorized NISSAN/INFINITI dealer.
• Improper maintenance, including in correct removal and installation of the SRS, can lead to personal
injury caused by unintentional act ivation of the system. For removal of Spiral Cable and Air Bag
Module, see the SRS section.
• Do not use electrical test equipm ent on any circuit related to the SRS unless instructed to in this
Service Manual. SRS wiring harnesses can be identi fied by yellow and/or orange harnesses or har-
ness connectors.
Page 1020 of 3061
COMBINATION METERSDI-9
< SERVICE INFORMATION >
C
DE
F
G H
I
J
L
M A
B
DI
N
O P
Wiring Diagram - METER -INFOID:0000000003533483
WKWA5132E
Page 1028 of 3061

COMBINATION METERSDI-17
< SERVICE INFORMATION >
C
DE
F
G H
I
J
L
M A
B
DI
N
O P
Refer to DI-9, "Wiring Diagram - METER -".
OK or NG
OK >> GO TO 2.
NG >> If fuse is blown, be sure to eliminate caus e of malfunction before installing new fuse. Refer to PG-
3.
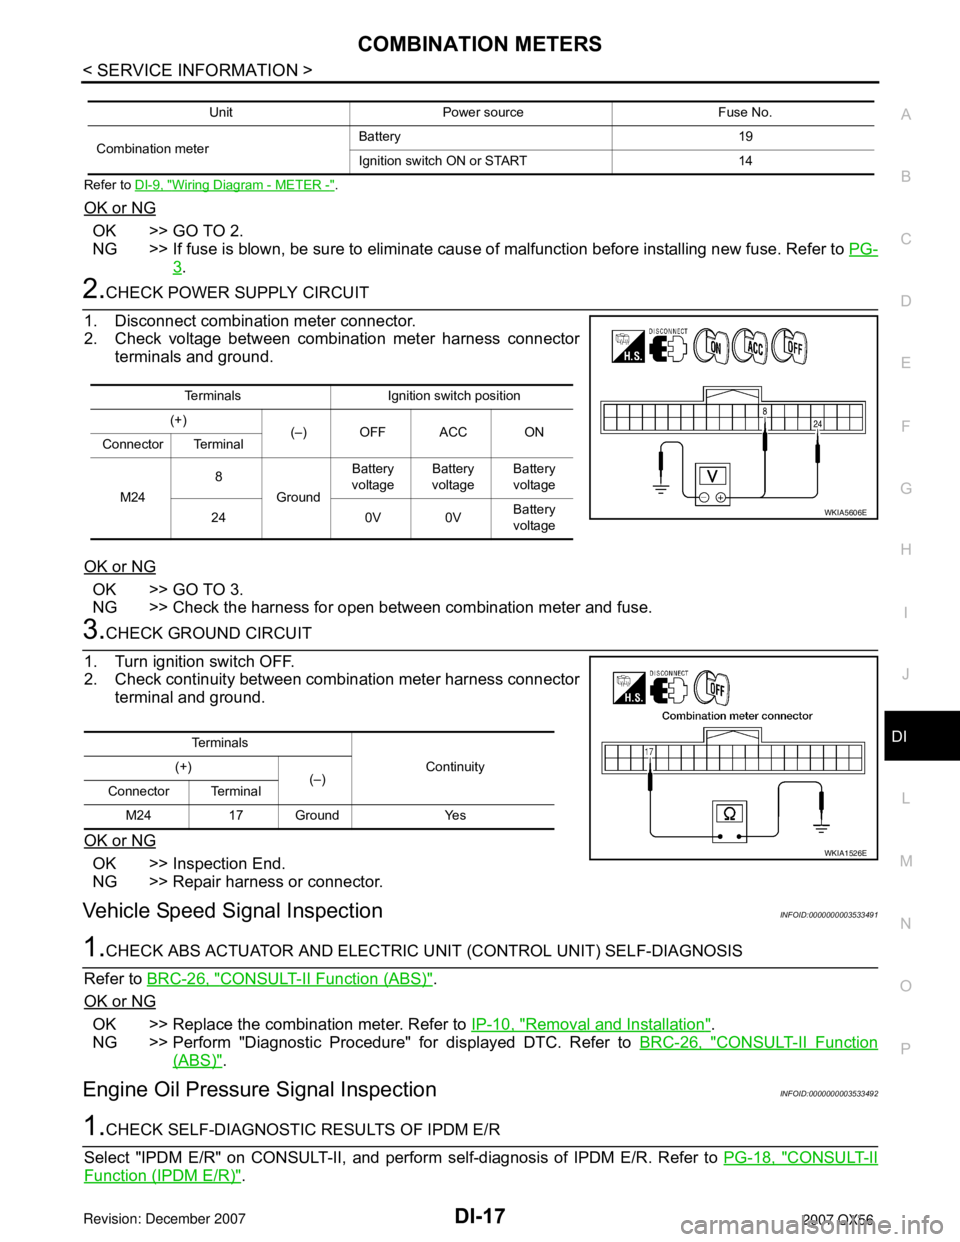
2.CHECK POWER SUPPLY CIRCUIT
1. Disconnect combination meter connector.
2. Check voltage between combination meter harness connector terminals and ground.
OK or NG
OK >> GO TO 3.
NG >> Check the harness for open between combination meter and fuse.
3.CHECK GROUND CIRCUIT
1. Turn ignition switch OFF.
2. Check continuity between combination meter harness connector terminal and ground.
OK or NG
OK >> Inspection End.
NG >> Repair harness or connector.
Vehicle Speed Signal InspectionINFOID:0000000003533491
1.CHECK ABS ACTUATOR AND ELECTRIC UNIT (CONTROL UNIT) SELF-DIAGNOSIS
Refer to BRC-26, "
CONSULT-II Function (ABS)".
OK or NG
OK >> Replace the combination meter. Refer to IP-10, "Removal and Installation".
NG >> Perform "Diagnostic Procedure" for displayed DTC. Refer to BRC-26, "
CONSULT-II Function
(ABS)".
Engine Oil Pressure Signal InspectionINFOID:0000000003533492
1.CHECK SELF-DIAGNOSTIC RESULTS OF IPDM E/R
Select "IPDM E/R" on CONSULT-II, and perform self-diagnosis of IPDM E/R. Refer to PG-18, "
CONSULT-II
Function (IPDM E/R)".
Unit Power source Fuse No.
Combination meter Battery 19
Ignition switch ON or START 14
Terminals Ignition switch position
(+) (–) OFF ACC ON
Connector Terminal
M24 8
Ground Battery
voltage Battery
voltage Battery
voltage
24 0V 0V Battery
voltage
WKIA5606E
Te r m i n a l s
Continuity
(+)
(–)
Connector Terminal
M24 17 Ground Yes
WKIA1526E
Page 1034 of 3061
COMPASS AND THERMOMETER
DI-23
< SERVICE INFORMATION >
C
D
E
F
G
H
I
J
L
MA
B
DI
N
O
P
Wiring Diagram - COMPAS -INFOID:0000000003533501
Trouble DiagnosisINFOID:0000000003533502
PRELIMINARY CHECK FOR THERMOMETER
1.COOL DOWN CHECK
WKWA3618E
Page 1038 of 3061
WARNING LAMPS
DI-27
< SERVICE INFORMATION >
C
D
E
F
G
H
I
J
L
MA
B
DI
N
O
P
Wiring Diagram - WARN -INFOID:0000000003533505
WKWA5135E
Page 1045 of 3061
DI-34
< SERVICE INFORMATION >
A/T INDICATOR
A/T INDICATOR
Wiring Diagram - AT/IND -INFOID:0000000003533508
A/T Indicator Does Not IlluminateINFOID:0000000003533509
1.CHECK SELF-DIAGNOSIS OF COMBINATION METER
Perform combination meter self-diagnosis. Refer to DI-12, "
Self-Diagnosis Mode of Combination Meter".
WKWA3626E
Page 1049 of 3061
DI-38
< SERVICE INFORMATION >
WARNING CHIME
Wiring Diagram - CHIME -
INFOID:0000000003533513
WKWA3627E