2007 INFINITI QX56 display
[x] Cancel search: displayPage 1152 of 3061
ON BOARD DIAGNOSTIC (OBD) SYSTEM
EC-69
< SERVICE INFORMATION >
C
D
E
F
G
H
I
J
K
L
MA
EC
N
P O
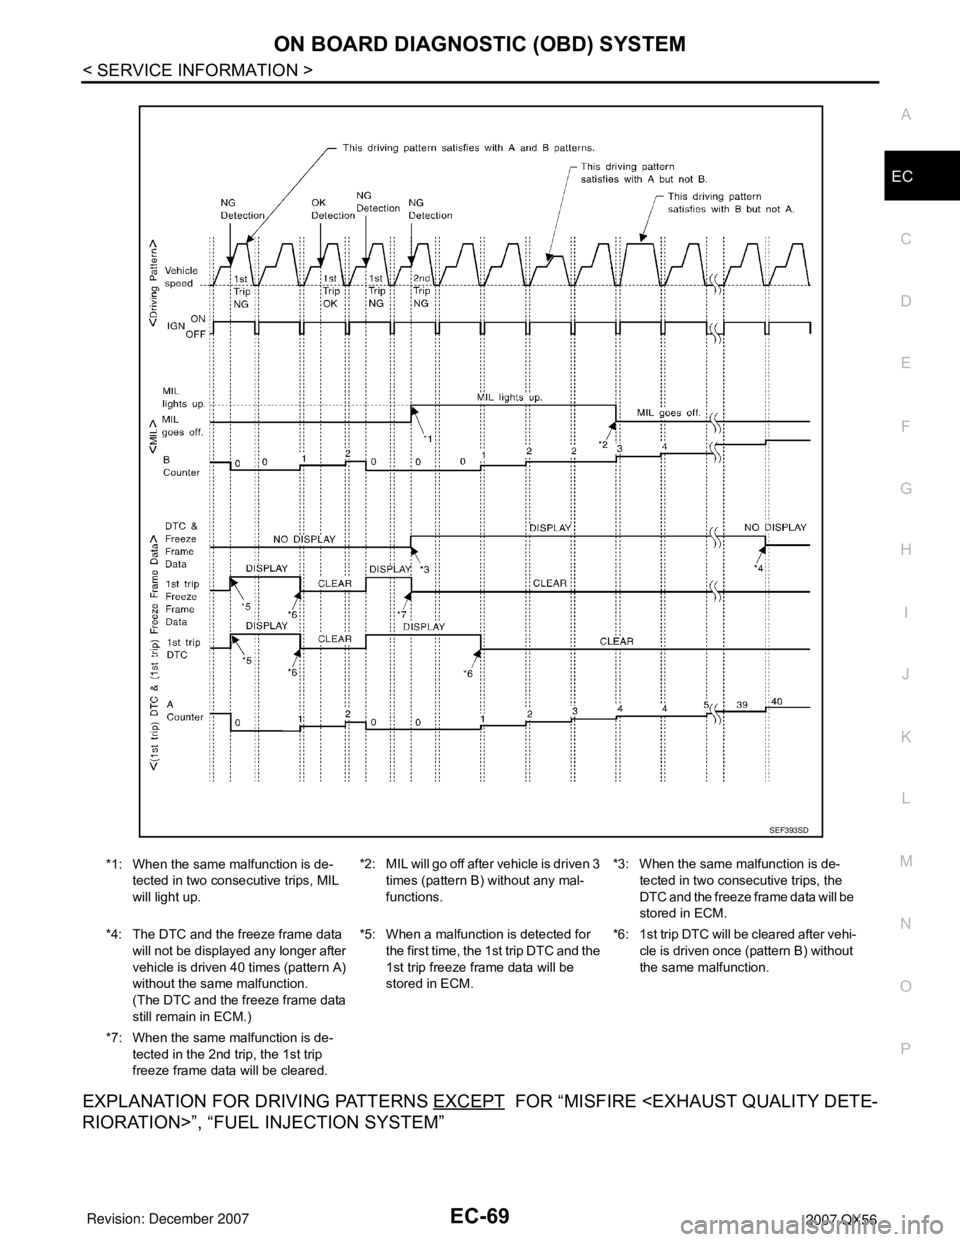
EXPLANATION FOR DRIVING PATTERNS EXCEPT FOR “MISFIRE
*1: When the same malfunction is de-
tected in two consecutive trips, MIL
will light up.*2: MIL will go off after vehicle is driven 3
times (pattern B) without any mal-
functions.*3: When the same malfunction is de-
tected in two consecutive trips, the
DTC and the freeze frame data will be
stored in ECM.
*4: The DTC and the freeze frame data
will not be displayed any longer after
vehicle is driven 40 times (pattern A)
without the same malfunction.
(The DTC and the freeze frame data
still remain in ECM.)*5: When a malfunction is detected for
the first time, the 1st trip DTC and the
1st trip freeze frame data will be
stored in ECM.*6: 1st trip DTC will be cleared after vehi-
cle is driven once (pattern B) without
the same malfunction.
*7: When the same malfunction is de-
tected in the 2nd trip, the 1st trip
freeze frame data will be cleared.
SEF393SD
Page 1153 of 3061
EC-70
< SERVICE INFORMATION >
ON BOARD DIAGNOSTIC (OBD) SYSTEM
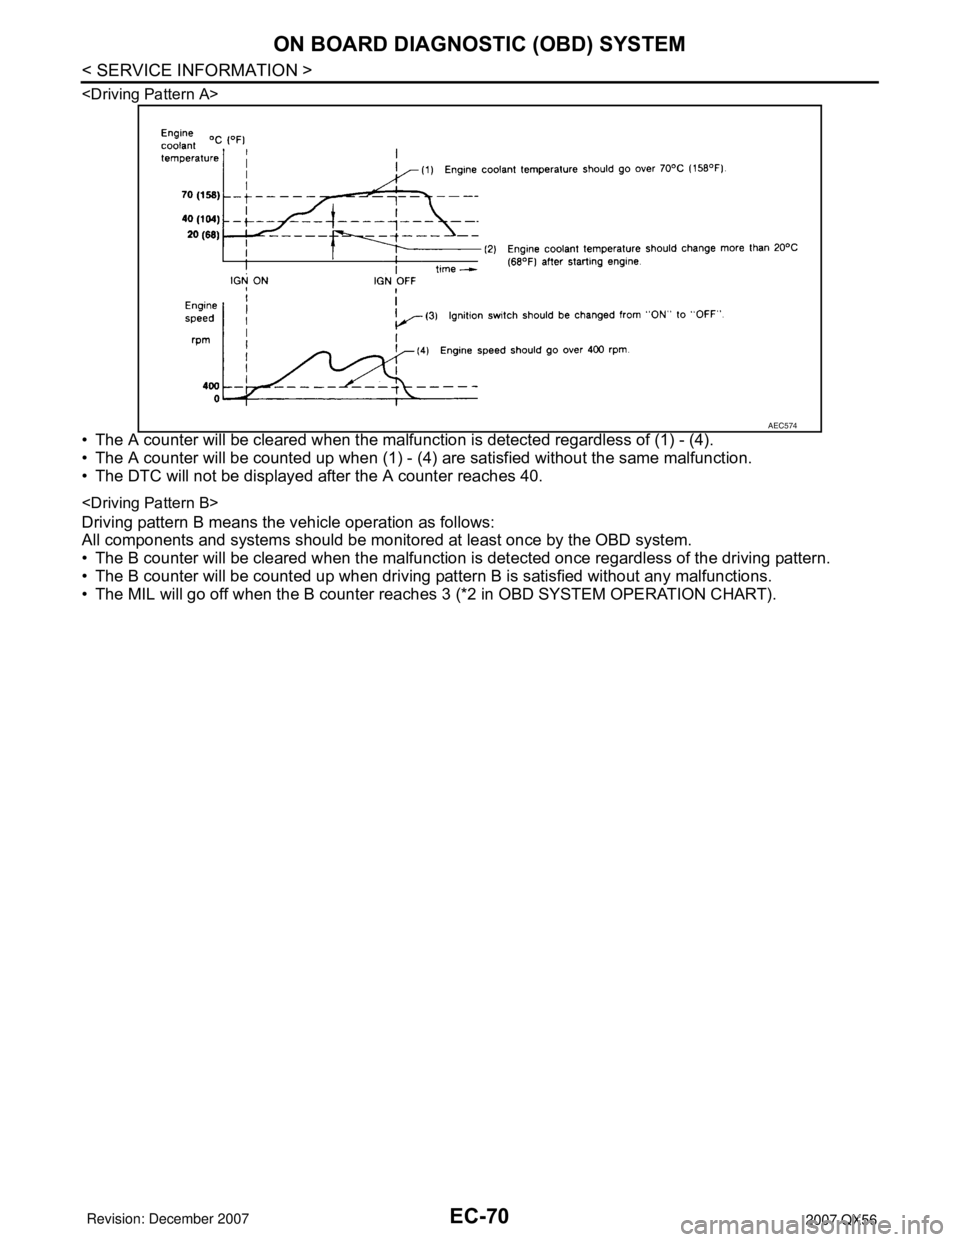
• The A counter will be cleared when the malfunction is detected regardless of (1) - (4).
• The A counter will be counted up when (1) - (4) are satisfied without the same malfunction.
• The DTC will not be displayed after the A counter reaches 40.
Driving pattern B means the vehicle operation as follows:
All components and systems should be monitored at least once by the OBD system.
• The B counter will be cleared when the malfunction is detected once regardless of the driving pattern.
• The B counter will be counted up when driving pattern B is satisfied without any malfunctions.
• The MIL will go off when the B counter reaches 3 (*2 in OBD SYSTEM OPERATION CHART).
AEC574
Page 1154 of 3061
BASIC SERVICE PROCEDURE
EC-71
< SERVICE INFORMATION >
C
D
E
F
G
H
I
J
K
L
MA
EC
N
P O
BASIC SERVICE PROCEDURE
Basic InspectionINFOID:0000000003531609
1.INSPECTION START
1. Check service records for any recent repairs that may indicate a related malfunction, or a current need for
scheduled maintenance.
2. Open engine hood and check the following:
- Harness connectors for improper connections
- Wiring harness for improper connections, pinches and cut
- Vacuum hoses for splits, kinks and improper connections
- Hoses and ducts for leaks
- Air cleaner clogging
- Gasket
3. Confirm that electrical or mechanical loads are not applied.
- Headlamp switch is OFF.
- Air conditioner switch is OFF.
- Rear window defogger switch is OFF.
- Steering wheel is in the straight-ahead position, etc.
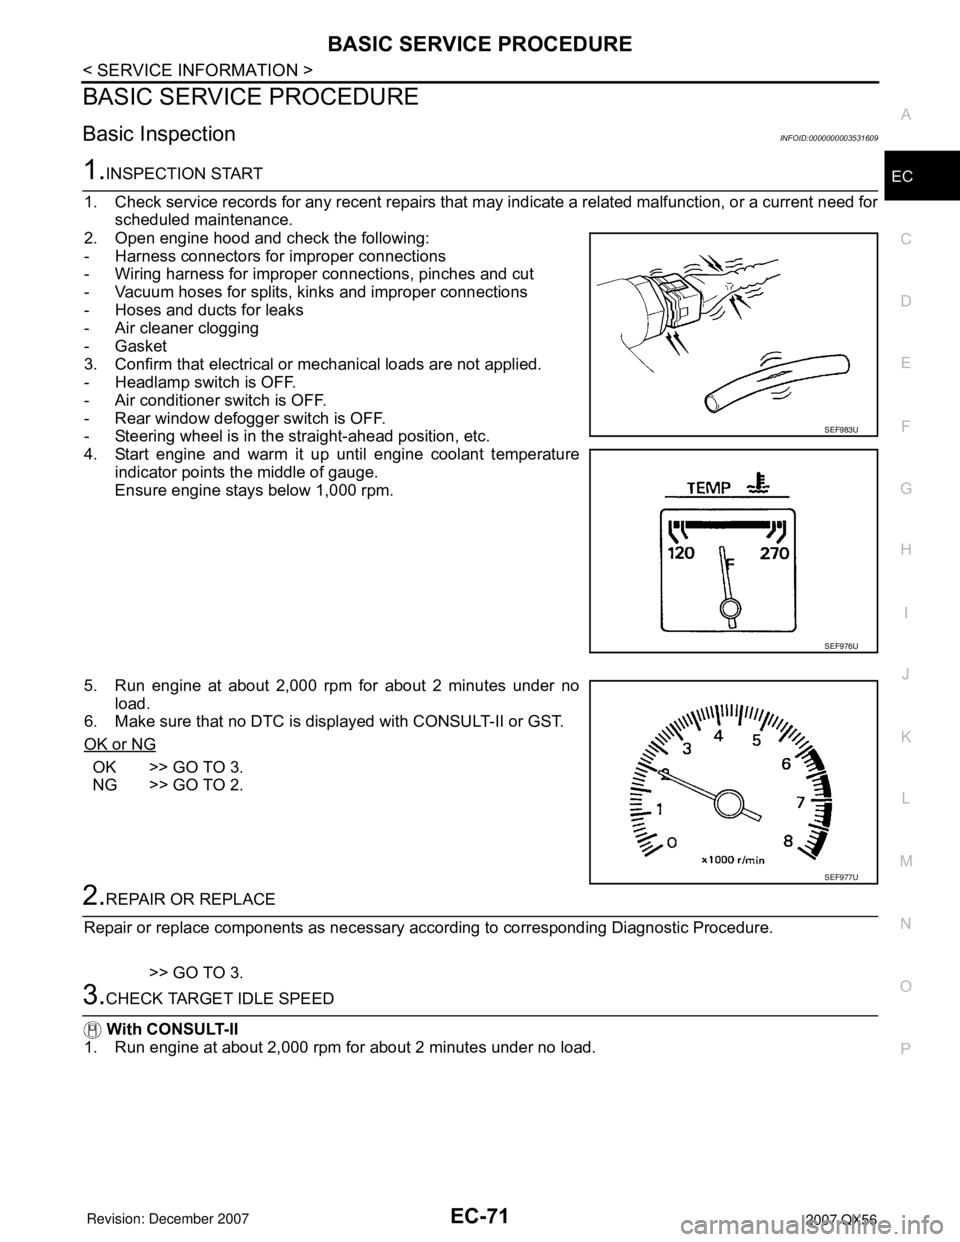
4. Start engine and warm it up until engine coolant temperature
indicator points the middle of gauge.
Ensure engine stays below 1,000 rpm.
5. Run engine at about 2,000 rpm for about 2 minutes under no
load.
6. Make sure that no DTC is displayed with CONSULT-II or GST.
OK or NG
OK >> GO TO 3.
NG >> GO TO 2.
2.REPAIR OR REPLACE
Repair or replace components as necessary according to corresponding Diagnostic Procedure.
>> GO TO 3.
3.CHECK TARGET IDLE SPEED
With CONSULT-II
1. Run engine at about 2,000 rpm for about 2 minutes under no load.
SEF983U
SEF976U
SEF977U
Page 1160 of 3061
BASIC SERVICE PROCEDURE
EC-77
< SERVICE INFORMATION >
C
D
E
F
G
H
I
J
K
L
MA
EC
N
P O
Procedure After Replacing ECMINFOID:0000000003531611
When replacing ECM, the following procedure must be performed.
1. Perform initialization of IVIS (NATS) system and registration of all IVIS (NATS) ignition key IDs.
Refer to BL-117, "
ECM Re-communicating Function".
2. Perform EC-77, "
VIN Registration".
3. Perform EC-77, "
Accelerator Pedal Released Position Learning".
4. Perform EC-77, "
Throttle Valve Closed Position Learning".
5. Perform EC-78, "
Idle Air Volume Learning".
VIN RegistrationINFOID:0000000003531612
DESCRIPTION
VIN Registration is an operation to registering VIN in ECM. It must be performed each time ECM is replaced.
NOTE:
Accurate VIN which is registered in ECM may be required for Inspection & Maintenance (I/M).
OPERATION PROCEDURE
With CONSULT-II
1. Check the VIN of the vehicle and note it. Refer to GI-46.
2. Turn ignition switch ON and engine stopped.
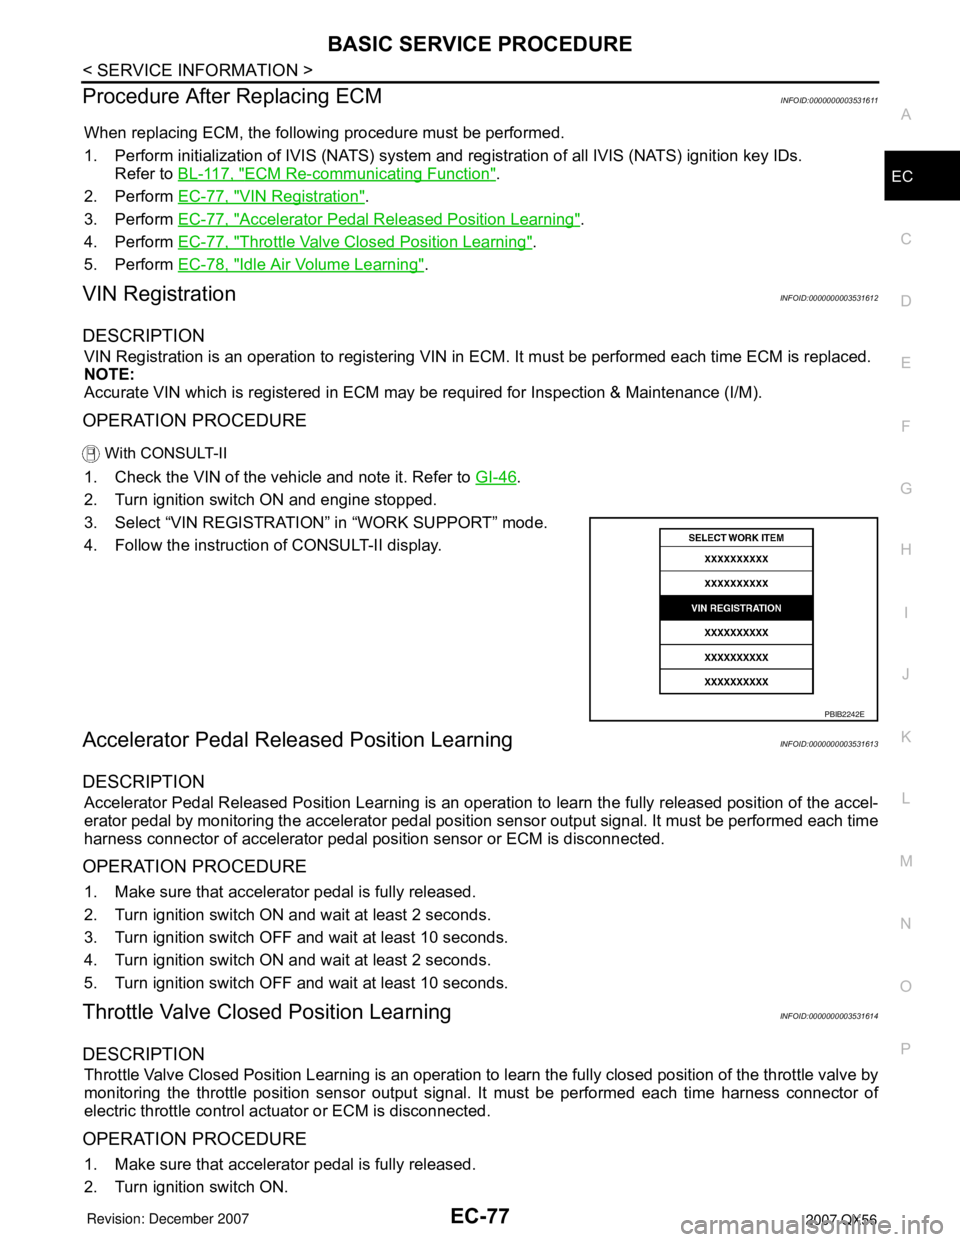
3. Select “VIN REGISTRATION” in “WORK SUPPORT” mode.
4. Follow the instruction of CONSULT-II display.
Accelerator Pedal Released Position LearningINFOID:0000000003531613
DESCRIPTION
Accelerator Pedal Released Position Learning is an operation to learn the fully released position of the accel-
erator pedal by monitoring the accelerator pedal position sensor output signal. It must be performed each time
harness connector of accelerator pedal position sensor or ECM is disconnected.
OPERATION PROCEDURE
1. Make sure that accelerator pedal is fully released.
2. Turn ignition switch ON and wait at least 2 seconds.
3. Turn ignition switch OFF and wait at least 10 seconds.
4. Turn ignition switch ON and wait at least 2 seconds.
5. Turn ignition switch OFF and wait at least 10 seconds.
Throttle Valve Closed Position LearningINFOID:0000000003531614
DESCRIPTION
Throttle Valve Closed Position Learning is an operation to learn the fully closed position of the throttle valve by
monitoring the throttle position sensor output signal. It must be performed each time harness connector of
electric throttle control actuator or ECM is disconnected.
OPERATION PROCEDURE
1. Make sure that accelerator pedal is fully released.
2. Turn ignition switch ON.
PBIB2242E
Page 1162 of 3061
BASIC SERVICE PROCEDURE
EC-79
< SERVICE INFORMATION >
C
D
E
F
G
H
I
J
K
L
MA
EC
N
P O
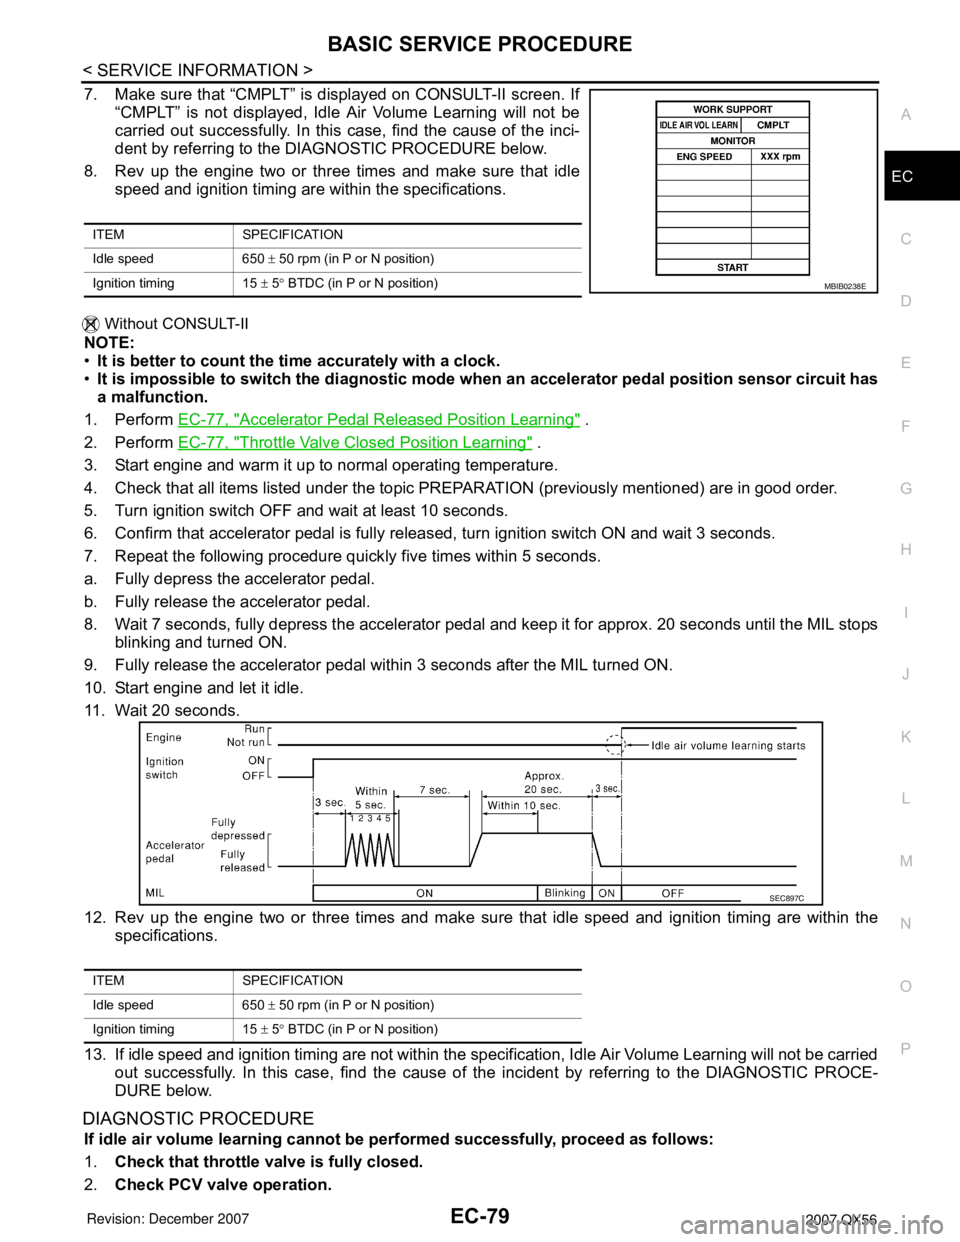
7. Make sure that “CMPLT” is displayed on CONSULT-II screen. If
“CMPLT” is not displayed, Idle Air Volume Learning will not be
carried out successfully. In this case, find the cause of the inci-
dent by referring to the DIAGNOSTIC PROCEDURE below.
8. Rev up the engine two or three times and make sure that idle
speed and ignition timing are within the specifications.
Without CONSULT-II
NOTE:
•It is better to count the time accurately with a clock.
•It is impossible to switch the diagnostic mode when an accelerator pedal position sensor circuit has
a malfunction.
1. Perform EC-77, "
Accelerator Pedal Released Position Learning" .
2. Perform EC-77, "
Throttle Valve Closed Position Learning" .
3. Start engine and warm it up to normal operating temperature.
4. Check that all items listed under the topic PREPARATION (previously mentioned) are in good order.
5. Turn ignition switch OFF and wait at least 10 seconds.
6. Confirm that accelerator pedal is fully released, turn ignition switch ON and wait 3 seconds.
7. Repeat the following procedure quickly five times within 5 seconds.
a. Fully depress the accelerator pedal.
b. Fully release the accelerator pedal.
8. Wait 7 seconds, fully depress the accelerator pedal and keep it for approx. 20 seconds until the MIL stops
blinking and turned ON.
9. Fully release the accelerator pedal within 3 seconds after the MIL turned ON.
10. Start engine and let it idle.
11. Wait 20 seconds.
12. Rev up the engine two or three times and make sure that idle speed and ignition timing are within the
specifications.
13. If idle speed and ignition timing are not within the specification, Idle Air Volume Learning will not be carried
out successfully. In this case, find the cause of the incident by referring to the DIAGNOSTIC PROCE-
DURE below.
DIAGNOSTIC PROCEDURE
If idle air volume learning cannot be performed successfully, proceed as follows:
1.Check that throttle valve is fully closed.
2.Check PCV valve operation.
ITEM SPECIFICATION
Idle speed 650 ± 50 rpm (in P or N position)
Ignition timing 15 ± 5° BTDC (in P or N position)
MBIB0238E
ITEM SPECIFICATION
Idle speed 650 ± 50 rpm (in P or N position)
Ignition timing 15 ± 5° BTDC (in P or N position)
SEC897C
Page 1167 of 3061
EC-84
< SERVICE INFORMATION >
TROUBLE DIAGNOSIS
2.CHECK DTC*1
1. Check DTC*1 .
2. Perform the following procedure if DTC*
1 is displayed.
- Record DTC*
1 and freeze frame data*2 . (Print them out with CONSULT-II or GST.)
- Erase DTC*
1 . (Refer to EC-49, "Emission-related Diagnostic Information" .)
- Study the relationship between the cause detected by DTC*
1 and the symptom described by the cus-
tomer. (Symptom Matrix Chart is useful. Refer to EC-90, "
Symptom Matrix Chart" .)
3. Check related service bulletins for information.
Is any symptom described and any DTC detected?
Symptom is described, DTC*1 is displayed>>GO TO 3.
Symptom is described, DTC*
1 is not displayed>>GO TO 4.
Symptom is not described, DTC*
1 is displayed>>GO TO 5.
3.CONFIRM THE SYMPTOM
Try to confirm the symptom described by the customer (except MIL ON).
DIAGNOSIS WORK SHEET is useful to verify the incident.
Connect CONSULT-II to the vehicle in “DATA MONITOR (AUTO TRIG)” mode and check real time diagnosis
results.
Verify relation between the symptom and the condition when the symptom is detected.
>> GO TO 5.
4.CONFIRM THE SYMPTOM
Try to confirm the symptom described by the customer.
DIAGNOSIS WORK SHEET is useful to verify the incident.
Connect CONSULT-II to the vehicle in “DATA MONITOR (AUTO TRIG)” mode and check real time diagnosis
results.
Verify relation between the symptom and the condition when the symptom is detected.
>> GO TO 6.
5.PERFORM DTC CONFIRMATION PROCEDURE
Perform DTC Confirmation Procedure for the displayed DTC* , and then make sure that DTC*
1 is detected
again.
At this time, always connect CONSULT-II to the vehicle, and check diagnostic results in real time on “DATA
MONITOR (AUTO TRIG)”.
If two or more DTCs*
1 are detected, refer to EC-87, "DTC Inspection Priority Chart" and determine trouble
diagnosis order.
NOTE:
• Freeze frame data*
2 is useful if the DTC*1 is not detected.
• Perform Overall Function Check if DTC Confirmation Procedure is not included on Service Manual. This
simplified check procedure is an effective alternative though DTC*
1 cannot be detected during this check.
If the result of Overall Function Check is NG, it is the same as the detection of DTC*
1 by DTC Confirmation
Procedure.
Is DTC*
1 detected?
Yes >> GO TO 10.
No >> Check according to EC-138
.
6.PERFORM BASIC INSPECTION
Perform EC-71, "
Basic Inspection" .
With CONSULT-II>>GO TO 7.
Without CONSULT-II>>GO TO 9.
Page 1168 of 3061
TROUBLE DIAGNOSIS
EC-85
< SERVICE INFORMATION >
C
D
E
F
G
H
I
J
K
L
MA
EC
N
P O
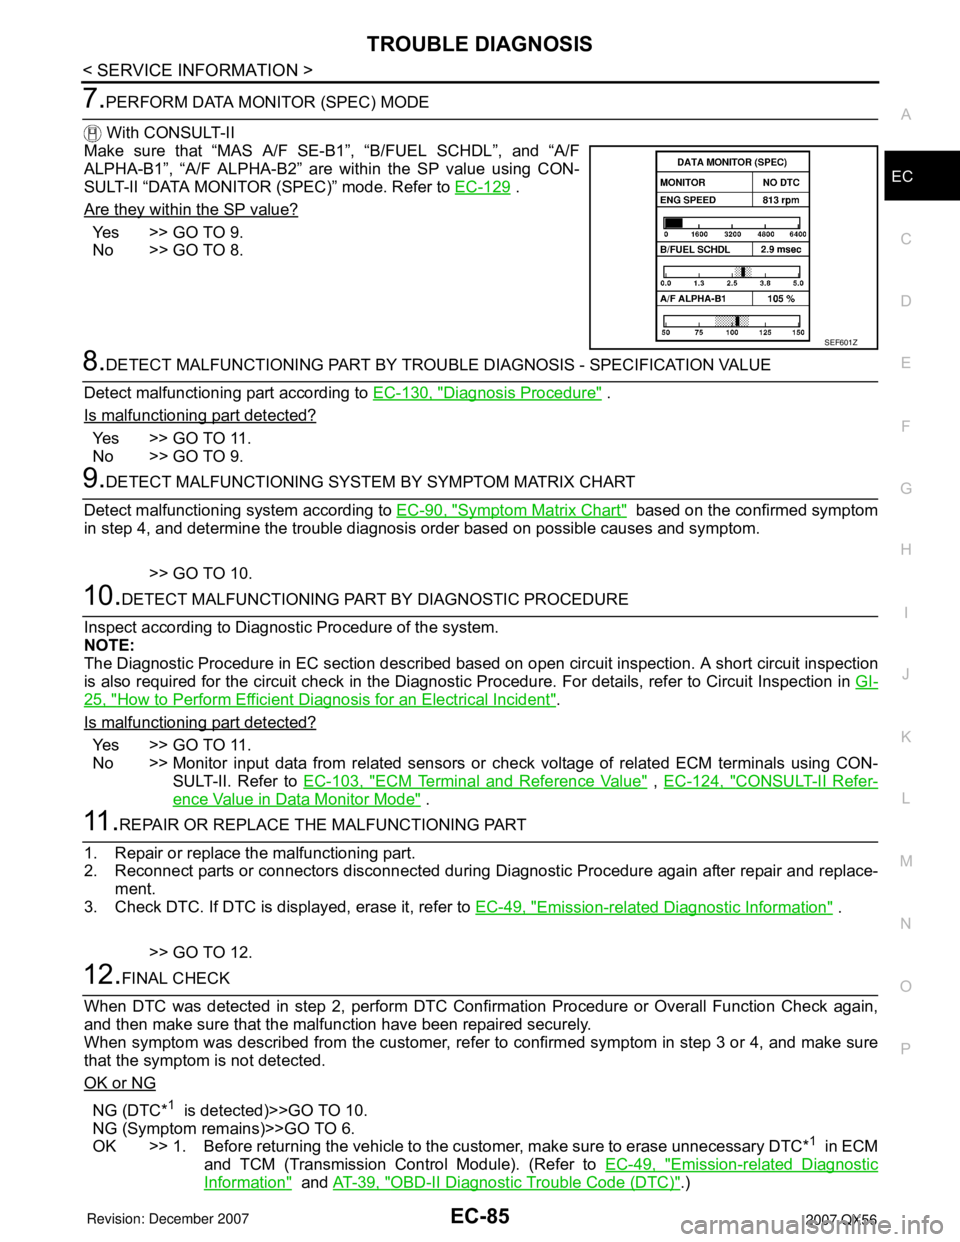
7.PERFORM DATA MONITOR (SPEC) MODE
With CONSULT-II
Make sure that “MAS A/F SE-B1”, “B/FUEL SCHDL”, and “A/F
ALPHA-B1”, “A/F ALPHA-B2” are within the SP value using CON-
SULT-II “DATA MONITOR (SPEC)” mode. Refer to EC-129
.
Are they within the SP value?
Yes >> GO TO 9.
No >> GO TO 8.
8.DETECT MALFUNCTIONING PART BY TROUBLE DIAGNOSIS - SPECIFICATION VALUE
Detect malfunctioning part according to EC-130, "
Diagnosis Procedure" .
Is malfunctioning part detected?
Yes >> GO TO 11.
No >> GO TO 9.
9.DETECT MALFUNCTIONING SYSTEM BY SYMPTOM MATRIX CHART
Detect malfunctioning system according to EC-90, "
Symptom Matrix Chart" based on the confirmed symptom
in step 4, and determine the trouble diagnosis order based on possible causes and symptom.
>> GO TO 10.
10.DETECT MALFUNCTIONING PART BY DIAGNOSTIC PROCEDURE
Inspect according to Diagnostic Procedure of the system.
NOTE:
The Diagnostic Procedure in EC section described based on open circuit inspection. A short circuit inspection
is also required for the circuit check in the Diagnostic Procedure. For details, refer to Circuit Inspection in GI-
25, "How to Perform Efficient Diagnosis for an Electrical Incident".
Is malfunctioning part detected?
Yes >> GO TO 11.
No >> Monitor input data from related sensors or check voltage of related ECM terminals using CON-
SULT-II. Refer to EC-103, "
ECM Terminal and Reference Value" , EC-124, "CONSULT-II Refer-
ence Value in Data Monitor Mode" .
11 .REPAIR OR REPLACE THE MALFUNCTIONING PART
1. Repair or replace the malfunctioning part.
2. Reconnect parts or connectors disconnected during Diagnostic Procedure again after repair and replace-
ment.
3. Check DTC. If DTC is displayed, erase it, refer to EC-49, "
Emission-related Diagnostic Information" .
>> GO TO 12.
12.FINAL CHECK
When DTC was detected in step 2, perform DTC Confirmation Procedure or Overall Function Check again,
and then make sure that the malfunction have been repaired securely.
When symptom was described from the customer, refer to confirmed symptom in step 3 or 4, and make sure
that the symptom is not detected.
OK or NG
NG (DTC*1 is detected)>>GO TO 10.
NG (Symptom remains)>>GO TO 6.
OK >> 1. Before returning the vehicle to the customer, make sure to erase unnecessary DTC*
1 in ECM
and TCM (Transmission Control Module). (Refer to EC-49, "
Emission-related Diagnostic
Information" and AT-39, "OBD-II Diagnostic Trouble Code (DTC)".)
SEF601Z
Page 1170 of 3061
TROUBLE DIAGNOSIS
EC-87
< SERVICE INFORMATION >
C
D
E
F
G
H
I
J
K
L
MA
EC
N
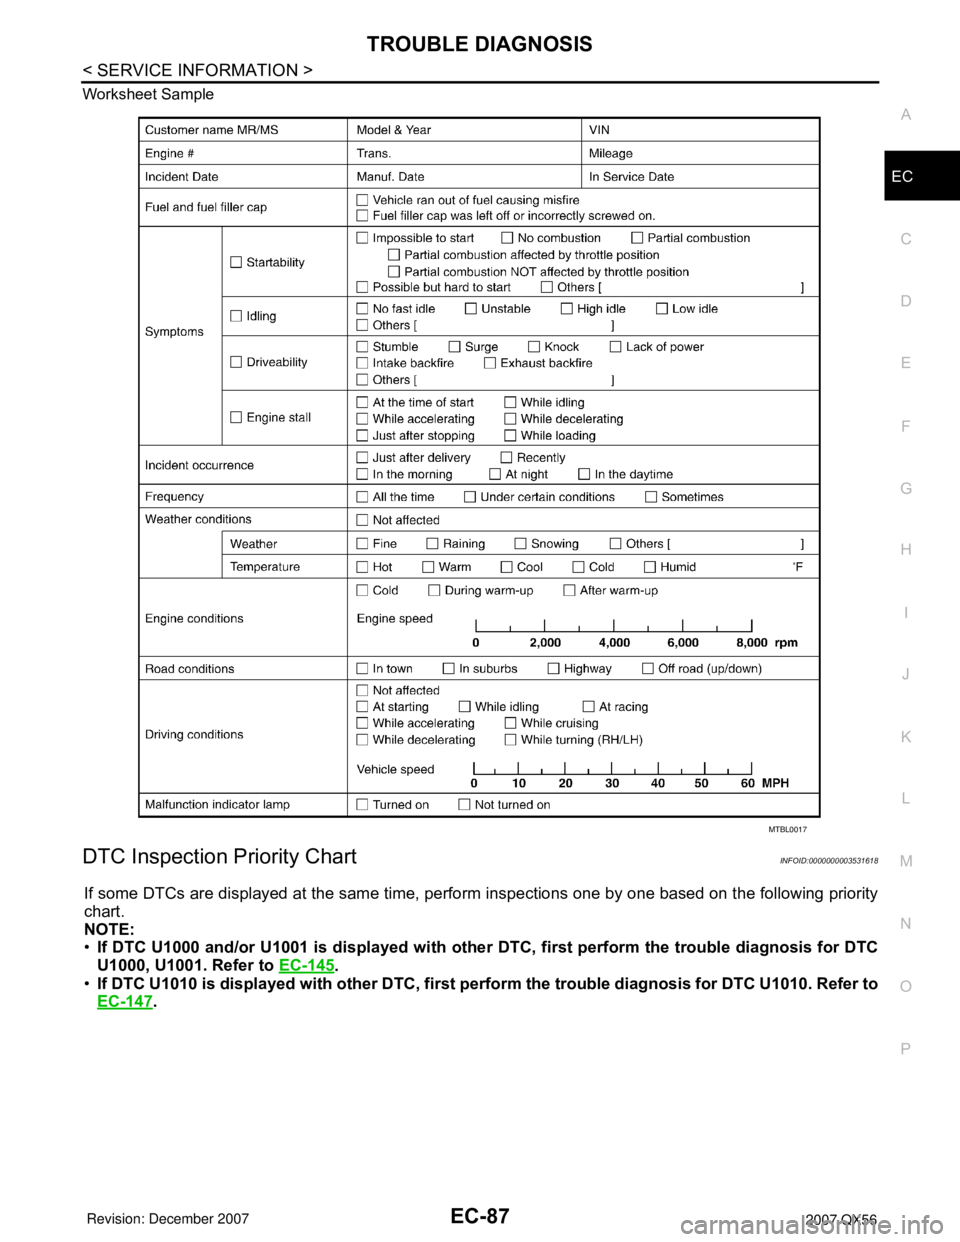
P O Worksheet Sample
DTC Inspection Priority ChartINFOID:0000000003531618
If some DTCs are displayed at the same time, perform inspections one by one based on the following priority
chart.
NOTE:
•If DTC U1000 and/or U1001 is displayed with other DTC, first perform the trouble diagnosis for DTC
U1000, U1001. Refer to EC-145
.
•If DTC U1010 is displayed with other DTC, first perform the trouble diagnosis for DTC U1010. Refer to
EC-147
.
MTBL0017