Page 4553 of 4647
WT-4
PREPARATION
Revision: 2007 April2007 M35/M45
PREPARATIONPFP:00002
Special Service ToolsNES000JL
The actual shapes of Kent-Moore tools may differ from those of special service tools illustrated here.
Commercial Service ToolsNES000JM
Tool number
(Kent-Moore No.)
Tool nameDescription
(J-45295)
Transmitter activation toolID registration
SEIA0462E
Tool nameDescription
Power toolRemoving wheel nuts
PBIC0190E
Page 4555 of 4647

WT-6
ROAD WHEEL
Revision: 2007 April2007 M35/M45
ROAD WHEELPFP:40300
InspectionNES000JO
ALUMINUM WHEEL
1. Check tires for wear and improper inflation.
2. Check wheels for deformation, cracks and other damage. If deformed, remove wheel and check wheel
runout.
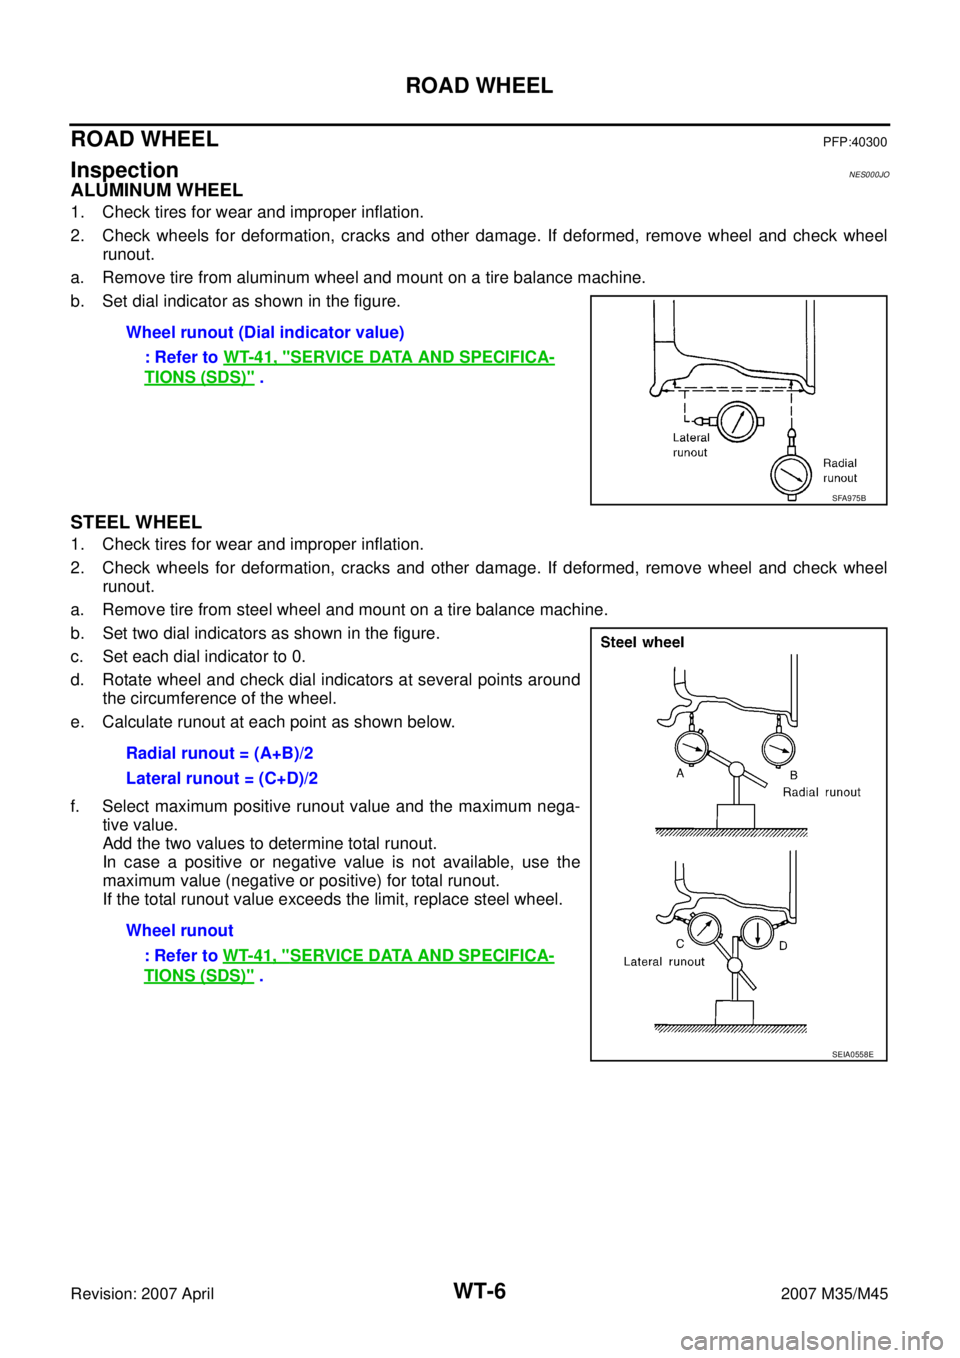
a. Remove tire from aluminum wheel and mount on a tire balance machine.
b. Set dial indicator as shown in the figure.
STEEL WHEEL
1. Check tires for wear and improper inflation.
2. Check wheels for deformation, cracks and other damage. If deformed, remove wheel and check wheel
runout.
a. Remove tire from steel wheel and mount on a tire balance machine.
b. Set two dial indicators as shown in the figure.
c. Set each dial indicator to 0.
d. Rotate wheel and check dial indicators at several points around
the circumference of the wheel.
e. Calculate runout at each point as shown below.
f. Select maximum positive runout value and the maximum nega-
tive value.
Add the two values to determine total runout.
In case a positive or negative value is not available, use the
maximum value (negative or positive) for total runout.
If the total runout value exceeds the limit, replace steel wheel.Wheel runout (Dial indicator value)
: Refer to WT-41, "
SERVICE DATA AND SPECIFICA-
TIONS (SDS)" .
SFA975B
Radial runout = (A+B)/2
Lateral runout = (C+D)/2
Wheel runout
: Refer to WT-41, "
SERVICE DATA AND SPECIFICA-
TIONS (SDS)" .
SEIA0558E
Page 4557 of 4647

WT-8
ROAD WHEEL AND TIRE ASSEMBLY
Revision: 2007 April2007 M35/M45
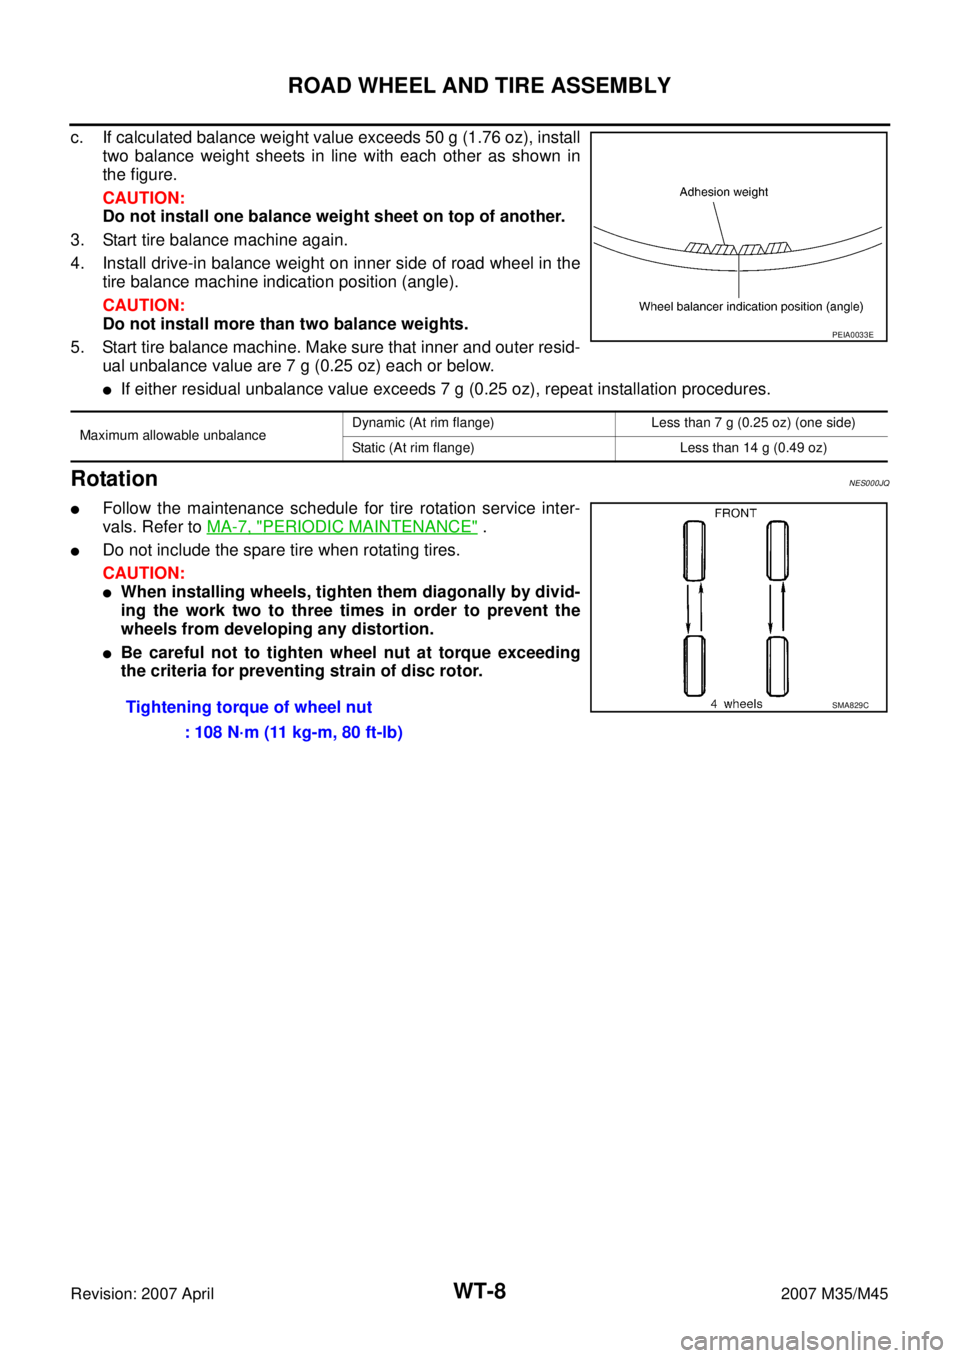
c. If calculated balance weight value exceeds 50 g (1.76 oz), install
two balance weight sheets in line with each other as shown in
the figure.
CAUTION:
Do not install one balance weight sheet on top of another.
3. Start tire balance machine again.
4. Install drive-in balance weight on inner side of road wheel in the
tire balance machine indication position (angle).
CAUTION:
Do not install more than two balance weights.
5. Start tire balance machine. Make sure that inner and outer resid-
ual unbalance value are 7 g (0.25 oz) each or below.
�If either residual unbalance value exceeds 7 g (0.25 oz), repeat installation procedures.
RotationNES000JQ
�Follow the maintenance schedule for tire rotation service inter-
vals. Refer to MA-7, "
PERIODIC MAINTENANCE" .
�Do not include the spare tire when rotating tires.
CAUTION:
�When installing wheels, tighten them diagonally by divid-
ing the work two to three times in order to prevent the
wheels from developing any distortion.
�Be careful not to tighten wheel nut at torque exceeding
the criteria for preventing strain of disc rotor.
PEIA0033E
Maximum allowable unbalanceDynamic (At rim flange) Less than 7 g (0.25 oz) (one side)
Static (At rim flange) Less than 14 g (0.49 oz)
Tightening torque of wheel nut
: 108 N·m (11 kg-m, 80 ft-lb)SMA829C
Page 4567 of 4647

WT-18
TROUBLE DIAGNOSES
Revision: 2007 April2007 M35/M45
ID Registration ProcedureNES000JY
ID REGISTRATION WITH ACTIVATION TOOL
This procedure must be done after replacement of a tire pressure transmitter, low tire pressure warn-
ing control unit, or tire rotation.
1. Perform “CONSULT-II Start Procedure”. Refer to GI-38, "
CONSULT-II Start Procedure" .
2. Touch “WORK SUPPORT” on “SELECT DIAG MODE” screen.
3. Touch “ID REGIST” on “SELECT WORK ITEM”.
4. With the activation tool (J-45295) pushed against the front-left
tire pressure transmitter position of the tire air valve, press and
hold the button for 5 seconds.
5. Register the IDs in order from FR LH, FR RH, RR RH, RR LH.
When ID registration of each wheel has been completed, turn
signal lamp blinks.
6. After completing all ID registrations, press “END” to complete the procedure.
NOTE:
Be sure to register the IDs in order from FR LH, FR RH, RR RH, to RR LH, or the self-diagnosis results
display will not function properly.
ID REGISTRATION WITHOUT ACTIVATION TOOL
This procedure must be done after replacement of a tire pressure transmitter, low tire pressure warn-
ing control unit, or tire rotation.
1. Perform “CONSULT-II Start Procedure”. Refer to GI-38, "
CONSULT-II Start Procedure" .
2. Touch “WORK SUPPORT” on “SELECT DIAG MODE” screen.
3. Touch “ID REGIST” on “SELECT WORK ITEM”.
4. Adjust the tire pressure to the values shown in the table below for ID registration, and drive the vehicle at
40 km/h (25 MPH) or more for a few minutes.
5. After completing all ID registrations, press “END” to complete the procedure.
6. Inflate all tires to proper pressure. Refer to WT-41, "
SERVICE DATA AND SPECIFICATIONS (SDS)" .
SEIA0460E
Activation tire position Turn signal lamp CONSULT-II
1 Front LH
2 times flashing“YET”
↓
“DONE” 2 Front RH
3Rear RH
4 Rear LH
Tire position
Tire pressure kPa (kg/cm2 , psi)
Front LH 240 (2.4, 34)
Front RH 220 (2.2, 31)
Rear RH 200 (2.0, 29)
Rear LH 180 (1.8, 26)
Activation tire position CONSULT-II
Front LH
“YET”
↓
“DONE” Front RH
Rear RH
Rear LH
Page 4575 of 4647
WT-26
TROUBLE DIAGNOSES
Revision: 2007 April2007 M35/M45
Preliminary CheckNES000K8
BASIC INSPECTION
1. CHECK ALL TIRE PRESSURES
Check all tire pressures. Refer to WT-41, "
SERVICE DATA AND SPECIFICATIONS (SDS)" .
OK or NG
OK >> GO TO 2.
NG >> Adjust tire pressure to specified value.
2. CHECK LOW TIRE PRESSURE WARNING LAMP ACTIVATION
1. Check low tire pressure warning lamp activation.
2. Does low tire pressure warning lamp activate for 1 second when ignition switch is turned “ON”.
Does warning lamp activate?
YES >> GO TO 3.
NO >> Check fuse and combination meter. Refer to DI-5, "
COMBINATION METERS" .
3. CHECK CONNECTOR
1. Disconnect low tire pressure warning control unit harness connectors M19.
2. Check terminals for damage or loose connection.
OK or NG
OK >> GO TO 4.
NG >> Repair or replace damaged parts.
4. CHECK ACTIVATION TOOL
Check activation tool battery.
OK or NG
OK >> Perform self-diagnosis.
NG >> Replace activation tool battery.
Page 4580 of 4647

TROUBLE DIAGNOSIS FOR SYSTEM
WT-31
C
D
F
G
H
I
J
K
L
MA
B
WT
Revision: 2007 April2007 M35/M45
4. CHECK RECEIVER HARNESS (EXAMPLE OF FRONT LH SIDE)
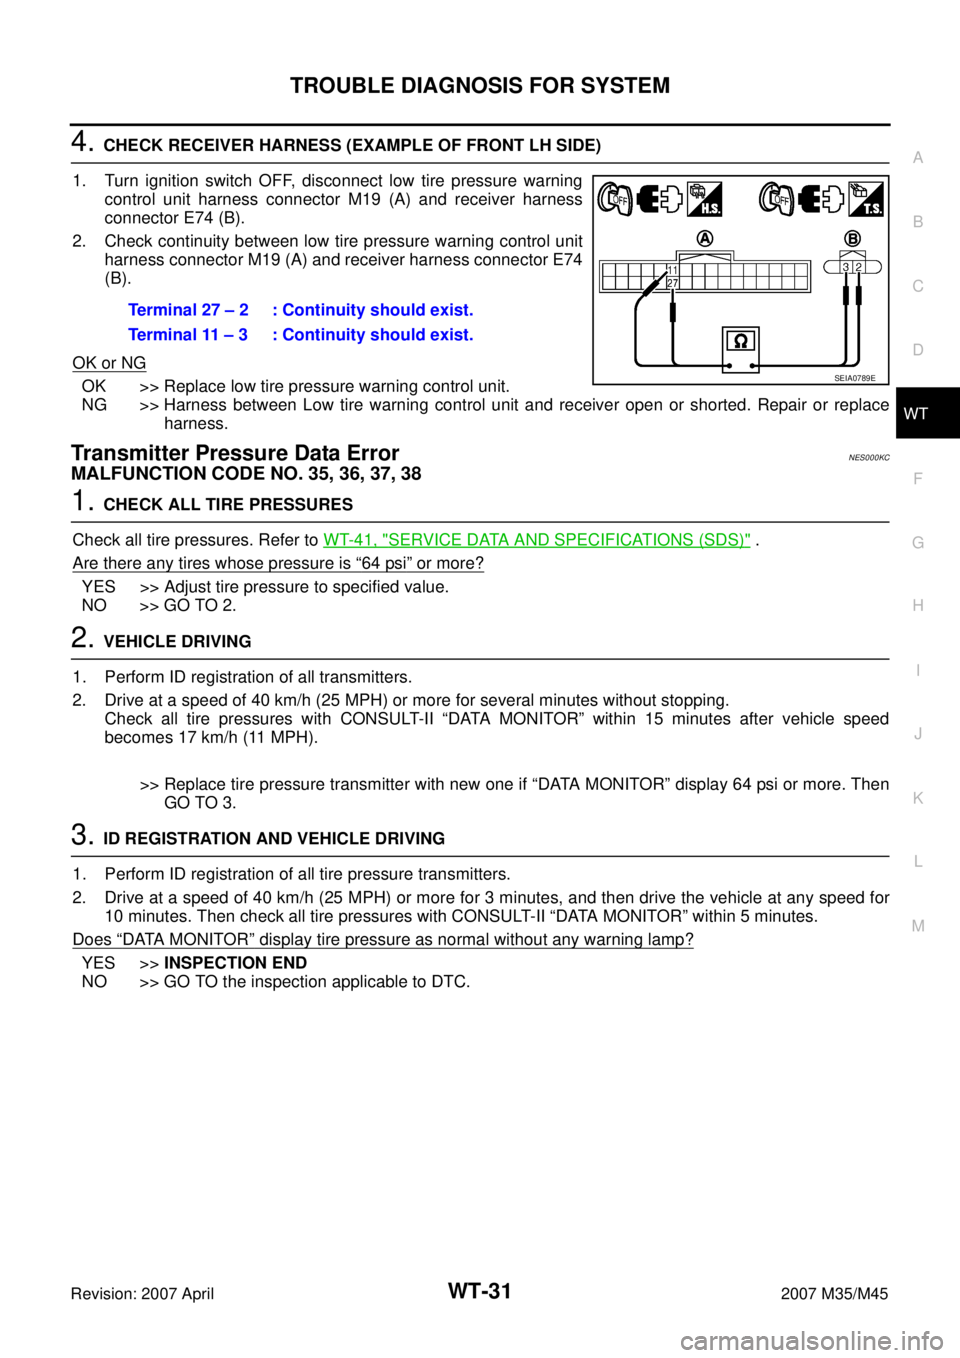
1. Turn ignition switch OFF, disconnect low tire pressure warning
control unit harness connector M19 (A) and receiver harness
connector E74 (B).
2. Check continuity between low tire pressure warning control unit
harness connector M19 (A) and receiver harness connector E74
(B).
OK or NG
OK >> Replace low tire pressure warning control unit.
NG >> Harness between Low tire warning control unit and receiver open or shorted. Repair or replace
harness.
Transmitter Pressure Data ErrorNES000KC
MALFUNCTION CODE NO. 35, 36, 37, 38
1. CHECK ALL TIRE PRESSURES
Check all tire pressures. Refer to WT-41, "
SERVICE DATA AND SPECIFICATIONS (SDS)" .
Are there any tires whose pressure is
“64 psi” or more?
YES >> Adjust tire pressure to specified value.
NO >> GO TO 2.
2. VEHICLE DRIVING
1. Perform ID registration of all transmitters.
2. Drive at a speed of 40 km/h (25 MPH) or more for several minutes without stopping.
Check all tire pressures with CONSULT-II “DATA MONITOR” within 15 minutes after vehicle speed
becomes 17 km/h (11 MPH).
>> Replace tire pressure transmitter with new one if “DATA MONITOR” display 64 psi or more. Then
GO TO 3.
3. ID REGISTRATION AND VEHICLE DRIVING
1. Perform ID registration of all tire pressure transmitters.
2. Drive at a speed of 40 km/h (25 MPH) or more for 3 minutes, and then drive the vehicle at any speed for
10 minutes. Then check all tire pressures with CONSULT-II “DATA MONITOR” within 5 minutes.
Does
“DATA MONITOR” display tire pressure as normal without any warning lamp?
YES >>INSPECTION END
NO >> GO TO the inspection applicable to DTC.Terminal 27 – 2 : Continuity should exist.
Terminal 11 – 3 : Continuity should exist.
SEIA0789E
Page 4584 of 4647

TROUBLE DIAGNOSIS FOR SYMPTOMS
WT-35
C
D
F
G
H
I
J
K
L
MA
B
WT
Revision: 2007 April2007 M35/M45
TROUBLE DIAGNOSIS FOR SYMPTOMSPFP:00007
Warning Lamp Does Not Come On When Ignition Switch Is Turned ONNES000KH
1. CHECK SELF-DIAGNOSIS RESULTS
1. Perform “CONSULT-II Start Procedure”. Refer to GI-38, "
CONSULT-II Start Procedure" .
2. Touch “SELF-DIAG RESULTS”.
3. Check display contents in self-diagnostic results.
Is above displayed on self-diagnosis display?
YES >>�If “CAN COMM CIRCUIT [U1000]” is displayed, print out self-diagnosis. And then, go to LAN-
50, "CAN System Specification Chart" .
�Replace low tire pressure warning control unit if “CONTROL UNIT [CAN] [U1010]” is displayed.
NO >> GO TO 2.
2. CHECK COMBINATION METER
Check combination meter function.
OK or NG
OK >> GO TO 3.
NG >> Check combination meter. Refer to DI-18, "
Trouble Diagnosis" .
3. CHECK LOW TIRE PRESSURE WARNING LAMP
Disconnect low tire pressure warning control unit harness connector M19.
Does the warning lamp activate?
YES >> Replace low tire pressure warning control unit. Refer to WT-40, "Low Tire Pressure Warning Con-
trol Unit" .
NO >> Check combination meter and repair or replace.
Warning Lamp Stay On When Ignition Switch Is Turned ONNES000KW
1. CHECK ALL TIRE PRESSURES
Check all tire pressures. Refer to WT-41, "
SERVICE DATA AND SPECIFICATIONS (SDS)" .
OK or NG
OK >> Check combination meter. Refer to DI-5, "COMBINATION METERS" .
NG >> Adjust tire pressure to specified value.
Self-diagnostic results
CAN COMM CIRCUIT [U1000]
CONTROL UNIT [CAN] [U1010]
Page 4590 of 4647
SERVICE DATA AND SPECIFICATIONS (SDS)
WT-41
C
D
F
G
H
I
J
K
L
MA
B
WT
Revision: 2007 April2007 M35/M45
SERVICE DATA AND SPECIFICATIONS (SDS)PFP:00030
Road WheelNES000KP
TireNES000KQ
Unit: kPa (kg/cm2 , psi) Kind of wheel Aluminum For temporary use
Maximum radial runout limitLateral deflection Less than 0.3 mm (0.012 in) Less than 1.5 mm (0.059 in)
Vertical deflection Less than 0.3 mm (0.012 in) Less than 1.5 mm (0.059 in)
Maximum allowable unbalanceDynamic (At rim flange) Less than 7 g (0.25 oz) (one side)
Static (At rim flange) Less than 14 g (0.49 oz)
Tire sizeAir pressure
Front Rear
245/40R19 94W 230 (2.3, 33) 230 (2.3, 33)
P245/45R18 96V 230 (2.3, 33) 230 (2.3, 33)
T145/80D17 107M 420 (4.2, 61) 420 (4.2, 61)