Page 3998 of 4647
STEERING COLUMN
PS-17
C
D
E
F
H
I
J
K
L
MA
B
PS
Revision: 2007 April2007 M35/M45
Disassembly and AssemblyNGS000DB
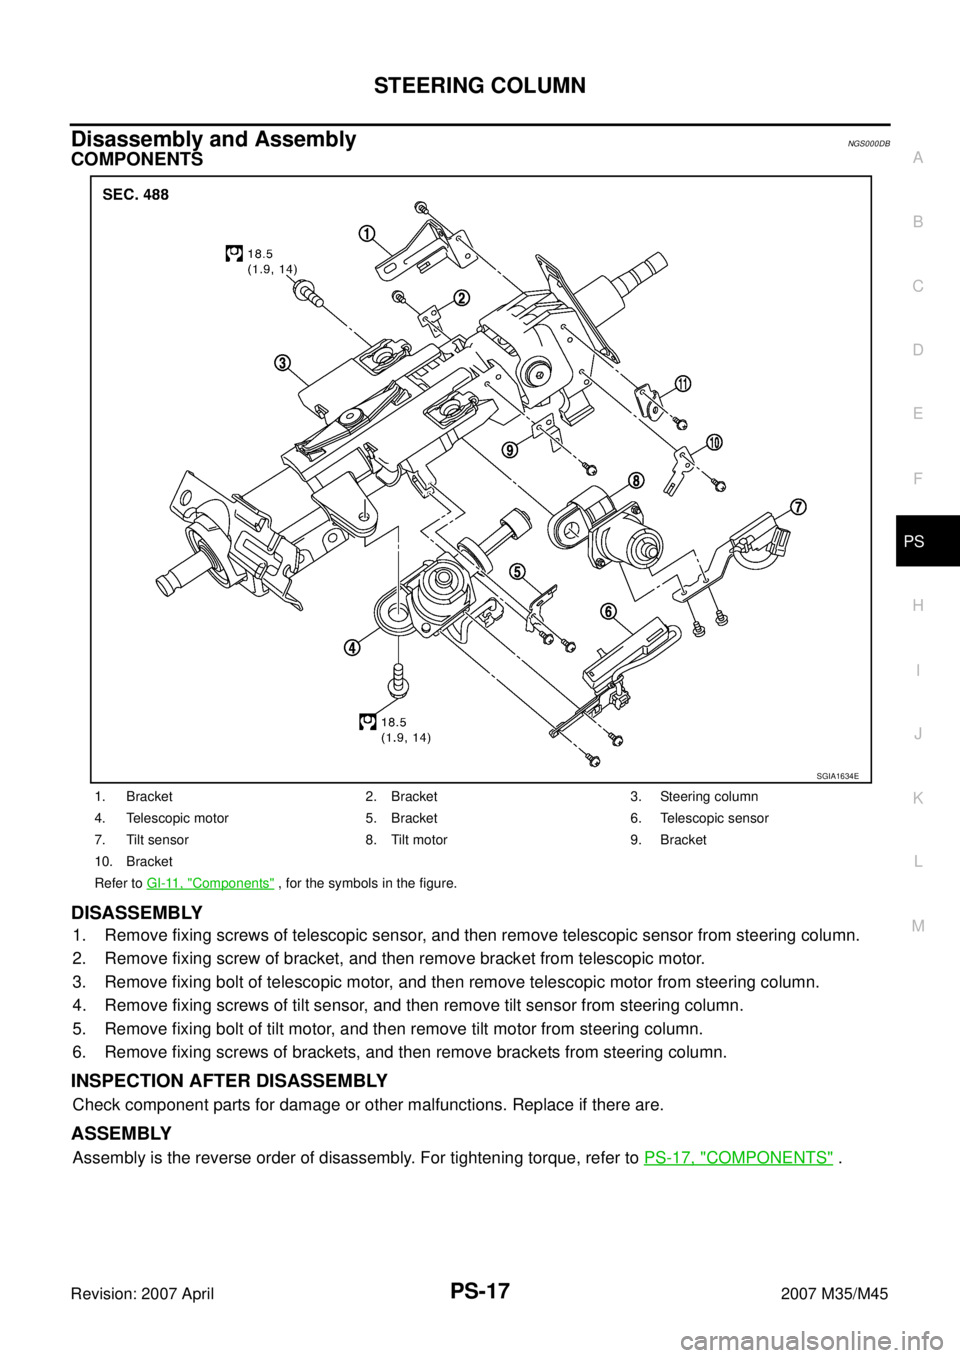
COMPONENTS
DISASSEMBLY
1. Remove fixing screws of telescopic sensor, and then remove telescopic sensor from steering column.
2. Remove fixing screw of bracket, and then remove bracket from telescopic motor.
3. Remove fixing bolt of telescopic motor, and then remove telescopic motor from steering column.
4. Remove fixing screws of tilt sensor, and then remove tilt sensor from steering column.
5. Remove fixing bolt of tilt motor, and then remove tilt motor from steering column.
6. Remove fixing screws of brackets, and then remove brackets from steering column.
INSPECTION AFTER DISASSEMBLY
Check component parts for damage or other malfunctions. Replace if there are.
ASSEMBLY
Assembly is the reverse order of disassembly. For tightening torque, refer to PS-17, "COMPONENTS" .
1. Bracket 2. Bracket 3. Steering column
4. Telescopic motor 5. Bracket 6. Telescopic sensor
7. Tilt sensor 8. Tilt motor 9. Bracket
10. Bracket
Refer to GI-11, "
Components" , for the symbols in the figure.
SGIA1634E
Page 3999 of 4647
PS-18
STEERING COLUMN
Revision: 2007 April2007 M35/M45
INSPECTION AFTER ASSEMBLY
Check tilt and telescopic mechanism operating range L1 , L2 as
shown in the figure.
Tilt operating range L
1: 37.5 mm (1.476 in)
Telescopic operating range L
2: 40 mm (1.57 in)
SGIA1179E
Page 4000 of 4647
POWER STEERING GEAR AND LINKAGE
PS-19
C
D
E
F
H
I
J
K
L
MA
B
PS
Revision: 2007 April2007 M35/M45
POWER STEERING GEAR AND LINKAGEPFP:49001
Removal and InstallationNGS000DC
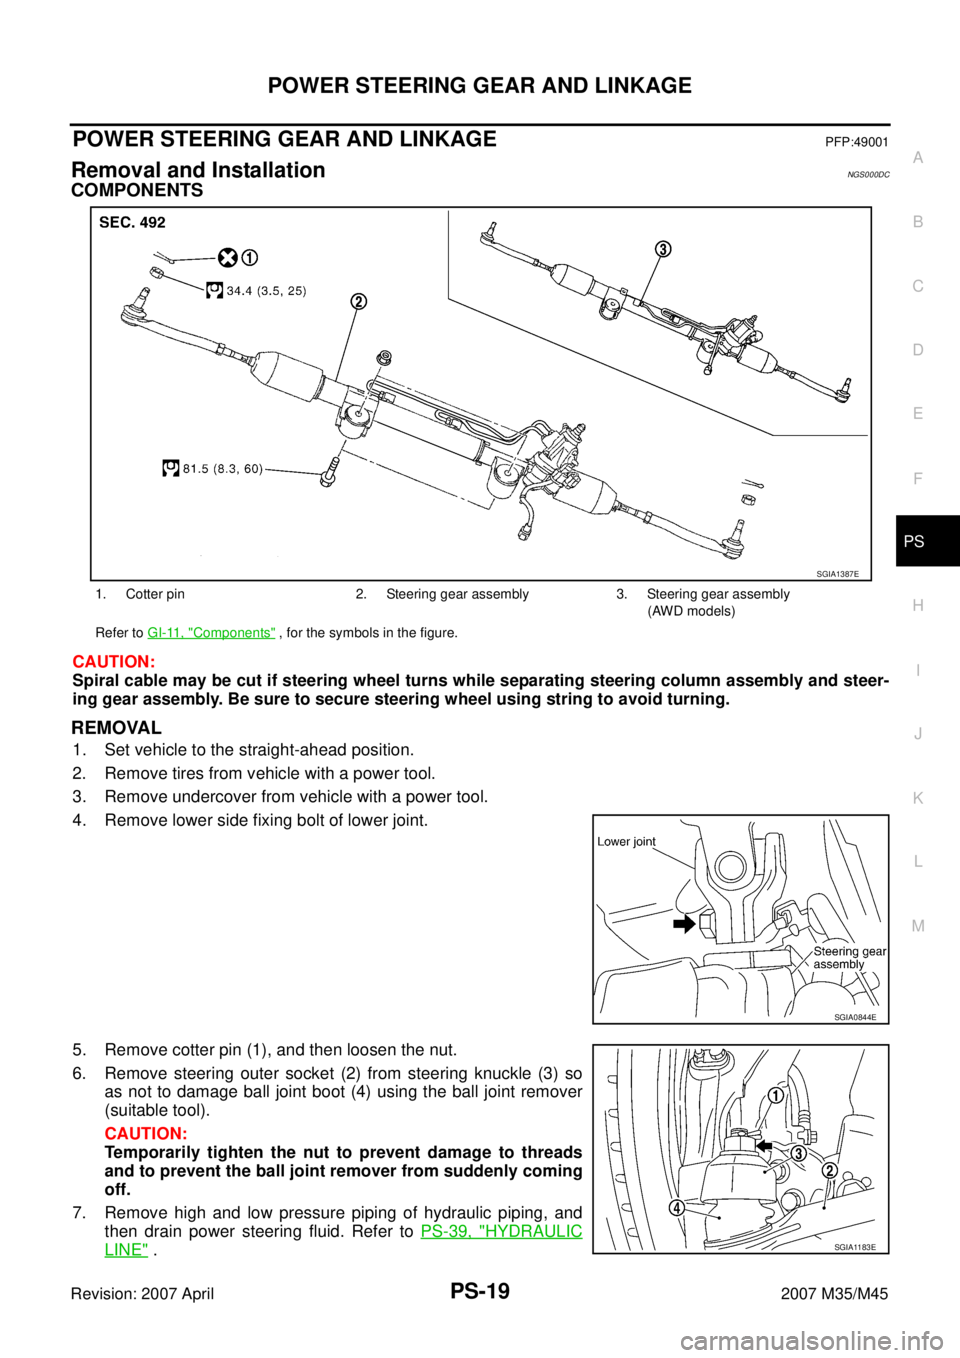
COMPONENTS
CAUTION:
Spiral cable may be cut if steering wheel turns while separating steering column assembly and steer-
ing gear assembly. Be sure to secure steering wheel using string to avoid turning.
REMOVAL
1. Set vehicle to the straight-ahead position.
2. Remove tires from vehicle with a power tool.
3. Remove undercover from vehicle with a power tool.
4. Remove lower side fixing bolt of lower joint.
5. Remove cotter pin (1), and then loosen the nut.
6. Remove steering outer socket (2) from steering knuckle (3) so
as not to damage ball joint boot (4) using the ball joint remover
(suitable tool).
CAUTION:
Temporarily tighten the nut to prevent damage to threads
and to prevent the ball joint remover from suddenly coming
off.
7. Remove high and low pressure piping of hydraulic piping, and
then drain power steering fluid. Refer to PS-39, "
HYDRAULIC
LINE" .
1. Cotter pin 2. Steering gear assembly 3. Steering gear assembly
(AWD models)
Refer to GI-11, "
Components" , for the symbols in the figure.
SGIA1387E
SGIA0844E
SGIA1183E
Page 4026 of 4647
SERVICE DATA AND SPECIFICATIONS (SDS)
PS-45
C
D
E
F
H
I
J
K
L
MA
B
PS
Revision: 2007 April2007 M35/M45
SERVICE DATA AND SPECIFICATIONS (SDS)PFP:00030
Steering WheelNGS000DM
Steering AngleNGS000DN
Steering ColumnNGS000DO
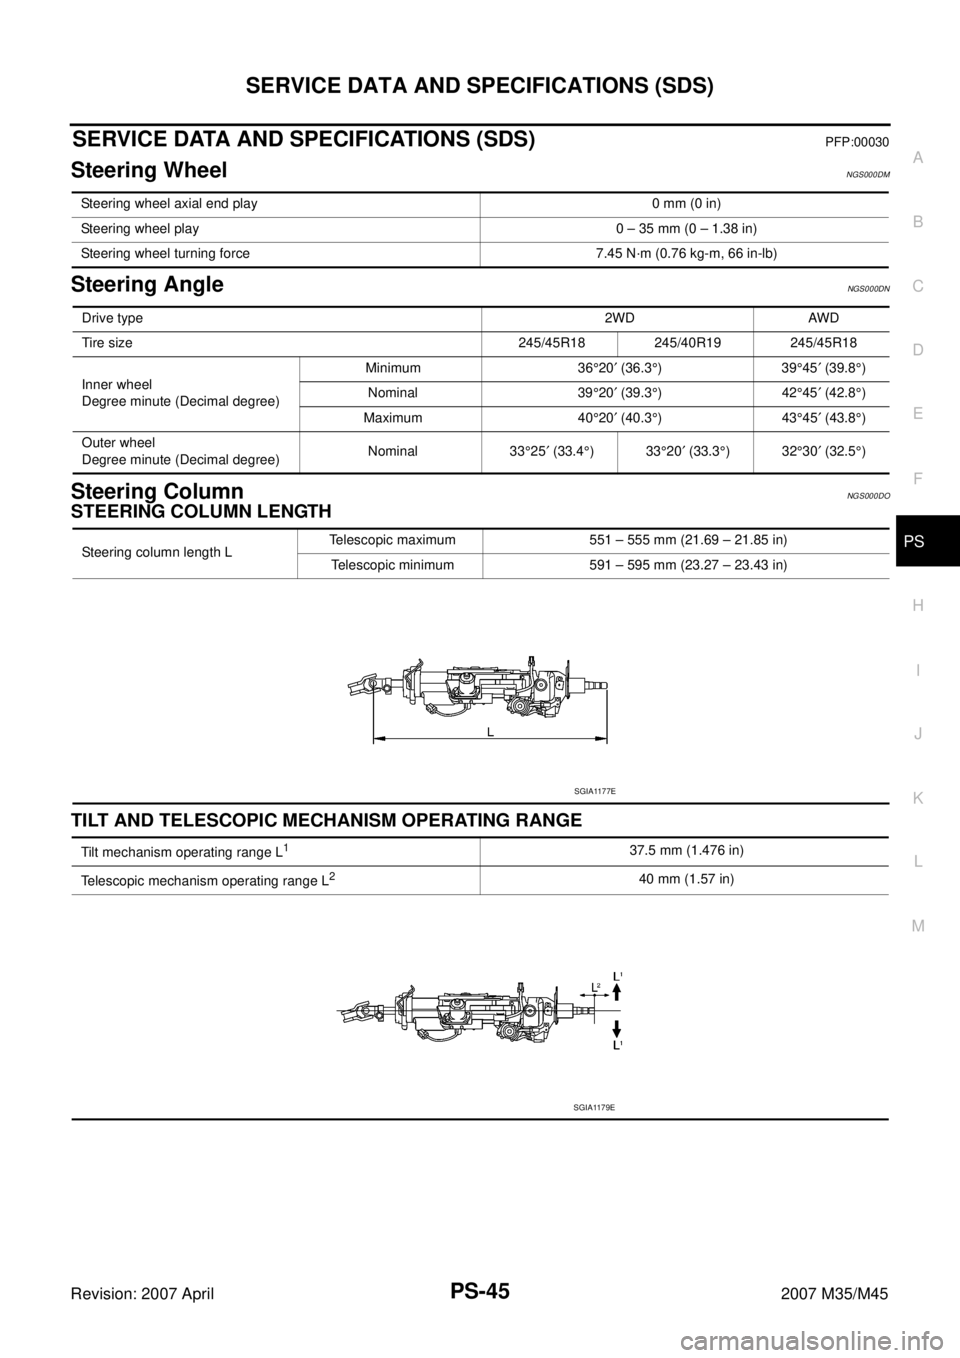
STEERING COLUMN LENGTH
TILT AND TELESCOPIC MECHANISM OPERATING RANGE
Steering wheel axial end play 0 mm (0 in)
Steering wheel play 0 – 35 mm (0 – 1.38 in)
Steering wheel turning force 7.45 N·m (0.76 kg-m, 66 in-lb)
Drive type2WD AWD
Tire size 245/45R18 245/40R19 245/45R18
Inner wheel
Degree minute (Decimal degree)Minimum 36°20′ (36.3°)39°45′ (39.8°)
Nominal 39°20′ (39.3°)42°45′ (42.8°)
Maximum 40°20′ (40.3°)43°45′ (43.8°)
Outer wheel
Degree minute (Decimal degree)Nominal 33°25′ (33.4°)33°20′ (33.3°)32°30′ (32.5°)
Steering column length LTelescopic maximum 551 – 555 mm (21.69 – 21.85 in)
Telescopic minimum 591 – 595 mm (23.27 – 23.43 in)
SGIA1177E
Tilt mechanism operating range L137.5 mm (1.476 in)
Telescopic mechanism operating range L
240 mm (1.57 in)
SGIA1179E
Page 4384 of 4647
PRECAUTIONS
SRS-3
C
D
E
F
G
I
J
K
L
MA
B
SRS
Revision: 2007 April2007 M35/M45
PRECAUTIONSPFP:00001
Precautions for Supplemental Restraint System (SRS) “AIR BAG” and “SEAT
BELT PRE-TENSIONER”
NHS0008O
The Supplemental Restraint System such as “AIR BAG” and “SEAT BELT PRE-TENSIONER”, used along
with a front seat belt, helps to reduce the risk or severity of injury to the driver and front passenger for certain
types of collision. This system includes seat belt switch inputs and dual stage front air bag modules. The SRS
system uses the seat belt switches to determine the front air bag deployment, and may only deploy one front
air bag, depending on the severity of a collision and whether the front occupants are belted or unbelted.
Information necessary to service the system safely is included in the SRS and SB section of this Service Man-
ual.
WARNING:
�To avoid rendering the SRS inoperative, which could increase the risk of personal injury or death
in the event of a collision which would result in air bag inflation, all maintenance must be per-
formed by an authorized NISSAN/INFINITI dealer.
�Improper maintenance, including incorrect removal and installation of the SRS, can lead to per-
sonal injury caused by unintentional activation of the system. For removal of Spiral Cable and Air
Bag Module, see the SRS section.
�Do not use electrical test equipment on any circuit related to the SRS unless instructed to in this
Service Manual. SRS wiring harnesses can be identified by yellow and/or orange harnesses or
harness connectors.
Precautions for SRS “AIR BAG” and “SEAT BELT PRE-TENSIONER” ServiceNHS0008P
�Do not use electrical test equipment to check SRS circuits unless instructed to in this Service Manual.
�Before servicing the SRS, turn ignition switch OFF, disconnect both battery cables and wait at least 3 min-
utes.
For approximately 3 minutes after the cables are removed, it is still possible for the air bag and seat belt
pre-tensioner to deploy. Therefore, do not work on any SRS connectors or wires until at least 3 minutes
have passed.
�Diagnosis sensor unit must always be installed with their arrow marks “⇐” pointing towards the front of the
vehicle for proper operation. Also check diagnosis sensor unit for cracks, deformities or rust before instal-
lation and replace as required.
�The spiral cable must be aligned with the neutral position since its rotations are limited. Do not turn steer-
ing wheel and column after removal of steering gear.
�Handle air bag module carefully. Always place driver and front passenger air bag modules with the pad
side facing upward and seat mounted front side air bag module standing with the stud bolt side facing
down.
�Conduct self-diagnosis to check entire SRS for proper function after replacing any components.
�After air bag inflates, the front instrument panel assembly should be replaced if damaged.
�Always replace instrument panel pad following front passenger air bag deployment.
Occupant Classification System PrecautionNHS0008Q
Replace occupant classification system control unit and passenger front seat cushion as an assembly.
Refer to SE-166, "
Passenger's Seat Components" .
Page 4425 of 4647
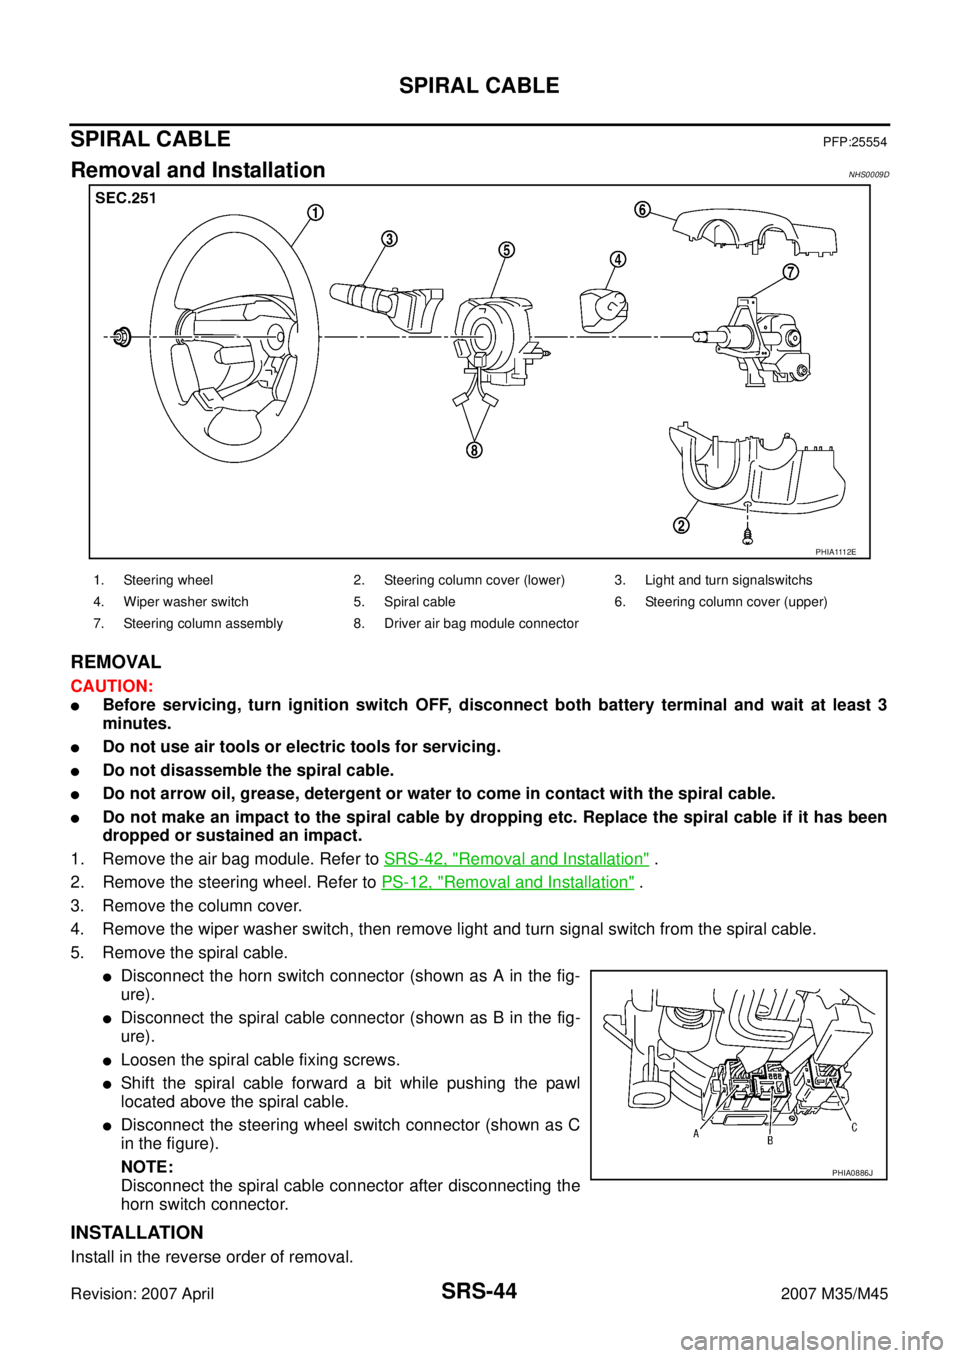
SRS-44
SPIRAL CABLE
Revision: 2007 April2007 M35/M45
SPIRAL CABLEPFP:25554
Removal and InstallationNHS0009D
REMOVAL
CAUTION:
�Before servicing, turn ignition switch OFF, disconnect both battery terminal and wait at least 3
minutes.
�Do not use air tools or electric tools for servicing.
�Do not disassemble the spiral cable.
�Do not arrow oil, grease, detergent or water to come in contact with the spiral cable.
�Do not make an impact to the spiral cable by dropping etc. Replace the spiral cable if it has been
dropped or sustained an impact.
1. Remove the air bag module. Refer to SRS-42, "
Removal and Installation" .
2. Remove the steering wheel. Refer to PS-12, "
Removal and Installation" .
3. Remove the column cover.
4. Remove the wiper washer switch, then remove light and turn signal switch from the spiral cable.
5. Remove the spiral cable.
�Disconnect the horn switch connector (shown as A in the fig-
ure).
�Disconnect the spiral cable connector (shown as B in the fig-
ure).
�Loosen the spiral cable fixing screws.
�Shift the spiral cable forward a bit while pushing the pawl
located above the spiral cable.
�Disconnect the steering wheel switch connector (shown as C
in the figure).
NOTE:
Disconnect the spiral cable connector after disconnecting the
horn switch connector.
INSTALLATION
Install in the reverse order of removal.
P H I A 111 2 E
1. Steering wheel 2. Steering column cover (lower) 3. Light and turn signalswitchs
4. Wiper washer switch 5. Spiral cable 6. Steering column cover (upper)
7. Steering column assembly 8. Driver air bag module connector
PHIA0886J
Page 4638 of 4647
FRONT WIPER AND WASHER SYSTEM
WW-47
C
D
E
F
G
H
I
J
L
MA
B
WW
Revision: 2007 April2007 M35/M45
Inspection for Washer Nozzle NKS003X4
CHECK VALVE INSPECTION
Blow air in the injection direction, and make sure that air flows only
one way. Make sure that the reverse direction (inhale) is not possi-
ble.
Inspection of Front Wiper and Washer Switch CircuitNKS003X5
Refer to LT- 2 3 9 , "Combination Switch Inspection" .
Removal and Installation of Front Wiper and Washer SwitchNKS003X6
REMOVAL
1. Remove steering column cover. Refer to IP-10, "INSTRUMENT PANEL ASSEMBLY" .
2. Disconnect the wiper and washer switch connector.
3. Pull wiper and washer switch (1) toward the passenger door
while pressing pawls (A) in direction shown by the arrow in the
figure, and remove it from the base.
INSTALLATION
Installation is the reverse order of removal.
SKIB4256E
SKIB4257E