Page 4248 of 4647
AUTOMATIC DRIVE POSITIONER
SE-49
C
D
E
F
G
H
J
K
L
MA
B
SE
Revision: 2007 April2007 M35/M45
Check Rear Lifting Motor Circuit NIS0026A
1. CHECK REAR SEAT LIFTING MECHANISM
Check the following.
�Operation malfunction caused by lifter mechanism deformation or pinched harness or other foreign mate-
rials
�Operation malfunction caused by foreign materials adhered to the rear lifting motor or lead screws
�Operation malfunction and interference with other parts by poor installation
OK or NG
OK >> GO TO 2.
NG >> Repair or replace the malfunctioning part and check again.
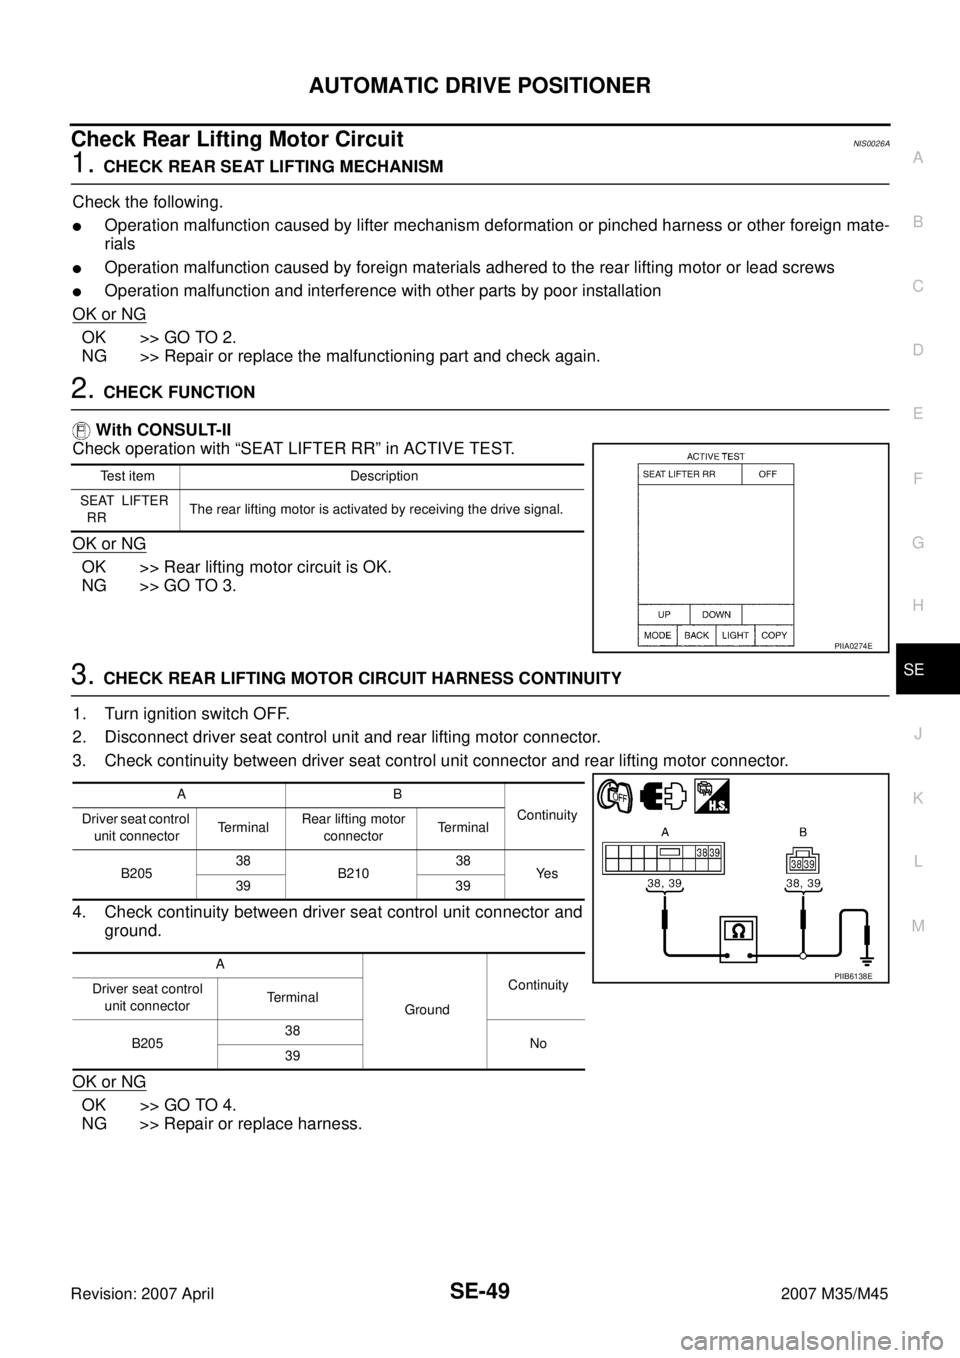
2. CHECK FUNCTION
With CONSULT-II
Check operation with “SEAT LIFTER RR” in ACTIVE TEST.
OK or NG
OK >> Rear lifting motor circuit is OK.
NG >> GO TO 3.
3. CHECK REAR LIFTING MOTOR CIRCUIT HARNESS CONTINUITY
1. Turn ignition switch OFF.
2. Disconnect driver seat control unit and rear lifting motor connector.
3. Check continuity between driver seat control unit connector and rear lifting motor connector.
4. Check continuity between driver seat control unit connector and
ground.
OK or NG
OK >> GO TO 4.
NG >> Repair or replace harness.
Test item Description
SEAT LIFTER
RRThe rear lifting motor is activated by receiving the drive signal.
PIIA0274E
AB
Continuity
Driver seat control
unit connectorTerminalRear lifting motor
connectorTerminal
B20538
B21038
Ye s
39 39
A
GroundContinuity
Driver seat control
unit connectorTe r m i n a l
B20538
No
39
PIIB6138E
Page 4249 of 4647
SE-50
AUTOMATIC DRIVE POSITIONER
Revision: 2007 April2007 M35/M45
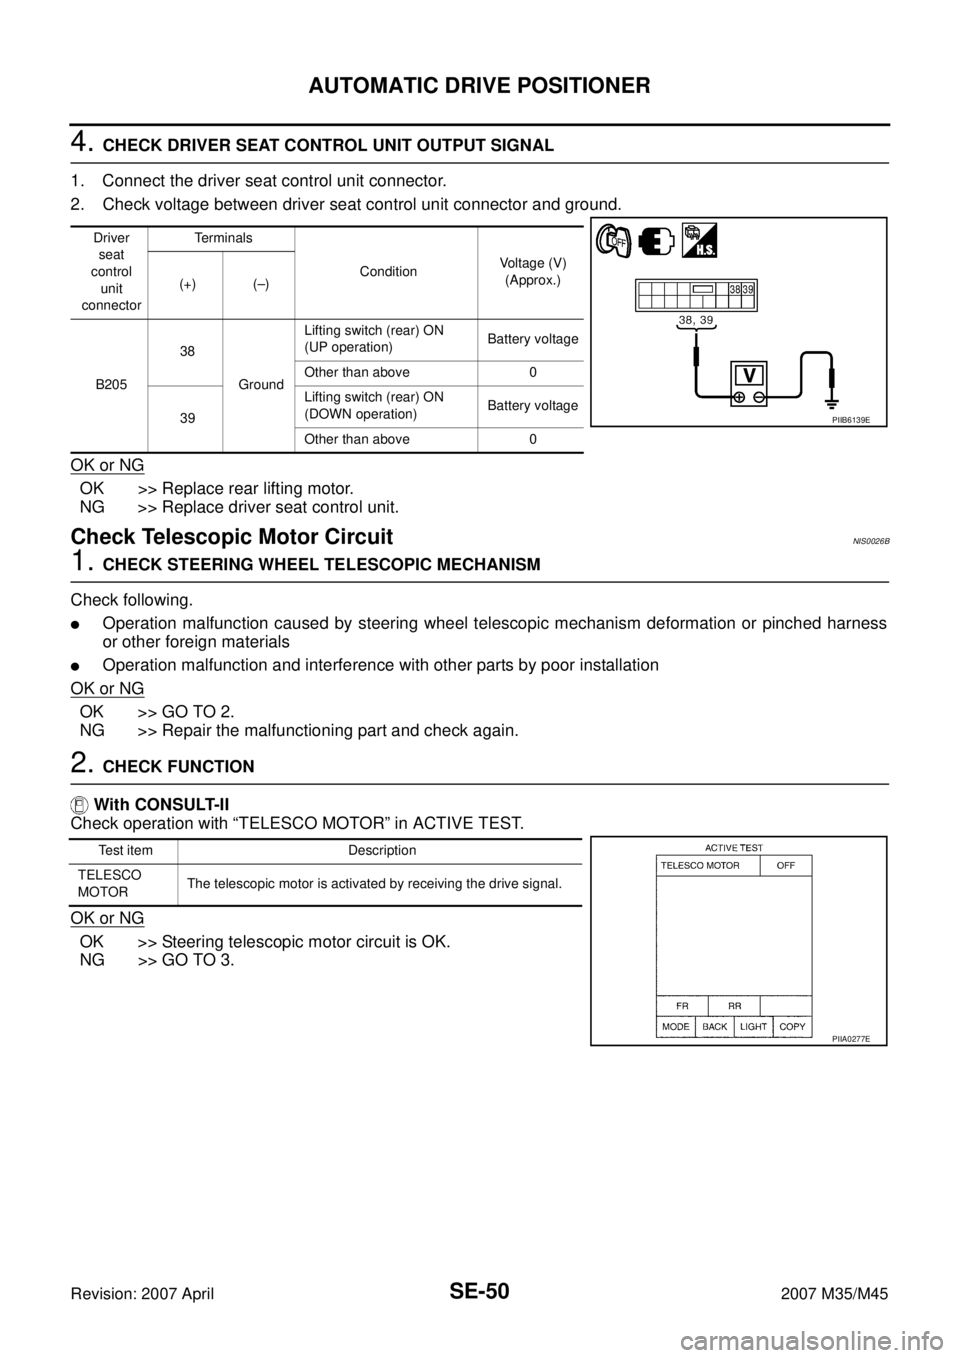
4. CHECK DRIVER SEAT CONTROL UNIT OUTPUT SIGNAL
1. Connect the driver seat control unit connector.
2. Check voltage between driver seat control unit connector and ground.
OK or NG
OK >> Replace rear lifting motor.
NG >> Replace driver seat control unit.
Check Telescopic Motor Circuit NIS0026B
1. CHECK STEERING WHEEL TELESCOPIC MECHANISM
Check following.
�Operation malfunction caused by steering wheel telescopic mechanism deformation or pinched harness
or other foreign materials
�Operation malfunction and interference with other parts by poor installation
OK or NG
OK >> GO TO 2.
NG >> Repair the malfunctioning part and check again.
2. CHECK FUNCTION
With CONSULT-II
Check operation with “TELESCO MOTOR” in ACTIVE TEST.
OK or NG
OK >> Steering telescopic motor circuit is OK.
NG >> GO TO 3.
Driver
seat
control
unit
connectorTerminals
ConditionVoltage (V)
(Approx.)
(+) (–)
B20538
GroundLifting switch (rear) ON
(UP operation)Battery voltage
Other than above 0
39Lifting switch (rear) ON
(DOWN operation)Battery voltage
Other than above 0
PIIB6139E
Test item Description
TELESCO
MOTORThe telescopic motor is activated by receiving the drive signal.
PIIA0277E
Page 4252 of 4647
AUTOMATIC DRIVE POSITIONER
SE-53
C
D
E
F
G
H
J
K
L
MA
B
SE
Revision: 2007 April2007 M35/M45
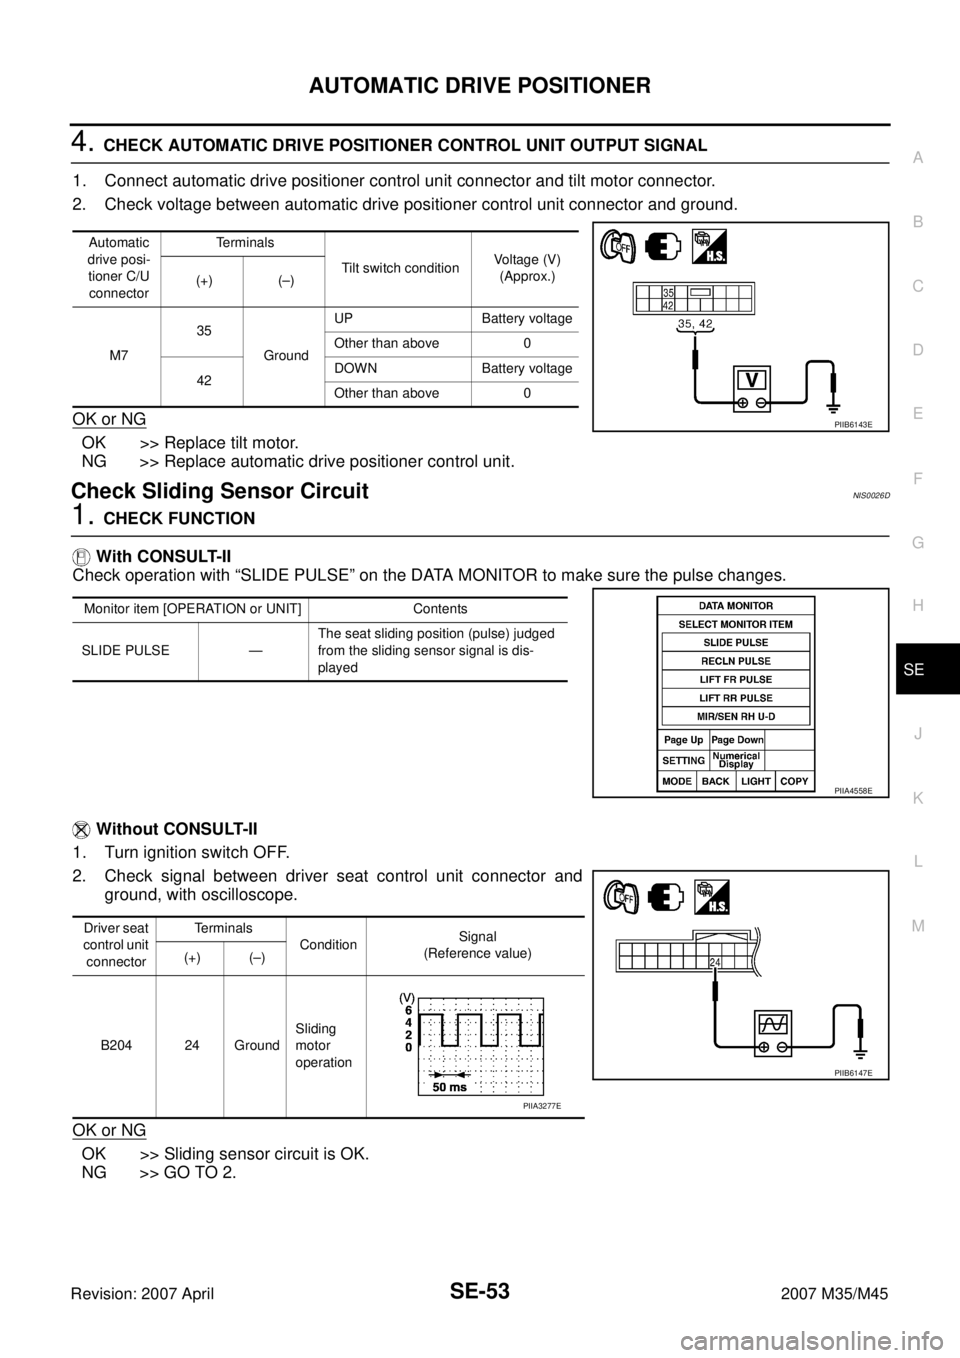
4. CHECK AUTOMATIC DRIVE POSITIONER CONTROL UNIT OUTPUT SIGNAL
1. Connect automatic drive positioner control unit connector and tilt motor connector.
2. Check voltage between automatic drive positioner control unit connector and ground.
OK or NG
OK >> Replace tilt motor.
NG >> Replace automatic drive positioner control unit.
Check Sliding Sensor Circuit NIS0026D
1. CHECK FUNCTION
With CONSULT-II
Check operation with “SLIDE PULSE” on the DATA MONITOR to make sure the pulse changes.
Without CONSULT-II
1. Turn ignition switch OFF.
2. Check signal between driver seat control unit connector and
ground, with oscilloscope.
OK or NG
OK >> Sliding sensor circuit is OK.
NG >> GO TO 2.
Automatic
drive posi-
tioner C/U
connectorTerminals
Tilt switch conditionVoltage (V)
(Approx.)
(+) (–)
M735
GroundUP Battery voltage
Other than above 0
42DOWN Battery voltage
Other than above 0
PIIB6143E
Monitor item [OPERATION or UNIT] Contents
SLIDE PULSE —The seat sliding position (pulse) judged
from the sliding sensor signal is dis-
played
PIIA4558E
Driver seat
control unit
connectorTe r m i n a l s
ConditionSignal
(Reference value)
(+) (–)
B204 24 GroundSliding
motor
operation
PIIB6147E
PIIA3277E
Page 4253 of 4647
SE-54
AUTOMATIC DRIVE POSITIONER
Revision: 2007 April2007 M35/M45
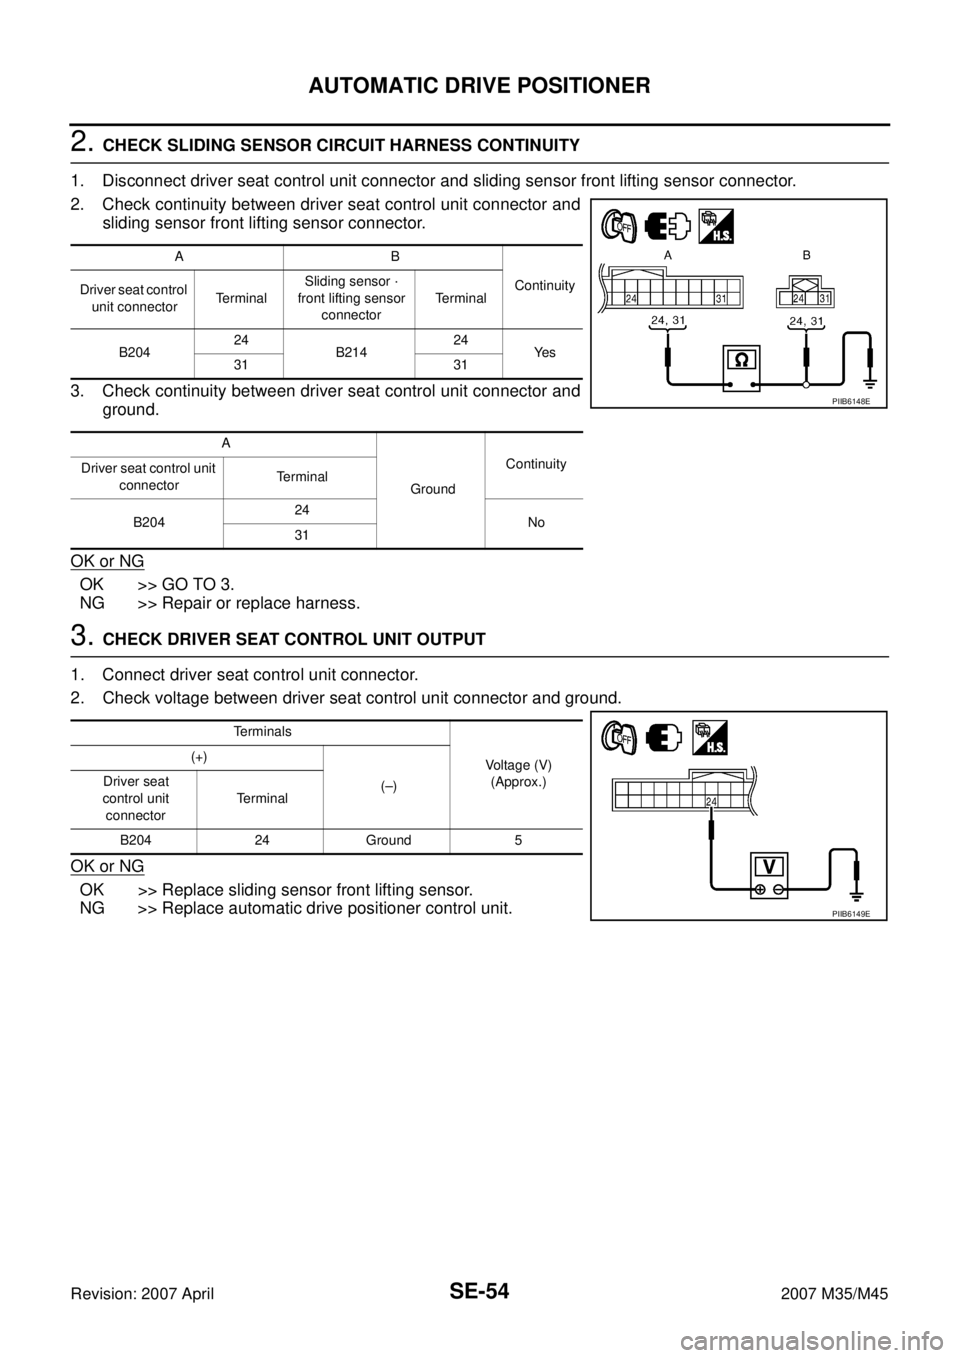
2. CHECK SLIDING SENSOR CIRCUIT HARNESS CONTINUITY
1. Disconnect driver seat control unit connector and sliding sensor front lifting sensor connector.
2. Check continuity between driver seat control unit connector and
sliding sensor front lifting sensor connector.
3. Check continuity between driver seat control unit connector and
ground.
OK or NG
OK >> GO TO 3.
NG >> Repair or replace harness.
3. CHECK DRIVER SEAT CONTROL UNIT OUTPUT
1. Connect driver seat control unit connector.
2. Check voltage between driver seat control unit connector and ground.
OK or NG
OK >> Replace sliding sensor front lifting sensor.
NG >> Replace automatic drive positioner control unit.
AB
Continuity
Driver seat control
unit connectorTe r m i n a lSliding sensor ·
front lifting sensor
connectorTerminal
B20424
B21424
Ye s
31 31
A
GroundContinuity
Driver seat control unit
connectorTerminal
B20424
No
31
PIIB6148E
Terminals
Voltage (V)
(Approx.) (+)
(–) Driver seat
control unit
connectorTerminal
B204 24 Ground 5
PIIB6149E
Page 4254 of 4647
AUTOMATIC DRIVE POSITIONER
SE-55
C
D
E
F
G
H
J
K
L
MA
B
SE
Revision: 2007 April2007 M35/M45
Check Reclining Sensor Circuit NIS0026E
1. CHECK FUNCTION
With CONSULT-II
Check operation with “RECLN PULSE” on the DATA MONITOR to make sure the pulse changes.
Without CONSULT-II
1. Turn ignition switch OFF.
2. Check signal between driver seat control unit connector and ground, with oscilloscope.
OK or NG
OK >> Reclining sensor circuit is OK.
NG >> GO TO 2.
Monitor item [OPERATION or UNIT] Contents
RECLN PULSE —The seat reclining position (pulse) judged
from the reclining sensor is displayed
PIIA4558E
Driver seat
control unit
connectorTerminals
ConditionSignal
(Reference value)
(+) (–)
B204 9 GroundReclining
motor
operation
PIIB6150EPIIB2807E
Page 4255 of 4647
SE-56
AUTOMATIC DRIVE POSITIONER
Revision: 2007 April2007 M35/M45
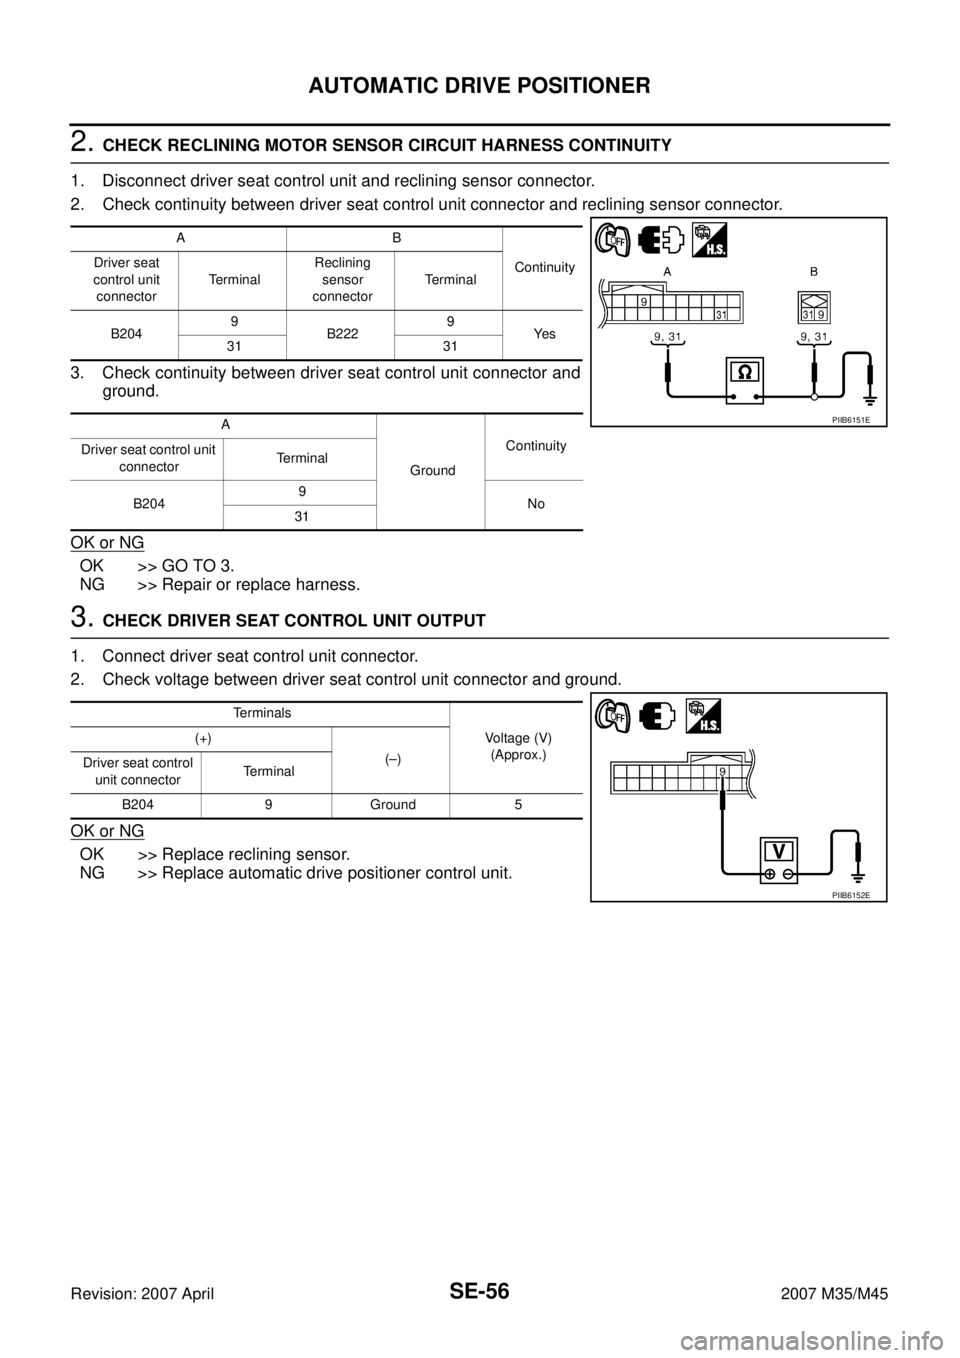
2. CHECK RECLINING MOTOR SENSOR CIRCUIT HARNESS CONTINUITY
1. Disconnect driver seat control unit and reclining sensor connector.
2. Check continuity between driver seat control unit connector and reclining sensor connector.
3. Check continuity between driver seat control unit connector and
ground.
OK or NG
OK >> GO TO 3.
NG >> Repair or replace harness.
3. CHECK DRIVER SEAT CONTROL UNIT OUTPUT
1. Connect driver seat control unit connector.
2. Check voltage between driver seat control unit connector and ground.
OK or NG
OK >> Replace reclining sensor.
NG >> Replace automatic drive positioner control unit.
AB
Continuity Driver seat
control unit
connectorTerminalReclining
sensor
connectorTerminal
B2049
B2229
Ye s
31 31
A
GroundContinuity
Driver seat control unit
connectorTerminal
B2049
No
31
PIIB6151E
Terminals
Voltage (V)
(Approx.) (+)
(–)
Driver seat control
unit connectorTerminal
B204 9 Ground 5
PIIB6152E
Page 4256 of 4647
AUTOMATIC DRIVE POSITIONER
SE-57
C
D
E
F
G
H
J
K
L
MA
B
SE
Revision: 2007 April2007 M35/M45
Check Front Lifting Sensor Circuit NIS0026F
1. CHECK FUNCTION
With CONSULT-II
Check operation with “LIFT FR PULSE” on the DATA MONITOR to make sure the pulse changes.
Without CONSULT-II
1. Turn ignition switch OFF.
2. Check signal between driver seat control unit connector and
ground, with oscilloscope.
OK or NG
OK >> Sliding sensor front lifting sensor is OK.
NG >> GO TO 2.
Monitor item [OPERATION or UNIT] Contents
LIFT FR PULSE —The front lifting position (pulse) judged
from the lifting sensor (front) is dis-
played
PIIA4558E
Sliding
sensor
front lifting
sensorTerminals
ConditionSignal
(Reference value)
(+) (–)
B214 25 GroundFront
lifting
motor
operation
PIIB6153E
PIIA3278E
Page 4257 of 4647
SE-58
AUTOMATIC DRIVE POSITIONER
Revision: 2007 April2007 M35/M45
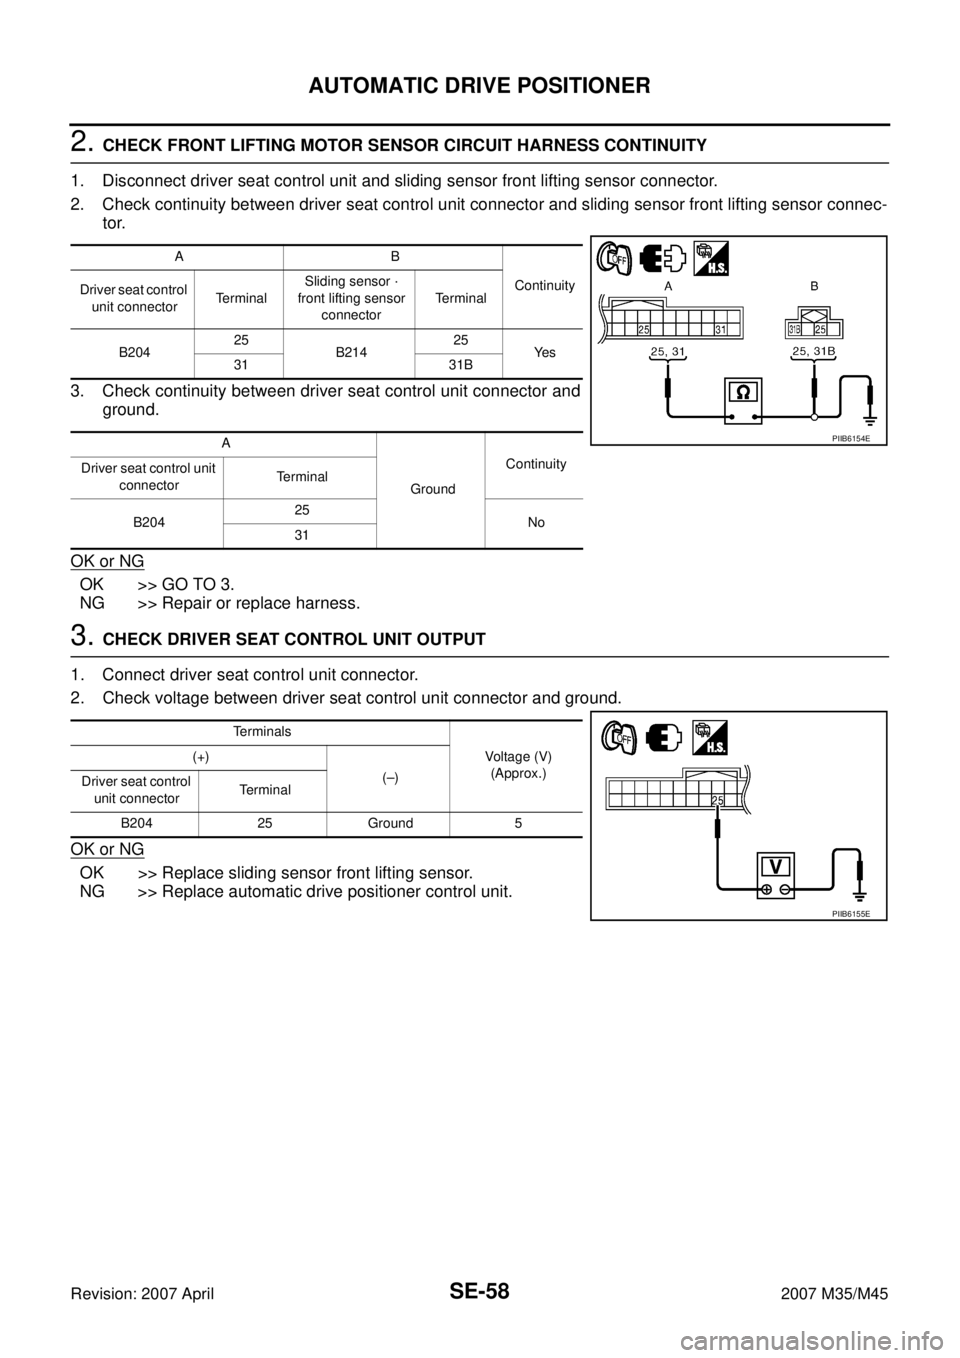
2. CHECK FRONT LIFTING MOTOR SENSOR CIRCUIT HARNESS CONTINUITY
1. Disconnect driver seat control unit and sliding sensor front lifting sensor connector.
2. Check continuity between driver seat control unit connector and sliding sensor front lifting sensor connec-
tor.
3. Check continuity between driver seat control unit connector and
ground.
OK or NG
OK >> GO TO 3.
NG >> Repair or replace harness.
3. CHECK DRIVER SEAT CONTROL UNIT OUTPUT
1. Connect driver seat control unit connector.
2. Check voltage between driver seat control unit connector and ground.
OK or NG
OK >> Replace sliding sensor front lifting sensor.
NG >> Replace automatic drive positioner control unit.
AB
Continuity
Driver seat control
unit connectorTe r m i n a lSliding sensor ·
front lifting sensor
connectorTerminal
B20425
B21425
Ye s
31 31B
A
GroundContinuity
Driver seat control unit
connectorTerminal
B20425
No
31
PIIB6154E
Terminals
Voltage (V)
(Approx.) (+)
(–)
Driver seat control
unit connectorTe r m i n a l
B204 25 Ground 5
PIIB6155E