Page 2950 of 4647
![INFINITI M35 2007 Factory Service Manual IGNITION SIGNAL
EC-1421
[VK45DE]
C
D
E
F
G
H
I
J
K
L
MA
EC
Revision: 2007 April2007 M35/M45
11 . DETECT MALFUNCTIONING PART
Check the following.
�Harness connector F3
�Harness for open or short betwe INFINITI M35 2007 Factory Service Manual IGNITION SIGNAL
EC-1421
[VK45DE]
C
D
E
F
G
H
I
J
K
L
MA
EC
Revision: 2007 April2007 M35/M45
11 . DETECT MALFUNCTIONING PART
Check the following.
�Harness connector F3
�Harness for open or short betwe](/manual-img/42/57024/w960_57024-2949.png)
IGNITION SIGNAL
EC-1421
[VK45DE]
C
D
E
F
G
H
I
J
K
L
MA
EC
Revision: 2007 April2007 M35/M45
11 . DETECT MALFUNCTIONING PART
Check the following.
�Harness connector F3
�Harness for open or short between ignition coil and harness connector F3
>> Repair or replace harness or connectors.
12. CHECK IGNITION COIL GROUND CIRCUIT FOR OPEN AND SHORT
1. Turn ignition switch OFF.
2. Check harness continuity between ignition coil terminal 2 and ground.
Refer to Wiring Diagram.
3. Also check harness for short to power.
OK or NG
OK >> GO TO 13.
NG >> Repair open circuit or short to power in harness or connectors.
13. CHECK IGNITION COIL OUTPUT SIGNAL CIRCUIT FOR OPEN AND SHORT
1. Disconnect ECM harness connector.
2. Check harness continuity between ECM terminals 46, 60, 61, 62, 65, 79, 80, 81 and ignition coil terminal
1. Refer to Wiring Diagram.
3. Also check harness for short to ground and short to power.
OK or NG
OK >> GO TO 14.
NG >> Repair open circuit or short to ground or short to power in harness or connectors.
14. CHECK IGNITION COIL WITH POWER TRANSISTOR
Refer to EC-1421, "
Component Inspection" .
OK or NG
OK >> GO TO 15.
NG >> Replace ignition coil with power transistor.
15. CHECK INTERMITTENT INCIDENT
Refer to EC-857, "
TROUBLE DIAGNOSIS FOR INTERMITTENT INCIDENT" .
>>INSPECTION END
Component InspectionNBS005PT
IGNITION COIL WITH POWER TRANSISTOR
CAUTION:
Do the following procedure in the place where ventilation is good without the combustible.
1. Turn ignition switch OFF.
2. Disconnect ignition coil harness connector.Continuity should exist.
Continuity should exist.
Page 2951 of 4647
![INFINITI M35 2007 Factory Service Manual EC-1422
[VK45DE]
IGNITION SIGNAL
Revision: 2007 April2007 M35/M45
3. Check resistance between ignition coil terminals as follows.
4. If NG, replace ignition coil with power transistor.
If OK, go to ne INFINITI M35 2007 Factory Service Manual EC-1422
[VK45DE]
IGNITION SIGNAL
Revision: 2007 April2007 M35/M45
3. Check resistance between ignition coil terminals as follows.
4. If NG, replace ignition coil with power transistor.
If OK, go to ne](/manual-img/42/57024/w960_57024-2950.png)
EC-1422
[VK45DE]
IGNITION SIGNAL
Revision: 2007 April2007 M35/M45
3. Check resistance between ignition coil terminals as follows.
4. If NG, replace ignition coil with power transistor.
If OK, go to next step.
5. Turn ignition switch OFF.
6. Reconnect all harness connectors disconnected.
7. Remove fuel pump fuse (1) in IPDM E/R (2) to release fuel pres-
sure.
NOTE:
Do not use CONSULT-II to release fuel pressure, or fuel pres-
sure applies again during the following procedure.
8. Start engine.
9. After engine stalls, crank it two or three times to release all fuel
pressure.
10. Turn ignition switch OFF.
11. Remove all ignition coil harness connectors to avoid the electri-
cal discharge from the ignition coils.
12. Remove ignition coil and spark plug of the cylinder to be checked.
13. Crank engine for 5 seconds or more to remove combustion gas in the cylinder.
14. Connect spark plug and harness connector to ignition coil.
15. Fix ignition coil using a rope etc. with gap of 13 - 17 mm
between the edge of the spark plug and grounded metal portion
as shown in the figure.
16. Crank engine for about 3 seconds, and check whether spark is
generated between the spark plug and the grounded metal por-
tion.
CAUTION:
�Do not approach to the spark plug and the ignition coil
within 50cm. Be careful not to get an electrical shock
while checking, because the electrical discharge voltage
becomes 20kV or more.
�It might cause to damage the ignition coil if the gap of more than 17 mm is taken.
NOTE:
When the gap is less than 13 mm, the spark might be generated even if the coil is malfunctioning.
17. If NG, replace ignition coil with power transistor.
CONDENSER
1. Turn ignition switch OFF.
2. Disconnect condenser harness connector.
Terminal No. (Polarity) Resistance Ω [at 25°C (77°F)]
1 and 2 Except 0 or ∞
1 and 3
Except 0
2 and 3
Spark should be generated.
PBIB0847E
PBIB2697E
PBIB2325E
Page 2952 of 4647
IGNITION SIGNAL
EC-1423
[VK45DE]
C
D
E
F
G
H
I
J
K
L
MA
EC
Revision: 2007 April2007 M35/M45
3. Check resistance between condenser terminals 1 and 2.
Removal and InstallationNBS005PU
IGNITION COIL WITH POWER TRANSISTOR
Refer to EM-190, "IGNITION COIL" . Resistance: Above 1 MΩ [at 25°C (77°F)]
PBIB0794E
Page 2959 of 4647
![INFINITI M35 2007 Factory Service Manual EC-1430
[VK45DE]
VIAS
Revision: 2007 April2007 M35/M45
COMPONENT DESCRIPTION
Power Valve
The power valve is installed in intake manifold collector and used to
control the suction passage of the variab INFINITI M35 2007 Factory Service Manual EC-1430
[VK45DE]
VIAS
Revision: 2007 April2007 M35/M45
COMPONENT DESCRIPTION
Power Valve
The power valve is installed in intake manifold collector and used to
control the suction passage of the variab](/manual-img/42/57024/w960_57024-2958.png)
EC-1430
[VK45DE]
VIAS
Revision: 2007 April2007 M35/M45
COMPONENT DESCRIPTION
Power Valve
The power valve is installed in intake manifold collector and used to
control the suction passage of the variable induction air control sys-
tem. It is set in the fully closed or fully opened position by the power
valve actuator (1) operated by the vacuum stored in the surge tank.
The vacuum in the surge tank is controlled by the VIAS control sole-
noid valve.
�: Vehicle front
VIAS Control Solenoid Valve
The VIAS control solenoid valve (1) cuts the intake manifold vacuum
signal for power valve actuator. It responds to ON/OFF signals from
the ECM. When the solenoid is off, the vacuum signal from the
intake manifold is cut. When the ECM sends an ON signal the coil
pulls the plunger downward and feeds the vacuum signal to the
power valve actuator.
�: Vehicle front
CONSULT-II Reference Value in Data Monitor ModeNBS005PL
PBIB2695E
PBIB2694E
MONITOR ITEM CONDITION SPECIFICATION
VIAS S/V
�Selector lever: P or N
ON
�Engine speed: More than 5,000 rpm
�Selector lever: Except P or N
�Engine speed: Less than 5,000 rpmOFF
Page 2982 of 4647
FRONT BUMPER
EI-11
C
D
E
F
G
H
J
K
L
MA
B
EI
Revision: 2007 April2007 M35/M45
FRONT BUMPERPFP:F2022
Removal and InstallationNIS0024D
CAUTION:
Bumper fascia is made of resin. Do not apply strong force to it, and be careful to prevent contact with
oil.
1. Bumper fascia assembly 2. Energy absorber 3. Bumper reinforcement
4. License plate bracket 5. Front bumper grille 6. Front air spoiler
7. Front undercover
PIIB4587E
Page 2983 of 4647

EI-12
FRONT BUMPER
Revision: 2007 April2007 M35/M45
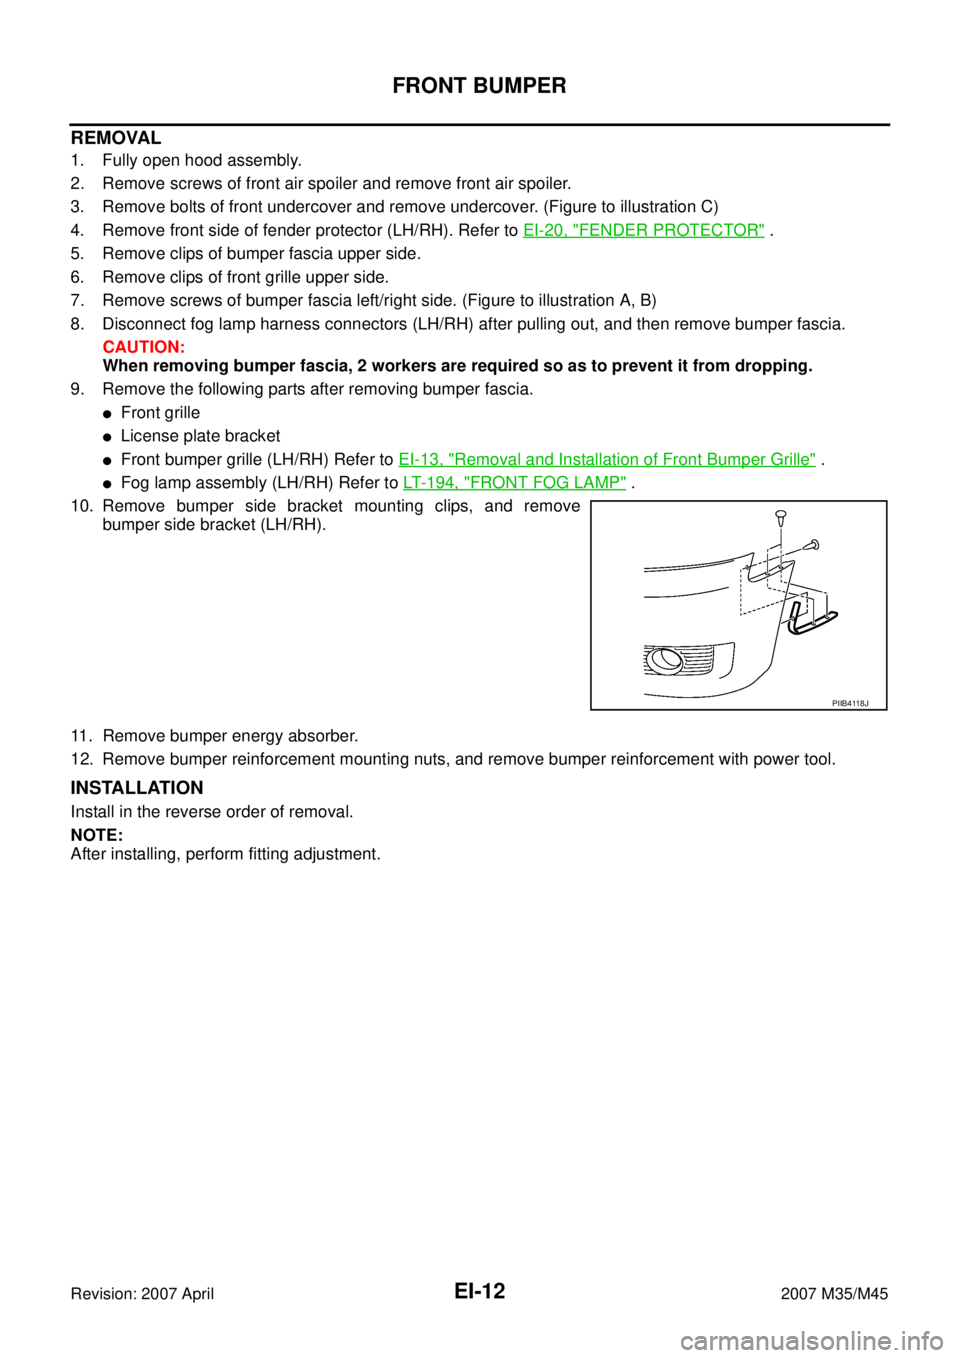
REMOVAL
1. Fully open hood assembly.
2. Remove screws of front air spoiler and remove front air spoiler.
3. Remove bolts of front undercover and remove undercover. (Figure to illustration C)
4. Remove front side of fender protector (LH/RH). Refer to EI-20, "
FENDER PROTECTOR" .
5. Remove clips of bumper fascia upper side.
6. Remove clips of front grille upper side.
7. Remove screws of bumper fascia left/right side. (Figure to illustration A, B)
8. Disconnect fog lamp harness connectors (LH/RH) after pulling out, and then remove bumper fascia.
CAUTION:
When removing bumper fascia, 2 workers are required so as to prevent it from dropping.
9. Remove the following parts after removing bumper fascia.
�Front grille
�License plate bracket
�Front bumper grille (LH/RH) Refer to EI-13, "Removal and Installation of Front Bumper Grille" .
�Fog lamp assembly (LH/RH) Refer to LT- 1 9 4 , "FRONT FOG LAMP" .
10. Remove bumper side bracket mounting clips, and remove
bumper side bracket (LH/RH).
11. Remove bumper energy absorber.
12. Remove bumper reinforcement mounting nuts, and remove bumper reinforcement with power tool.
INSTALLATION
Install in the reverse order of removal.
NOTE:
After installing, perform fitting adjustment.
PIIB4118J
Page 2985 of 4647
EI-14
REAR BUMPER
Revision: 2007 April2007 M35/M45
REAR BUMPERPFP:H5022
Removal and InstallationNIS0024F
CAUTION:
Bumper fascia is made of resin. Do not apply strong force to it, and be careful to prevent contact with
oil.
1. Bumper fascia assembly 2. Energy absorber 3. Bumper reinforcement
PIIB4589E
Page 3049 of 4647

FAX-12
FRONT DRIVE SHAFT
Revision: 2007 April2007 M35/M45
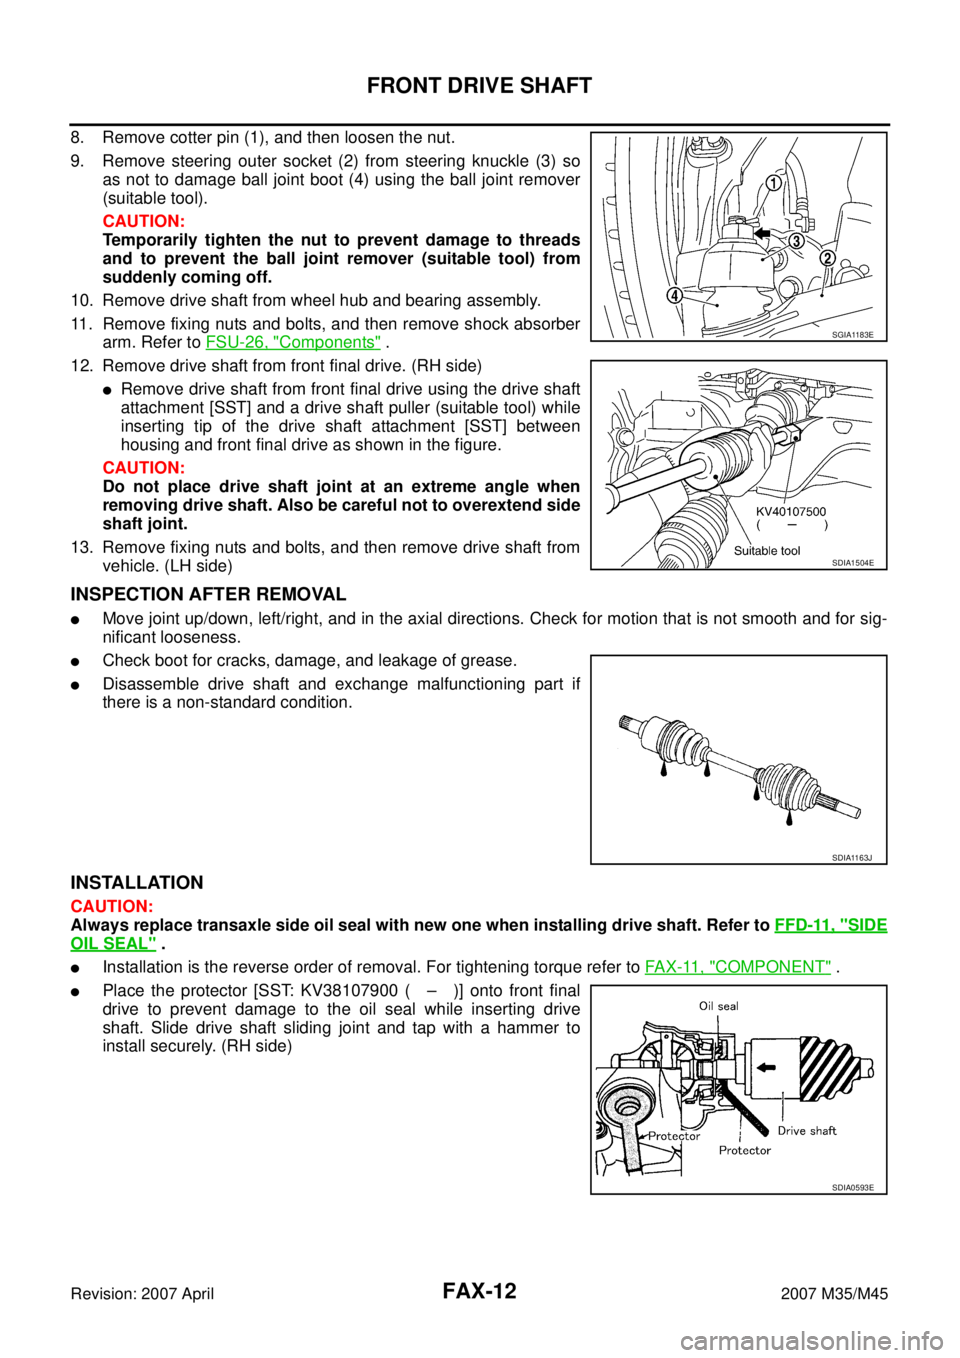
8. Remove cotter pin (1), and then loosen the nut.
9. Remove steering outer socket (2) from steering knuckle (3) so
as not to damage ball joint boot (4) using the ball joint remover
(suitable tool).
CAUTION:
Temporarily tighten the nut to prevent damage to threads
and to prevent the ball joint remover (suitable tool) from
suddenly coming off.
10. Remove drive shaft from wheel hub and bearing assembly.
11. Remove fixing nuts and bolts, and then remove shock absorber
arm. Refer to FSU-26, "
Components" .
12. Remove drive shaft from front final drive. (RH side)
�Remove drive shaft from front final drive using the drive shaft
attachment [SST] and a drive shaft puller (suitable tool) while
inserting tip of the drive shaft attachment [SST] between
housing and front final drive as shown in the figure.
CAUTION:
Do not place drive shaft joint at an extreme angle when
removing drive shaft. Also be careful not to overextend side
shaft joint.
13. Remove fixing nuts and bolts, and then remove drive shaft from
vehicle. (LH side)
INSPECTION AFTER REMOVAL
�Move joint up/down, left/right, and in the axial directions. Check for motion that is not smooth and for sig-
nificant looseness.
�Check boot for cracks, damage, and leakage of grease.
�Disassemble drive shaft and exchange malfunctioning part if
there is a non-standard condition.
INSTALLATION
CAUTION:
Always replace transaxle side oil seal with new one when installing drive shaft. Refer to FFD-11, "
SIDE
OIL SEAL" .
�Installation is the reverse order of removal. For tightening torque refer to FA X - 11 , "COMPONENT" .
�Place the protector [SST: KV38107900 ( – )] onto front final
drive to prevent damage to the oil seal while inserting drive
shaft. Slide drive shaft sliding joint and tap with a hammer to
install securely. (RH side)
SGIA1183E
SDIA1504E
SDIA1163J
SDIA0593E