Page 3167 of 4647
GI-24
HOW TO USE THIS MANUAL
Revision: 2007 April2007 M35/M45
AbbreviationsNAS0007O
The following ABBREVIATIONS are used:
ABBREVIATION DESCRIPTION
A/C Air Conditioner
A/T Automatic Transaxle/Transmission
ATF Automatic Transmission Fluid
D
1Drive range 1st gear
D
2Drive range 2nd gear
D
3Drive range 3rd gear
D
4Drive range 4th gear
FR, RR Front, Rear
LH, RH Left-Hand, Right-Hand
M/T Manual Transaxle/Transmission
OD Overdrive
P/S Power Steering
SAE Society of Automotive Engineers, Inc.
SDS Service Data and Specifications
SST Special Service Tools
2WD 2-Wheel Drive
2
22nd range 2nd gear
2
12nd range 1st gear
1
21st range 2nd gear
1
11st range 1st gear
Page 4065 of 4647

RF-24
SUNROOF
Revision: 2007 April2007 M35/M45
Fitting AdjustmentNIS00242
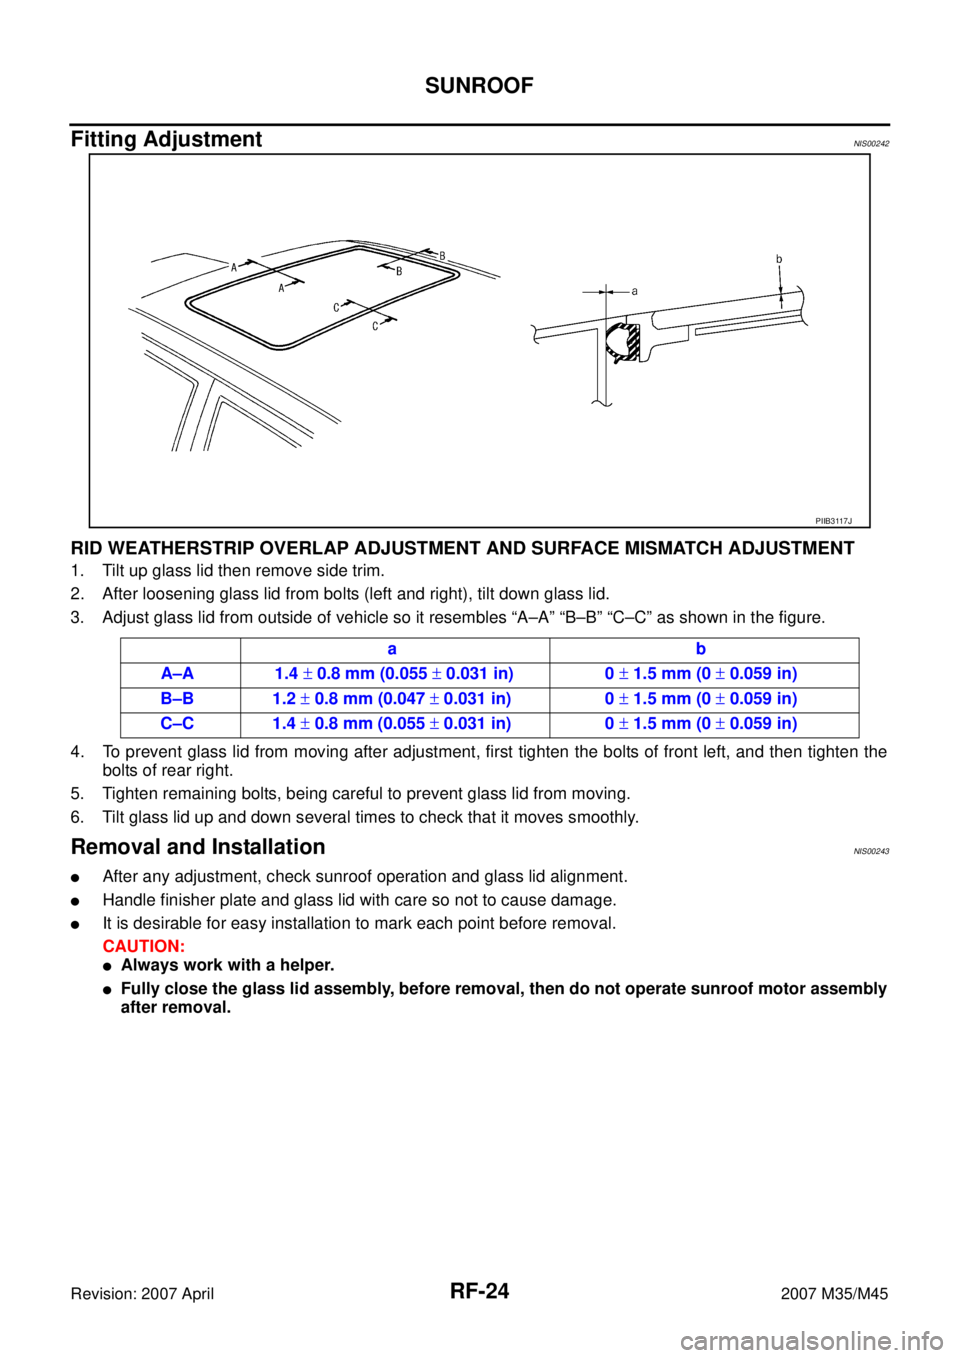
RID WEATHERSTRIP OVERLAP ADJUSTMENT AND SURFACE MISMATCH ADJUSTMENT
1. Tilt up glass lid then remove side trim.
2. After loosening glass lid from bolts (left and right), tilt down glass lid.
3. Adjust glass lid from outside of vehicle so it resembles “A–A” “B–B” “C–C” as shown in the figure.
4. To prevent glass lid from moving after adjustment, first tighten the bolts of front left, and then tighten the
bolts of rear right.
5. Tighten remaining bolts, being careful to prevent glass lid from moving.
6. Tilt glass lid up and down several times to check that it moves smoothly.
Removal and InstallationNIS00243
�After any adjustment, check sunroof operation and glass lid alignment.
�Handle finisher plate and glass lid with care so not to cause damage.
�It is desirable for easy installation to mark each point before removal.
CAUTION:
�Always work with a helper.
�Fully close the glass lid assembly, before removal, then do not operate sunroof motor assembly
after removal.
PIIB3117J
ab
A–A 1.4 ± 0.8 mm (0.055 ± 0.031 in) 0 ± 1.5 mm (0 ± 0.059 in)
B–B 1.2 ± 0.8 mm (0.047 ± 0.031 in) 0 ± 1.5 mm (0 ± 0.059 in)
C–C 1.4 ± 0.8 mm (0.055 ± 0.031 in) 0 ± 1.5 mm (0 ± 0.059 in)
Page 4125 of 4647

RSU-18
SERVICE DATA AND SPECIFICATIONS (SDS)
Revision: 2007 April2007 M35/M45
SERVICE DATA AND SPECIFICATIONS (SDS)PFP:00030
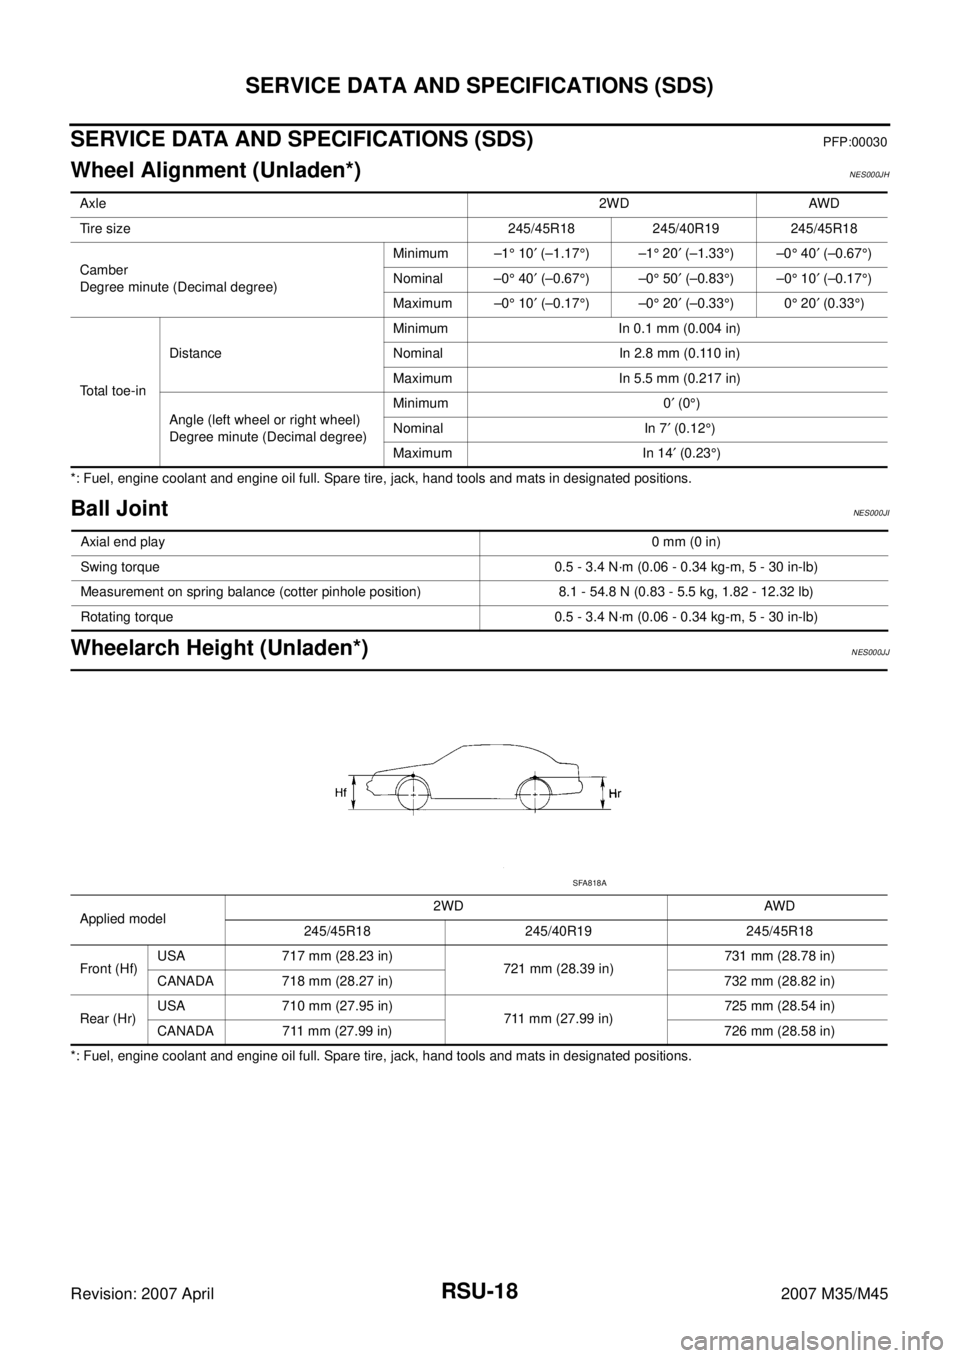
Wheel Alignment (Unladen*)NES000JH
*: Fuel, engine coolant and engine oil full. Spare tire, jack, hand tools and mats in designated positions.
Ball JointNES000JI
Wheelarch Height (Unladen*)NES000JJ
*: Fuel, engine coolant and engine oil full. Spare tire, jack, hand tools and mats in designated positions.Axle2WD AWD
Tire size 245/45R18 245/40R19 245/45R18
Camber
Degree minute (Decimal degree)Minimum –1° 10′ (–1.17°)–1° 20′ (–1.33°)–0° 40′ (–0.67°)
Nominal –0° 40′ (–0.67°)–0° 50′ (–0.83°)–0° 10′ (–0.17°)
Maximum –0° 10′ (–0.17°)–0° 20′ (–0.33°)0° 20′ (0.33°)
Total toe-inDistanceMinimum In 0.1 mm (0.004 in)
Nominal In 2.8 mm (0.110 in)
Maximum In 5.5 mm (0.217 in)
Angle (left wheel or right wheel)
Degree minute (Decimal degree)Minimum 0′ (0°)
Nominal In 7′ (0.12°)
Maximum In 14′ (0.23°)
Axial end play0 mm (0 in)
Swing torque 0.5 - 3.4 N·m (0.06 - 0.34 kg-m, 5 - 30 in-lb)
Measurement on spring balance (cotter pinhole position) 8.1 - 54.8 N (0.83 - 5.5 kg, 1.82 - 12.32 lb)
Rotating torque 0.5 - 3.4 N·m (0.06 - 0.34 kg-m, 5 - 30 in-lb)
Applied model2WD AWD
245/45R18 245/40R19 245/45R18
Front (Hf)USA 717 mm (28.23 in)
721 mm (28.39 in)731 mm (28.78 in)
CANADA 718 mm (28.27 in) 732 mm (28.82 in)
Rear (Hr)USA 710 mm (27.95 in)
711 mm (27.99 in)725 mm (28.54 in)
CANADA 711 mm (27.99 in) 726 mm (28.58 in)
SFA818A
Page 4166 of 4647

BATTERY
SC-5
C
D
E
F
G
H
I
J
L
MA
B
SC
Revision: 2007 April2007 M35/M45
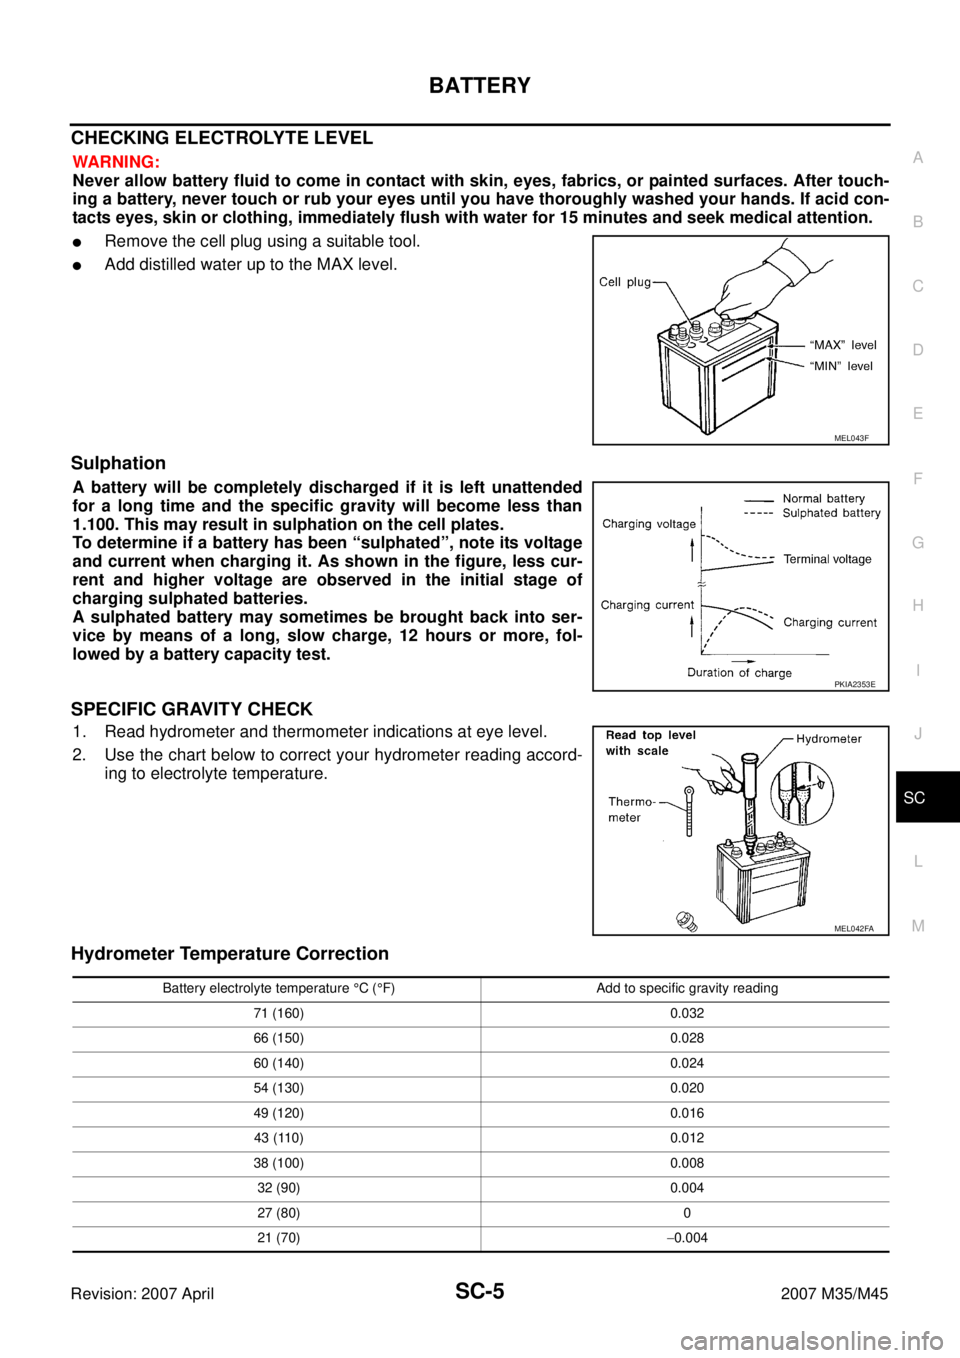
CHECKING ELECTROLYTE LEVEL
WARNING:
Never allow battery fluid to come in contact with skin, eyes, fabrics, or painted surfaces. After touch-
ing a battery, never touch or rub your eyes until you have thoroughly washed your hands. If acid con-
tacts eyes, skin or clothing, immediately flush with water for 15 minutes and seek medical attention.
�Remove the cell plug using a suitable tool.
�Add distilled water up to the MAX level.
Sulphation
A battery will be completely discharged if it is left unattended
for a long time and the specific gravity will become less than
1.100. This may result in sulphation on the cell plates.
To determine if a battery has been “sulphated”, note its voltage
and current when charging it. As shown in the figure, less cur-
rent and higher voltage are observed in the initial stage of
charging sulphated batteries.
A sulphated battery may sometimes be brought back into ser-
vice by means of a long, slow charge, 12 hours or more, fol-
lowed by a battery capacity test.
SPECIFIC GRAVITY CHECK
1. Read hydrometer and thermometer indications at eye level.
2. Use the chart below to correct your hydrometer reading accord-
ing to electrolyte temperature.
Hydrometer Temperature Correction
MEL043F
PKIA2353E
MEL042FA
Battery electrolyte temperature °C (°F) Add to specific gravity reading
71 (160) 0.032
66 (150) 0.028
60 (140) 0.024
54 (130) 0.020
49 (120) 0.016
43 (110) 0.012
38 (100) 0.008
32 (90) 0.004
27 (80) 0
21 (70)−0.004
Page 4454 of 4647
![INFINITI M35 2007 Factory Service Manual REAR ACTIVE STEER
STC-15
[RAS]
C
D
E
F
H
I
J
K
L
MA
B
STC
Revision: 2007 April2007 M35/M45
4. Supply 6 V voltage by connecting the four 1.5 V batteries in a
series. Connect them to the RAS motor conne INFINITI M35 2007 Factory Service Manual REAR ACTIVE STEER
STC-15
[RAS]
C
D
E
F
H
I
J
K
L
MA
B
STC
Revision: 2007 April2007 M35/M45
4. Supply 6 V voltage by connecting the four 1.5 V batteries in a
series. Connect them to the RAS motor conne](/manual-img/42/57024/w960_57024-4453.png)
REAR ACTIVE STEER
STC-15
[RAS]
C
D
E
F
H
I
J
K
L
MA
B
STC
Revision: 2007 April2007 M35/M45
4. Supply 6 V voltage by connecting the four 1.5 V batteries in a
series. Connect them to the RAS motor connector (motor side),
and then operate the motor and adjust the rack in the neutral
position (A).
CAUTION:
Do not supply 12 V voltage (battery, etc) to the RAS motor.
NOTE:
For right stroke, connect positive probe to the RAS motor con-
nector terminal 1. For left stroke, connect it to the terminal 2.
5. Install rear wheel steering angle sensor with O-ring to the RAS
actuator assembly. Temporarily tighten the mounting bolts in the specified torque that the sensor can be
moved by hand.
6. Turn and adjust the rear wheel steering angle sensor so as to make each sensor signal of “DATA MONI-
TOR” mode to the following standard with CONSULT-II.
CAUTION:
During DATA MONITOR mode, “MONITORING ERROR” is displayed. But there is not malfunction
in this procedure.
7. Tighten rear wheel steering angle sensor mounting bolts.
8. Perform “ERASE” with CONSULT-II, and then erase the error memory of rear wheel steering angle sen-
sor. Refer to STC-29, "
How to Erase Self-Diagnostic Results" .
9. Perform CONSULT-II “SELF-DIAG RESULTS” again, and then make sure that there is no malfunction.
Refer to STC-28, "
SELF-DIAG RESULT MODE" . Full stroke (B) : 6.8 - 7.2 mm (0.268 - 0.283 in)
STEERING ANG (°) L - 0, R - 0, N - 0
RR ST ANG-MAI (V) Approx. 2.4
RR ST ANG-SUB (V) Approx. 2.4
RR ST ANG-VOL (V) Approx. 5.0
SGIA1240E