Page 3562 of 4647
HEADLAMP (FOR CANADA) - DAYTIME LIGHT SYSTEM -
LT-111
C
D
E
F
G
H
I
J
L
MA
B
LT
Revision: 2007 April2007 M35/M45
Headlamp Low Beam Does Not Illuminate (One Side)NKS003PP
1. CHECK BULB
Check ballast (HID control unit) and xenon bulb of lamp which does not illuminate. Refer to LT- 11 4 , "
Xenon
Headlamp Trouble Diagnosis" .
OK or NG
OK >> GO TO 2.
NG >> Repair malfunctioning part.
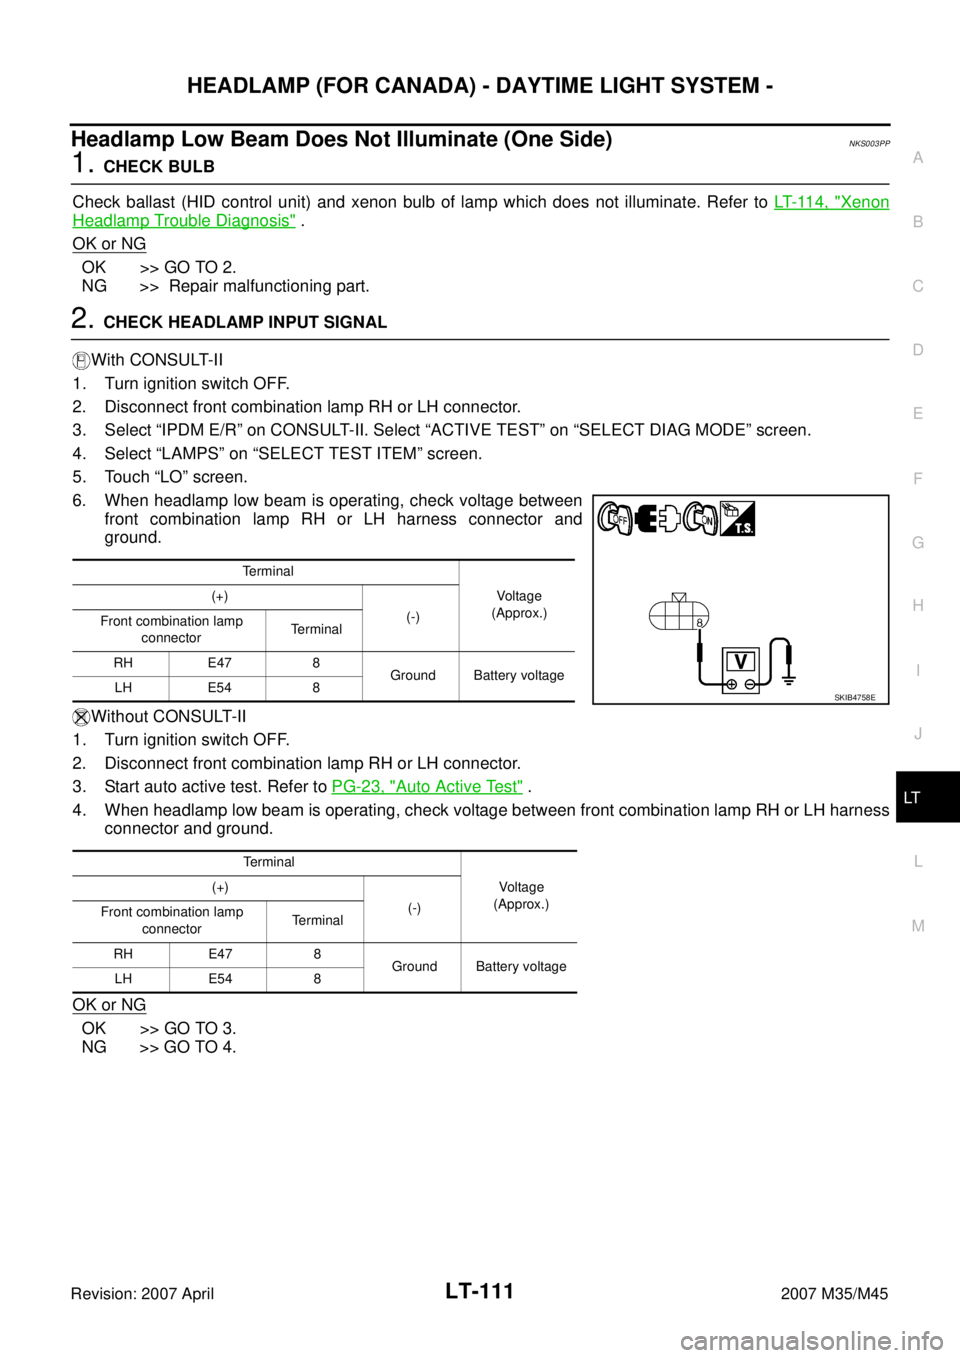
2. CHECK HEADLAMP INPUT SIGNAL
With CONSULT-II
1. Turn ignition switch OFF.
2. Disconnect front combination lamp RH or LH connector.
3. Select “IPDM E/R” on CONSULT-II. Select “ACTIVE TEST” on “SELECT DIAG MODE” screen.
4. Select “LAMPS” on “SELECT TEST ITEM” screen.
5. Touch “LO” screen.
6. When headlamp low beam is operating, check voltage between
front combination lamp RH or LH harness connector and
ground.
Without CONSULT-II
1. Turn ignition switch OFF.
2. Disconnect front combination lamp RH or LH connector.
3. Start auto active test. Refer to PG-23, "
Auto Active Test" .
4. When headlamp low beam is operating, check voltage between front combination lamp RH or LH harness
connector and ground.
OK or NG
OK >> GO TO 3.
NG >> GO TO 4.
Terminal
Voltage
(Approx.) (+)
(-)
Front combination lamp
connectorTe r m i n a l
RH E47 8
Ground Battery voltage
LH E54 8
Terminal
Voltage
(Approx.) (+)
(-)
Front combination lamp
connectorTe r m i n a l
RH E47 8
Ground Battery voltage
LH E54 8
SKIB4758E
Page 3563 of 4647
LT-112
HEADLAMP (FOR CANADA) - DAYTIME LIGHT SYSTEM -
Revision: 2007 April2007 M35/M45
3. CHECK HEADLAMP GROUND
1. Turn ignition switch OFF.
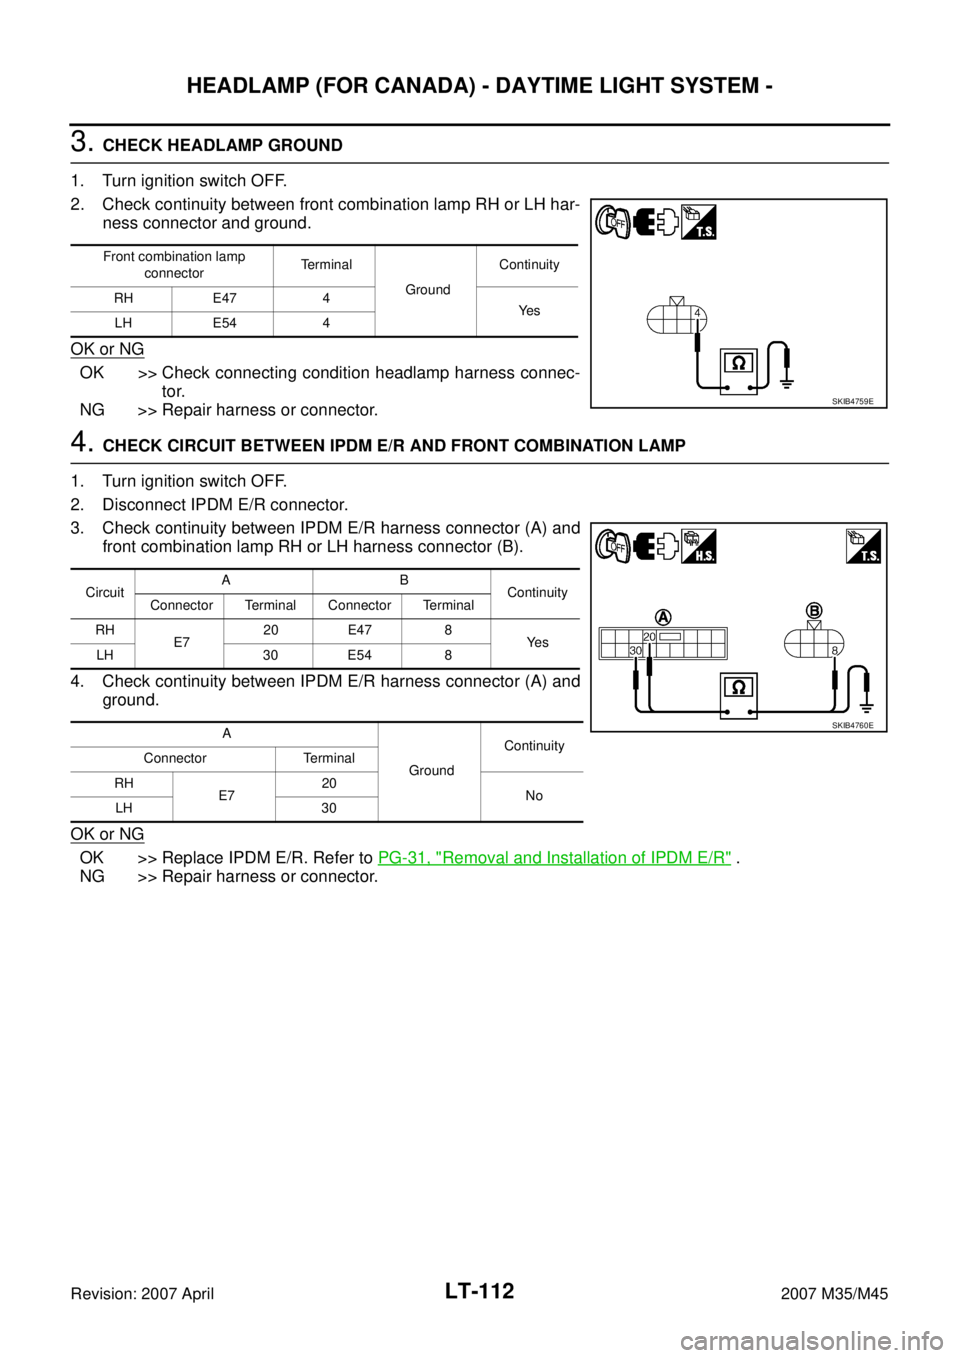
2. Check continuity between front combination lamp RH or LH har-
ness connector and ground.
OK or NG
OK >> Check connecting condition headlamp harness connec-
tor.
NG >> Repair harness or connector.
4. CHECK CIRCUIT BETWEEN IPDM E/R AND FRONT COMBINATION LAMP
1. Turn ignition switch OFF.
2. Disconnect IPDM E/R connector.
3. Check continuity between IPDM E/R harness connector (A) and
front combination lamp RH or LH harness connector (B).
4. Check continuity between IPDM E/R harness connector (A) and
ground.
OK or NG
OK >> Replace IPDM E/R. Refer to PG-31, "Removal and Installation of IPDM E/R" .
NG >> Repair harness or connector.
Front combination lamp
connectorTerminal
GroundContinuity
RH E47 4
Ye s
LH E54 4
SKIB4759E
CircuitAB
Continuity
Connector Terminal Connector Terminal
RH
E720 E47 8
Ye s
LH 30 E54 8
A
GroundContinuity
Connector Terminal
RH
E720
No
LH 30
SKIB4760E
Page 3564 of 4647
HEADLAMP (FOR CANADA) - DAYTIME LIGHT SYSTEM -
LT-113
C
D
E
F
G
H
I
J
L
MA
B
LT
Revision: 2007 April2007 M35/M45
Headlamps Do Not Turn OFFNKS003PQ
1. CHECK HEADLAMP TURN OFF
Make sure that lighting switch is OFF. And make sure is headlamp turns off when ignition switch is turned OFF.
OK or NG
OK >> GO TO 3.
NG >> GO TO 2.
2. CHECK COMBINATION SWITCH INPUT SIGNAL
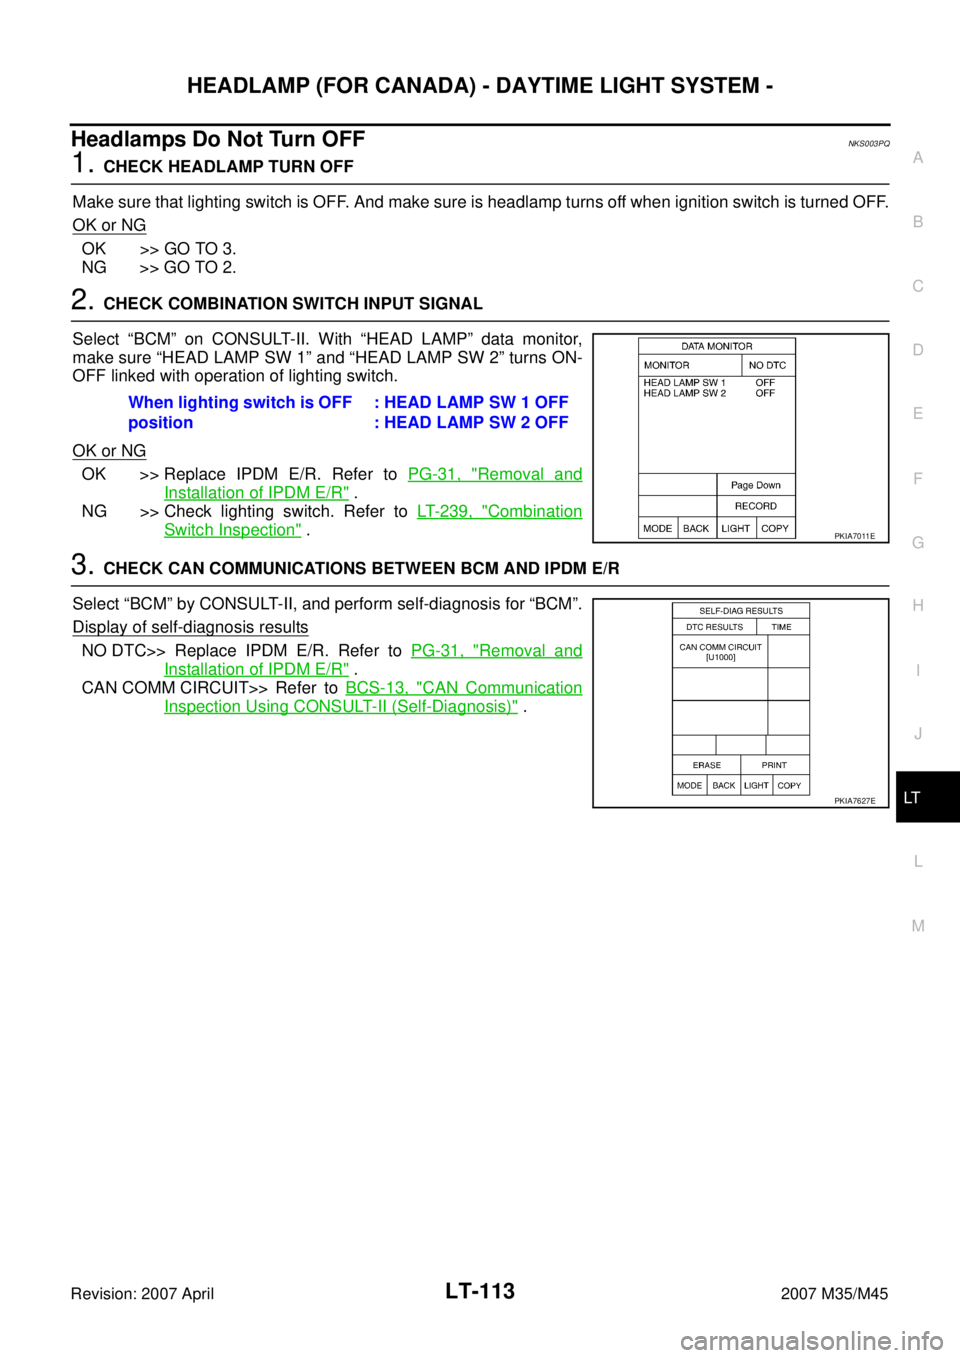
Select “BCM” on CONSULT-II. With “HEAD LAMP” data monitor,
make sure “HEAD LAMP SW 1” and “HEAD LAMP SW 2” turns ON-
OFF linked with operation of lighting switch.
OK or NG
OK >> Replace IPDM E/R. Refer to PG-31, "Removal and
Installation of IPDM E/R" .
NG >> Check lighting switch. Refer to LT- 2 3 9 , "
Combination
Switch Inspection" .
3. CHECK CAN COMMUNICATIONS BETWEEN BCM AND IPDM E/R
Select “BCM” by CONSULT-II, and perform self-diagnosis for “BCM”.
Display of self-diagnosis results
NO DTC>> Replace IPDM E/R. Refer to PG-31, "Removal and
Installation of IPDM E/R" .
CAN COMM CIRCUIT>> Refer to BCS-13, "
CAN Communication
Inspection Using CONSULT-II (Self-Diagnosis)" . When lighting switch is OFF
position: HEAD LAMP SW 1 OFF
: HEAD LAMP SW 2 OFF
PKIA7011E
PKIA7627E
Page 3566 of 4647
AUTO LIGHT SYSTEM
LT-115
C
D
E
F
G
H
I
J
L
MA
B
LT
Revision: 2007 April2007 M35/M45
AUTO LIGHT SYSTEMPFP:28491
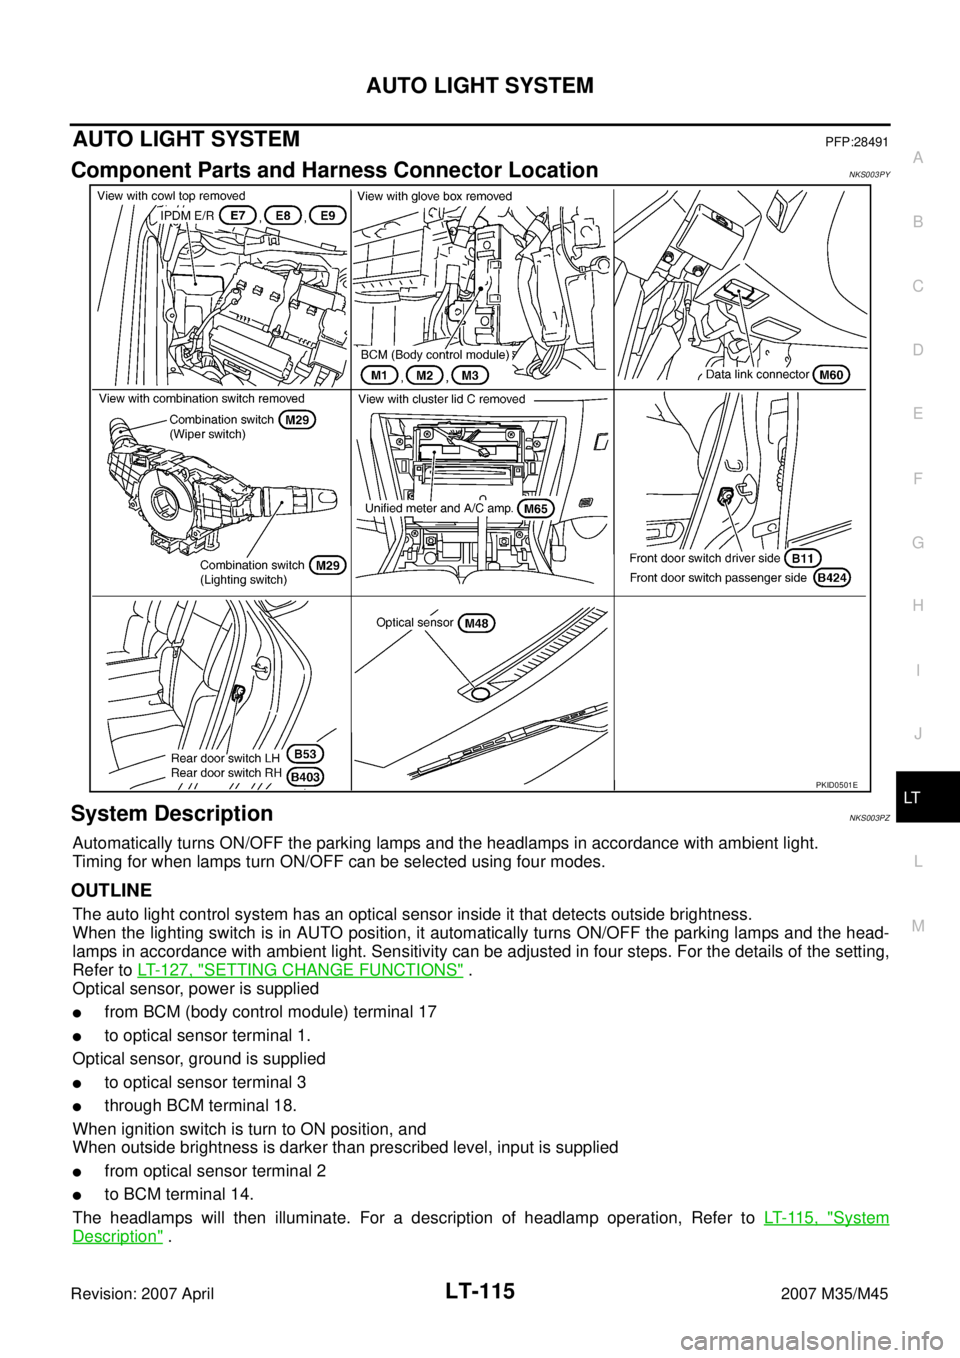
Component Parts and Harness Connector LocationNKS003PY
System DescriptionNKS003PZ
Automatically turns ON/OFF the parking lamps and the headlamps in accordance with ambient light.
Timing for when lamps turn ON/OFF can be selected using four modes.
OUTLINE
The auto light control system has an optical sensor inside it that detects outside brightness.
When the lighting switch is in AUTO position, it automatically turns ON/OFF the parking lamps and the head-
lamps in accordance with ambient light. Sensitivity can be adjusted in four steps. For the details of the setting,
Refer to LT- 1 2 7 , "
SETTING CHANGE FUNCTIONS" .
Optical sensor, power is supplied
�from BCM (body control module) terminal 17
�to optical sensor terminal 1.
Optical sensor, ground is supplied
�to optical sensor terminal 3
�through BCM terminal 18.
When ignition switch is turn to ON position, and
When outside brightness is darker than prescribed level, input is supplied
�from optical sensor terminal 2
�to BCM terminal 14.
The headlamps will then illuminate. For a description of headlamp operation, Refer to LT- 11 5 , "
System
Description" .
PKID0501E
Page 3567 of 4647

LT-116
AUTO LIGHT SYSTEM
Revision: 2007 April2007 M35/M45
COMBINATION SWITCH READING FUNCTION
Refer to BCS-3, "COMBINATION SWITCH READING FUNCTION" .
EXTERIOR LAMP BATTERY SAVER CONTROL
When the combination switch (lighting switch) is in the 2ND position (or if auto light system is activated), and
the ignition switch is turned from ON or ACC to OFF, the battery saver control function is activated.
Under this condition, the headlamps remain illuminated for 5 minutes, then the headlamps are turned off.
Exterior lamp battery saver control mode can be changed by the function setting of CONSULT-II.
DELAY TIMER FUNCTION
Delay timer function carries out a function that BCM activates the timer and controls lights out of headlamps by
door switch signal and lightning switch signal when turning the Ignition switch OFF while it is ON and head-
lamps are ON by the auto light function.
Timer types are a 5 minutes timer and a 45 seconds timer
�When opening any door (door switch is ON), the 5 minutes timer starts and then headlamps go out five
minutes later
�When all the doors are closed (from door switch ON to OFF), the 45 second timer starts and then head-
lamps go out 45 seconds later. If any door is opened (door switch ON) while the 45 seconds timer is in
operation, the 5 minutes timer starts again
�The timer stops when turning on the ignition switch or turning off the auto light switch under the above
conditions.
Delay timer control mode can be changed by the function setting of CONSULT-II.
CAN Communication System DescriptionNKS003Q0
CAN (Controller Area Network) is a serial communication line for real time application. It is an on-vehicle mul-
tiplex communication line with high data communication speed and excellent error detection ability. Many elec-
tronic control units are equipped onto vehicle, and each control unit shares information and links with other
control units during operation (not independent). In CAN communication, control units are connected with 2
communication lines (CAN H line, CAN L line) allowing the high rate of information transmission with less wir-
ing. Each control unit transmits/receives data but selectively reads required data only.
CAN Communication UnitNKS003Q1
Refer to LAN-50, "CAN System Specification Chart" .
Major Components and FunctionsNKS003Q2
Components Functions
BCM
�Turns on/off circuits of tail light and headlamp according to signals from optical sensor, lighting switch
(AUTO), driver door switch, passenger door switch, rear door switch, and ignition switch (ON, OFF).
Optical sensor
�Converts outside brightness (lux) to voltage, and sends it to BCM. (Detects brightness of 50 to 1,300 lux)
Page 3575 of 4647
LT-124
AUTO LIGHT SYSTEM
Revision: 2007 April2007 M35/M45
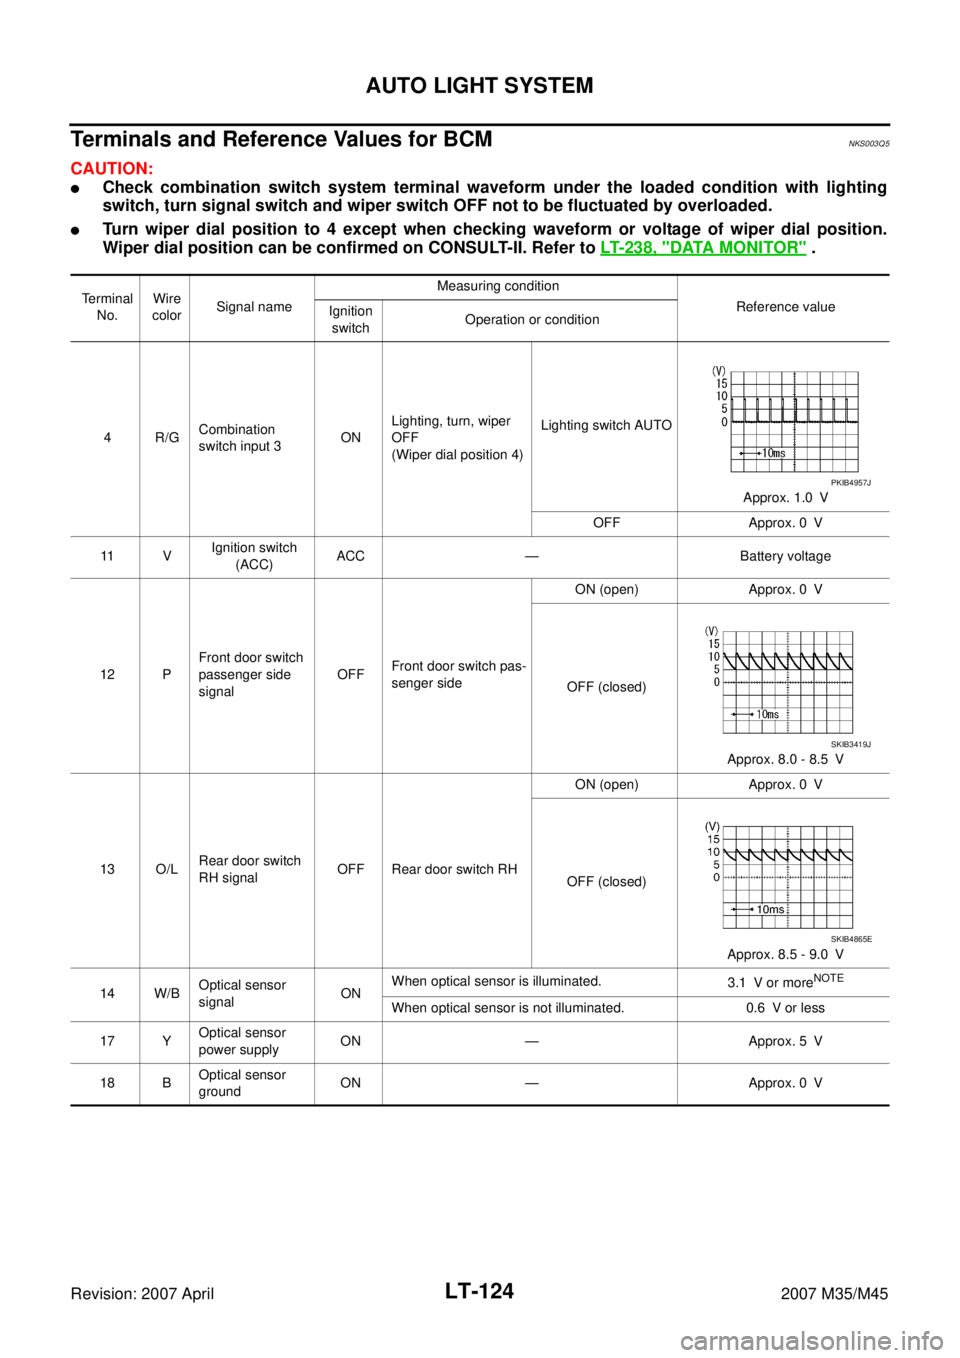
Terminals and Reference Values for BCMNKS003Q5
CAUTION:
�Check combination switch system terminal waveform under the loaded condition with lighting
switch, turn signal switch and wiper switch OFF not to be fluctuated by overloaded.
�Turn wiper dial position to 4 except when checking waveform or voltage of wiper dial position.
Wiper dial position can be confirmed on CONSULT-II. Refer to LT- 2 3 8 , "
DATA MONITOR" .
Te r m i n a l
No.Wire
colorSignal nameMeasuring condition
Reference value
Ignition
switchOperation or condition
4R/GCombination
switch input 3ONLighting, turn, wiper
OFF
(Wiper dial position 4)Lighting switch AUTO
Approx. 1.0 V
OFF Approx. 0 V
11 VIgnition switch
(ACC)ACC — Battery voltage
12 PFront door switch
passenger side
signalOFFFront door switch pas-
senger sideON (open) Approx. 0 V
OFF (closed)
Approx. 8.0 - 8.5 V
13 O/LRear door switch
RH signalOFF Rear door switch RHON (open) Approx. 0 V
OFF (closed)
Approx. 8.5 - 9.0 V
14 W/BOptical sensor
signalONWhen optical sensor is illuminated.
3.1 V or more
NOTE
When optical sensor is not illuminated. 0.6 V or less
17 YOptical sensor
power supplyON — Approx. 5 V
18 BOptical sensor
groundON — Approx. 0 V
PKIB4957J
SKIB3419J
SKIB4865E
Page 3576 of 4647
AUTO LIGHT SYSTEM
LT-125
C
D
E
F
G
H
I
J
L
MA
B
LT
Revision: 2007 April2007 M35/M45
NOTE:
Optical sensor must be securely subjected to work lamp light. If the optical sensor is insufficiently illuminated, the measured value may
not satisfy standard.33 GRCombination
switch output 4ONLighting, turn, wiper
OFF
(Wiper dial position 4)Lighting switch AUTO
Approx. 1.2 V
OFF
Approx. 7.0 - 7.5 V
38 WIgnition switch
(ON) ON — Battery voltage
39 L CAN − H— — —
40 P CAN − L— — —
42 PBattery power
supplyOFF — Battery voltage
52 B Ground ON — Approx. 0 V
55 WBattery power
supplyOFF — Battery voltage
62 VFront door switch
driver side signalOFFFront door switch
driver sideON (open) Approx. 0 V
OFF (closed)
Approx. 7.5 - 8.0 V
63 R/GRear door switch
LH signalOFF Rear door switch LHON (open) Approx. 0V
OFF (closed)
Approx. 7.5 - 8.0 V Terminal
No.Wire
colorSignal nameMeasuring condition
Reference value
Ignition
switchOperation or condition
PKIB4958J
PKIB4960J
PKIB4960J
PKIB4960J
Page 3577 of 4647

LT-126
AUTO LIGHT SYSTEM
Revision: 2007 April2007 M35/M45
Terminals and Reference Values for IPDM E/RNKS003Q6
How to Perform Trouble DiagnosesNKS003Q7
1. Confirm the symptom or customer complaint.
2. Understand operation description and function description. Refer to LT- 11 5 , "
System Description" .
3. Perform the Preliminary Check. Refer to LT- 1 2 7 , "
Preliminary Check" .
4. Check symptom and repair or replace the cause of malfunction. Refer to LT- 1 3 0 , "
Symptom Chart" .
5. Does the auto light system operate normally? If YES, GO TO 6. If NO, GO TO 4.
6. INSPECTION END.
Terminal
No.Wire
colorSignal nameMeasuring condition
Reference value
Ignition
switchOperation or condition
20 R Headlamp low (RH) ONLighting switch 2ND
positionOFF Approx. 0 V
ON Battery voltage
21 R/LParking, license plate,
and tail lampONLighting switch 1ST
positionOFF Approx. 0 V
ON Battery voltage
27 BR Headlamp high (RH) ONLighting switch HIGH
or PASSING positionOFF Approx. 0 V
ON Battery voltage
28 R/Y Headlamp high (LH) ONLighting switch HIGH
or PASSING positionOFF Approx. 0 V
ON Battery voltage
30 R/B Headlamp low (LH) ONLighting switch 2ND
positionOFF Approx. 0 V
ON Battery voltage
38 B Ground ON — Approx. 0 V
49 L CAN − H— — —
50 P CAN − L— — —
51 B Ground ON — Approx. 0 V